編輯:關於Android編程
整理總結自鴻洋的博客:http://blog.csdn.net/lmj623565791/article/details/38339817/
一、com.cctvjiatao.customviewgroup.act.MainActivity.Java
需求:我們定義一個ViewGroup,內部可以傳入0到4個childView,分別依次顯示在左上角,右上角,左下角,右下角
public class MainActivity extends AppCompatActivity {

 @Override
 protected void onCreate(Bundle savedInstanceState) {
  super.onCreate(savedInstanceState);
  setContentView(R.layout.activity_main);
//  setContentView(R.layout.activity_main2);
//  setContentView(R.layout.activity_main3);
 }
}
二、com.cctvjiatao.customviewgroup.view.CustomViewGroup.java
一)、ViewGroup是是什麼?作用呢?
1、它相當於放置View的容器。xml布局文件中,凡是以“layout”開頭的屬性都是和ViewGroup(即容器)相關的,比如高度(layout_height)、寬度(layout_width)、對齊方式(layout_gravity)等;
2、它給childView計算出建議的寬、高和測量模式,決定childView的位置;
為什麼是“建議的寬、高”而不是直接確定呢?因為當childView的寬、高設置為wrap_content時,只有childView自己才能計算出自己的寬和高。
二)、View的作用是什麼?
1、它根據測量模式和ViewGroup給出的建議的寬、高,計算出自己的寬、高;
2、在ViewGroup為其指定的區域內繪制自己的形態;
三)、View的三種測量模式
1、EXACTLY:表示設置了精確的值,一般當childView設置其寬高為精確值、match_parent時,ViewGroup會將其設置為EXACTLY;
2、AT_MOST:表示子布局被限制在一個最大值內,一般當childView設置其寬、高為wrap_content時,ViewGroup會將其設置為AT_MOST;
3、UNSPECIFIED:表示子布局想要多大就多大,一般出現在AadapterView的item的heightMode中、ScrollView的childView的heightMode中;此種模式比較少見。
四)、ViewGroup 和 LayoutParams的關系
當在LinearLayout中寫childView的時候,可以寫layout_gravity,layout_weight屬性;
而在RelativeLayout中的childView有layout_centerInParent屬性,卻沒有layout_gravity,layout_weight,這是為什麼呢?
這是因為每個ViewGroup需要指定一個LayoutParams,用於確定支持childView支持哪些屬性,比如LinearLayout指定LinearLayout.LayoutParams等
如果去看LinearLayout的源碼,會發現其內部定義了LinearLayout.LayoutParams,在此類中,你可以發現weight和gravity的身影。
五)、從API角度分析ViewGroup和View的作用
View 根據 ViewGroup 傳入的測量值和測量模式,確定自己的寬、高(在onMeasure中完成),然後在onDraw中完成對自己的繪制;
ViewGroup需要給View傳入View的測量值和測量模式(在onMeasure中完成),而且對於此ViewGroup的父布局,ViewGroup也要在onMeasure中完成對自己寬、高的確定;
ViewGroup需要再onLayout中完成對其childView的位置的指定。
public class CustomViewGroup extends ViewGroup {

 public CustomViewGroup(Context context) {
  super(context);
 }

 public CustomViewGroup(Context context, AttributeSet attrs) {
  super(context, attrs);
 }

 public CustomViewGroup(Context context, AttributeSet attrs, int defStyleAttr) {
  super(context, attrs, defStyleAttr);
 }

 /**
  * 一、重寫generateLayoutParams,確定該ViewGroup的LayoutParams
  * 返回MarginLayoutParams的實例,這樣就為我們的ViewGroup指定了其LayoutParams為MarginLayoutParams
  */
 @Override
 public LayoutParams generateLayoutParams(AttributeSet attrs) {
  return new MarginLayoutParams(getContext(), attrs);
 }

 /**
  * 二、計算所有ChildView的寬度和高度 然後根據ChildView的計算結果,設置自己的寬和高
  */
 @Override
 protected void onMeasure(int widthMeasureSpec, int heightMeasureSpec) {
  //1、獲得此ViewGroup上級容器為其推薦的寬和高,以及計算模式
  int widthMode = MeasureSpec.getMode(widthMeasureSpec);
  int heightMode = MeasureSpec.getMode(heightMeasureSpec);
  int sizeWidth = MeasureSpec.getSize(widthMeasureSpec);
  int sizeHeight = MeasureSpec.getSize(heightMeasureSpec);
  // 2、計算出所有的childView的寬和高
  measureChildren(widthMeasureSpec, heightMeasureSpec);
  // 3、如果ViewGroup布局是wrap_content時,根據childView的尺寸,計算容器的寬和高
  int width = 0;//ViewGroup的寬度
  int height = 0;//ViewGroup的高度
  int cCount = getChildCount();//childView的數量
  int cWidth = 0;//childView的總寬度
  int cHeight = 0;//childView的總高度
  MarginLayoutParams cParams = null;//View的測量模式
  int lHeight = 0;// 用於計算左邊兩個childView的高度
  int rHeight = 0;// 用於計算右邊兩個childView的高度,最終高度取二者之間大值
  int tWidth = 0;// 用於計算上邊兩個childView的寬度
  int bWidth = 0;// 用於計算下面兩個childiew的寬度,最終寬度取二者之間大值
  for (int i = 0; i < cCount; i++) {
   View childView = getChildAt(i);
   cWidth = childView.getMeasuredWidth();
   cHeight = childView.getMeasuredHeight();
   cParams = (MarginLayoutParams) childView.getLayoutParams();
   if (i == 0 || i == 1) {// 上面兩個childView
    tWidth += cWidth + cParams.leftMargin + cParams.rightMargin;
   }
   if (i == 2 || i == 3) {// 下面兩個childView
    bWidth += cWidth + cParams.leftMargin + cParams.rightMargin;
   }
   if (i == 0 || i == 2) {// 左面兩個childView
    lHeight += cHeight + cParams.topMargin + cParams.bottomMargin;
   }
   if (i == 1 || i == 3) {// 右面兩個childView
    rHeight += cHeight + cParams.topMargin + cParams.bottomMargin;
   }
  }
  width = Math.max(tWidth, bWidth);//取最大寬度
  height = Math.max(lHeight, rHeight);//去最大高度
  //4、如果是wrap_content設置為我們計算的值;否則直接設置為父容器計算的值
  setMeasuredDimension(
    (widthMode == MeasureSpec.EXACTLY) ? sizeWidth : width,
    (heightMode == MeasureSpec.EXACTLY) ? sizeHeight : height
  );
 }

 /**
  * 三、重寫onLayout,對其所有childView進行定位(設置childView的繪制區域)
  */
 @Override
 protected void onLayout(boolean changed, int l, int t, int r, int b) {
  int cCount = getChildCount();
  int cWidth = 0;
  int cHeight = 0;
  MarginLayoutParams cParams = null;
  //遍歷所有childView根據其寬和高,以及margin進行布局
  for (int i = 0; i < cCount; i++) {
   View childView = getChildAt(i);
   cWidth = childView.getMeasuredWidth();
   cHeight = childView.getMeasuredHeight();
   cParams = (MarginLayoutParams) childView.getLayoutParams();
   int cl = 0, ct = 0, cr = 0, cb = 0;
   switch (i) {
    case 0:
     cl = cParams.leftMargin;
     ct = cParams.topMargin;
     break;
    case 1:
     cl = getWidth() - cWidth - cParams.leftMargin - cParams.rightMargin;
     ct = cParams.topMargin;
     break;
    case 2:
     cl = cParams.leftMargin;
     ct = getHeight() - cHeight - cParams.bottomMargin;
     break;
    case 3:
     cl = getWidth() - cWidth - cParams.leftMargin - cParams.rightMargin;
     ct = getHeight() - cHeight - cParams.bottomMargin;
     break;
   }
   cr = cl + cWidth;
   cb = cHeight + ct;
   childView.layout(cl, ct, cr, cb);
  }
 }
}
三、三種布局
activity_main.xml
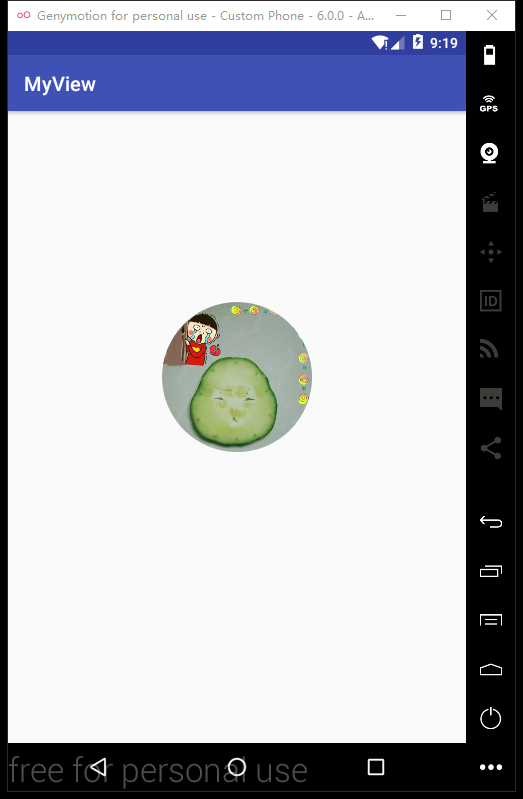
<com.cctvjiatao.customviewgroup.view.CustomViewGroup xmlns:android="http://schemas.android.com/apk/res/android"
 xmlns:tools="http://schemas.android.com/tools"
 android:layout_width="200dp"
 android:layout_height="200dp"
 android:background="#AA333333">

 <TextView
  android:layout_width="50dp"
  android:layout_height="50dp"
  android:background="#FF4444"
  android:gravity="center"
  android:text="0"
  android:textColor="#FFFFFF"
  android:textSize="22sp"
  android:text />

 <TextView
  android:layout_width="50dp"
  android:layout_height="50dp"
  android:background="#00ff00"
  android:gravity="center"
  android:text="1"
  android:textColor="#FFFFFF"
  android:textSize="22sp"
  android:text />

 <TextView
  android:layout_width="50dp"
  android:layout_height="50dp"
  android:background="#ff0000"
  android:gravity="center"
  android:text="2"
  android:textColor="#FFFFFF"
  android:textSize="22sp"
  android:text />

 <TextView
  android:layout_width="50dp"
  android:layout_height="50dp"
  android:background="#0000ff"
  android:gravity="center"
  android:text="3"
  android:textColor="#FFFFFF"
  android:textSize="22sp"
  android:text />

</com.cctvjiatao.customviewgroup.view.CustomViewGroup>
activity_main2.xml
<com.cctvjiatao.customviewgroup.view.CustomViewGroup xmlns:android="http://schemas.android.com/apk/res/android"
 xmlns:tools="http://schemas.android.com/tools"
 android:layout_width="wrap_content"
 android:layout_height="wrap_content"
 android:background="#AA333333">

 <TextView
  android:layout_width="150dp"
  android:layout_height="150dp"
  android:background="#E5ED05"
  android:gravity="center"
  android:text="0"
  android:textColor="#FFFFFF"
  android:textSize="22sp"
  android:text />

 <TextView
  android:layout_width="50dp"
  android:layout_height="50dp"
  android:background="#00ff00"
  android:gravity="center"
  android:text="1"
  android:textColor="#FFFFFF"
  android:textSize="22sp"
  android:text />

 <TextView
  android:layout_width="50dp"
  android:layout_height="50dp"
  android:background="#ff0000"
  android:gravity="center"
  android:text="2"
  android:textColor="#FFFFFF"
  android:textSize="22sp"
  android:text />

 <TextView
  android:layout_width="50dp"
  android:layout_height="50dp"
  android:background="#0000ff"
  android:gravity="center"
  android:text="3"
  android:textColor="#FFFFFF"
  android:textSize="22sp"
  android:text />

</com.cctvjiatao.customviewgroup.view.CustomViewGroup>
activity_main3.xml
<com.cctvjiatao.customviewgroup.view.CustomViewGroup xmlns:android="http://schemas.android.com/apk/res/android"
 xmlns:tools="http://schemas.android.com/tools"
 android:layout_width="match_parent"
 android:layout_height="match_parent"
 android:background="#AA333333">

 <TextView
  android:layout_width="150dp"
  android:layout_height="150dp"
  android:background="#E5ED05"
  android:gravity="center"
  android:text="0"
  android:textColor="#FFFFFF"
  android:textSize="22sp"
  android:text />

 <TextView
  android:layout_width="50dp"
  android:layout_height="50dp"
  android:background="#00ff00"
  android:gravity="center"
  android:text="1"
  android:textColor="#FFFFFF"
  android:textSize="22sp"
  android:text />

 <TextView
  android:layout_width="50dp"
  android:layout_height="50dp"
  android:background="#ff0000"
  android:gravity="center"
  android:text="2"
  android:textColor="#FFFFFF"
  android:textSize="22sp"
  android:text />

 <TextView
  android:layout_width="150dp"
  android:layout_height="150dp"
  android:background="#0000ff"
  android:gravity="center"
  android:text="3"
  android:textColor="#FFFFFF"
  android:textSize="22sp"
  android:text />

</com.cctvjiatao.customviewgroup.view.CustomViewGroup>
以上就是本文的全部內容,希望對大家的學習有所幫助,也希望大家多多支持本站。
 詳解android使用ItemDecoration 懸浮導航欄效果
開始逐漸領略到ItemDecoration的美~今天讓我 使用 ItemDecoration 來完成 可推動的懸浮導航欄的效果,最終實現的效果如下圖:具體實現步驟如下:根
 android仿微信聊天界面 語音錄制功能
本例為模仿微信聊天界面UI設計,文字發送以及語言錄制UI。1先看效果圖: 第一:chat.xml設計 <?xml vers
 android繪制圓形圖片的兩種方式示例
android繪制圓形圖片的兩種方式看下效果先下面有完整的示例代碼使用BitmapShader(著色器)我們在繪制view 的時候 就是小學上美術課 用水彩筆在本子上畫畫
 Android 自定義View UC下拉刷新效果(二)
啦啦啦,這是山寨UC浏覽器的下拉刷新效果的第二篇,第一篇請移步Android 自定義View UC下拉刷新效果(一)我們看圖說話:主要工作1.下拉刷新的圓形向回首頁的圓形