編輯:關於Android編程
前面文章講述的都是"隨手拍"中圖像處理的操作,此篇文章主要講述GridView控件實現添加本地圖片並顯示.主要是關於GridView控件的基本操作,通常可以通過自定義繼承BaseAdapter的適配器加載圖片,而下面講述的不是自定義的適配器,而是調用SimpleAdapter實現的.至於上傳發布與網絡交互此處不講述,後面文章會講!
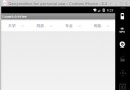
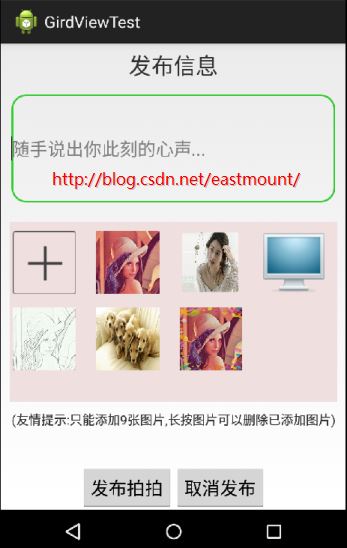
一. 實現效果
主要是通過點擊+從本地相冊中添加圖片,同時顯示圖片至GridView.點擊圖片可以進行刪除操作,同時界面中的發布EditView控件也很好看,不足之處在於+好沒有移動至最後,但原理相同.

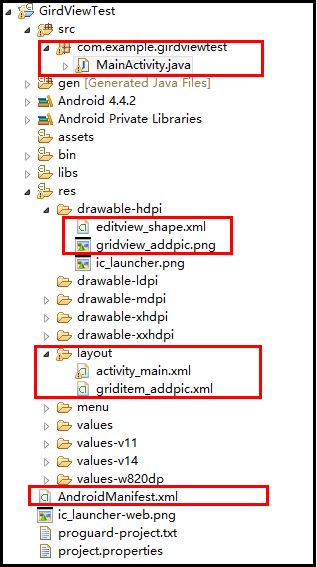
二. 項目工程結構
三. 界面布局詳細代碼
1.主界面activity_main.xml
主要通過相對布局實現,第一部分是底部的TextView,中間是EditView和GridView相對布局,下面是兩個按鈕.同時EditView調用res/drawable-hdpi中的editview_shape.xml,GridView顯示的每張圖片通過griditem_addpic.xml實現.
<RelativeLayout xmlns:android="http://schemas.android.com/apk/res/android"
  xmlns:tools="http://schemas.android.com/tools"
  android:id="@+id/container"
  android:layout_width="match_parent"
  android:layout_height="match_parent"
  tools:context="com.example.suishoupaipublish.MainActivity"
  tools:ignore="MergeRootFrame" >

  <!-- 頂部添加文字 -->
  <RelativeLayout
    android:id="@+id/Layout_top"
    android:orientation="horizontal"
    android:layout_width="fill_parent"
    android:layout_height="40dp"
    android:layout_marginTop="5dp"
    android:layout_alignParentTop="true"
    android:gravity="center">
    <TextView
      android:layout_width="fill_parent"
      android:layout_height="wrap_content"
      android:textSize="25sp"
      android:gravity="center"
      android:text="發布信息" />
  </RelativeLayout>
  <!-- 底部按鈕 -->
  <RelativeLayout
    android:id="@+id/Layout_bottom"
    android:layout_alignParentBottom="true"
    android:layout_width="fill_parent"
    android:layout_height="50dp"
    android:gravity="center" >
    <Button
      android:id="@+id/button1"
      android:layout_width="wrap_content"
      android:layout_height="fill_parent"
      android:textSize="20sp"
      android:text="發布拍拍" />
    <Button
      android:id="@+id/button2"
      android:layout_width="wrap_content"
      android:layout_height="fill_parent"
      android:layout_toRightOf="@+id/button1"
      android:textSize="20sp"
      android:text="取消發布" />
  </RelativeLayout>
  <!-- 顯示圖片 -->
  <RelativeLayout
    android:id="@+id/Content_Layout"
    android:layout_width="fill_parent"
    android:layout_height="fill_parent"
    android:layout_above="@id/Layout_bottom"
    android:layout_below="@id/Layout_top"
    android:gravity="center">
    <LinearLayout
      android:layout_width="match_parent"
      android:layout_height="match_parent"
      android:orientation="vertical"
      android:layout_alignParentBottom="true" >
      <!-- 設置運行多行 設置圓角圖形 黑色字體-->
      <EditText
        android:id="@+id/editText1"
        android:layout_height="120dp"
        android:layout_width="fill_parent"
        android:textColor="#000000"
        android:layout_margin="12dp"
        android:textSize="20sp"
        android:hint="隨手說出你此刻的心聲..."
        android:maxLength="500"
        android:singleLine="false"
        android:background="@drawable/editview_shape" />
      <!-- 網格顯示圖片 行列間距5dp 每列寬度90dp -->
      <GridView
        android:id="@+id/gridView1"
        android:layout_width="fill_parent"
        android:layout_height="200dp"
        android:layout_margin="10dp"
        android:background="#EFDFDF"
        android:horizontalSpacing="5dp"
        android:verticalSpacing="5dp"
        android:numColumns="4"
        android:columnWidth="90dp"
        android:stretchMode="columnWidth"
        android:gravity="center" >
      </GridView>
      <TextView
        android:layout_width="fill_parent"
        android:layout_height="wrap_content"
        android:text="(友情提示:只能添加9張圖片,長按圖片可以刪除已添加圖片)"
        android:gravity="center" />
    </LinearLayout>
  </RelativeLayout>

</RelativeLayout>
2.顯示ImageView圖片布局griditem_addpic.xml
<?xml version="1.0" encoding="utf-8"?>
<LinearLayout xmlns:android="http://schemas.android.com/apk/res/android"
  android:layout_width="match_parent"
  android:layout_height="match_parent"
  android:gravity="center"
  android:descendantFocusability="blocksDescendants"
  android:orientation="vertical" >
  <RelativeLayout
    android:layout_gravity="center"
    android:layout_width="80dp"
    android:layout_height="80dp"
    android:orientation="vertical" >
    <ImageView
      android:layout_marginTop="10dp"
      android:layout_marginRight="10dp"
      android:id="@+id/imageView1"
      android:layout_width="fill_parent"
      android:layout_height="fill_parent"
      android:scaleType="fitXY"
      android:src="@drawable/gridview_addpic" />
  </RelativeLayout>
</LinearLayout>
3.設置EditView控件圓角和顏色 editview_shape.xml
<?xml version="1.0" encoding="utf-8"?>
<shape xmlns:android="http://schemas.android.com/apk/res/android"
  android:shape="rectangle"
  android:padding="10dp">
  <!-- 填充editView的顏色 -->
  <soild android:color="#ffffff"/>
  <!-- 設置圓角的弧度,radius半徑越大,editView的邊角越圓 -->
  <corners
    android:radius="15dp"
    android:bottomRightRadius="15dp"
    android:bottomLeftRadius="15dp"
    android:topLeftRadius="15dp"
    android:topRightRadius="15dp"/>
  <stroke
    android:color="#32CD32"
    android:width="4px" />
</shape>
四. 代碼詳解
它主要是思想如下:
1.通過SimpleAdapter適配器實現實現加載圖片,在gridView1.setOnItemClickListener()點擊函數中響應不同操作.
2.當點擊加號圖片(+)時,調用本地相冊通過Intent實現獲取圖片路徑存於字符串pathImage.
3.獲取圖片路徑後在onResume中刷新圖片,通過GridView的setAdapter()和notifyDataSetChanged()()函數刷新加載圖片.
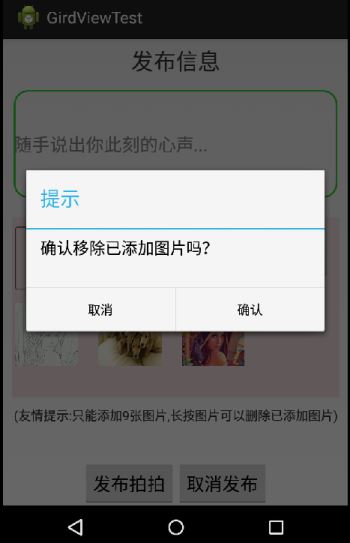
4.點擊圖片時會獲取其position,通過dialog()函數彈出對話框提示是否刪除,通過remove實現刪除.
具體代碼如下所示:
public class MainActivity extends Activity {

  private GridView gridView1;       //網格顯示縮略圖
  private Button buttonPublish;      //發布按鈕
  private final int IMAGE_OPEN = 1;    //打開圖片標記
  private String pathImage;        //選擇圖片路徑
  private Bitmap bmp;           //導入臨時圖片
  private ArrayList<HashMap<String, Object>> imageItem;
  private SimpleAdapter simpleAdapter;   //適配器

  @Override
  protected void onCreate(Bundle savedInstanceState) {
    super.onCreate(savedInstanceState);
    setContentView(R.layout.activity_main);
    /*
     * 防止鍵盤擋住輸入框
     * 不希望遮擋設置activity屬性 android:windowSoftInputMode="adjustPan"
     * 希望動態調整高度 android:windowSoftInputMode="adjustResize"
     */
    getWindow().setSoftInputMode(WindowManager.LayoutParams.
        SOFT_INPUT_ADJUST_PAN);
    //鎖定屏幕
    setRequestedOrientation(ActivityInfo.SCREEN_ORIENTATION_PORTRAIT);
    setContentView(R.layout.activity_main);
    //獲取控件對象
    gridView1 = (GridView) findViewById(R.id.gridView1);

    /*
     * 載入默認圖片添加圖片加號
     * 通過適配器實現
     * SimpleAdapter參數imageItem為數據源 R.layout.griditem_addpic為布局
     */
    //獲取資源圖片加號
    bmp = BitmapFactory.decodeResource(getResources(), R.drawable.gridview_addpic);
    imageItem = new ArrayList<HashMap<String, Object>>();
    HashMap<String, Object> map = new HashMap<String, Object>();
    map.put("itemImage", bmp);
    imageItem.add(map);
    simpleAdapter = new SimpleAdapter(this,
        imageItem, R.layout.griditem_addpic,
        new String[] { "itemImage"}, new int[] { R.id.imageView1});
    /*
     * HashMap載入bmp圖片在GridView中不顯示,但是如果載入資源ID能顯示 如
     * map.put("itemImage", R.drawable.img);
     * 解決方法:
     *       1.自定義繼承BaseAdapter實現
     *       2.ViewBinder()接口實現
     */
    simpleAdapter.setViewBinder(new ViewBinder() {
      @Override
      public boolean setViewValue(View view, Object data,
          String textRepresentation) {
        // TODO Auto-generated method stub
        if(view instanceof ImageView && data instanceof Bitmap){
          ImageView i = (ImageView)view;
          i.setImageBitmap((Bitmap) data);
          return true;
        }
        return false;
      }
    });
    gridView1.setAdapter(simpleAdapter);

    /*
     * 監聽GridView點擊事件
     * 報錯:該函數必須抽象方法 故需要手動導入import android.view.View;
     */
    gridView1.setOnItemClickListener(new OnItemClickListener() {
      @Override
      public void onItemClick(AdapterView<?> parent, View v, int position, long id)
      {
        if( imageItem.size() == 10) { //第一張為默認圖片
          Toast.makeText(MainActivity.this, "圖片數9張已滿", Toast.LENGTH_SHORT).show();
        }
        else if(position == 0) { //點擊圖片位置為+ 0對應0張圖片
          Toast.makeText(MainActivity.this, "添加圖片", Toast.LENGTH_SHORT).show();
          //選擇圖片
          Intent intent = new Intent(Intent.ACTION_PICK,
              android.provider.MediaStore.Images.Media.EXTERNAL_CONTENT_URI);
          startActivityForResult(intent, IMAGE_OPEN);
          //通過onResume()刷新數據
        }
        else {
          dialog(position);
          //Toast.makeText(MainActivity.this, "點擊第"+(position + 1)+" 號圖片",
          //   Toast.LENGTH_SHORT).show();
        }
      }
    });
  }

  //獲取圖片路徑 響應startActivityForResult
  protected void onActivityResult(int requestCode, int resultCode, Intent data) {
    super.onActivityResult(requestCode, resultCode, data);
    //打開圖片
    if(resultCode==RESULT_OK && requestCode==IMAGE_OPEN) {
      Uri uri = data.getData();
      if (!TextUtils.isEmpty(uri.getAuthority())) {
        //查詢選擇圖片
        Cursor cursor = getContentResolver().query(
            uri,
            new String[] { MediaStore.Images.Media.DATA },
            null,
            null,
            null);
        //返回 沒找到選擇圖片
        if (null == cursor) {
          return;
        }
        //光標移動至開頭 獲取圖片路徑
        cursor.moveToFirst();
        pathImage = cursor.getString(cursor
            .getColumnIndex(MediaStore.Images.Media.DATA));
      }
    } //end if 打開圖片
  }

  //刷新圖片
  @Override
  protected void onResume() {
    super.onResume();
    if(!TextUtils.isEmpty(pathImage)){
      Bitmap addbmp=BitmapFactory.decodeFile(pathImage);
      HashMap<String, Object> map = new HashMap<String, Object>();
      map.put("itemImage", addbmp);
      imageItem.add(map);
      simpleAdapter = new SimpleAdapter(this,
          imageItem, R.layout.griditem_addpic,
          new String[] { "itemImage"}, new int[] { R.id.imageView1});
      simpleAdapter.setViewBinder(new ViewBinder() {
        @Override
        public boolean setViewValue(View view, Object data,
            String textRepresentation) {
          // TODO Auto-generated method stub
          if(view instanceof ImageView && data instanceof Bitmap){
            ImageView i = (ImageView)view;
            i.setImageBitmap((Bitmap) data);
            return true;
          }
          return false;
        }
      });
      gridView1.setAdapter(simpleAdapter);
      simpleAdapter.notifyDataSetChanged();
      //刷新後釋放防止手機休眠後自動添加
      pathImage = null;
    }
  }

  /*
   * Dialog對話框提示用戶刪除操作
   * position為刪除圖片位置
   */
  protected void dialog(final int position) {
    AlertDialog.Builder builder = new Builder(MainActivity.this);
    builder.setMessage("確認移除已添加圖片嗎?");
    builder.setTitle("提示");
    builder.setPositiveButton("確認", new DialogInterface.OnClickListener() {
      @Override
      public void onClick(DialogInterface dialog, int which) {
        dialog.dismiss();
        imageItem.remove(position);
        simpleAdapter.notifyDataSetChanged();
      }
    });
    builder.setNegativeButton("取消", new DialogInterface.OnClickListener() {
      @Override
      public void onClick(DialogInterface dialog, int which) {
        dialog.dismiss();
        }
      });
    builder.create().show();
  }

}
同時需要在AndroidMainfest.xml中添加權限操作SD卡和網絡上傳至服務器.
<!-- 申明網絡權限 -->
<uses-permission android:name="android.permission.INTERNET" />
<!-- 申明權限 操作SD卡 -->
<uses-permission android:name="android.permission.WRITE_EXTERNAL_STORAGE" />
五. 總結
該文章需要注意一個地方:在使用SimpleAdapter適配器加載bmp圖片時,可能在GridView中不顯示.即HashMap中map.put("itemImage",bmp)不顯示圖片,而使用put裝入R.drawable.img卻能顯示.
這時有兩種解決方法,一種是自定義繼承BaseAdapter的適配器實現;另一種方法則是如上所示通過ViewBinder()接口實現,感謝博主dmin_提供的方法.
demo下載地址:http://xiazai.jb51.net/201701/yuanma/GirdViewTest_jb51.rar
以上就是本文的全部內容,希望對大家的學習有所幫助,也希望大家多多支持本站。
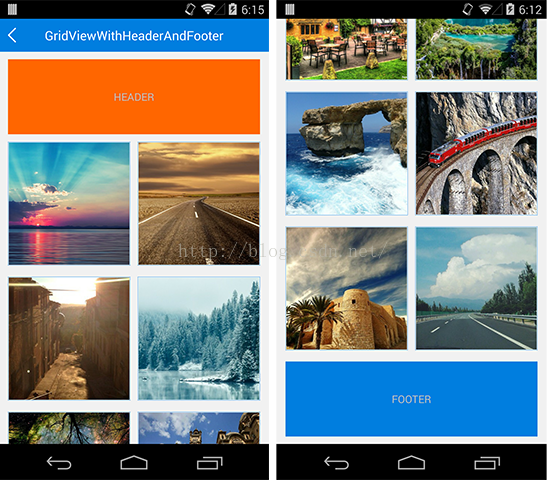 開源項目GridViewWithHeaderAndFooter使用和源碼分析
GridViewWithHeaderAndFooter控件,可以像使用ListView一樣為GridView添加Header和Footer。項目地址:https://gi
 Android使用CircleImageView實現圓形頭像的方法
有時我們在應用中會用到圓形頭像,下面是利用CircleImageView實現圓形頭像的演示,下面效果和代碼,效果如圖實現起來也比較簡單,先在項目中建一個circleima
 Android ActionBar的基本用法
本文翻譯了這篇文章:Using the Android action bar (ActionBar) - Tutorial 1、ActionBar的簡介 ActionB
 Android5.0 新特性學習總結
低版本android上實現Material design應用Android5.0版本,推出了Material Design的概念,這是在設計上Android的又一大突破。