編輯:關於Android編程
在之前講到Android Paint的使用詳解的時候,其中setColorFilter(ColorFilter filter)方法沒有講,今天就來簡單的分析一下,在Android中ColorFilter共有3個子類,ColorMatrixColorFilter,LightingColorFilter,PorterDuffColorFilter,今天先來看第一個ColorMatrixColorFilter,ColorMatrixColorFilter的構造方法很簡單,一個是傳入數組,一個是傳入ColorMatrix類型的對象
    public ColorMatrixColorFilter(ColorMatrix matrix) {
        mMatrix.set(matrix);
        update();
    }
    public ColorMatrixColorFilter(float[] array) {
        if (array.length < 20) {
            throw new ArrayIndexOutOfBoundsException();
        }
        mMatrix.set(array);
        update();
    }
這裡主要來看一下ColorMatrix這個類,它內部有一個數組mArray,其實他保存的是一個4x5顏色矩陣,
 *  [ a, b, c, d, e,
 *    f, g, h, i, j,
 *    k, l, m, n, o,
 *    p, q, r, s, t ]
可以用來修改ARGB的值,其中第一行決定紅色R,第二行決定綠色G,第三行決定藍色B,第四行決定了透明度A,第五列是顏色的偏移量
而圖像的ARGB值存儲在一個5*1的顏色分量矩陣中[R, G, B, A,1]。最終運算的結果是兩矩陣相乘
   R = a*R + b*G + c*B + d*A + e;
   G = f*R + g*G + h*B + i*A + j;
   B = k*R + l*G + m*B + n*A + o;
   A = p*R + q*G + r*B + s*A + t;
我們看到mArray的大小為20,也就相當於一個4*5的數組,
private final float[] mArray = new float[20];在初始化的時候,矩陣的數值會進行初始化
    /**
     * Set this colormatrix to identity:
     *
* [ 1 0 0 0 0 - red vector * 0 1 0 0 0 - green vector * 0 0 1 0 0 - blue vector * 0 0 0 1 0 ] - alpha vector **/ public void reset() { final float[] a = mArray; Arrays.fill(a, 0); a[0] = a[6] = a[12] = a[18] = 1; }其中第五列是偏移量,比如
[ 1 0 0 0 8
  0 1 0 0 8
  0 0 1 0 8
  0 0 0 1 0 ]
表示個顏色分量計算完成之後要在加上8,其中最後一行是表示透明度的,一般不要修改。我們來演示一下
public class ColorFilterView extends View {
	private Paint mPaint;
	private Bitmap mBitmap;
	private int padding = 12;
	float[] colorMatrix = {
		    1, 0, 0, 0, 0, //red
		    0, 0, 0, 0, 0, //green
		    0, 0, 0, 0, 0, //blue
		    0, 0, 0, 1, 0 //alpha
		  };
	private ColorMatrixColorFilter mLightingColorFilter= new ColorMatrixColorFilter(colorMatrix);

	public ColorFilterView(Context context, AttributeSet attrs) {
		super(context, attrs);
		init();
	}

	private void init() {
		mPaint = new Paint(Paint.ANTI_ALIAS_FLAG);
		mBitmap = BitmapFactory.decodeResource(getResources(), R.drawable.icon);
	}

	@Override
	protected void onDraw(Canvas canvas) {
		super.onDraw(canvas);
		for (int i = 0; i < 8; i++) {
			mPaint.setColorFilter(mLightingColorFilter);
			canvas.drawBitmap(mBitmap,
					(i % 4) * (mBitmap.getWidth() + padding), (i / 4)
							* (mBitmap.getHeight() + padding), mPaint);
		}
	}

}
看一下結果

再來修改一下
	float[] colorMatrix = {
		    1, 0, 0, 0, 0, //red
		    0, 1, 0, 0, 0, //green
		    0, 0, 0, 0, 0, //blue
		    0, 0, 0, 1, 0 //alpha
		  };
看一下運行結果
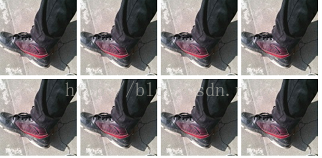
最後在修改一下,讓他還原正常圖片
	float[] colorMatrix = {
		    1, 0, 0, 0, 0, //red
		    0, 1, 0, 0, 0, //green
		    0, 0, 1, 0, 0, //blue
		    0, 0, 0, 1, 0 //alpha
		  };
看一下結果
OK,上面的演示完了,我們看下面的一個矩陣。
[ 1 0 0 0 8
  0 2 0 0 8
  0 0 3 0 8
  0 0 0 1 0 ]
他表示紅色分量偏移8,綠色分量*2在偏移8,藍色分量*3在偏移8。下面看一下主要的方法,setScale(float rScale, float gScale, float bScale,float aScale)
    public void setScale(float rScale, float gScale, float bScale,
                         float aScale) {
        final float[] a = mArray;

        for (int i = 19; i > 0; --i) {
            a[i] = 0;
        }
        a[0] = rScale;
        a[6] = gScale;
        a[12] = bScale;
        a[18] = aScale;
    }
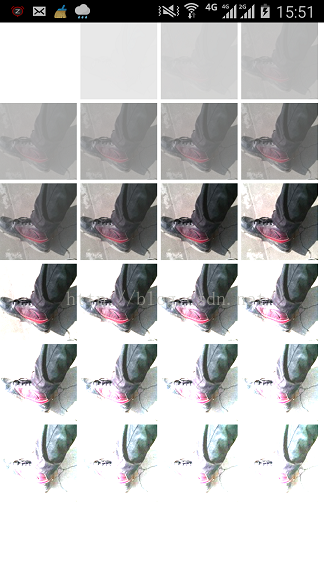
這個和矩陣剛初始化的時候差不多,不過這裡的值不是1,是我們傳入的值,代表的是亮度,我們看一下
public class ColorFilterView extends View {
	private Paint mPaint;
	private Bitmap mBitmap;
	private ColorMatrix colorMatrix = new ColorMatrix();
	private ColorMatrixColorFilter matrixColorFilter[] = new ColorMatrixColorFilter[24];
	private int padding = 12;

	public ColorFilterView(Context context, AttributeSet attrs) {
		super(context, attrs);
		init();
	}

	private void init() {
		mPaint = new Paint(Paint.ANTI_ALIAS_FLAG);
		mBitmap = BitmapFactory.decodeResource(getResources(), R.drawable.icon);
		for (int i = 0; i < 24; i++) {
			if (i < 8)
				colorMatrix.setScale(i * .1f, i * .1f, i * .1f, i * .1f);
			else if (i < 16)
				colorMatrix.setScale(i * .1f, i * .1f, i * .1f, i * .1f);
			else
				colorMatrix.setScale(i * .1f, i * .1f, i * .1f, i * .1f);
			matrixColorFilter[i] = new ColorMatrixColorFilter(colorMatrix);
		}
	}

	@Override
	protected void onDraw(Canvas canvas) {
		super.onDraw(canvas);
		for (int i = 0; i < 24; i++) {
			mPaint.setColorFilter(matrixColorFilter[i]);
			canvas.drawBitmap(mBitmap,
					(i % 4) * (mBitmap.getWidth() + padding), (i / 4)
							* (mBitmap.getHeight() + padding), mPaint);
		}
	}
}
我們看一下運行結果
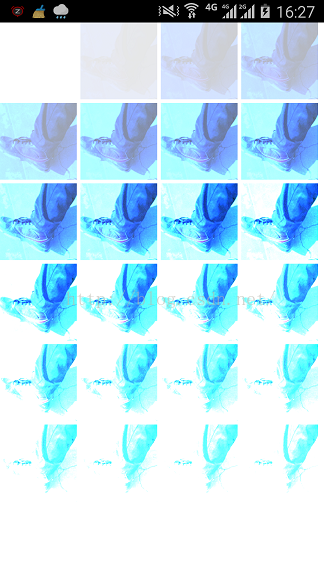
再來修改一下
		for (int i = 0; i < 24; i++) {
			if (i < 8)
				colorMatrix.setScale(i * .1f, i * .3f, i * .9f, i * .1f);
			else if (i < 16)
				colorMatrix.setScale(i * .1f, i * .3f, i * .9f, i * .1f);
			else
				colorMatrix.setScale(i * .1f, i * .3f, i * .9f, i * .1f);
			matrixColorFilter[i] = new ColorMatrixColorFilter(colorMatrix);
		}
看一下運行結果
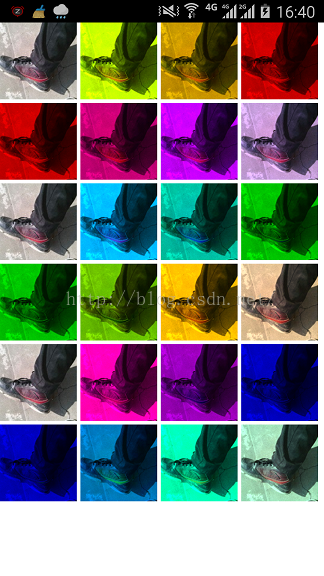
再看另一個方法setRotate(int axis, float degrees),表示的是色相
 /**
     * Set the rotation on a color axis by the specified values.
     * <p>
     * <code>axis=0</code> correspond to a rotation around the RED color
     * <code>axis=1</code> correspond to a rotation around the GREEN color
     * <code>axis=2</code> correspond to a rotation around the BLUE color
     * </p>
     */
    public void setRotate(int axis, float degrees) {
        reset();
        double radians = degrees * Math.PI / 180d;
        float cosine = (float) Math.cos(radians);
        float sine = (float) Math.sin(radians);
        switch (axis) {
        // Rotation around the red color
        case 0:
            mArray[6] = mArray[12] = cosine;
            mArray[7] = sine;
            mArray[11] = -sine;
            break;
        // Rotation around the green color
        case 1:
            mArray[0] = mArray[12] = cosine;
            mArray[2] = -sine;
            mArray[10] = sine;
            break;
        // Rotation around the blue color
        case 2:
            mArray[0] = mArray[6] = cosine;
            mArray[1] = sine;
            mArray[5] = -sine;
            break;
        default:
            throw new RuntimeException();
        }
    }
其中axis為0時表示的是紅色分量旋轉的角度,為1時是綠色分量旋轉的角度,為2時是藍色分量旋轉的角度,
		for (int i = 0; i < 24; i++) {
			if (i < 8)
				colorMatrix.setRotate(0, i*50);
			else if (i < 16)
				colorMatrix.setRotate(1, i*50);
			else
				colorMatrix.setRotate(2, i*50);
			matrixColorFilter[i] = new ColorMatrixColorFilter(colorMatrix);
		}
看一下運行結果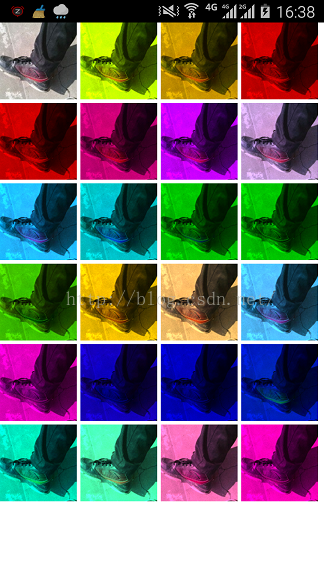
再來修改一下
		for (int i = 0; i < 24; i++) {
			if (i < 8)
				colorMatrix.setRotate(0, i*50);
			else if (i < 16)
				colorMatrix.setRotate(1, (i%8)*50);
			else
				colorMatrix.setRotate(2, (i%8)*50);
			matrixColorFilter[i] = new ColorMatrixColorFilter(colorMatrix);
		}
看一下運行結果
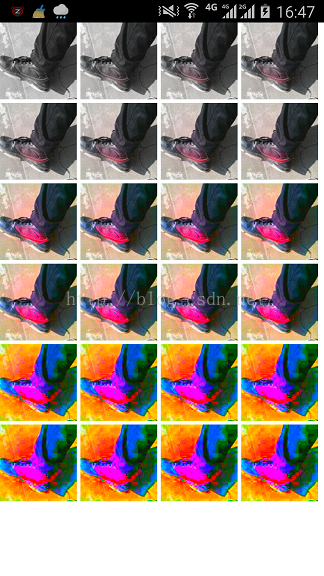
再看另一個方法setSaturation(float sat),代表的是飽和度,其中0是灰色,1是正常
		for (int i = 0; i < 24; i++) {
			if (i < 8)
				colorMatrix.setSaturation(i*.2f);
			else if (i < 16)
				colorMatrix.setSaturation(i*.5f);
			else
				colorMatrix.setSaturation(i*2f);
			matrixColorFilter[i] = new ColorMatrixColorFilter(colorMatrix);
		}
運行結果為
setConcat(ColorMatrix matA, ColorMatrix matB),兩矩陣相乘
    public void setConcat(ColorMatrix matA, ColorMatrix matB) {
        float[] tmp;
        if (matA == this || matB == this) {
            tmp = new float[20];
        } else {
            tmp = mArray;
        }

        final float[] a = matA.mArray;
        final float[] b = matB.mArray;
        int index = 0;
        for (int j = 0; j < 20; j += 5) {
            for (int i = 0; i < 4; i++) {
                tmp[index++] = a[j + 0] * b[i + 0] +  a[j + 1] * b[i + 5] +
                               a[j + 2] * b[i + 10] + a[j + 3] * b[i + 15];
            }
            tmp[index++] = a[j + 0] * b[4] +  a[j + 1] * b[9] +
                           a[j + 2] * b[14] + a[j + 3] * b[19] +
                           a[j + 4];
        }

        if (tmp != mArray) {
            System.arraycopy(tmp, 0, mArray, 0, 20);
        }
    }
preConcat(ColorMatrix prematrix)前乘,postConcat(ColorMatrix postmatrix)後乘,調用的都是setConcat(ColorMatrix matA, ColorMatrix matB)方法,因為矩陣的乘法不具有交換律,改變兩個矩陣的位置會產生不同的結果。
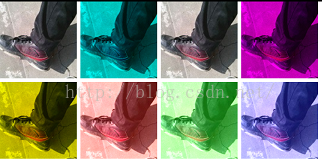
再來看ColorFilter的另一個子類LightingColorFilter光線顏色過濾,就一個構造方法
    public LightingColorFilter(int mul, int add) {
        mMul = mul;
        mAdd = add;
        update();
    }
mul表示顏色增加的倍數,add為色彩增加,
public class ColorFilterView extends View {
	private Paint mPaint;
	private Bitmap mBitmap;
	private LightingColorFilter mLightingColorFilter[] = new LightingColorFilter[8];
	private int padding = 12;

	public ColorFilterView(Context context, AttributeSet attrs) {
		super(context, attrs);
		init();
	}

	private void init() {
		mPaint = new Paint(Paint.ANTI_ALIAS_FLAG);
		mBitmap = BitmapFactory.decodeResource(getResources(), R.drawable.icon);
		//不變
		mLightingColorFilter[0] = new LightingColorFilter(0xFFFFFFFF,
				0x00000000);
		//去掉紅色
		mLightingColorFilter[1] = new LightingColorFilter(0xFF00FFFF,
				0x00000000);
		//去掉綠色
		mLightingColorFilter[3] = new LightingColorFilter(0xFFFF00FF,
				0x00000000);
		//去掉藍色
		mLightingColorFilter[4] = new LightingColorFilter(0xFFFFFF00,
				0x00000000);
		//增加紅色
		mLightingColorFilter[5] = new LightingColorFilter(0xFFFFFFFF,
				0x00560000);
		//增加綠色
		mLightingColorFilter[6] = new LightingColorFilter(0xFFFFFFFF,
				0x00006400);
		//增加藍色
		mLightingColorFilter[7] = new LightingColorFilter(0xFFFFFFFF,
				0x00000056);
	}

	@Override
	protected void onDraw(Canvas canvas) {
		super.onDraw(canvas);
		for (int i = 0; i < 8; i++) {
			mPaint.setColorFilter(mLightingColorFilter[i]);
			canvas.drawBitmap(mBitmap,
					(i % 4) * (mBitmap.getWidth() + padding), (i / 4)
							* (mBitmap.getHeight() + padding), mPaint);
		}
	}

}
運行結果為
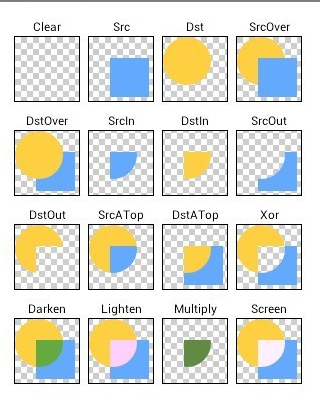
再來看ColorFilter的最後一個子類PorterDuffColorFilter,他也是只有一個構造方法
    /**
     * Create a color filter that uses the specified color and Porter-Duff mode.
     *
     * @param color The ARGB source color used with the specified Porter-Duff mode
     * @param mode The porter-duff mode that is applied
     *
     * @see Color
     * @see #setColor(int)
     * @see #setMode(android.graphics.PorterDuff.Mode)
     */
    public PorterDuffColorFilter(@ColorInt int color, @NonNull PorterDuff.Mode mode) {
        mColor = color;
        mMode = mode;
        update();
    }
我們看一下
public class ColorFilterView extends View {
private Paint mPaint;
private Bitmap mBitmap;
private int length = PorterDuff.Mode.values().length;
private PorterDuffColorFilter mLightingColorFilter[] = new PorterDuffColorFilter[length];
private int padding = 12;
public ColorFilterView(Context context, AttributeSet attrs) {
super(context, attrs);
init();
}
private void init() {
mPaint = new Paint(Paint.ANTI_ALIAS_FLAG);
mBitmap = BitmapFactory.decodeResource(getResources(), R.drawable.icon);
int i = 0;
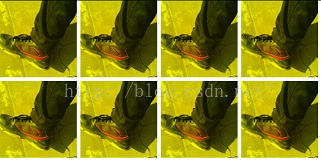
for (PorterDuff.Mode e : PorterDuff.Mode.values())
mLightingColorFilter[i++] = new PorterDuffColorFilter(Color.YELLOW,
e);
}
@Override
protected void onDraw(Canvas canvas) {
super.onDraw(canvas);
for (int i = 0; i < length; i++) {
mPaint.setColorFilter(mLightingColorFilter[i]);
canvas.drawBitmap(mBitmap,
(i % 4) * (mBitmap.getWidth() + padding), (i / 4)
* (mBitmap.getHeight() + padding), mPaint);
}
}
}
運行結果為
 Android UI效果之繪圖篇(三)
一、 PorterDuffXfermodePorterDuffXfermode類似於數據集合裡面的交集並集概念,只是數據裡面取的是兩個集合,而我們這裡取的是兩個圖形之間的
 Android中View的滑動沖突——Android開發藝術探索筆記
介紹相信開發Android的人都會有這種體會:從網上下載的demo運行的好好的,但是只要出現了滑動沖突,Demo就無法正常工作了。但是不用擔心,解決滑動沖突有固定的模式,
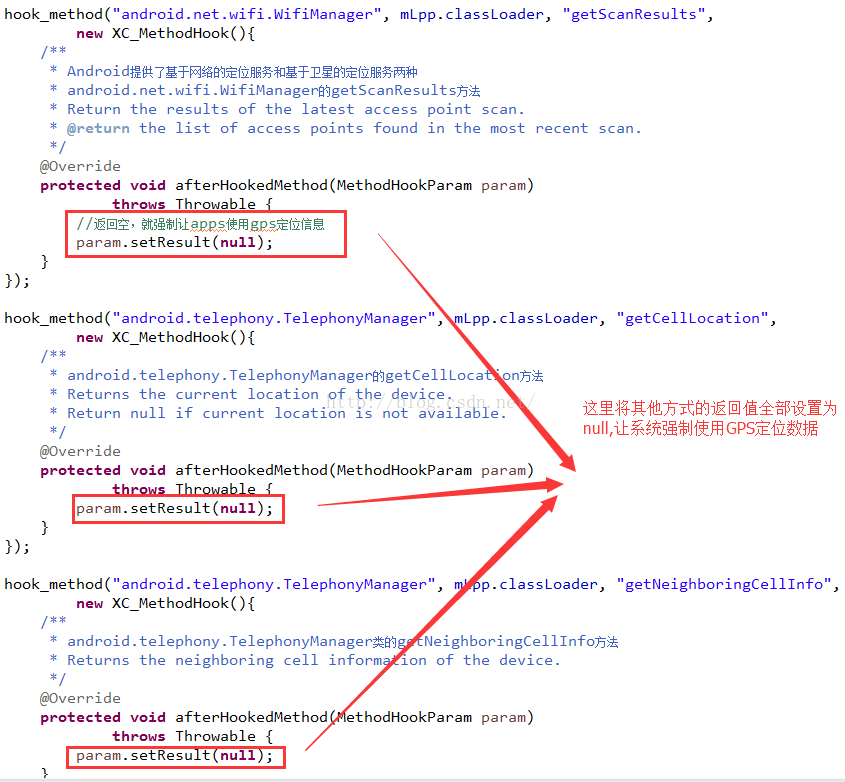 Android中Xposed框架篇---修改系統位置信息實現自身隱藏功能實例
一、前言本文主要來介紹一個實際案例就是如何通過這個框架來修改系統的地理位置信息來實現隱藏功能,在如今社交工具的發展特別是微信,他有一個實時位置共享功能,那麼對於那些不是單
 viewPager+Fragment的多重嵌套問題
大多數場景下,會單單使用viewPager+Fragment來完成項目需求,但也有一些特殊情況需要用到viewPager的多重嵌套。一、例如:我的想法是:①用viewPa