編輯:關於Android編程
這裡是使用 TOC 生成的目錄:
•Layout文件定義
◦ListView定義
◦item 模板定義
•代碼
◦初始化列表
◦用戶點擊處理
•效果
--------------------------------------------------------------------------------
要使用 ListView 實現一個充值方式選擇,默認想選中第二項,搞了一下午,終於搞定了。原本就沒怎麼用 Java 寫過 Android 應用,又隔了好久沒寫,一切都生疏了,半吊子變成大呆瓜了……
Layout文件定義
分兩部分,一部分是 ListView 的定義,一部分 item 模板,即 row 的定義。
ListView定義
說起來也很簡單,下面是 Layout 文件中的 ListView 定義:
  <ListView
    android:id="@+id/recharge_method_list"
    android:layout_width="fill_parent"
    android:layout_height="wrap_content"
    android:layout_marginTop="6dp"
    android:dividerHeight="2dp"
    android:divider="@color/ssq_bkgnd"
    android:background="@android:color/white"
    android:choiceMode="singleChoice"
    android:listSelector="@null"
    >
  </ListView>
嘿,別說,CSDN的Markdown編輯器比原來的默認編輯器好用多了,插入代碼更簡單了。這是第一次使用CSDN的Markdown,贊一個。
item 模板定義
item模板如下定義:
<?xml version="1.0" encoding="utf-8"?>
<LinearLayout xmlns:android="http://schemas.android.com/apk/res/android"
  android:orientation="horizontal"
  android:layout_width="match_parent"
  android:layout_height="60dp"
  android:gravity="center_vertical"
  android:background="@drawable/option_selector"
  >
  <ImageView
    android:id="@+id/recharge_method_icon"
    android:layout_width="40dp"
    android:layout_height="40dp"
    android:layout_marginLeft="20dp"
    android:layout_marginRight="4dp"
    />
  <LinearLayout
    android:layout_width="0dp"
    android:layout_height="wrap_content"
    android:layout_weight="1"
    android:orientation="vertical"
    >
    <TextView
      android:id="@+id/recharge_method_name"
      android:layout_width="wrap_content"
      android:layout_height="wrap_content"
      android:textSize="15sp"
      />
    <TextView
      android:id="@+id/recharge_method_clue"
      android:layout_width="wrap_content"
      android:layout_height="wrap_content"
      android:textSize="12sp"
      />
  </LinearLayout>
  <ImageView
    android:id="@+id/recharge_method_checked"
    android:layout_width="34dp"
    android:layout_height="28dp"
    android:layout_marginRight="16dp"
    android:src="@drawable/option_checked"
    android:visibility="invisible"
    />
</LinearLayout>
我為了給一個 ListView 的 item 顯示一個選擇圖標,在定義 item 模板文件時直接加了一個 ImageView ,通過控制它的顯示和隱藏來達到看起來選中的效果。偷了個懶,這是比較簡單的實現,在 ListView 中 item 數量不多時對內存、性能等影響不大。
代碼
代碼比較簡單,分兩部分來看吧,一部分是初始化列表,一部分是用戶點擊列表中的某項後切換選中標記。
初始化列表
initRechargeList()方法用來初始化充值方式列表,代碼如下:
  private void initRechargeList(){
    actionTexts = new String[]{
        getString(R.string.recharge_unionpay), getString(R.string.recharge_alipay), getString(R.string.recharge_bestpay)
    };
    actionClue = new String[]{
        getString(R.string.recharge_unionpay_clue), getString(R.string.recharge_alipay_clue), getString(R.string.recharge_bestpay_clue)
    };
    actionImages = new int[]{
        R.drawable.unionpay,
        R.drawable.recharge_icon_alipay,
        R.drawable.recharge_icon_bestpay
    };
    actionList = (ListView)findViewById(R.id.recharge_method_list);
    actionItems = new ArrayList<HashMap<String, Object>>();
    actionAdapter = new SimpleAdapter(this, actionItems, R.layout.recharge_method_list_item,
        new String[]{"action_icon", "action_name", "action_clue"},
        new int[]{R.id.recharge_method_icon, R.id.recharge_method_name, R.id.recharge_method_clue});

    for(int i = 0; i < actionImages.length; ++i) {
      HashMap<String, Object> item = new HashMap<String, Object>();
      item.put("action_icon", actionImages[i]);
      item.put("action_name", actionTexts[i]);
      item.put("action_clue", actionClue[i]);
      actionItems.add(item);
    }
    actionList.setAdapter(actionAdapter);
    actionList.setOnItemClickListener(itemListener);
    actionList.post(new Runnable() {
      @Override
      public void run() {
        lastCheckedOption = actionList.getChildAt(1).findViewById(R.id.recharge_method_checked);
        lastCheckedOption.setVisibility(View.VISIBLE);
        actionList.setItemChecked(1, true);
      }
    });
  }
上面的代碼是初始化充值方式列表。 ListView 的用法也比較簡單,View–Row Template–Data–Adapter,四個要素。
我遇到的問題是:如何默認選中某一項。
實際上我的列表中只有三項,不用考慮哪一項會不可見,應該在安卓手機上都是可見的。
一開始我在調用了 ListView 的 setAdapter 方法後,直接使用 getChildAt(1) 來獲取第二項對應的 View ,你猜到了,沒錯,崩潰了: NullPointerException 。空指針啊,用 C++ 時的老情人,改用 Java 寫 Android 了,她又跑來和我約會了。
搞了半天,我才弄明白: setAdapter() 其實是異步的 ,調用了這個方法, ListView 的 item 並沒有立馬創建,而是在下一輪消息處理時才創建。弄明白了這個,就有了前面代碼中的解決辦法:使用 post() 提交一個 Runnable() 對象,在 Runnable() 內部來做默認選中這種初始化動作。
如你所見,我 new 了一個 Runnable 給 post() 方法,在 run() 內找到了第 2 項,顯示了選中圖標;並且我把第 2 項對應的 View 保存到 lastCheckedOption 成員變量中。後面我們會通過 lastCheckedOption 這個變量,結合 OnItemClickListener 來實現 ListView 中三個 item 的互斥選擇效果。
Markdown怎麼給每個段落前加縮進呢……迷惑中……四個空格就給本段落打上背景色了,挺好……
用戶點擊處理
點擊處理是通過 AdapterView.OnItemClickedListener 接口完成的。代碼如下:
  private AdapterView.OnItemClickListener itemListener = new AdapterView.OnItemClickListener() {

    @Override
    public void onItemClick(AdapterView<?> parent, View view, int position, long id) {
      if(lastCheckedOption != null){
        lastCheckedOption.setVisibility(View.INVISIBLE);
      }
      lastCheckedOption = view.findViewById(R.id.recharge_method_checked);
      lastCheckedOption.setVisibility(View.VISIBLE);
    }
  };
如你所見,我通過 lastCheckedOption 變量保存了上次選中的 item 中的表示選中效果的圖標,用戶點擊某一個時,先隱藏上一個 item 的選中圖標,再顯示當前的,就有了貌似互斥的效果了。
一切就這麼簡單,搞定了。
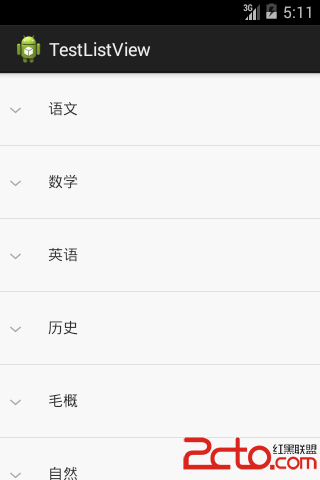
效果
最終的效果是醬紫的:

嗳,插入圖片比原來的非 Markdown 編輯器好用多了。
--------------------------------------------------------------------------------
好啦,想不到我又來寫 Android 應用了,感覺很 High 啊。
--------------------------------------------------------------------------------
還不知道 Markdown 版本的編輯器寫出來的博客,發表出來腫麼樣呢,生成了個目錄,直接 TOC 就 OK 了,還是很方便的。寫完了,還是沒搞明白段落的行首縮進如何搞呢。
據說還支持離線編輯,贊。
還有一點:左右分欄,可以看到效果,比 github 的 wiki 頁面編輯要強一點。
以上就是本文的全部內容,希望對大家的學習有所幫助,也希望大家多多支持本站。
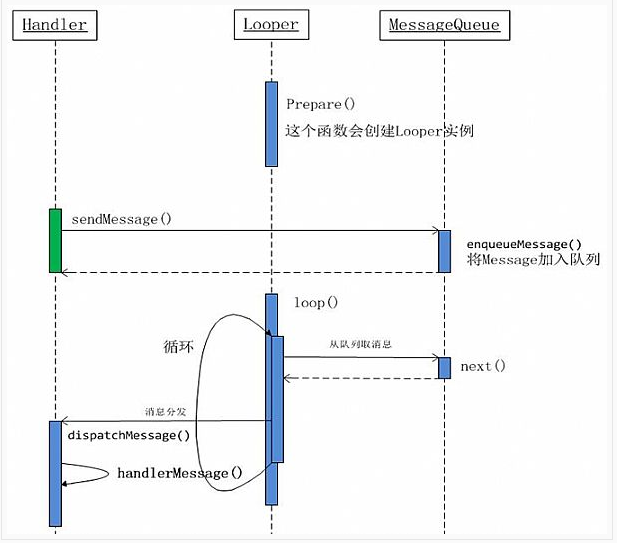
 Android消息循環機制
Android的消息循環機制主要先關的類有:Handler Looper Message MessageQueue ActivityThread實際上應用程序
 Android處理大圖片
項目中經常碰到需要處理大圖片的問題,因為android對應用分配資源的限制,如果不進行相應的處理,容易造成OOM。 Android處理大圖的方法: 對於大圖先獲取出圖片的
 Android開發之MediaRecorder類詳解
MediaRecorder類詳解 手機一般都有麥克風和攝像頭,而Android系統就可以利用這些硬件來錄制音視頻了。 為了增加對錄制音視頻的支持,Android系統提
 Android OpenGLES2.0(六)——構建圓錐、圓柱和球體
之前的博客中,我們繪制了三角形、正方形、圓形、立方體,今天我們將繪制圓錐、圓柱和球體。能夠繪制這些基本的常規幾何形體後,其他的常見幾何形體的繪制對於我們來說就基本沒問題了