編輯:關於Android編程
android中,在進行耗時操作更新UI用到最多的方法就是Handler了,一般在子線程中進行耗時操作(訪問網絡等),然後發送消息到UI線程(主線程),使得界面得以更新。
對於Handler的用法,相信大家都比較熟悉了,那麼Handler機制的原理是什麼呢?我們今天從源碼角度來分析下Handler機制的原理。
Handler mHandler = new Handler(){

        public void handleMessage(Message msg) {
            //處理消息
        };
    };
    A Handler allows you to send and process Message and Runnable
objects associated with a thread's MessageQueue.  Each Handler
instance is associated with a single thread and that thread's message
queue.  When you create a new Handler, it is bound to the thread /
message queue of the thread that is creating it -- from that point on,
it will deliver messages and runnables to that message queue and execute
them as they come out of the message queue.

There are two main uses for a Handler: (1) to schedule messages and
runnables to be executed as some point in the future; and (2) to enqueue
an action to be performed on a different thread than your own.
首先我們來看API中給的描述,一個Handler能夠通過關聯的線程的MessageQueue來發送和處理Message 和Runnable對象。每一個Handler實例化的時候會關聯一個獨立的線程和這個線程的消息隊列。當 你創建一個新的Handler,它會綁定到創建它的的線程和消息隊列上–從這個點上,當消息隊列中 有消息來的時候,它會傳遞消息和Runnable對象到那個消息隊列並且會執行這些消息。
Handler有兩個用法:(1)能夠使messages和runnables在即將到來的某個點一同執行;(2)能夠協調一個操作在不同的線程中的執行
Handler 的構造方法
我們從Handler初始化開始,從構造方法入口,看看它實例化的時候做了什麼操作。
 public Handler() {
        this(null, false);
    }
默認的構造方法會調用下面這個帶兩個參數的構造方法。
 public Handler(Callback callback, boolean async) {
        if (FIND_POTENTIAL_LEAKS) {
            final Class klass = getClass();
            if ((klass.isAnonymousClass() || klass.isMemberClass() || klass.isLocalClass()) &&
                    (klass.getModifiers() & Modifier.STATIC) == 0) {
                Log.w(TAG, "The following Handler class should be static or leaks might occur: " +
                    klass.getCanonicalName());
            }
        }
        ////////////////////////////////
        獲取Looper
        mLooper = Looper.myLooper();
        ///////////////////////////////
        if (mLooper == null) {
            throw new RuntimeException(
                "Can't create handler inside thread that has not called Looper.prepare()");
        }
        mQueue = mLooper.mQueue;
        mCallback = callback;
        mAsynchronous = async;
    }
我們這裡主要看mLooper = Looper.myLooper(); 這行代碼,Looper是什麼呢,有什麼用呢?
我們追蹤到Looper的myLooper方法:
  public static Looper myLooper() {
        return sThreadLocal.get();
    }
問題又來了,這個ThreadLoacal又是個什麼東西呢?
ThreadLoacal即線程局部變量,ThreadLocal設計出來是為了避免在線程間共享變量,使用ThreadLoacal能夠為各個線程提供各自的實例。

ThreadLocal的兩個方法:

get和set用於獲取ThreadLocal中存儲的局部變量
/**
  Returns the value in the current thread's copy of this thread-local variable.
*/
public T get();

/**
  Sets the current thread's copy of this thread-local variable to the specified value.
*/
public void set(T value)
這裡我們只做簡單的介紹,關於ThreadLoacal這裡不做詳細介紹,有興趣可以自己研究研究。
我們看下面的代碼片段,ThreadLocal作為Looper的靜態常量,一般在類加載的時候就會創建(靜態成員變量和靜態初始化塊級別相同),接下來我們來看這個prepare方法,prepare方法中會將Looper放在ThreadLocal,確保每個線程取得Looper的時候是屬於自己的那個Looper。
 //sThreadLocal的創建
 static final ThreadLocal sThreadLocal = new ThreadLocal();


private static void prepare(boolean quitAllowed) {
    if (sThreadLocal.get() != null) {
        throw new RuntimeException("Only one Looper may be created per thread");
    }
    //創建Looper並將Looper保存到sThreadLocal中
    sThreadLocal.set(new Looper(quitAllowed));
}
看到這裡,細心的你不由得會產生這樣的疑問,Looper在調用myLooper方法獲得ThreadLocal中存放的Looper的時候,如果prepare方法沒有在這之前調用的話,那麼肯定是取不到Looper的,但問題是平時我們在使用Handler的時候,並沒有調用Looper中的prepare方法啊?
其實我們平時用Handler的時候,都是在Main線程中,在Main線程中,已經提前調用過這個prepare方法了。
public static void main(String[] args) {

        ...............

        //////////////////////////////
        ①主線程調用prepare方法,創建Looper
        Looper.prepareMainLooper();
        /////////////////////////////

        ActivityThread thread = new ActivityThread();
        thread.attach(false);

        if (sMainThreadHandler == null) {
            sMainThreadHandler = thread.getHandler();
        }

        AsyncTask.init();

        if (false) {
            Looper.myLooper().setMessageLogging(new
                    LogPrinter(Log.DEBUG, "ActivityThread"));
        }
        //////////////////////////////
        ②調用loop進行消息循環
        Looper.loop();
        //////////////////////////////

        throw new RuntimeException("Main thread loop unexpectedly exited");
    }
在ActivityThread的main方法中,①這裡會調用來prepareMainLooper創建Looper,prepareMainLooper會轉掉Looper中的prepare方法。ActivityThread的main方法其實是android一個應用程序的入口,每啟動一個應用進程,都會創建ActivityThread與之對應的實例,是應用程序的UI線程。UI線程中會通過prepareMainLooper等方法來建立消息循環(即為Handler作相關的准備工作)。
另外,如果我們在自己定義的線程中使用Handler的話,則必須要自己調Looper.prepare()來創建Looper。
我們在來看main方法②處,會調用Looper中loop方法。

那麼loop方法是干什麼呢?
    public static void loop() {
        final Looper me = myLooper();
        ....
        final MessageQueue queue = me.mQueue;

        ....
        ///////////////////////////////
        ①死循環。需要不停的從MessageQueue去消息進行處理
        for (;;) {
            Message msg = queue.next(); // might block
            if (msg == null) {
                // No message indicates that the message queue is quitting.
                return;
            }
        //////////////////////////////

            //②分發消息
            msg.target.dispatchMessage(msg);

            msg.recycle();
        }
    }
這裡在loop方法中,為了顯得比較整潔,略去了一些不重要的代碼,這裡我們看兩個地方,首先我們來看loop方法的①處,這裡是個死循環,這裡又引入了一個新類MessageQueue,那麼MessageQueue是什麼呢?
MessageQueue用於存放一個消息列表,其數據結構就是一個隊列。上面的next方法會取出隊列中需要馬上處理的消息,取到消息後,執行loop方法中的②,msg是Message類型,那麼Message的target是什麼呢?繼續看Message的代碼。
 /*package*/ Handler target;

  public Message() {
  }
可以看到在Message中的target其實是Handler,上面②處,在取得需要處理的消息後,由消息的Handler來分發消息進行處理。
另外,Message中的Handler是在什麼時候傳遞進去的呢?我們來看下Handler中的相關方法:
Handler發送消息,一般有兩種構造消息的方式:

1. 使用new 一個Message

這種方式,new Message的方式,其實Message構造方法其中沒有做任何操作,關鍵還是在Handler這裡sendMessage方法,sendMessage最終會調用enqueueMessage,在enqueueMessage中就設置了Message的target為this,即Handler

1. 使用Handler中obtain獲取一個信息
當使用第二種方式obtainMessage來獲得一個Message時,同樣會將target置為Handler。
Handler發送消息的流程
public final boolean sendMessage(Message msg)
{
    return sendMessageDelayed(msg, 0);
}

public boolean sendMessageAtTime(Message msg, long uptimeMillis) {
    MessageQueue queue = mQueue;
    if (queue == null) {
        RuntimeException e = new RuntimeException(
                this + " sendMessageAtTime() called with no mQueue");
        Log.w("Looper", e.getMessage(), e);
        return false;
    }
    return enqueueMessage(queue, msg, uptimeMillis);
}

private boolean enqueueMessage(MessageQueue queue, Message msg, long uptimeMillis) {
    //將當前Message中target設置為自己,即Handler
    msg.target = this;
    if (mAsynchronous) {
        msg.setAsynchronous(true);
    }
    return queue.enqueueMessage(msg, uptimeMillis);
}
public final Message obtainMessage()
{
    return Message.obtain(this);
}

public static Message obtain(Handler h) {
    Message m = obtain();
    m.target = h;

    return m;
}
由上面Handler發送消息的流程可知,Handler發送消息後MessageQueue中enqueueMessage來將消息入隊,我麼來看enqueueMessage方法:
 boolean enqueueMessage(Message msg, long when) {
        .....

        boolean needWake;
        .........

            msg.when = when;
            Message p = mMessages;
            if (p == null || when == 0 || when < p.when) {

                //① 當前發送的message需要馬上被處理調,needWake喚醒狀態置true

                // New head, wake up the event queue if blocked.
                msg.next = p;
                mMessages = msg;
                needWake = mBlocked;
            } else {

              // Inserted within the middle of the queue.  Usually we don't have to wake
                // up the event queue unless there is a barrier at the head of the queue
                // and the message is the earliest asynchronous message in the queue.
                needWake = mBlocked && p.target == null && msg.isAsynchronous();
                Message prev;

                // ② 當前發送的message被排隊到其他message的後面,needWake喚醒狀態置false

                for (;;) {
                    prev = p;
                    p = p.next;
                    if (p == null || when < p.when) {
                        break;
                    }
                    if (needWake && p.isAsynchronous()) {
                        needWake = false;
                    }
                }
                msg.next = p; // invariant: p == prev.next
                prev.next = msg;
            }
        }

        //③  是否喚醒主線程
        if (needWake) {
            nativeWake(mPtr);
        }
        return true;
    }
在MessageQueue中enqueueMessage方法中,我們主要關注三個地方:①②③,根據傳進來消息Message中的時間和隊列中最前面一個消息的時間進行比對,判斷是不是需要及時處理,還是排到後面去。
在①處,當前發送的message需要馬上被處理調,needWake喚醒狀態置true。
在②處,當前發送的message被排隊到其他message的後面,needWake喚醒狀態置false。
在③處,needWake,來確定是否喚醒主線程來處理消息。
這樣消息就能被存放到消息隊列中,當需要及時處理,會通過nativeWake來喚醒主線程,nativeWake是一個native方法,用jni來實現,Handler機制用的是Linux下的一種通信方式,叫管道。管道(Pipe),是Linux中的一種進程間通信方式,使用了特殊的文件,有兩個文件描述符(一個是讀取,一個是寫入)。關於管道有興趣的可以自己研究看看,這裡不做過多介紹。
在Looper.loop()方法中,沒有消息處理,主線程就會阻塞,當主線程被子線程喚醒後,會繼續執行,這樣就會執行 msg.target.dispatchMessage(msg)方法
public static void loop() {
        final Looper me = myLooper();
        ....
        final MessageQueue queue = me.mQueue;

        ....

        for (;;) {
            Message msg = queue.next(); // might block
            if (msg == null) {
                // No message indicates that the message queue is quitting.
                return;
            }
            //分發消息
            msg.target.dispatchMessage(msg);


            msg.recycle();
        }
    }
dispatchMessage方法如下,會調用handleMessage,而handleMessage是個空方法,正是我們需要重寫的地方,我們處理消息的邏輯就在這裡,這樣,這個Handler機制的流程就走通了。
public void dispatchMessage(Message msg) {
        if (msg.callback != null) {
            handleCallback(msg);
        } else {
            if (mCallback != null) {
                if (mCallback.handleMessage(msg)) {
                    return;
                }
            }
            handleMessage(msg);
        }
    }

public void handleMessage(Message msg) {
}
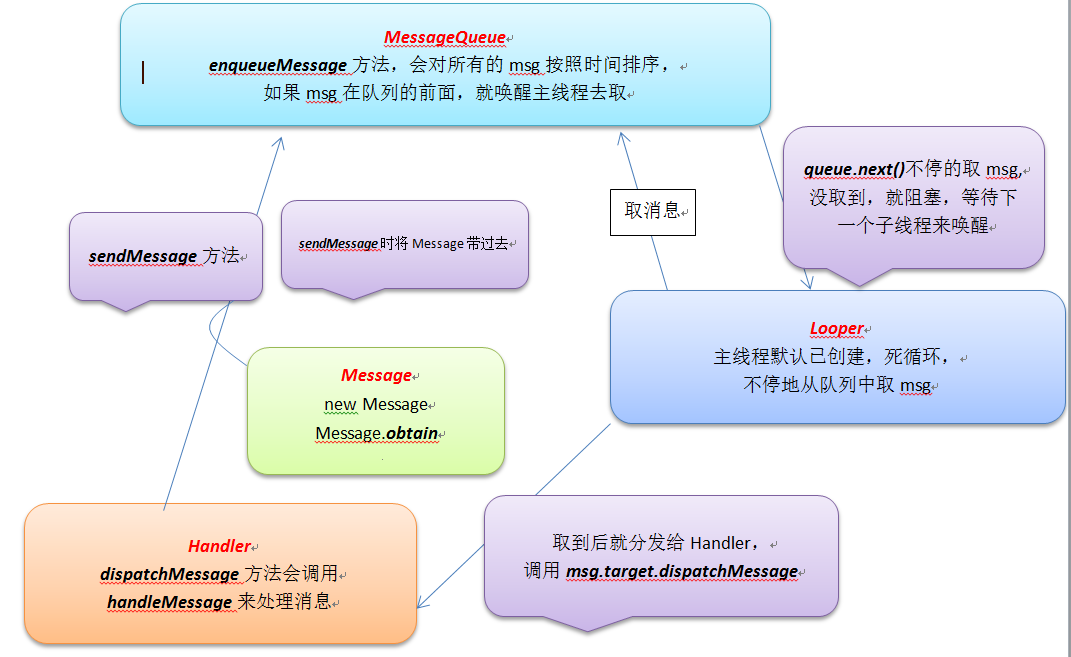
最後是兩張關於Handler的圖:

希望能幫助大家理解。

第一張書序圖來自網絡,第二張類是調用關系圖。

 Android中利用Handler實現消息的分發機制(三)
在第二篇文章《Android中利用Handler實現消息的分發機制(一)》中,我們講到主線程的Looper是Android系統在啟動App的時候,已經幫我們創建好了,而如
 Android基礎之Activity生命周期
子曰:溫故而知新,可以為師矣。《論語》學習技術也一樣,對於技術文檔或者經典的技術書籍來說,指望看一遍就完全掌握,那基本不大可能,所以我們需要經常回過頭再仔細研讀幾遍,以領
 android自定義View——Bitmap使用詳解
先看一個效果圖本節課程實現完成右圖效果(三步)以及保存塗鴉過的圖片步驟【1】將背景Bitmap圖片畫到底層canvas上 bitmapBackground = Bitma
 android之SharedPreferences
簡介 將數據存儲到SharedPreferences中 獲取SharedPreferences對象 Context類中的getSharedPreferences方法 文件