編輯:關於Android編程
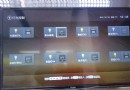
最近幫朋友做了一個動畫菜單,感覺有一定的實用價值,就在此給大家分享一下,先看看效果:
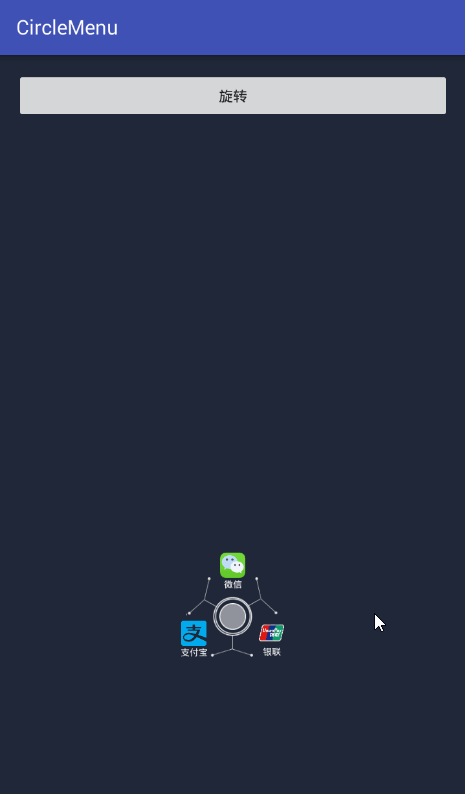
實現思路:
從圖中可以看出,這三個(或更多,需要自己再實現)菜單是圍繞著中心點旋轉的,旋轉分為2層,背景旋轉和菜單旋轉,背景旋轉可以直接用旋轉動畫來實現;菜單的旋轉是在以中心點為圓心的圓環上,所以這裡用了根據旋轉角度求此點在直角坐標系中的坐標點的函數(x = r * cos(rotation* 3.14 / 180) 和y = r * sin(rotation* 3.14 / 180) ),然後根據獲取到的點的位置來設置菜單的位置就能實現這種效果。由此可見 數學是很重要的 哈哈~~
有了思路我們就能用代碼來實現了:
1、首先自定義View繼承相對布局並重寫構造函數
/**
 * Created by ywl on 2016/8/7.
 */
public class CircleMenuLayout extends RelativeLayout {
  public CircleMenuLayout(Context context) {
    this(context, null);
  }
  public CircleMenuLayout(Context context, AttributeSet attrs) {
    this(context, attrs, 0);
  }
  /**
   * 初始化布局 把旋轉背景和中心點添加進去
   * @param context
   * @param attrs
   * @param defStyleAttr
   */
  public CircleMenuLayout(Context context, AttributeSet attrs, int defStyleAttr) {
    super(context, attrs, defStyleAttr);
    this.context = context;
    layoutInflater = LayoutInflater.from(context);
    menuitems = new ArrayList<View>();
    centerview = new View(context);//中心點
    centerview.setId(ID_CENTER_VIEW);
    LayoutParams lp = new LayoutParams(0, 0);
    lp.addRule(RelativeLayout.CENTER_IN_PARENT, RelativeLayout.TRUE);
    addView(centerview, lp); //添加中心的 用於旋轉定位
    progressBar = new ProgressBar(context);//旋轉的背景
    LayoutParams lp2 = new LayoutParams(dip2px(context, 90), dip2px(context, 90));
    lp2.addRule(RelativeLayout.CENTER_IN_PARENT, RelativeLayout.TRUE);
    addView(progressBar, lp2);
    progressBar.setIndeterminateDrawable(context.getResources().getDrawable(R.mipmap.icon_circle_menu));
  }
}
構造函數中添加中心定位點和旋轉背景圖片,並設置合適的大小。
2、根據傳入的圖片數組和菜單名字數組,生成菜單原始位置效果。
/**
   * 菜單的數量 和 半徑 名字 和圖片 這裡只為3個菜單做了適配
   * @param size
   * @param center_distance
   */
  public void initMenuItem(int size, int center_distance, String[] titles, int[] imgs)
  {
    radus = 360f / size;
    int width = dip2px(context, 50); //菜單寬度
    int height = dip2px(context, 50);//菜單高度
    for(int i = 0; i < size; i++) //循環添加布局
    {
      int top = 0;
      int left = 0;
      top = -(int)(Math.sin(radus * i * 3.1415f / 180) * center_distance); //r  *  cos(ao  *  3.14  /180  )
      left = -(int)(Math.cos(radus * i * 3.1415f / 180) * center_distance); //計算位置點
      LayoutParams lp = new LayoutParams(dip2px(context, 50), dip2px(context, 50));
      View view = layoutInflater.inflate(R.layout.item_circle_menu, this, false);
      view.setTag(i);
      TextView tvname = (TextView) view.findViewById(R.id.tv_name);
      ImageView ivimg = (ImageView) view.findViewById(R.id.img);
      tvname.setText(titles[i]);
      ivimg.setImageResource(imgs[i]);
      view.setOnClickListener(new OnClickListener() {
        @Override
        public void onClick(View v) {//根據點擊的區域 旋轉菜單
          if(!isrun) {
            tag = (int) v.getTag();
            currentPosition = tag;
            if(tag == 0)
            {
              finishdus = -360;
            }
            else if(tag == 1)
            {
              finishdus = -120;
            }
            else if(tag == 2)
            {
              finishdus = -240;
            }
            LayoutParams lp = (LayoutParams) v.getLayoutParams();
            int l = lp.leftMargin;
            int t = lp.topMargin;
            if (t > -dip2px(context, 5) && l > -dip2px(context, 5)) {
              oldradus = 120f;
              isright = false;
            } else if (t > -dip2px(context, 5) && l < -dip2px(context, 5)) {
              oldradus = 120f;
              isright = true;
            } else if (t < -dip2px(context, 5)) {
              oldradus = 0f;
            }
            sub = 0;
            circleMenu(8, dip2px(context, 45), oldradus, isright);
          }
        }
      });
      lp.addRule(RelativeLayout.BELOW, centerview.getId());
      lp.addRule(RelativeLayout.RIGHT_OF, centerview.getId());
      lp.setMargins(-width / 2 + top, -height / 2 + left, 0, 0);
      addView(view, lp);
      menuitems.add(view);
    }
    handler.postDelayed(runnable, 0);
  }
根據菜單的數量循環計算每個菜單的位置,然後在相應的位置添加相應的菜單就可以實現菜單的初始化了。這裡為每個菜單添加了點擊事件,但是只適配了3個菜單的情況,至於其他數量的菜單,可以自己來改或者寫一個通用的方法來計算點擊位置。
3、背景旋轉動畫:
/**
  * 根據度數來旋轉菜單 菜單中心都在一個圓上面 采用圓周運動來旋轉
  * @param offserradius
  * @param center_distance
  * @param d
  * @param right
  */
  public void circleMenu(float offserradius, int center_distance, float d, boolean right)
  {
  if(oldradus != 0)
  {
    progressBar.clearAnimation();
    if(isright)
    {
      mRotateUpAnim = new RotateAnimation(bgdus, bgdus + 120,
          Animation.RELATIVE_TO_SELF, 0.5f, Animation.RELATIVE_TO_SELF,
          0.5f);
      bgdus += 120;
    }
    else
    {
      mRotateUpAnim = new RotateAnimation(bgdus, bgdus - 120,
          Animation.RELATIVE_TO_SELF, 0.5f, Animation.RELATIVE_TO_SELF,
          0.5f);
      bgdus -= 120;
    }
    lir = new LinearInterpolator();
    mRotateUpAnim.setDuration(350);
    mRotateUpAnim.setFillAfter(true);
    mRotateUpAnim.setInterpolator(lir);
//    mRotateUpAnim.setRepeatCount(Animation.INFINITE);
    progressBar.startAnimation(mRotateUpAnim);
  }
    circleMenuItem(offserradius, center_distance, d, right);
  }
這個比較簡單,就是根據旋轉的角度,啟用旋轉動畫。
4、旋轉菜單:
/**
   * 菜單旋轉
   * @param offserradius
   * @param center_distance
   * @param d
   * @param right
   */
  public void circleMenuItem(float offserradius, int center_distance, float d, boolean right)
  {
    sub += offserradius;
    if(sub > d)
    {
      if(onMenuItemSelectedListener != null)
      {
        onMenuItemSelectedListener.onMenuItemOnclick(tag);
      }
      isrun = false;
      return;
    }
    if(right) {
      offsetradus -= offserradius;
    }
    else
    {
      offsetradus += offserradius;
    }
    int size = menuitems.size();
    int width = dip2px(context, 50);
    int height = dip2px(context, 50);
    for(int i = 0; i < size; i++)
    {
      if(Math.abs(sub - d) <= 8)
      {
        offsetradus = finishdus;
      }
      LayoutParams lp = (LayoutParams) menuitems.get(i).getLayoutParams();
      float ds = radus * i + offsetradus;
      int top = -(int)(Math.sin(ds * 3.1415f / 180) * center_distance); //r  *  cos(ao  *  3.14  /180  )
      int left = -(int)(Math.cos(ds * 3.1415f / 180) * center_distance);
      lp.setMargins(-width / 2 + top, -height / 2 + left, 0, 0);
      menuitems.get(i).requestLayout();
    }
    if(sub <= d) {
      isrun = true;
      offsetradus = offsetradus % 360;
      handler.postDelayed(runnable, 5);
    }
    else
    {
      if(onMenuItemSelectedListener != null)
      {
        onMenuItemSelectedListener.onMenuItemOnclick(tag);
      }
      isrun = false;
    }
  }
這裡旋轉是根據初始化時每個菜單所在的位置來求的旋轉角度,然後啟動handler來動遞加或遞減角度來求響應的位置,就實現了動畫效果。
5、手動設置菜單項(有局限,沒有通用性):
/**
   * 設置旋轉到哪個菜單項
   * @param tag
   */
  public void setCurrentTag(int tag)
  {
    if(currentPosition == tag)
    {
      return;
    }
    if(tag == 0)
    {
      finishdus = -360;
    }
    else if(tag == 1)
    {
      finishdus = -120;
    }
    else if(tag == 2)
    {
      finishdus = -240;
    }
    if(currentPosition == 0) //當前是0
    {
      if(tag == 1)
      {
        oldradus = 120f;
        isright = true;
      }
      else if(tag == 2)
      {
        oldradus = 120f;
        isright = false;
      }
    }
    else if(currentPosition == 1)
    {
      if(tag == 2)
      {
        oldradus = 120f;
        isright = true;
      }
      else if(tag == 0)
      {
        oldradus = 120f;
        isright = false;
      }
    }
    else if(currentPosition == 2)
    {
      if(tag == 0)
      {
        oldradus = 120f;
        isright = true;
      }
      else if(tag == 1)
      {
        oldradus = 120f;
        isright = false;
      }
    }
    currentPosition = tag;
    this.tag = tag;
    sub = 0;
    circleMenu(8, dip2px(context, 45), oldradus, isright);
  }
這樣就可以實現旋轉效果了。
6、調用方法:
(1)布局文件:
<com.ywl5320.circlemenu.CircleMenuLayout
    android:id="@+id/cml_menu"
    android:layout_width="150dp"
    android:layout_height="150dp"
    android:layout_centerHorizontal="true"
    android:layout_alignParentBottom="true"
    android:layout_marginBottom="92dp"/>
(2)菜單布局文件:
<?xml version="1.0" encoding="utf-8"?>
<LinearLayout xmlns:android="http://schemas.android.com/apk/res/android"
  android:orientation="vertical"
  android:layout_width="100dp"
  android:layout_height="100dp"
  android:padding="5dp"
  android:gravity="center">
  <ImageView
    android:id="@+id/img"
    android:layout_width="25dp"
    android:layout_height="25dp"
    android:scaleType="fitXY"/>
  <TextView
    android:id="@+id/tv_name"
    android:layout_width="wrap_content"
    android:layout_height="wrap_content"
    android:text="菜單項"
    android:textSize="9sp"
    android:gravity="center"
    android:textColor="#ffffff"/>
</LinearLayout>
(3)Activity中調用
<span >  </span>cmlmenu = (CircleMenuLayout) findViewById(R.id.cml_menu);
    btn = (Button) findViewById(R.id.btn);
    cmlmenu.initDatas(titles, imgs);
    cmlmenu.setOnMenuItemSelectedListener(new CircleMenuLayout.OnMenuItemSelectedListener() {
      @Override
      public void onMenuItemOnclick(int code) {
        if(code == 0)//
        {
          Toast.makeText(MainActivity.this, "支付寶", Toast.LENGTH_SHORT).show();
        }
        else if(code == 1)
        {
          Toast.makeText(MainActivity.this, "銀聯", Toast.LENGTH_SHORT).show();
        }
        else if(code == 2)
        {
          Toast.makeText(MainActivity.this, "微信", Toast.LENGTH_SHORT).show();
        }
      }
    });
OK,就完成了三個菜單旋轉效果(注:這裡僅僅是為了3個菜單而設計的,其他個數的自己還需要精簡或更改一些代碼,相信自己改出來的會更有收獲的~~)。
以上所述是小編給大家介紹的Android圓形旋轉菜單開發實例,希望對大家有所幫助,如果大家有任何疑問請給我留言,小編會及時回復大家的。在此也非常感謝大家對本站網站的支持!
 Android開發之機頂盒上gridview和ScrollView的使用詳解
最近在機頂盒上做一個gridview,其焦點需要在item的子控件上,但gridview的焦點默認在item上,通過android:descendantFocusabil
 【Android】ListView、RecyclerView、ScrollView裡嵌套ListView 相對優雅的解決方案:NestFullListView
一 背景概述:ScrollView裡嵌套ListView,一直是Android開發者(反正至少是我們組)最討厭的設計之一,完美打破ListView(RecyclerVie
 利用Warensoft Stock Service編寫高頻交易軟件
無論是哪種交易軟件,對於程序員來講,最麻煩的就是去實現各種算法。本文以SAR算法的實現過程為例,為大家說明如何使用Warensoft Stock Service來實現高頻
 Android編程實現的重力感應示例代碼
本文實例講述了Android編程實現的重力感應效果。分享給大家供大家參考,具體如下:android中的很多游戲的游戲都使用了重力感應的技術,就研究了一下重力感應以屏幕的左