編輯:Android資訊
前面寫了兩篇分析了tinker的loader部分源碼以及dex diff/patch算法相關解析,那麼為了保證完整性,最後一篇主要寫tinker-patch-gradle-plugin相關了。
(距離看的時候已經快兩個月了,再不寫就忘了,趕緊記錄下來)
注意:
本文基於1.7.7
前兩篇文章分別為:
有興趣的可以查看~
在介紹細節之前,我們可以先考慮下:通過一個命令生成一個patch文件,這個文件可以用於下發做熱修復(可修復常規代碼、資源等),那麼第一反應是什麼呢?
正常思維,需要設置oldApk,然後我這邊build生成newApk,兩者需要做diff,找出不同的代碼、資源,通過特定的算法將diff出來的數據打成patch文件。
ok,的確是這樣的,但是上述這個過程有什麼需要注意的麼?
如果大家嘗試過接入tinker並使用gradle的方式生成patch相關,會發現在需要在項目的build.gradle中,添加一些配置,這些配置中,會要求我們配置oldApk路徑,資源的R.txt路徑,混淆mapping文件路徑、還有一些比較tinker相關的比較細致的配置信息等。
不過並沒有要求我們顯示去處理上述幾個問題(並沒有讓你去keep混淆規則,主dex分包規則,以及apply mapping文件),所以上述的幾個實際上都是tinker的gradle plugin 幫我們做了。
所以,本文將會以這些問題為線索來帶大家走一圈plugin的代碼(當然實際上tinker gradle plugin所做的事情遠不止上述)。
其次,tinker gradle plugin也是非常好的gradle的學習資料~
下載tinker的代碼,導入後,plugin的代碼都在tinker-patch-gradle-plugin中,不過當然不能抱著代碼一行一行去啃了,應該有個明確的入口,有條理的去閱讀這些代碼。
那麼這個入口是什麼呢?
其實很簡單,我們在打patch的時候,需要執行tinkerPatchDebug(注:本篇博客基於debug模式講解)。
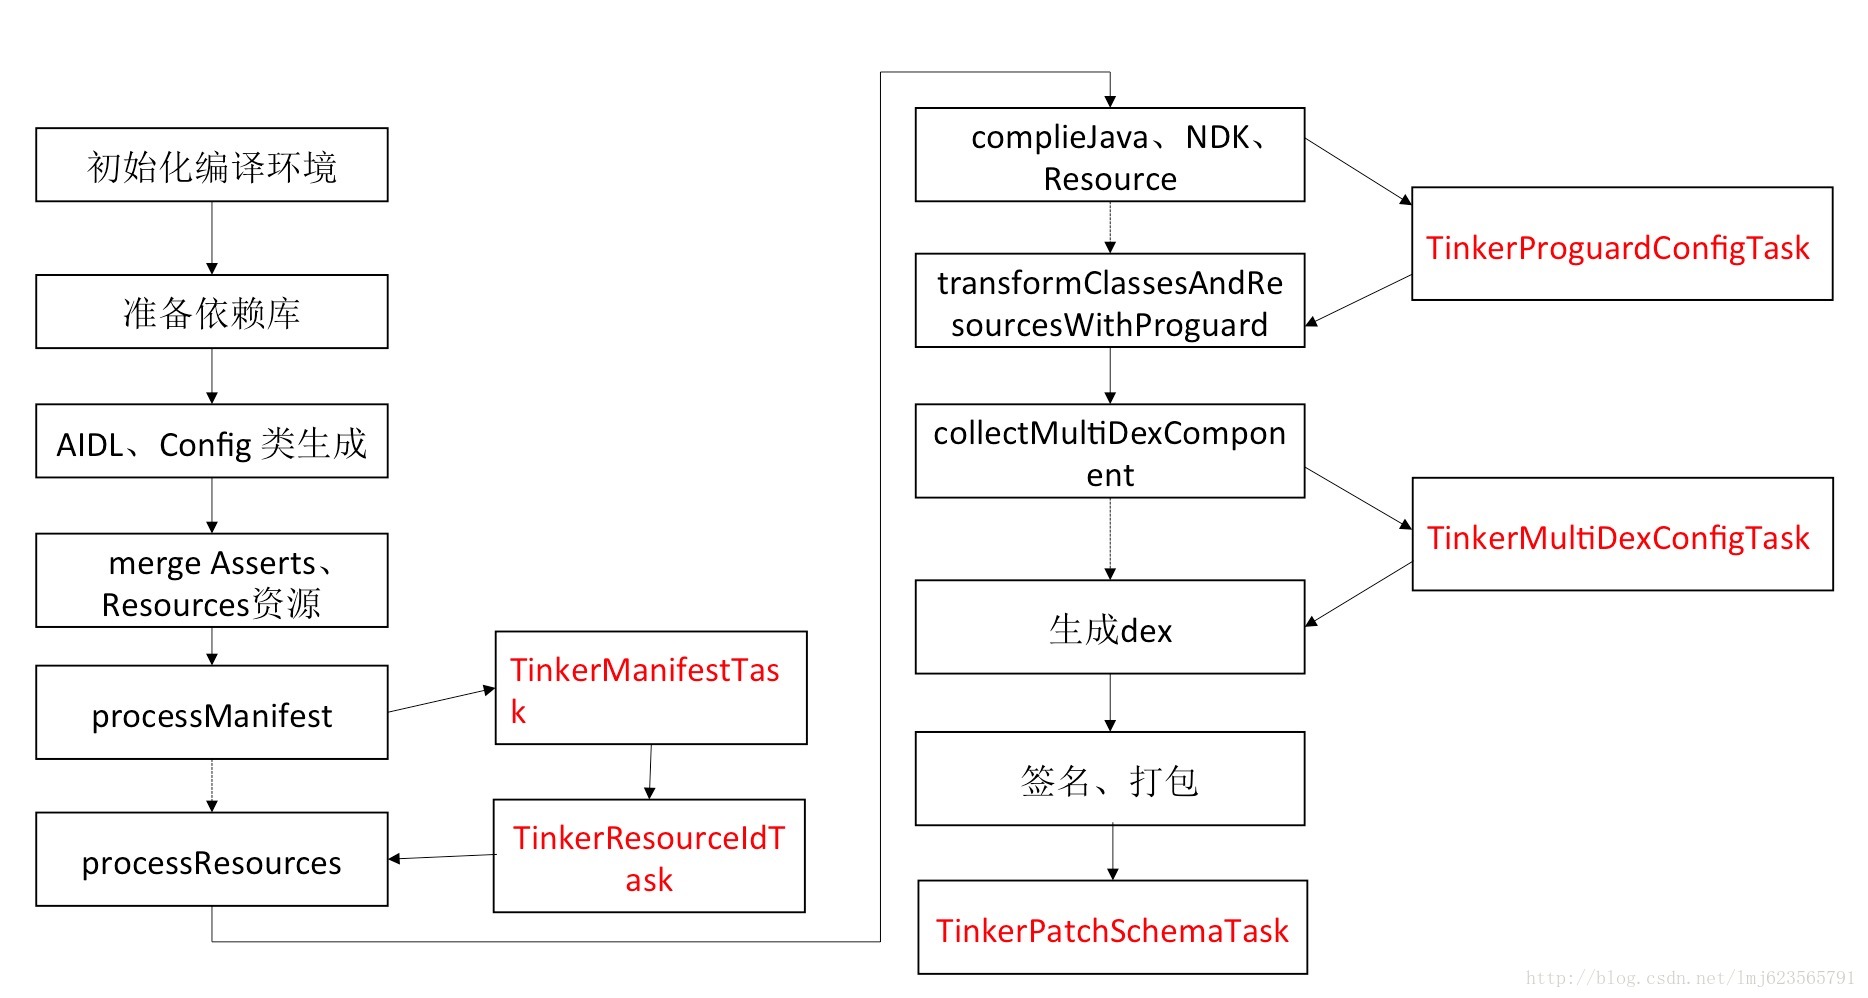
當執行完後,將會看到執行過程包含以下流程:
:app:processDebugManifest
:app:tinkerProcessDebugManifest(tinker)
:app:tinkerProcessDebugResourceId (tinker)
:app:processDebugResources
:app:tinkerProguardConfigTask(tinker)
:app:transformClassesAndResourcesWithProguard
:app:tinkerProcessDebugMultidexKeep (tinker)
:app:transformClassesWidthMultidexlistForDebug
:app:assembleDebug
:app:tinkerPatchDebug(tinker)
注:包含(tinker)的都是tinker plugin 所添加的task
可以看到部分task加入到了build的流程中,那麼這些task是如何加入到build過程中的呢?
在我們接入tinker之後,build.gradle中有如下代碼:
if (buildWithTinker()) {
    apply plugin: 'com.tencent.tinker.patch'
    tinkerPatch {} // 各種參數
}
如果開啟了tinker,會apply一個plugincom.tencent.tinker.patch:

名稱實際上就是properties文件的名字,該文件會對應具體的插件類。
對於gradle plugin不了解的,可以參考http://www.cnblogs.com/davenkin/p/gradle-learning-10.html,後面寫會抽空單獨寫一篇詳細講gradle的文章。
下面看TinkerPatchPlugin,在apply方法中,裡面大致有類似的代碼:
// ... 省略了一堆代碼
TinkerPatchSchemaTask tinkerPatchBuildTask
        = project.tasks.create("tinkerPatch${variantName}", TinkerPatchSchemaTask)
tinkerPatchBuildTask.dependsOn variant.assemble

TinkerManifestTask manifestTask
        = project.tasks.create("tinkerProcess${variantName}Manifest", TinkerManifestTask)
manifestTask.mustRunAfter variantOutput.processManifest
variantOutput.processResources.dependsOn manifestTask

TinkerResourceIdTask applyResourceTask
        = project.tasks.create("tinkerProcess${variantName}ResourceId", TinkerResourceIdTask)
applyResourceTask.mustRunAfter manifestTask
variantOutput.processResources.dependsOn applyResourceTask

if (proguardEnable) {
    TinkerProguardConfigTask proguardConfigTask
            = project.tasks.create("tinkerProcess${variantName}Proguard", TinkerProguardConfigTask)
    proguardConfigTask.mustRunAfter manifestTask

    def proguardTask = getProguardTask(project, variantName)
    if (proguardTask != null) {
        proguardTask.dependsOn proguardConfigTask
    }

}
if (multiDexEnabled) {
    TinkerMultidexConfigTask multidexConfigTask
            = project.tasks.create("tinkerProcess${variantName}MultidexKeep", TinkerMultidexConfigTask)
    multidexConfigTask.mustRunAfter manifestTask

    def multidexTask = getMultiDexTask(project, variantName)
    if (multidexTask != null) {
        multidexTask.dependsOn multidexConfigTask
    }
}
可以看到它通過gradle Project API創建了5個task,通過dependsOn,mustRunAfter插入到了原本的流程中。
例如:
TinkerManifestTask manifestTask = ...
manifestTask.mustRunAfter variantOutput.processManifest
variantOutput.processResources.dependsOn manifestTask
TinkerManifestTask必須在processManifest之後執行,processResources在manifestTask後執行。
所以流程變為:
processManifest-> manifestTask-> processResources
其他同理。
ok,大致了解了這些task是如何注入的之後,接下來就看看每個task的具體作用吧。
注:如果我們有需求在build過程中搞事,可以參考上述task編寫以及依賴方式的設置。
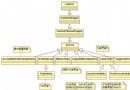
我們按照上述的流程來看,依次為:
TinkerManifestTask
TinkerResourceIdTask
TinkerProguardConfigTask
TinkerMultidexConfigTask
TinkerPatchSchemaTask
丟個圖,對應下:
#TinkerManifestTask
@TaskAction
def updateManifest() {
    // Parse the AndroidManifest.xml
    String tinkerValue = project.extensions.tinkerPatch.buildConfig.tinkerId

    tinkerValue = TINKER_ID_PREFIX + tinkerValue;//"tinker_id_"

    // /build/intermediates/manifests/full/debug/AndroidManifest.xml
    writeManifestMeta(manifestPath, TINKER_ID, tinkerValue)

    addApplicationToLoaderPattern()
    File manifestFile = new File(manifestPath)
    if (manifestFile.exists()) {
        FileOperation.copyFileUsingStream(manifestFile, project.file(MANIFEST_XML))
    }
}
這裡主要做了兩件事:
writeManifestMeta主要就是解析AndroidManifest.xml,在<application>內部添加一個meta標簽,value為tinkerValue。例如:
<meta-data
        android:name="TINKER_ID"
        android:value="tinker_id_com.zhy.abc" />
這裡不詳細展開了,話說groovy解析XML真方便。
addApplicationToLoaderPattern主要是記錄自己的application類名和tinker相關的一些load class com.tencent.tinker.loader.*,記錄在project.extensions.tinkerPatch.dex.loader中。
最後copy修改後的AndroidManifest.xml至build/intermediates/tinker_intermediates/AndroidManifest.xml。
這裡我們需要想一下,在文初的分析中,並沒有想到需要tinkerId這個東西,那麼它到底是干嘛的呢?
看一下微信提供的參數說明,就明白了:
在運行過程中,我們需要驗證基准apk包的tinkerId是否等於補丁包的tinkerId。這個是決定補丁包能運行在哪些基准包上面,一般來說我們可以使用Git版本號、versionName等等。
想一下,在非強制升級的情況下,線上一般分布著各個版本的app。但是。你打patch肯定是對應某個版本,所以你要保證這個patch下發下去只影響對應的版本,不會對其他版本造成影響,所以你需要tinkerId與具體的版本相對應。
ok,下一個TinkerResourceIdTask。
文初提到,打patch的過程實際上要控制已有的資源id不能發生變化,這個task所做的事就是為此。
如果保證已有資源的id保持不變呢?
實際上需要public.xml和ids.xml的參與,即預先在public.xml中的如下定義,在第二次打包之後可保持該資源對應的id值不變。
注:對xml文件的名稱應該沒有強要求。
<public type="id" name="search_button" id="0x7f0c0046" />
很多時候我們在搜索固化資源,一般都能看到通過public.xml去固化資源id,但是這裡有個ids.xml是干嘛的呢?
下面這篇文章有個很好的解釋~
http://blog.csdn.net/sbsujjbcy/article/details/52541803
首先需要生成public.xml,public.xml的生成通過aapt編譯時添加-P參數生成。相關代碼通過gradle插件去hook Task無縫加入該參數,有一點需要注意,通過appt生成的public.xml並不是可以直接用的,該文件中存在id類型的資源,生成patch時應用進去編譯的時候會報resource is not defined,解決方法是將id類型型的資源單獨記錄到ids.xml文件中,相當於一個聲明過程,編譯的時候和public.xml一樣,將ids.xml也參與編譯即可。
ok,知道了public.xml和ids.xml的作用之後,需要再思考一下如何保證id不變?
首先我們在配置old apk的時候,會配置tinkerApplyResourcePath參數,該參數對應一個R.txt,裡面的內容涵蓋了所有old apk中資源對應的int值。
那麼我們可以這麼做,根據這個R.txt,把裡面的數據寫成public.xml不就能保證原本的資源對應的int值不變了麼。
的確是這樣的,不過tinker做了更多,不僅將old apk的中的資源信息寫到public.xml,而且還干涉了新的資源,對新的資源按照資源id的生成規則,也分配的對應的int值,寫到了public.xml,可以說該task包辦了資源id的生成。
好了,由於代碼非常長,我決定在這個地方先用總結性的語言總結下,如果沒有耐心看代碼的可以直接跳過源碼分析階段:
首先將設置的old R.txt讀取到內存中,轉為:
接下來遍歷當前app中的資源,資源分為:
values文件夾下文件
對所有values相關文件夾下的文件已經處理完畢,大致的處理為:遍歷文件中的節點,大致有item,dimen,color,drawable,bool,integer,array,style,declare-styleable,attr,fraction這些節點,將所有的節點按類型分類存儲到rTypeResourceMap(key為資源類型,value為對應類型資源集合Set)中。
其中declare-styleable這個標簽,主要讀取其內部的attr標簽,對attr標簽對應的資源按上述處理。
res下非values文件夾
打開自己的項目有看一眼,除了values相關還有layout,anim,color等文件夾,主要分為兩類:
一類是對 文件 即為資源,例如R.layout.xxx,R.drawable.xxx等;另一類為xml文檔中以@+(去除@+Android:id),其實就是找到我們自定義id節點,然後截取該節點的id值部分作為屬性的名稱(例如:@+id/tv,tv即為屬性的名稱)。
如果和設置的old apk中文件中相同name和type的節點不需要特殊處理,直接復用即可;如果不存在則需要生成新的typeId、resourceId等信息。
會將所有生成的資源都存到rTypeResourceMap中,最後寫文件。
這樣就基本收集到了所有的需要生成資源信息的所有的資源,最後寫到public.xml即可。
總結性的語言難免有一些疏漏,實際以源碼分析為標准。
@TaskAction
def applyResourceId() {
     // 資源mapping文件
    String resourceMappingFile = project.extensions.tinkerPatch.buildConfig.applyResourceMapping

    // resDir /build/intermediates/res/merged/debug
    String idsXml = resDir + "/values/ids.xml";
    String publicXml = resDir + "/values/public.xml";
    FileOperation.deleteFile(idsXml);
    FileOperation.deleteFile(publicXml);

    List<String> resourceDirectoryList = new ArrayList<String>();
    // /build/intermediates/res/merged/debug
    resourceDirectoryList.add(resDir);

    project.logger.error("we build ${project.getName()} apk with apply resource mapping file ${resourceMappingFile}");

    project.extensions.tinkerPatch.buildConfig.usingResourceMapping = true;

    // 收集所有的資源,以type->type,name,id,int/int[]存儲
    Map<RDotTxtEntry.RType, Set<RDotTxtEntry>> rTypeResourceMap = PatchUtil.readRTxt(resourceMappingFile);

    AaptResourceCollector aaptResourceCollector = AaptUtil.collectResource(resourceDirectoryList, rTypeResourceMap);

    PatchUtil.generatePublicResourceXml(aaptResourceCollector, idsXml, publicXml);
    File publicFile = new File(publicXml);
    if (publicFile.exists()) {
        FileOperation.copyFileUsingStream(publicFile, project.file(RESOURCE_PUBLIC_XML));
        project.logger.error("tinker gen resource public.xml in ${RESOURCE_PUBLIC_XML}");
    }
    File idxFile = new File(idsXml);
    if (idxFile.exists()) {
        FileOperation.copyFileUsingStream(idxFile, project.file(RESOURCE_IDX_XML));
        project.logger.error("tinker gen resource idx.xml in ${RESOURCE_IDX_XML}");
    }
}
大體浏覽下代碼,可以看到首先檢測是否設置了resource mapping文件,如果沒有設置會直接跳過。並且最後的產物是public.xml和ids.xml。
因為生成patch時,需要保證兩次打包已經存在的資源的id一致,需要
public.xml和ids.xml的參與。
首先清理已經存在的public.xml和ids.xml,然後通過PatchUtil.readRTxt讀取resourceMappingFile(參數中設置的),該文件記錄的格式如下:
int anim abc_slide_in_bottom 0x7f050006
int id useLogo 0x7f0b0012
int[] styleable AppCompatImageView { 0x01010119, 0x7f010027 }
int styleable AppCompatImageView_android_src 0
int styleable AppCompatImageView_srcCompat 1
大概有兩類,一類是int型各種資源;一類是int[]數組,代表styleable,其後面緊跟著它的item(熟悉自定義View的一定不陌生)。
PatchUtil.readRTxt的代碼就不貼了,簡單描述下:
首先正則按行匹配,每行分為四部分,即idType,rType,name,idValue(四個屬性為RDotTxtEntry的成員變量)。
INT和INT_ARRAY。ANIM, ANIMATOR, ARRAY, ATTR, BOOL, COLOR, DIMEN, DRAWABLE, FRACTION,
ID, INTEGER, INTERPOLATOR, LAYOUT, MENU, MIPMAP, PLURALS, RAW,
STRING, STYLE, STYLEABLE, TRANSITION, XML
http://developer.android.com/reference/android/R.html
name和value就是普通的鍵值對了。
這裡並沒有對styleable做特殊處理。
最後按rType分類,存在一個Map中,即key為rType,value為一個RDotTxtEntry類型的Set集合。
回顧下剩下的代碼:
//...省略前半部分
     AaptResourceCollector aaptResourceCollector = AaptUtil.collectResource(resourceDirectoryList, rTypeResourceMap);
    PatchUtil.generatePublicResourceXml(aaptResourceCollector, idsXml, publicXml);
    File publicFile = new File(publicXml);
    if (publicFile.exists()) {
        FileOperation.copyFileUsingStream(publicFile, project.file(RESOURCE_PUBLIC_XML));
        project.logger.error("tinker gen resource public.xml in ${RESOURCE_PUBLIC_XML}");
    }
    File idxFile = new File(idsXml);
    if (idxFile.exists()) {
        FileOperation.copyFileUsingStream(idxFile, project.file(RESOURCE_IDX_XML));
        project.logger.error("tinker gen resource idx.xml in ${RESOURCE_IDX_XML}");
    }
那麼到了AaptUtil.collectResource方法,傳入了resDir目錄和我們剛才收集了資源信息的Map,返回了一個AaptResourceCollector對象,看名稱是對aapt相關的資源的收集:
看代碼:
public static AaptResourceCollector collectResource(List<String> resourceDirectoryList,
                                                    Map<RType, Set<RDotTxtEntry>> rTypeResourceMap) {
    AaptResourceCollector resourceCollector = new AaptResourceCollector(rTypeResourceMap);
    List<com.tencent.tinker.build.aapt.RDotTxtEntry> references = new ArrayList<com.tencent.tinker.build.aapt.RDotTxtEntry>();
    for (String resourceDirectory : resourceDirectoryList) {
        try {
            collectResources(resourceDirectory, resourceCollector);
        } catch (Exception e) {
            throw new RuntimeException(e);
        }
    }
    for (String resourceDirectory : resourceDirectoryList) {
        try {
            processXmlFilesForIds(resourceDirectory, references, resourceCollector);
        } catch (Exception e) {
            throw new RuntimeException(e);
        }
    }
    return resourceCollector;
}
首先初始化了一個AaptResourceCollector對象,看其構造方法:
public AaptResourceCollector(Map<RType, Set<RDotTxtEntry>> rTypeResourceMap) {
    this();
    if (rTypeResourceMap != null) {
        Iterator<Entry<RType, Set<RDotTxtEntry>>> iterator = rTypeResourceMap.entrySet().iterator();
        while (iterator.hasNext()) {
            Entry<RType, Set<RDotTxtEntry>> entry = iterator.next();
            RType rType = entry.getKey();
            Set<RDotTxtEntry> set = entry.getValue();

            for (RDotTxtEntry rDotTxtEntry : set) {
                originalResourceMap.put(rDotTxtEntry, rDotTxtEntry);

                ResourceIdEnumerator resourceIdEnumerator = null;
                    // ARRAY主要是styleable
                if (!rDotTxtEntry.idType.equals(IdType.INT_ARRAY)) {
                        // 獲得resourceId
                    int resourceId = Integer.decode(rDotTxtEntry.idValue.trim()).intValue();
                    // 獲得typeId
                    int typeId = ((resourceId & 0x00FF0000) / 0x00010000);

                    if (typeId >= currentTypeId) {
                        currentTypeId = typeId + 1;
                    }

                        // type -> id的映射
                    if (this.rTypeEnumeratorMap.containsKey(rType)) {
                        resourceIdEnumerator = this.rTypeEnumeratorMap.get(rType);
                        if (resourceIdEnumerator.currentId < resourceId) {
                            resourceIdEnumerator.currentId = resourceId;
                        }
                    } else {
                        resourceIdEnumerator = new ResourceIdEnumerator();
                        resourceIdEnumerator.currentId = resourceId;
                        this.rTypeEnumeratorMap.put(rType, resourceIdEnumerator);
                    }
                }
            }
        }
    }
}
對rTypeResourceMap根據rType進行遍歷,讀取每個rType對應的Set集合;然後遍歷每個rDotTxtEntry:
結束完成構造方法,執行了
分別讀代碼了:
collectResources
private static void collectResources(String resourceDirectory, AaptResourceCollector resourceCollector) throws Exception {
    File resourceDirectoryFile = new File(resourceDirectory);
    File[] fileArray = resourceDirectoryFile.listFiles();
    if (fileArray != null) {
        for (File file : fileArray) {
            if (file.isDirectory()) {
                String directoryName = file.getName();
                if (directoryName.startsWith("values")) {
                    if (!isAValuesDirectory(directoryName)) {
                        throw new AaptUtilException("'" + directoryName + "' is not a valid values directory.");
                    }
                    processValues(file.getAbsolutePath(), resourceCollector);
                } else {
                    processFileNamesInDirectory(file.getAbsolutePath(), resourceCollector);
                }
            }
        }
    }
}
遍歷我們的resDir中的所有文件夾
processValues處理values相關文件,會遍歷每一個合法的values相關文件夾下的文件,執行processValuesFile(file.getAbsolutePath(), resourceCollector);
public static void processValuesFile(String valuesFullFilename,
                                     AaptResourceCollector resourceCollector) throws Exception {
    Document document = JavaXmlUtil.parse(valuesFullFilename);
    String directoryName = new File(valuesFullFilename).getParentFile().getName();
    Element root = document.getDocumentElement();

    for (Node node = root.getFirstChild(); node != null; node = node.getNextSibling()) {
        if (node.getNodeType() != Node.ELEMENT_NODE) {
            continue;
        }

        String resourceType = node.getNodeName();
        if (resourceType.equals(ITEM_TAG)) {
            resourceType = node.getAttributes().getNamedItem("type").getNodeValue();
            if (resourceType.equals("id")) {
                resourceCollector.addIgnoreId(node.getAttributes().getNamedItem("name").getNodeValue());
            }
        }

        if (IGNORED_TAGS.contains(resourceType)) {
            continue;
        }

        if (!RESOURCE_TYPES.containsKey(resourceType)) {
            throw new AaptUtilException("Invalid resource type '<" + resourceType + ">' in '" + valuesFullFilename + "'.");
        }

        RType rType = RESOURCE_TYPES.get(resourceType);
        String resourceValue = null;
        switch (rType) {
            case STRING:
            case COLOR:
            case DIMEN:
            case DRAWABLE:
            case BOOL:
            case INTEGER:
                resourceValue = node.getTextContent().trim();
                break;
            case ARRAY://has sub item
            case PLURALS://has sub item
            case STYLE://has sub item
            case STYLEABLE://has sub item
                resourceValue = subNodeToString(node);
                break;
            case FRACTION://no sub item
                resourceValue = nodeToString(node, true);
                break;
            case ATTR://no sub item
                resourceValue = nodeToString(node, true);
                break;
        }
        try {
            addToResourceCollector(resourceCollector,
                    new ResourceDirectory(directoryName, valuesFullFilename),
                    node, rType, resourceValue);
        } catch (Exception e) {
            throw new AaptUtilException(e.getMessage() + ",Process file error:" + valuesFullFilename, e);
        }
    }
}
values下相關的文件基本都是xml咯,所以遍歷xml文件,遍歷其內部的節點,(values的xml文件其內部一般為item,dimen,color,drawable,bool,integer,array,style,declare-styleable,attr,fraction等),每種類型的節點對應一個rType,根據不同類型的節點也會去獲取節點的值,確定一個都會執行:
addToResourceCollector(resourceCollector,
    new ResourceDirectory(directoryName, valuesFullFilename),
    node, rType, resourceValue);
注:除此以外,這裡在ignoreIdSet記錄了聲明的id資源,這些id是已經聲明過的,所以最終在編寫ids.xml時,可以過濾掉這些id。
下面繼續看:addToResourceCollector
源碼如下:
private static void addToResourceCollector(AaptResourceCollector resourceCollector,
                                           ResourceDirectory resourceDirectory,
                                           Node node, RType rType, String resourceValue) {
    String resourceName = sanitizeName(rType, resourceCollector, extractNameAttribute(node));

    if (rType.equals(RType.STYLEABLE)) {

        int count = 0;
        for (Node attrNode = node.getFirstChild(); attrNode != null; attrNode = attrNode.getNextSibling()) {
            if (attrNode.getNodeType() != Node.ELEMENT_NODE || !attrNode.getNodeName().equals("attr")) {
                continue;
            }
            String rawAttrName = extractNameAttribute(attrNode);
            String attrName = sanitizeName(rType, resourceCollector, rawAttrName);

            if (!rawAttrName.startsWith("android:")) {
                resourceCollector.addIntResourceIfNotPresent(RType.ATTR, attrName);
            }
        }
    } else {
        resourceCollector.addIntResourceIfNotPresent(rType, resourceName);
    }
}
如果不是styleable的資源,則直接獲取resourceName,然後調用resourceCollector.addIntResourceIfNotPresent(rType, resourceName)。
如果是styleable類型的資源,則會遍歷找到其內部的attr節點,找出非android:開頭的(因為android:開頭的attr的id不需要我們去確定),設置rType為ATTR,value為attr屬性的name,調用addIntResourceIfNotPresent。
public void addIntResourceIfNotPresent(RType rType, String name) { //, ResourceDirectory resourceDirectory) {
    if (!rTypeEnumeratorMap.containsKey(rType)) {
        if (rType.equals(RType.ATTR)) {
            rTypeEnumeratorMap.put(rType, new ResourceIdEnumerator(1));
        } else {
            rTypeEnumeratorMap.put(rType, new ResourceIdEnumerator(currentTypeId++));
        }
    }

    RDotTxtEntry entry = new FakeRDotTxtEntry(IdType.INT, rType, name);
    Set<RDotTxtEntry> resourceSet = null;
    if (this.rTypeResourceMap.containsKey(rType)) {
        resourceSet = this.rTypeResourceMap.get(rType);
    } else {
        resourceSet = new HashSet<RDotTxtEntry>();
        this.rTypeResourceMap.put(rType, resourceSet);
    }
    if (!resourceSet.contains(entry)) {
        String idValue = String.format("0x%08x", rTypeEnumeratorMap.get(rType).next());
        addResource(rType, IdType.INT, name, idValue); //, resourceDirectory);
    }
}
首先構建一個entry,然後判斷當前的rTypeResourceMap中是否存在該資源實體,如果存在,則什麼都不用做。
如果不存在,則需要構建一個entry,那麼主要是id的構建。
關於id的構建:
還記得rTypeEnumeratorMap麼,其內部包含了我們設置的”res mapping”文件,存儲了每一類資源(rType)的資源的最大resourceId值。
那麼首先判斷就是是否已經有這種類型了,如果有的話,獲取出該類型當前最大的resourceId,然後+1,最為傳入資源的resourceId.
如果不存在當前這種類型,那麼如果類型為ATTR則固定type為1;否則的話,新增一個typeId,為當前最大的type+1(currentTypeId中也是記錄了目前最大的type值),有了類型就可以通過ResourceIdEnumerator.next()來獲取id。
經過上述就可以構造出一個idValue了。
最後調用:
addResource(rType, IdType.INT, name, idValue);
查看代碼:
public void addResource(RType rType, IdType idType, String name, String idValue) {
    Set<RDotTxtEntry> resourceSet = null;
    if (this.rTypeResourceMap.containsKey(rType)) {
        resourceSet = this.rTypeResourceMap.get(rType);
    } else {
        resourceSet = new HashSet<RDotTxtEntry>();
        this.rTypeResourceMap.put(rType, resourceSet);
    }
    RDotTxtEntry rDotTxtEntry = new RDotTxtEntry(idType, rType, name, idValue);

    if (!resourceSet.contains(rDotTxtEntry)) {
        if (this.originalResourceMap.containsKey(rDotTxtEntry)) {
            this.rTypeEnumeratorMap.get(rType).previous();
            rDotTxtEntry = this.originalResourceMap.get(rDotTxtEntry);
        }
        resourceSet.add(rDotTxtEntry);
    }

}
大體意思就是如果該資源不存在就添加到rTypeResourceMap。
首先構建出該資源實體,判斷該類型對應的資源集合是否包含該資源實體(這裡contains只比對name和type),如果不包含,判斷是否在originalResourceMap中,如果存在(這裡做了一個previous操作,其實與上面的代碼的next操作對應,主要是針對資源存在我們的res map中這種情況)則取出該資源實體,最終將該資源實體加入到rTypeResourceMap中。
ok,到這裡需要小節一下,我們剛才對所有values相關文件夾下的文件已經處理完畢,大致的處理為:遍歷文件中的節點,大致有item,dimen,color,drawable,bool,integer,array,style,declare-styleable,attr,fraction這些節點,將所有的節點按類型分類存儲到rTypeResourceMap中(如果和設置的”res map”文件中相同name和type的節點不需要特殊處理,直接復用即可;如果不存在則需要生成新的typeId、resourceId等信息)。
其中declare-styleable這個標簽,主要讀取其內部的attr標簽,對attr標簽對應的資源按上述處理。
處理完成values相關文件夾之後,還需要處理一些res下的其他文件,比如layout、layout、anim等文件夾,該類資源也需要在R中生成對應的id值,這類值也需要固化。
processFileNamesInDirectory
public static void processFileNamesInDirectory(String resourceDirectory,
                                               AaptResourceCollector resourceCollector) throws IOException {
    File resourceDirectoryFile = new File(resourceDirectory);
    String directoryName = resourceDirectoryFile.getName();
    int dashIndex = directoryName.indexOf('-');
    if (dashIndex != -1) {
        directoryName = directoryName.substring(0, dashIndex);
    }

    if (!RESOURCE_TYPES.containsKey(directoryName)) {
        throw new AaptUtilException(resourceDirectoryFile.getAbsolutePath() + " is not a valid resource sub-directory.");
    }
    File[] fileArray = resourceDirectoryFile.listFiles();
    if (fileArray != null) {
        for (File file : fileArray) {
            if (file.isHidden()) {
                continue;
            }
            String filename = file.getName();
            int dotIndex = filename.indexOf('.');
            String resourceName = dotIndex != -1 ? filename.substring(0, dotIndex) : filename;

            RType rType = RESOURCE_TYPES.get(directoryName);
            resourceCollector.addIntResourceIfNotPresent(rType, resourceName);

            System.out.println("rType = " + rType + " , resName = " + resourceName);

            ResourceDirectory resourceDirectoryBean = new ResourceDirectory(file.getParentFile().getName(), file.getAbsolutePath());
            resourceCollector.addRTypeResourceName(rType, resourceName, null, resourceDirectoryBean);
        }
    }
}
遍歷res下所有文件夾,根據文件夾名稱確定其對應的資源類型(例如:drawable-xhpi,則認為其內部的文件類型為drawable類型),然後遍歷該文件夾下所有的文件,最終以文件名為資源的name,文件夾確定資源的type,最終調用:
resourceCollector
.addIntResourceIfNotPresent(rType, resourceName);
processXmlFilesForIds
public static void processXmlFilesForIds(String resourceDirectory,
                                         List<RDotTxtEntry> references, AaptResourceCollector resourceCollector) throws Exception {
    List<String> xmlFullFilenameList = FileUtil
            .findMatchFile(resourceDirectory, Constant.Symbol.DOT + Constant.File.XML);
    if (xmlFullFilenameList != null) {
        for (String xmlFullFilename : xmlFullFilenameList) {
            File xmlFile = new File(xmlFullFilename);

            String parentFullFilename = xmlFile.getParent();
            File parentFile = new File(parentFullFilename);
            if (isAValuesDirectory(parentFile.getName()) || parentFile.getName().startsWith("raw")) {
                // Ignore files under values* directories and raw*.
                continue;
            }
            processXmlFile(xmlFullFilename, references, resourceCollector);
        }
    }
}
遍歷除了raw*以及values*相關文件夾下的xml文件,執行processXmlFile。
public static void processXmlFile(String xmlFullFilename, List<RDotTxtEntry> references, AaptResourceCollector resourceCollector)
        throws IOException, XPathExpressionException {
    Document document = JavaXmlUtil.parse(xmlFullFilename);
    NodeList nodesWithIds = (NodeList) ANDROID_ID_DEFINITION.evaluate(document, XPathConstants.NODESET);
    for (int i = 0; i < nodesWithIds.getLength(); i++) {
        String resourceName = nodesWithIds.item(i).getNodeValue();

        if (!resourceName.startsWith(ID_DEFINITION_PREFIX)) {
            throw new AaptUtilException("Invalid definition of a resource: '" + resourceName + "'");
        }

        resourceCollector.addIntResourceIfNotPresent(RType.ID, resourceName.substring(ID_DEFINITION_PREFIX.length()));
    }

    // 省略了無關代碼
}
主要找xml文檔中以@+(去除@+android:id),其實就是找到我們自定義id節點,然後截取該節點的id值部分作為屬性的名稱(例如:@+id/tv,tv即為屬性的名稱),最終調用:
resourceCollector
    .addIntResourceIfNotPresent(RType.ID,
        resourceName.substring(ID_DEFINITION_PREFIX.length()));
上述就完成了所有的資源的收集,那麼剩下的就是寫文件了:
public static void generatePublicResourceXml(AaptResourceCollector aaptResourceCollector,
                                             String outputIdsXmlFullFilename,
                                             String outputPublicXmlFullFilename) {
    if (aaptResourceCollector == null) {
        return;
    }
    FileUtil.createFile(outputIdsXmlFullFilename);
    FileUtil.createFile(outputPublicXmlFullFilename);

    PrintWriter idsWriter = null;
    PrintWriter publicWriter = null;
    try {
        FileUtil.createFile(outputIdsXmlFullFilename);
        FileUtil.createFile(outputPublicXmlFullFilename);
        idsWriter = new PrintWriter(new File(outputIdsXmlFullFilename), "UTF-8");

        publicWriter = new PrintWriter(new File(outputPublicXmlFullFilename), "UTF-8");
        idsWriter.println("<?xml version=\"1.0\" encoding=\"utf-8\"?>");
        publicWriter.println("<?xml version=\"1.0\" encoding=\"utf-8\"?>");
        idsWriter.println("<resources>");
        publicWriter.println("<resources>");
        Map<RType, Set<RDotTxtEntry>> map = aaptResourceCollector.getRTypeResourceMap();
        Iterator<Entry<RType, Set<RDotTxtEntry>>> iterator = map.entrySet().iterator();
        while (iterator.hasNext()) {
            Entry<RType, Set<RDotTxtEntry>> entry = iterator.next();
            RType rType = entry.getKey();
            if (!rType.equals(RType.STYLEABLE)) {
                Set<RDotTxtEntry> set = entry.getValue();
                for (RDotTxtEntry rDotTxtEntry : set) {
                    String rawName = aaptResourceCollector.getRawName(rType, rDotTxtEntry.name);
                    if (StringUtil.isBlank(rawName)) {
                        rawName = rDotTxtEntry.name;
                    }
                    publicWriter.println("<public type=\"" + rType + "\" name=\"" + rawName + "\" id=\"" + rDotTxtEntry.idValue.trim() + "\" />");
                }
                Set<String> ignoreIdSet = aaptResourceCollector.getIgnoreIdSet();
                for (RDotTxtEntry rDotTxtEntry : set) {
                    if (rType.equals(RType.ID) && !ignoreIdSet.contains(rDotTxtEntry.name)) {
                        idsWriter.println("<item type=\"" + rType + "\" name=\"" + rDotTxtEntry.name + "\"/>");
                    }
                }
            }
            idsWriter.flush();
            publicWriter.flush();
        }
        idsWriter.println("</resources>");
        publicWriter.println("</resources>");
    } catch (Exception e) {
        throw new PatchUtilException(e);
    } finally {
        if (idsWriter != null) {
            idsWriter.flush();
            idsWriter.close();
        }
        if (publicWriter != null) {
            publicWriter.flush();
            publicWriter.close();
        }
    }
}
主要就是遍歷rTypeResourceMap,然後每個資源實體對應一條public標簽記錄寫到public.xml中。
此外,如果發現該元素節點的type為Id,並且不在ignoreSet中,會寫到ids.xml這個文件中。(這裡有個ignoreSet,這裡ignoreSet中記錄了values下所有的<item type=id的資源,是直接在項目中已經聲明過的,所以去除)。
還記得文初說:
- 我們在上線app的時候,會做代碼混淆,如果沒有做特殊的設置,每次混淆後的代碼差別應該非常巨大;所以,build過程中理論上需要設置混淆的mapping文件。
- 在接入一些庫的時候,往往還需要配置混淆,比如第三方庫中哪些東西不能被混淆等(當然強制某些類在主dex中,也可能需要配置相對應的混淆規則)。
這個task的作用很明顯了。有時候為了確保一些類在main dex中,簡單的做法也會對其在混淆配置中進行keep(避免由於混淆造成類名更改,而使main dex的keep失效)。
如果開啟了proguard會執行該task。
這個就是主要去設置混淆的mapping文件,和keep一些必要的類了。
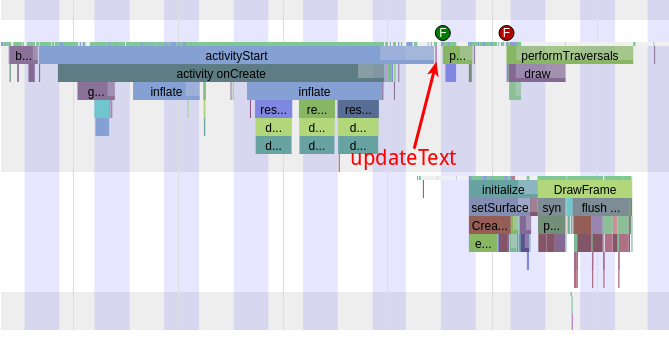
@TaskAction
def updateTinkerProguardConfig() {
    def file = project.file(PROGUARD_CONFIG_PATH)
    project.logger.error("try update tinker proguard file with ${file}")

    // Create the directory if it doesnt exist already
    file.getParentFile().mkdirs()

    // Write our recommended proguard settings to this file
    FileWriter fr = new FileWriter(file.path)

    String applyMappingFile = project.extensions.tinkerPatch.buildConfig.applyMapping

    //write applymapping
    if (shouldApplyMapping && FileOperation.isLegalFile(applyMappingFile)) {
        project.logger.error("try add applymapping ${applyMappingFile} to build the package")
        fr.write("-applymapping " + applyMappingFile)
        fr.write("\n")
    } else {
        project.logger.error("applymapping file ${applyMappingFile} is illegal, just ignore")
    }

    fr.write(PROGUARD_CONFIG_SETTINGS)

    fr.write("#your dex.loader patterns here\n")
    //they will removed when apply
    Iterable<String> loader = project.extensions.tinkerPatch.dex.loader
    for (String pattern : loader) {
        if (pattern.endsWith("*") && !pattern.endsWith("**")) {
            pattern += "*"
        }
        fr.write("-keep class " + pattern)
        fr.write("\n")
    }
    fr.close()
    // Add this proguard settings file to the list
    applicationVariant.getBuildType().buildType.proguardFiles(file)
    def files = applicationVariant.getBuildType().buildType.getProguardFiles()

    project.logger.error("now proguard files is ${files}")
}
讀取我們設置的mappingFile,設置
-applymapping applyMappingFile
然後設置一些默認需要keep的規則:
PROGUARD_CONFIG_SETTINGS =
"-keepattributes *Annotation* \n" +
"-dontwarn com.tencent.tinker.anno.AnnotationProcessor \n" +
"-keep @com.tencent.tinker.anno.DefaultLifeCycle public class *\n" +
"-keep public class * extends android.app.Application {\n" +
"    *;\n" +
"}\n" +
"\n" +
"-keep public class com.tencent.tinker.loader.app.ApplicationLifeCycle {\n" +
"    *;\n" +
"}\n" +
"-keep public class * implements com.tencent.tinker.loader.app.ApplicationLifeCycle {\n" +
"    *;\n" +
"}\n" +
"\n" +
"-keep public class com.tencent.tinker.loader.TinkerLoader {\n" +
"    *;\n" +
"}\n" +
"-keep public class * extends com.tencent.tinker.loader.TinkerLoader {\n" +
"    *;\n" +
"}\n" +
"-keep public class com.tencent.tinker.loader.TinkerTestDexLoad {\n" +
"    *;\n" +
"}\n" +
"\n"
最後是keep住我們的application、com.tencent.tinker.loader.**以及我們設置的相關類。
TinkerManifestTask中:addApplicationToLoaderPattern主要是記錄自己的application類名和tinker相關的一些load class
com.tencent.tinker.loader.*,記錄在project.extensions.tinkerPatch.dex.loader。
對應文初:
當項目比較大的時候,我們可能會遇到方法數超過65535的問題,我們很多時候會通過分包解決,這樣就有主dex和其他dex的概念。集成了tinker之後,在應用的Application啟動時會非常早的就去做tinker的load操作,所以就決定了load相關的類必須在主dex中。
如果multiDexEnabled開啟。
主要是讓相關類必須在main dex。
"-keep public class * implements com.tencent.tinker.loader.app.ApplicationLifeCycle {\n" +
    "    *;\n" +
    "}\n" +
    "\n" +
    "-keep public class * extends com.tencent.tinker.loader.TinkerLoader {\n" +
    "    *;\n" +
    "}\n" +
    "\n" +
    "-keep public class * extends android.app.Application {\n" +
    "    *;\n" +
    "}\n"
Iterable<String> loader = project.extensions.tinkerPatch.dex.loader
    for (String pattern : loader) {
        if (pattern.endsWith("*")) {
            if (!pattern.endsWith("**")) {
                pattern += "*"
            }
        }
        lines.append("-keep class " + pattern + " {\n" +
                "    *;\n" +
                "}\n")
                .append("\n")
    }
相關類都在loader這個集合中,在TinkerManifestTask中設置的。
主要執行Runner.tinkerPatch
protected void tinkerPatch() {
    try {
        //gen patch
        ApkDecoder decoder = new ApkDecoder(config);
        decoder.onAllPatchesStart();
        decoder.patch(config.mOldApkFile, config.mNewApkFile);
        decoder.onAllPatchesEnd();

        //gen meta file and version file
        PatchInfo info = new PatchInfo(config);
        info.gen();

        //build patch
        PatchBuilder builder = new PatchBuilder(config);
        builder.buildPatch();

    } catch (Throwable e) {
        e.printStackTrace();
        goToError();
    }
}
主要分為以下環節:
顧名思義就是兩個apk比較去生成各類patch文件,那麼從一個apk的組成來看,大致可以分為:
看下代碼:
public boolean patch(File oldFile, File newFile) throws Exception {
    //check manifest change first
    manifestDecoder.patch(oldFile, newFile);

    unzipApkFiles(oldFile, newFile);

    Files.walkFileTree(mNewApkDir.toPath(), new ApkFilesVisitor(config, mNewApkDir.toPath(),
            mOldApkDir.toPath(), dexPatchDecoder, soPatchDecoder, resPatchDecoder));

    soPatchDecoder.onAllPatchesEnd();
    dexPatchDecoder.onAllPatchesEnd();
    manifestDecoder.onAllPatchesEnd();
    resPatchDecoder.onAllPatchesEnd();

    //clean resources
    dexPatchDecoder.clean();
    soPatchDecoder.clean();
    resPatchDecoder.clean();
    return true;
}
代碼內部包含四個Decoder:
剛才提到需要對dex、so、res文件做diff,但是為啥會有個manifestDecoder。目前tinker並不支持四大組件,也就是說manifest文件中是不允許出現新增組件的。
所以,manifestDecoder的作用實際上是用於檢查的:
代碼就不貼了非常好理解,關於manifest的解析是基於該庫封裝的:
https://github.com/clearthesky/apk-parser
然後就是解壓兩個apk文件了,old apk(我們設置的),old apk 生成的。
解壓的目錄為:
解壓完成後,就是單個文件對比了:
對比的思路是,以newApk解壓目錄下所有的文件為基准,去oldApk中找同名的文件,那麼會有以下幾個情況:
有了大致的了解後,可以看代碼:
Files.walkFileTree(
    mNewApkDir.toPath(),
    new ApkFilesVisitor(
        config,
        mNewApkDir.toPath(),
        mOldApkDir.toPath(),
        dexPatchDecoder,
        soPatchDecoder,
        resPatchDecoder));
Files.walkFileTree會以mNewApkDir.toPath()為基准,遍歷其內部所有的文件,ApkFilesVisitor中可以對每個遍歷的文件進行操作。
重點看ApkFilesVisitor是如何操作每個文件的:
@Override
public FileVisitResult visitFile(Path file, BasicFileAttributes attrs) throws IOException {

    Path relativePath = newApkPath.relativize(file);
    // 在oldApkDir中找到該文件
    Path oldPath = oldApkPath.resolve(relativePath);

    File oldFile = null;
    //is a new file?!
    if (oldPath.toFile().exists()) {
        oldFile = oldPath.toFile();
    }

    String patternKey = relativePath.toString().replace("\\", "/");

    if (Utils.checkFileInPattern(config.mDexFilePattern, patternKey)) {
        dexDecoder.patch(oldFile, file.toFile());
    }
    if (Utils.checkFileInPattern(config.mSoFilePattern, patternKey)) {
        soDecoder.patch(oldFile, file.toFile());
    }
    if (Utils.checkFileInPattern(config.mResFilePattern, patternKey)) {
         resDecoder.patch(oldFile, file.toFile());
    }
    return FileVisitResult.CONTINUE;
}
首先去除newApkDir中的一個文件,在oldApkDir中尋找同名的apk;然後根據名稱判斷該文件屬於:
各種文件的規則是可配置的。
public boolean patch(final File oldFile, final File newFile)  {
    final String dexName = getRelativeDexName(oldFile, newFile);

    // 檢查loader class,省略了拋異常的一些代碼
    excludedClassModifiedChecker.checkIfExcludedClassWasModifiedInNewDex(oldFile, newFile);

    File dexDiffOut = getOutputPath(newFile).toFile();

    final String newMd5 = getRawOrWrappedDexMD5(newFile);

    //new add file
    if (oldFile == null || !oldFile.exists() || oldFile.length() == 0) {
        hasDexChanged = true;
        copyNewDexAndLogToDexMeta(newFile, newMd5, dexDiffOut);
        return true;
    }

    final String oldMd5 = getRawOrWrappedDexMD5(oldFile);

    if ((oldMd5 != null && !oldMd5.equals(newMd5)) || (oldMd5 == null && newMd5 != null)) {
        hasDexChanged = true;
        if (oldMd5 != null) {
            collectAddedOrDeletedClasses(oldFile, newFile);
        }
    }

    RelatedInfo relatedInfo = new RelatedInfo();
    relatedInfo.oldMd5 = oldMd5;
    relatedInfo.newMd5 = newMd5;

    // collect current old dex file and corresponding new dex file for further processing.
    oldAndNewDexFilePairList.add(new AbstractMap.SimpleEntry<>(oldFile, newFile));

    dexNameToRelatedInfoMap.put(dexName, relatedInfo);

    return true;
}
首先執行:
checkIfExcludedClassWasModifiedInNewDex(oldFile, newFile);
該方法主要用處是檢查 tinker loader相關classes**必須存在primary dex中**,且不允許新增、修改和刪除。
所有首先將兩個dex讀取到內存中,按照config.mDexLoaderPattern進行過濾,找出deletedClassInfos、addedClassInfos、changedClassInfosMap,必須保證deletedClassInfos.isEmpty() && addedClassInfos.isEmpty() && changedClassInfosMap.isEmpty()即不允許新增、刪除、修改loader 相關類。
繼續,拿到輸出目錄:
build/intermediates/outputs/tinker_result/
然後如果oldFile不存在,則newFile認為是新增文件,直接copy到輸出目錄,並記錄log
copyNewDexAndLogToDexMeta(newFile, newMd5, dexDiffOut);
如果存在,則計算兩個文件的md5,如果md5不同,則認為dexChanged(hasDexChanged = true),執行:
collectAddedOrDeletedClasses(oldFile, newFile);
該方法收集了addClasses和deleteClasses的相關信息,記錄在:
後續會使用這兩個數據結構,mark一下。
繼續往下走,初始化了一個relatedInfo記錄了兩個文件的md5,以及在oldAndNewDexFilePairList中記錄了兩個dex file,在dexNameToRelatedInfoMap中記錄了dexName和relatedInfo的映射。
後續會使用該變量,mark一下。
到此,dexDecoder的patch方法就結束了,僅將新增的文件copy到了目標目錄。
那麼發生改變的文件,理論上應該要做md5看來在後面才會執行。
如果文件是so文件,則會走soDecoder.patch。
soDecoder實際上是BsDiffDecoder
@Override
public boolean patch(File oldFile, File newFile)  {
    //new add file
    String newMd5 = MD5.getMD5(newFile);
    File bsDiffFile = getOutputPath(newFile).toFile();

    if (oldFile == null || !oldFile.exists()) {
        FileOperation.copyFileUsingStream(newFile, bsDiffFile);
        writeLogFiles(newFile, null, null, newMd5);
        return true;
    }

    //new add file
    String oldMd5 = MD5.getMD5(oldFile);

    if (oldMd5.equals(newMd5)) {
        return false;
    }

    if (!bsDiffFile.getParentFile().exists()) {
        bsDiffFile.getParentFile().mkdirs();
    }
    BSDiff.bsdiff(oldFile, newFile, bsDiffFile);

    //超過80%,返回false
    if (Utils.checkBsDiffFileSize(bsDiffFile, newFile)) {
        writeLogFiles(newFile, oldFile, bsDiffFile, newMd5);
    } else {
        FileOperation.copyFileUsingStream(newFile, bsDiffFile);
        writeLogFiles(newFile, null, null, newMd5);
    }
    return true;
}
如果oldFile不存在,則認為newFile為新增文件,直接copy到目標文件(連著so相關目錄)。
若oldFile存在,則比對二者md5,如果md5不一致,則直接進行bsdiff算法,直接在目標位置寫入bsdiff產生的bsDiffFile。
本來到此應該已經結束了,但是接下來做了一件挺有意思的事:
繼續判斷了生成的patch文件是否已經超過newFile的80%,如果超過80%,則直接copy newFile到目標目錄,直接覆蓋了剛生成的patch文件。
那麼soPatch整個過程:
如果newFile是res 資源,則會走resDecoder
@Override
public boolean patch(File oldFile, File newFile) throws IOException, TinkerPatchException {
    String name = getRelativePathStringToNewFile(newFile);

    File outputFile = getOutputPath(newFile).toFile();

    if (oldFile == null || !oldFile.exists()) {
        FileOperation.copyFileUsingStream(newFile, outputFile);
        addedSet.add(name);
        writeResLog(newFile, oldFile, TypedValue.ADD);
        return true;
    }

    //new add file
    String newMd5 = MD5.getMD5(newFile);
    String oldMd5 = MD5.getMD5(oldFile);

    //oldFile or newFile may be 0b length
    if (oldMd5 != null && oldMd5.equals(newMd5)) {
        return false;
    }
    if (Utils.checkFileInPattern(config.mResIgnoreChangePattern, name)) {
        Logger.d("found modify resource: " + name + ", but it match ignore change pattern, just ignore!");
        return false;
    }
    if (name.equals(TypedValue.RES_MANIFEST)) {
        Logger.d("found modify resource: " + name + ", but it is AndroidManifest.xml, just ignore!");
        return false;
    }
    if (name.equals(TypedValue.RES_ARSC)) {
        if (AndroidParser.resourceTableLogicalChange(config)) {
            Logger.d("found modify resource: " + name + ", but it is logically the same as original new resources.arsc, just ignore!");
            return false;
        }
    }
    dealWithModeFile(name, newMd5, oldFile, newFile, outputFile);
    return true;
}
如果oldFile不存在,則認為新增文件,直接copy且加入到addedSet集合,並記錄log
如果存在,且md5不同調研dealWithModeFile(設置的sIgnoreChangePattern、MANIFEST和邏輯上相同的ARSC不做處理)。
private boolean dealWithModeFile(String name, String newMd5, File oldFile, File newFile, File outputFile) {
    if (checkLargeModFile(newFile)) {
        if (!outputFile.getParentFile().exists()) {
            outputFile.getParentFile().mkdirs();
        }
        BSDiff.bsdiff(oldFile, newFile, outputFile);
        //未超過80%返回true
        if (Utils.checkBsDiffFileSize(outputFile, newFile)) {
            LargeModeInfo largeModeInfo = new LargeModeInfo();
            largeModeInfo.path = newFile;
            largeModeInfo.crc = FileOperation.getFileCrc32(newFile);
            largeModeInfo.md5 = newMd5;
            largeModifiedSet.add(name);
            largeModifiedMap.put(name, largeModeInfo);
            writeResLog(newFile, oldFile, TypedValue.LARGE_MOD);
            return true;
        }
    }
    modifiedSet.add(name);
    FileOperation.copyFileUsingStream(newFile, outputFile);
    writeResLog(newFile, oldFile, TypedValue.MOD);
    return false;
}
這裡,首先check了largeFile,即改變的文件是否大於100K(該值可以配置)。
如果非大文件,則直接copy至目標文件,且記錄到modifiedSet,並記錄了log。
如果是大文件,則直接bsdiff,生成patch File;接下來也檢查了一下patch file是否超過newFile的80%,如果超過,則直接copy newFile覆蓋剛生成的patch File;
總體和so patch基本一致。
到這裡,除了dex patch中對改變的dex文件沒有做處理以外,so 和 res都做了。
接下來執行了:
public boolean patch(File oldFile, File newFile) throws Exception {
    //...

    soPatchDecoder.onAllPatchesEnd();
    dexPatchDecoder.onAllPatchesEnd();
    manifestDecoder.onAllPatchesEnd();
    resPatchDecoder.onAllPatchesEnd();

    //clean resources
    dexPatchDecoder.clean();
    soPatchDecoder.clean();
    resPatchDecoder.clean();
    return true;
}
其中dexPatchDecoder和resPatchDecoder有後續實現。
# DexDiffDecoder
@Override
public void onAllPatchesEnd() throws Exception {
    if (!hasDexChanged) {
        Logger.d("No dexes were changed, nothing needs to be done next.");
        return;
    }

    generatePatchInfoFile();

    addTestDex();
}
如果dex文件沒有改變,直接返回。
private void generatePatchInfoFile() throws IOException {
    generatePatchedDexInfoFile();

    logDexesToDexMeta();

    checkCrossDexMovingClasses();
}
主要看generatePatchedDexInfoFile
private void generatePatchedDexInfoFile() {
    // Generate dex diff out and full patched dex if a pair of dex is different.
    for (AbstractMap.SimpleEntry<File, File> oldAndNewDexFilePair : oldAndNewDexFilePairList) {
        File oldFile = oldAndNewDexFilePair.getKey();
        File newFile = oldAndNewDexFilePair.getValue();
        final String dexName = getRelativeDexName(oldFile, newFile);
        RelatedInfo relatedInfo = dexNameToRelatedInfoMap.get(dexName);
        if (!relatedInfo.oldMd5.equals(relatedInfo.newMd5)) {
            diffDexPairAndFillRelatedInfo(oldFile, newFile, relatedInfo);
        } else {
            // In this case newDexFile is the same as oldDexFile, but we still
            // need to treat it as patched dex file so that the SmallPatchGenerator
            // can analyze which class of this dex should be kept in small patch.
            relatedInfo.newOrFullPatchedFile = newFile;
            relatedInfo.newOrFullPatchedMd5 = relatedInfo.newMd5;
        }
    }
}
oldAndNewDexFilePairList中記錄了兩個dex文件,然後根據dex file獲取到dexName,再由dexNameToRelatedInfoMap根據name獲得到RelatedInfo。
RelatedInfo中包含了兩個dex file的md5,如果不同,則執行diffDexPairAndFillRelatedInfo。
private void diffDexPairAndFillRelatedInfo(File oldDexFile,
                        File newDexFile, RelatedInfo relatedInfo) {
    //outputs/tempPatchedDexes
    File tempFullPatchDexPath = new File(config.mOutFolder
                + File.separator + TypedValue.DEX_TEMP_PATCH_DIR);
    final String dexName = getRelativeDexName(oldDexFile, newDexFile);

    File dexDiffOut = getOutputPath(newDexFile).toFile();
    ensureDirectoryExist(dexDiffOut.getParentFile());

    // dex diff , 去除loader classes
    DexPatchGenerator dexPatchGen = new DexPatchGenerator(oldDexFile, newDexFile);
    dexPatchGen.setAdditionalRemovingClassPatterns(config.mDexLoaderPattern);

    dexPatchGen.executeAndSaveTo(dexDiffOut);

    relatedInfo.dexDiffFile = dexDiffOut;
    relatedInfo.dexDiffMd5 = MD5.getMD5(dexDiffOut);

    File tempFullPatchedDexFile = new File(tempFullPatchDexPath, dexName);

    try {
        new DexPatchApplier(oldDexFile, dexDiffOut).executeAndSaveTo(tempFullPatchedDexFile);

        Logger.d(
                String.format("Verifying if patched new dex is logically the same as original new dex: %s ...", getRelativeStringBy(newDexFile, config.mTempUnzipNewDir))
        );

        Dex origNewDex = new Dex(newDexFile);
        Dex patchedNewDex = new Dex(tempFullPatchedDexFile);
        checkDexChange(origNewDex, patchedNewDex);

        relatedInfo.newOrFullPatchedFile = tempFullPatchedDexFile;
        relatedInfo.newOrFullPatchedMd5 = MD5.getMD5(tempFullPatchedDexFile);
    } catch (Exception e) {
        e.printStackTrace();
        throw new TinkerPatchException(
                "Failed to generate temporary patched dex, which makes MD5 generating procedure of new dex failed, either.", e
        );
    }

    if (!tempFullPatchedDexFile.exists()) {
        throw new TinkerPatchException("can not find the temporary full patched dex file:" + tempFullPatchedDexFile.getAbsolutePath());
    }
    Logger.d("\nGen %s for dalvik full dex file:%s, size:%d, md5:%s", dexName, tempFullPatchedDexFile.getAbsolutePath(), tempFullPatchedDexFile.length(), relatedInfo.newOrFullPatchedMd5);
}
開始針對兩個dex文件做dex diff,最終將生成的patch 文件放置在目標文件夾中。
接下來,生成一個臨時文件夾,通過DexPatchApplier針對生成的patch文件和old dex file,直接做了合並操作,相當於在本地模擬執行了在客戶端上的patch操作。
然後再對新合並生成的patchedNewDex與之前的origNewDex,進行了checkDexChange,即這兩者類級別對比,應該所有的類都相同。
最後在dexDecoder的onAllPatchesEnd中還執行了一個addTestDex
private void addTestDex() throws IOException {
    //write test dex
    String dexMode = "jar";
    if (config.mDexRaw) {
        dexMode = "raw";
    }

    final InputStream is = DexDiffDecoder.class.getResourceAsStream("/" + TEST_DEX_NAME);
    String md5 = MD5.getMD5(is, 1024);
    is.close();

    String meta = TEST_DEX_NAME + "," + "" + "," + md5 + "," + md5 + "," + 0 + "," + 0 + "," + dexMode;

    File dest = new File(config.mTempResultDir + "/" + TEST_DEX_NAME);
    FileOperation.copyResourceUsingStream(TEST_DEX_NAME, dest);
    Logger.d("\nAdd test install result dex: %s, size:%d", dest.getAbsolutePath(), dest.length());
    Logger.d("DexDecoder:write test dex meta file data: %s", meta);

    metaWriter.writeLineToInfoFile(meta);
}
copy了一個test.dex文件至目標文件夾,該文件存儲在tinker-patch-lib的resources文件夾下,主要用於在app上進行測試。
完成了所有的diff工作後,後面就是生成patch文件了。
//build patch
PatchBuilder builder = new PatchBuilder(config);
builder.buildPatch();
詳細代碼:
public PatchBuilder(Configuration config) {
    this.config = config;
    this.unSignedApk = new File(config.mOutFolder, PATCH_NAME + "_unsigned.apk");
    this.signedApk = new File(config.mOutFolder, PATCH_NAME + "_signed.apk");
    this.signedWith7ZipApk = new File(config.mOutFolder, PATCH_NAME + "_signed_7zip.apk");
    this.sevenZipOutPutDir = new File(config.mOutFolder, TypedValue.OUT_7ZIP_FILE_PATH);
}

public void buildPatch() throws Exception {
    final File resultDir = config.mTempResultDir;
    //no file change
    if (resultDir.listFiles().length == 0) {
        return;
    }
generateUnsignedApk(unSignedApk);
    signApk(unSignedApk, signedApk);

    use7zApk(signedApk, signedWith7ZipApk, sevenZipOutPutDir);

    if (!signedApk.exists()) {
        Logger.e("Result: final unsigned patch result: %s, size=%d", unSignedApk.getAbsolutePath(), unSignedApk.length());
    } else {
        long length = signedApk.length();
        Logger.e("Result: final signed patch result: %s, size=%d", signedApk.getAbsolutePath(), length);
        if (signedWith7ZipApk.exists()) {
            long length7zip = signedWith7ZipApk.length();
            Logger.e("Result: final signed with 7zip patch result: %s, size=%d", signedWith7ZipApk.getAbsolutePath(), length7zip);
            if (length7zip > length) {
                Logger.e("Warning: %s is bigger than %s %d byte, you should choose %s at these time!",
                    signedWith7ZipApk.getName(),
                    signedApk.getName(),
                    (length7zip - length),
                    signedApk.getName());
            }
        }
    }

}
主要會生成3個文件:unSignedApk,signedApk以及signedWith7ZipApk。
unSignedApk只要將tinker_result中的文件壓縮到一個壓縮包即可。
signedApk將unSignedApk使用jarsigner進行簽名。
signedWith7ZipApk主要是對signedApk進行解壓再做sevenZip壓縮。
好了,到此茫茫長的文章就結束啦~~~
受限於本人知識,文中難免出現錯誤,可以直接留言指出。
一直關注tinker的更新,也在項目中對tinker進行了使用與定制,tinker中包含了大量的可學習的知識,項目本身在也具有非常強的價值。
對於tinker的“技術的初心與堅持”一文感觸頗深,希望tinker越來越好~
可以閱讀以下文章,繼續了解tinker~~
 22 個 Android Studio 優秀插件匯總
第一部分 插件的介紹 Google 在2013年5月的I/O開發者大會推出了基於IntelliJ IDEA java ide上的Android Studio。An
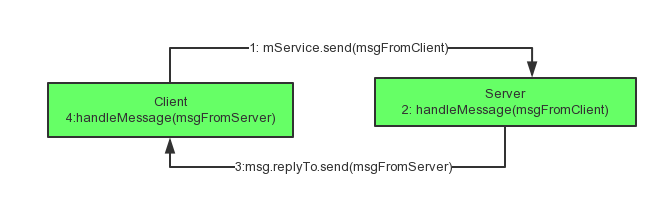 Android Messenger完全解析 實現進程間通信
一、概述 說到Android進程間通信,大家肯定能想到的是編寫aidl文件,然後通過aapt生成的類方便的完成服務端,以及客戶端代碼的編寫。如果你對這個過程不熟悉
 利用Fiddler對Android HTTPs請求進行監測
Web開發中Chrome、IE、firefox等浏覽器都自帶提供了插件幫助開發者跟蹤http數據,在手機客戶端怎麼實現http數據抓包 呢?Fiddler可以實現
 Android開發中巧用Activity和Fragment
1.Activity的生命周期 1)多個Activity組成Activity棧,當前活動位於棧頂。我們先來看看各種Activity基類的類圖: 當Activit