編輯:Android資訊
在上一篇文章中,我們介紹了Android 熱修復 Tinker接入及源碼淺析,裡面包含了熱修的一些背景知識,從tinker對dex文件的處理來看,源碼大體上可以分為3部分閱讀:
tinker有個非常大的亮點就是自研發了一套dex diff、patch相關算法。本篇文章主要目的就是分析該算法。當然值得注意的是,分析的前提就是需要對dex文件的格式要有一定的認識,否則的話可能會一臉懵逼態。
所以,本文會先對dex文件格式做一個簡單的分析,也會做一些簡單的實驗,最後進入到dex diff,patch算法部分。
首先簡單了解下Dex文件,大家在反編譯的時候,都清楚apk中會包含一個或者多個*.dex文件,該文件中存儲了我們編寫的代碼,一般情況下我們還會通過工具轉化為jar,然後通過一些工具反編譯查看。
jar文件大家應該都清楚,類似於class文件的壓縮包,一般情況下,我們直接解壓就可以看到一個個class文件。而dex文件我們無法通過解壓獲取內部的一個個class文件,說明dex文件擁有自己特定的格式:
dex對Java類文件重新排列,將所有JAVA類文件中的常量池分解,消除其中的冗余信息,重新組合形成一個常量池,所有的類文件共享同一個常量池,使得相同的字符串、常量在DEX文件中只出現一次,從而減小了文件的體積。引自:http://blog.csdn.net/jason0539/article/details/50440669
接下來我們看看dex文件的內部結構到底是什麼樣子。
分析一個文件的組成,最好自己編寫一個最簡單的dex文件來分析。
首先我們編寫一個類Hello.java:
public class Hello{
    public static void main(String[] args){
        System.out.println("hello dex!");
    }
}
然後進行編譯:
javac -source 1.7 -target 1.7 Hello.java
最後通過dx工作將其轉化為dex文件:
dx --dex --output=Hello.dex Hello.class
dx路徑在
Android-sdk/build-tools/版本號/dx下,如果無法識別dx命令,記得將該路徑放到path下,或者使用絕對路徑。
這樣我們就得到了一個非常簡單的dex文件。
首先展示一張dex文件的大致的內部結構圖:
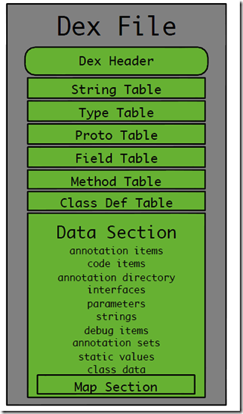
該圖來自dodola的tinker文章->AloneMonkey 的博客
當然,單純從一張圖來說明肯定是遠遠不夠的,因為我們後續要研究diff,patch算法,理論上我們應該要知道更多的細節,甚至要細致到:一個dex文件的每個字節表示的是什麼內容。
對於一個類似於二進制的文件,最好的辦法肯定不是靠記憶,好在有這麼一個軟件可以幫助我們的分析:
下載完成安裝後,打開我們的dex文件,會引導你安裝dex文件的解析模板。
最終打開效果圖如下:
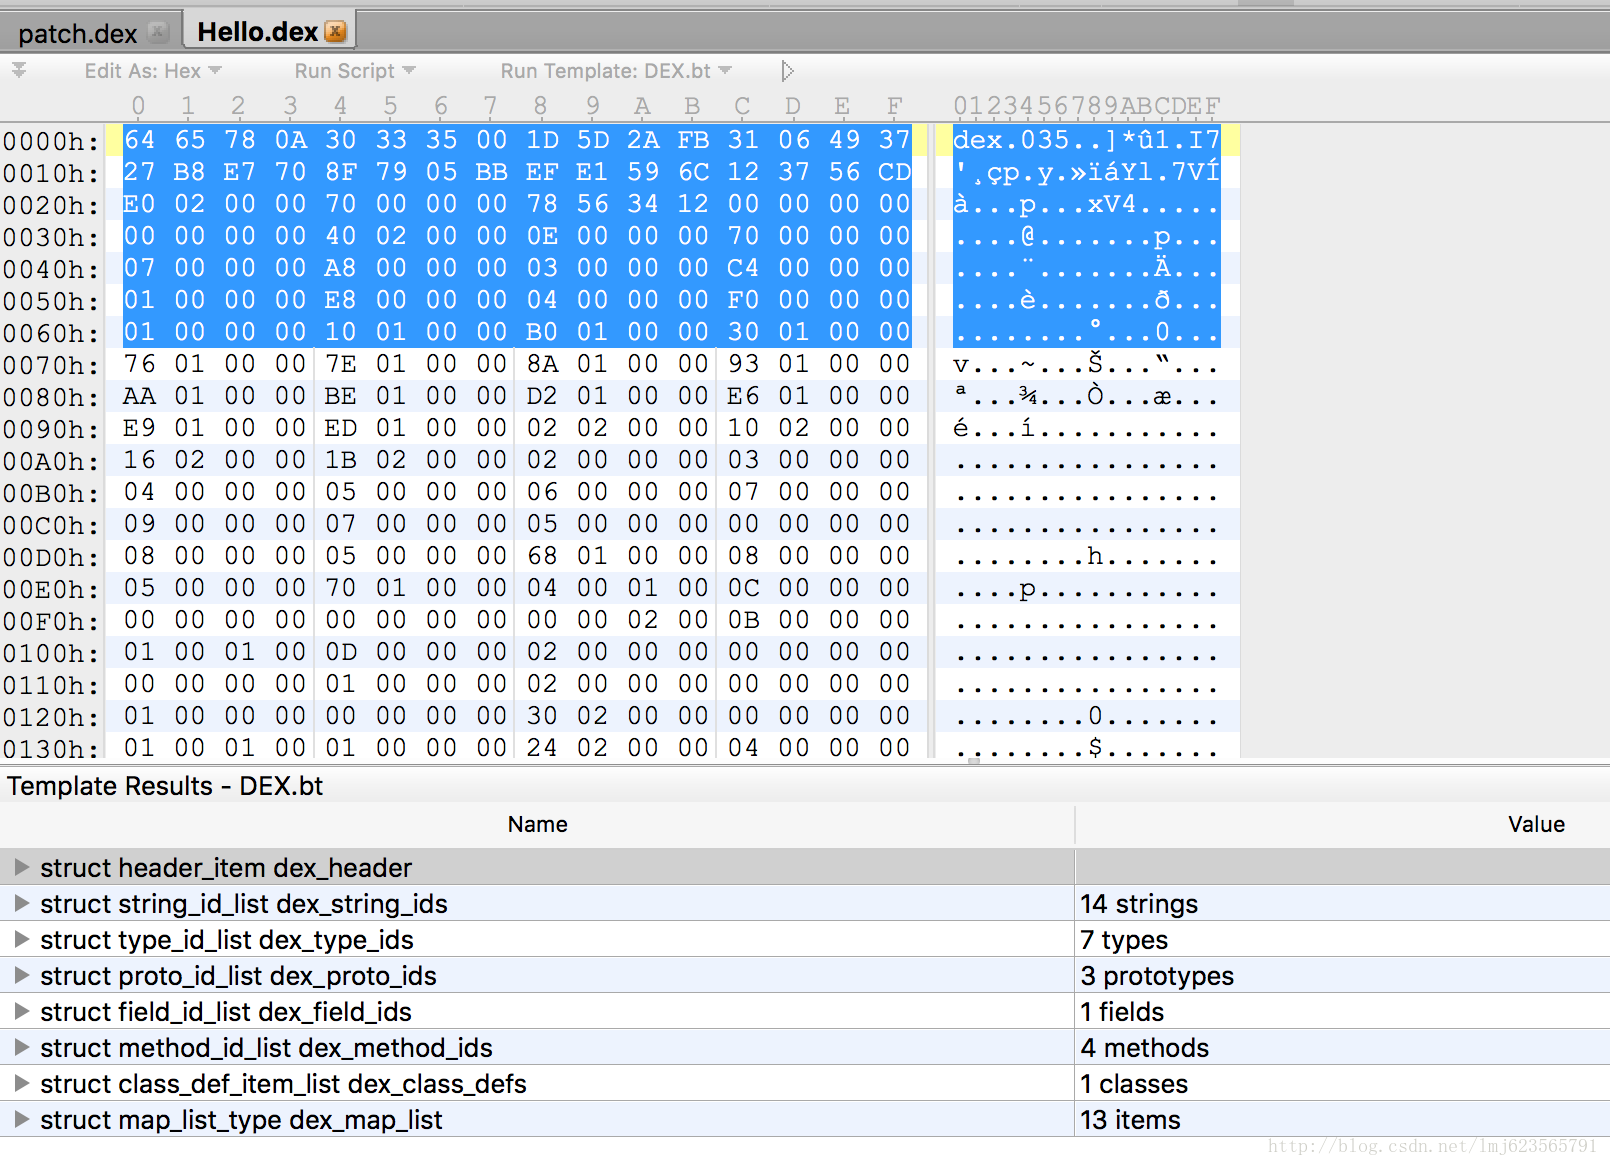
上面部分代表了dex文件的內容(16進制的方式展示),下面部分展示了dex文件的各個區域,你可以通過點擊下面部分,來查看其對應的內容區域以及內容。
當然這裡也非常建議,閱讀一些專門的文章來加深對dex文件的理解:
本文也僅會對dex文件做簡單的格式分析。
dex_header首先我們隊dex_header做一個大致的分析,header中包含如下字段:
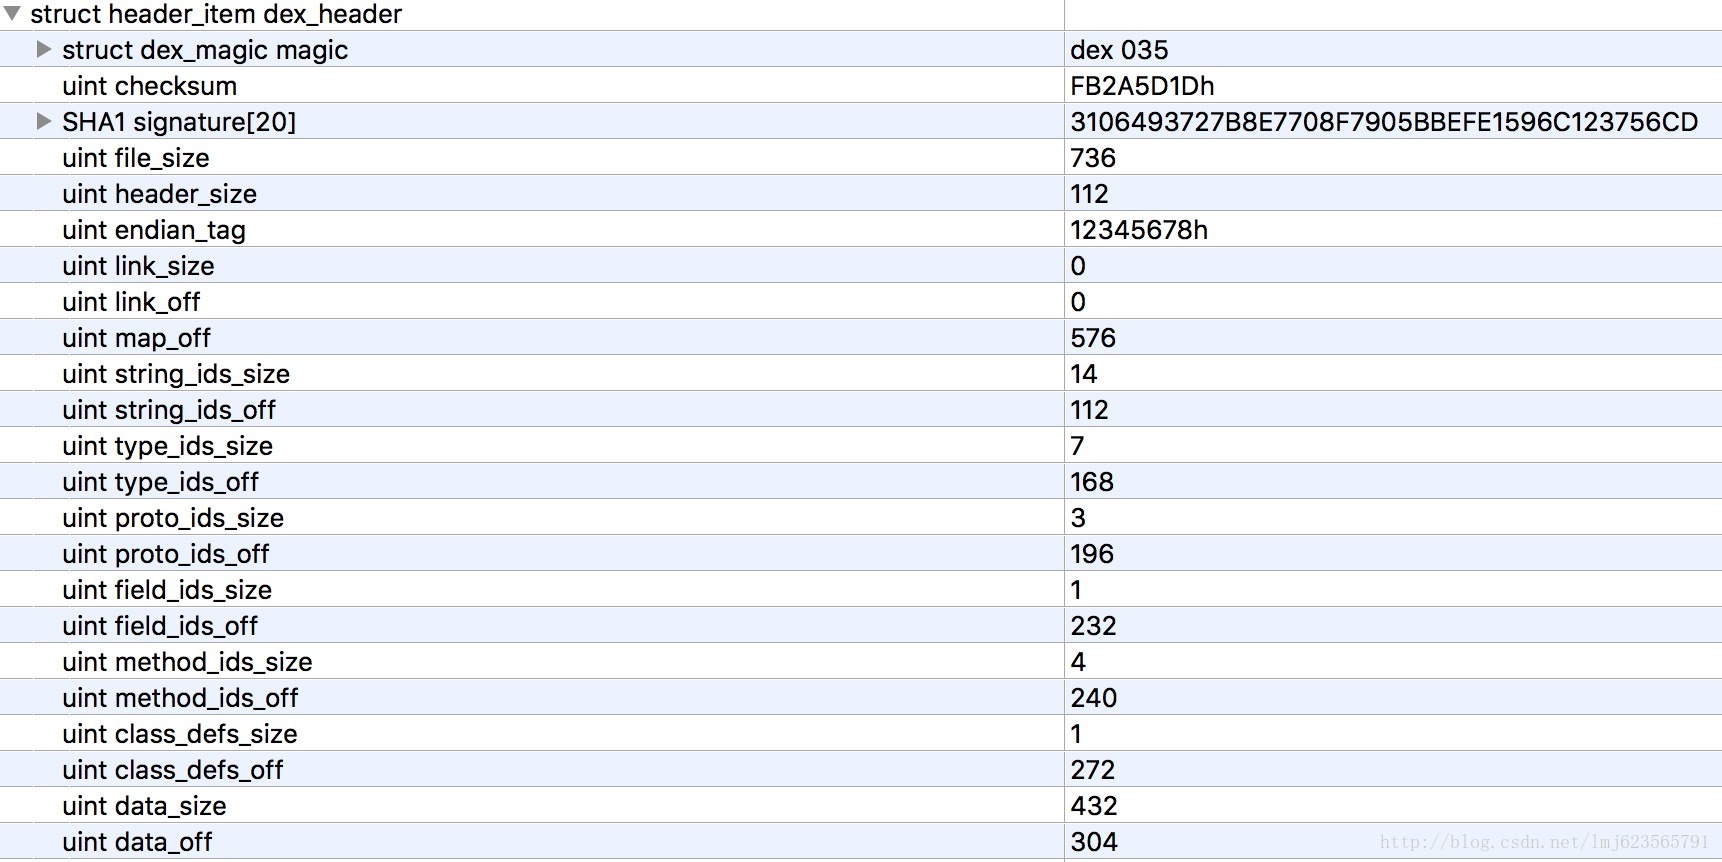
首先我們猜測下header的作用,可以看到起包含了一些校驗相關的字段,和整個dex文件大致區塊的分布(off都為偏移量)。
這樣的好處就是,當虛擬機讀取dex文件時,只需要讀取出header部分,就可以知道dex文件的大致區塊分布了;並且可以檢驗出該文件格式是否正確、文件是否被篡改等。
剩下的幾乎都是成對出現的size和off,大多代表各區塊的包含的特定數據結構的數量和偏移量。例如:string_ids_off為112,指的是偏移量112開始為string_ids區域;string_ids_size為14,代表string_id_item的數量為14個。剩下的都類似就不介紹了。
結合010Editor可以看到各個區域包含的數據結構,以及對應的值,慢慢看就好了。
dex_map_list除了header還有個比較重要的部分是dex_map_list,首先看個圖:
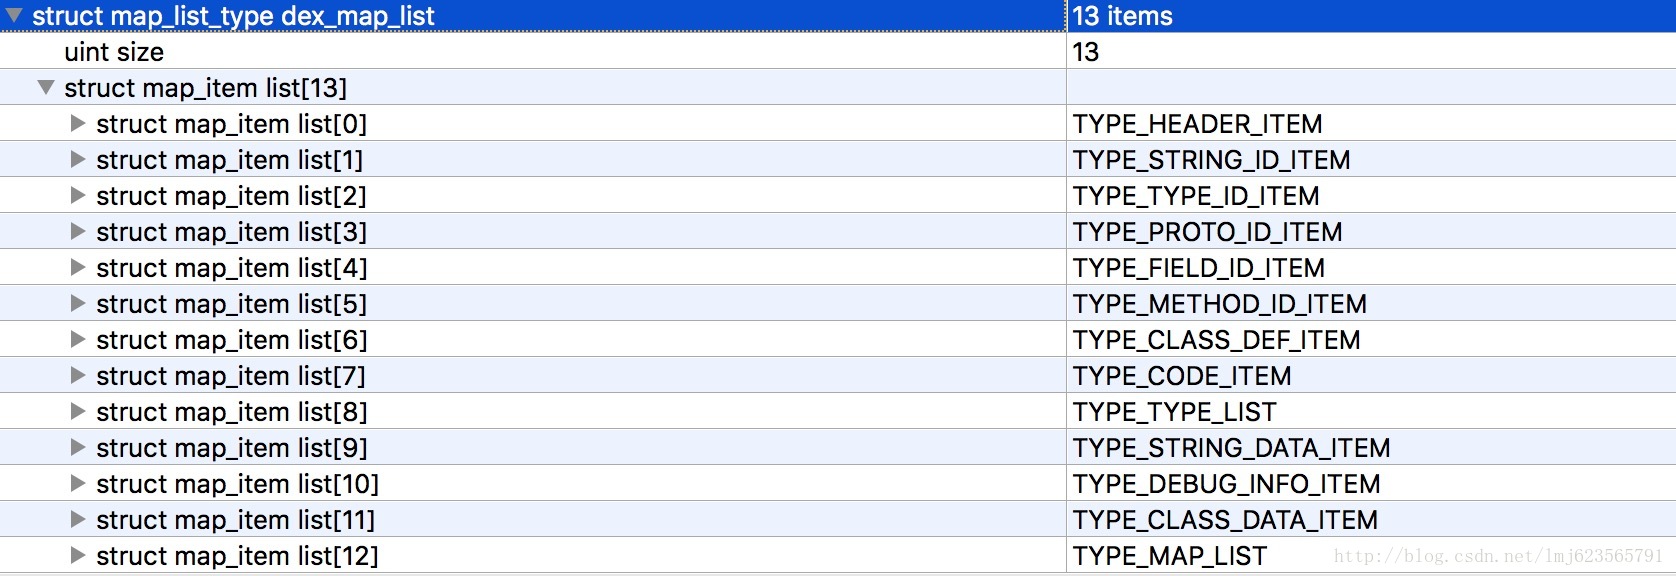
首先是map_item_list數量,接下來是每個map_item_list的描述。
map_item_list有什麼用呢?

可以看到每個map_list_item包含一個枚舉類型,一個2字節暫未使用的成員、一個size表明當前類型的個數,offset表明當前類型偏移量。
拿本例來說:
TYPE_HEADER_ITEM類型,包含1個header(size=1),且偏移量為0。TYPE_STRING_ID_ITEM,包含14個string_id_item(size=14),且偏移量為112(如果有印象,header的長度為112,緊跟著header)。剩下的依次類推~~
這樣的話,可以看出通過map_list,可以將一個完整的dex文件劃分成固定的區域(本例為13),且知道每個區域的開始,以及該區域對應的數據格式的個數。
通過map_list找到各個區域的開始,每個區域都會對應特定的數據結構,通過010 Editor看就好了。
現在我們了解了dex的基本格式,接下來我們考慮下如何做dex diff 和 patch。
先要考慮的是我們有什麼:
我們想要生成一個patch文件,該文件和old dex 通過patch算法還能生成new dex。
根據上文的分析,我們知道dex文件大致有3個部分(這裡3個部分主要用於分析,勿較真):
header實際上是可以根據後面的數據確定其內容的,並且是定長112的;各個區域後面說;map list實際上可以做到定位到各個區域開始位置;
我們最終patch + old dex -> new dex;針對上述的3個部分,
那麼我們看看針對一個區域的diff,假設有個string區域,主要用於存儲字符串:
old dex該區域的字符串有: Hello、World、zhy
new dex該區域的字符串有: Android、World、zhy
可以看出,針對該區域,我們刪除了Hello,增加了Android。
那麼patch中針對該區域可以如下記錄:
“del Hello , add Android”(實際情況需要轉化為二進制)。
想想應用中可以直接讀取出old dex,即知道:
那麼,可以非常容易的計算出new dex中包含:
Android、World、zhy。
這樣我們就完成了一個區域大致的diff和patch算法,其他各個區域的diff和patch和上述類似。
這樣來看,是不是覺得這個diff和patch算法也沒有那麼的復雜,實際上tinker的做法與上述類似,實際情況可能要比上述描述要復雜一些,但是大體上是差不多的。
有了一個大致的算法概念之後,我們就可以去看源碼了。
tinker的地址:https://github.com/Tencent/tinker
這裡看代碼實際上也是有技巧的,tinker的代碼實際上蠻多的,往往你可以會陷在一堆的代碼中。我們可以這麼考慮,比如diff算法,輸入參數為old dex 、new dex,輸出為patch file。
那麼肯定存在某個類,或者某個方法接受和輸出上述參數。實際上該類為DexPatchGenerator:
diff的API使用代碼為:
@Test
public void testDiff() throws IOException {
    File oldFile = new File("Hello.dex");
    File newFile = new File("Hello-World.dex");

    File patchFile = new File("patch.dex");
    DexPatchGenerator dexPatchGenerator
            = new DexPatchGenerator(oldFile, newFile);
    dexPatchGenerator.executeAndSaveTo(patchFile);
}
代碼在tinker-build的tinker-patch-lib下。
寫一個單元測試或者main方法,上述幾行代碼就是diff算法。
所以查看代碼時要有針對性,比如看diff算法,就找到diff算法的入口,不要在gradle plugin中去糾結。
public DexPatchGenerator(File oldDexFile, File newDexFile) throws IOException {
    this(new Dex(oldDexFile), new Dex(newDexFile));
}
將我們傳入的dex文件轉化為了Dex對象。
public Dex(File file) throws IOException {
    // 刪除了一堆代碼
    InputStream  in = new BufferedInputStream(new FileInputStream(file));
    loadFrom(in, (int) file.length());
}

private void loadFrom(InputStream in, int initSize) throws IOException {
    byte[] rawData = FileUtils.readStream(in, initSize);
    this.data = ByteBuffer.wrap(rawData);
    this.data.order(ByteOrder.LITTLE_ENDIAN);
    this.tableOfContents.readFrom(this);
}
首先將我們的文件讀取為byte[]數組(這裡還是蠻耗費內存的),然後由ByteBuffer進行包裝,並設置字節順序為小端(這裡說明ByteBuffer還是蠻方便的。然後通過readFrom方法為Dex對象的tableOfContents賦值。
#TableOfContents
public void readFrom(Dex dex) throws IOException {
    readHeader(dex.openSection(header));
    // special case, since mapList.byteCount is available only after
    // computeSizesFromOffsets() was invoked, so here we can't use
    // dex.openSection(mapList) to get dex section. Or
    // an {@code java.nio.BufferUnderflowException} will be thrown.
    readMap(dex.openSection(mapList.off));
    computeSizesFromOffsets();
}
在其內部執行了readHeader和readMap,上文我們大致分析了header和map list相關,實際上就是將這兩個區域轉化為一定的數據結構,讀取然後存儲到內存中。
首先看readHeader:
private void readHeader(Dex.Section headerIn) throws UnsupportedEncodingException {
    byte[] magic = headerIn.readByteArray(8);
    int apiTarget = DexFormat.magicToApi(magic);

    if (apiTarget != DexFormat.API_NO_EXTENDED_OPCODES) {
        throw new DexException("Unexpected magic: " + Arrays.toString(magic));
    }

    checksum = headerIn.readInt();
    signature = headerIn.readByteArray(20);
    fileSize = headerIn.readInt();
    int headerSize = headerIn.readInt();
    if (headerSize != SizeOf.HEADER_ITEM) {
        throw new DexException("Unexpected header: 0x" + Integer.toHexString(headerSize));
    }
    int endianTag = headerIn.readInt();
    if (endianTag != DexFormat.ENDIAN_TAG) {
        throw new DexException("Unexpected endian tag: 0x" + Integer.toHexString(endianTag));
    }
    linkSize = headerIn.readInt();
    linkOff = headerIn.readInt();
    mapList.off = headerIn.readInt();
    if (mapList.off == 0) {
        throw new DexException("Cannot merge dex files that do not contain a map");
    }
    stringIds.size = headerIn.readInt();
    stringIds.off = headerIn.readInt();
    typeIds.size = headerIn.readInt();
    typeIds.off = headerIn.readInt();
    protoIds.size = headerIn.readInt();
    protoIds.off = headerIn.readInt();
    fieldIds.size = headerIn.readInt();
    fieldIds.off = headerIn.readInt();
    methodIds.size = headerIn.readInt();
    methodIds.off = headerIn.readInt();
    classDefs.size = headerIn.readInt();
    classDefs.off = headerIn.readInt();
    dataSize = headerIn.readInt();
    dataOff = headerIn.readInt();
}
如果你現在打開著010 Editor,或者看一眼最前面的圖,實際上就是將header中所有的字段定義出來,讀取響應的字節並賦值。
接下來看readMap:
private void readMap(Dex.Section in) throws IOException {
    int mapSize = in.readInt();
    Section previous = null;
    for (int i = 0; i < mapSize; i++) {
        short type = in.readShort();
        in.readShort(); // unused
        Section section = getSection(type);
        int size = in.readInt();
        int offset = in.readInt();

        section.size = size;
        section.off = offset;

        previous = section;
    }

    header.off = 0;

    Arrays.sort(sections);

    // Skip header section, since its offset must be zero.
    for (int i = 1; i < sections.length; ++i) {
        if (sections[i].off == Section.UNDEF_OFFSET) {
            sections[i].off = sections[i - 1].off;
        }
    }
}
這裡注意,在讀取header的時候,實際上已經讀取除了map list區域的offset,並存儲在mapList.off中。所以map list中實際上是從這個位置開始的。首先讀取的就是map_list_item的個數,接下來讀取的就是每個map_list_item對應的實際數據。
可以看到依次讀取:type,unused,size,offset,如果你還有印象前面我們描述了map_list_item是與此對應的,對應的數據結構為TableContents.Section對象。
computeSizesFromOffsets()主要為section的byteCount(占據了多個字節)參數賦值。
到這裡就完成了dex file 到 Dex對象的初始化。
有了兩個Dex對象之後,就需要去做diff操作了。
繼續回到源碼:
public DexPatchGenerator(File oldDexFile, InputStream newDexStream) throws IOException {
    this(new Dex(oldDexFile), new Dex(newDexStream));
}
直接到兩個Dex對象的構造函數:
public DexPatchGenerator(Dex oldDex, Dex newDex) {
    this.oldDex = oldDex;
    this.newDex = newDex;

    SparseIndexMap oldToNewIndexMap = new SparseIndexMap();
    SparseIndexMap oldToPatchedIndexMap = new SparseIndexMap();
    SparseIndexMap newToPatchedIndexMap = new SparseIndexMap();
    SparseIndexMap selfIndexMapForSkip = new SparseIndexMap();

    additionalRemovingClassPatternSet = new HashSet<>();

    this.stringDataSectionDiffAlg = new StringDataSectionDiffAlgorithm(
            oldDex, newDex,
            oldToNewIndexMap,
            oldToPatchedIndexMap,
            newToPatchedIndexMap,
            selfIndexMapForSkip
    );
    this.typeIdSectionDiffAlg = ...
    this.protoIdSectionDiffAlg = ...
    this.fieldIdSectionDiffAlg = ...
    this.methodIdSectionDiffAlg = ...
    this.classDefSectionDiffAlg = ...
    this.typeListSectionDiffAlg = ...
    this.annotationSetRefListSectionDiffAlg = ...
    this.annotationSetSectionDiffAlg = ...
    this.classDataSectionDiffAlg = ...
    this.codeSectionDiffAlg = ...
    this.debugInfoSectionDiffAlg = ...
    this.annotationSectionDiffAlg = ...
    this.encodedArraySectionDiffAlg = ...
    this.annotationsDirectorySectionDiffAlg = ...
}
看到其首先為oldDex,newDex賦值,然後依次初始化了15個算法,每個算法代表每個區域,算法的目的就像我們之前描述的那樣,要知道“刪除了哪些,新增了哪些”;
我們繼續看代碼:
dexPatchGenerator.executeAndSaveTo(patchFile);
有了dexPatchGenerator對象後,直接指向了executeAndSaveTo方法。
public void executeAndSaveTo(File file) throws IOException {
    OutputStream os = null;
    try {
        os = new BufferedOutputStream(new FileOutputStream(file));
        executeAndSaveTo(os);
    } finally {
        if (os != null) {
            try {
                os.close();
            } catch (Exception e) {
                // ignored.
            }
        }
    }
}
到executeAndSaveTo方法:
public void executeAndSaveTo(OutputStream out) throws IOException {
    int patchedheaderSize = SizeOf.HEADER_ITEM;
    int patchedStringIdsSize = newDex.getTableOfContents().stringIds.size * SizeOf.STRING_ID_ITEM;
    int patchedTypeIdsSize = newDex.getTableOfContents().typeIds.size * SizeOf.TYPE_ID_ITEM;

    int patchedProtoIdsSize = newDex.getTableOfContents().protoIds.size * SizeOf.PROTO_ID_ITEM;

    int patchedFieldIdsSize = newDex.getTableOfContents().fieldIds.size * SizeOf.MEMBER_ID_ITEM;
    int patchedMethodIdsSize = newDex.getTableOfContents().methodIds.size * SizeOf.MEMBER_ID_ITEM;
    int patchedClassDefsSize = newDex.getTableOfContents().classDefs.size * SizeOf.CLASS_DEF_ITEM;

    int patchedIdSectionSize =
            patchedStringIdsSize
                    + patchedTypeIdsSize
                    + patchedProtoIdsSize
                    + patchedFieldIdsSize
                    + patchedMethodIdsSize
                    + patchedClassDefsSize;

    this.patchedHeaderOffset = 0;

    this.patchedStringIdsOffset = patchedHeaderOffset + patchedheaderSize;

    this.stringDataSectionDiffAlg.execute();
    this.patchedStringDataItemsOffset = patchedheaderSize + patchedIdSectionSize;

    this.stringDataSectionDiffAlg.simulatePatchOperation(this.patchedStringDataItemsOffset);

    // 省略了其余14個算法的一堆代碼
    this.patchedDexSize
            = this.patchedMapListOffset
            + patchedMapListSize;
    writeResultToStream(out);
}
因為涉及到15個算法,所以這裡的代碼非常長,我們這裡只拿其中一個算法來說明。
每個算法都會執行execute和simulatePatchOperation方法:
首先看execute:
public void execute() {
    this.patchOperationList.clear();

    // 1. 拿到oldDex和newDex的itemList
    this.adjustedOldIndexedItemsWithOrigOrder = collectSectionItems(this.oldDex, true);
    this.oldItemCount = this.adjustedOldIndexedItemsWithOrigOrder.length;

    AbstractMap.SimpleEntry<Integer, T>[] adjustedOldIndexedItems = new AbstractMap.SimpleEntry[this.oldItemCount];
    System.arraycopy(this.adjustedOldIndexedItemsWithOrigOrder, 0, adjustedOldIndexedItems, 0, this.oldItemCount);
    Arrays.sort(adjustedOldIndexedItems, this.comparatorForItemDiff);

    AbstractMap.SimpleEntry<Integer, T>[] adjustedNewIndexedItems = collectSectionItems(this.newDex, false);
    this.newItemCount = adjustedNewIndexedItems.length;
    Arrays.sort(adjustedNewIndexedItems, this.comparatorForItemDiff);

    int oldCursor = 0;
    int newCursor = 0;
    // 2.遍歷,對比,收集patch操作
    while (oldCursor < this.oldItemCount || newCursor < this.newItemCount) {
        if (oldCursor >= this.oldItemCount) {
            // rest item are all newItem.
            while (newCursor < this.newItemCount) {
                // 對剩下的newItem做ADD操作
            }
        } else if (newCursor >= newItemCount) {
            // rest item are all oldItem.
            while (oldCursor < oldItemCount) {
                // 對剩下的oldItem做DEL操作
            }
        } else {
            AbstractMap.SimpleEntry<Integer, T> oldIndexedItem = adjustedOldIndexedItems[oldCursor];
            AbstractMap.SimpleEntry<Integer, T> newIndexedItem = adjustedNewIndexedItems[newCursor];
            int cmpRes = oldIndexedItem.getValue().compareTo(newIndexedItem.getValue());
            if (cmpRes < 0) {
                int deletedIndex = oldIndexedItem.getKey();
                int deletedOffset = getItemOffsetOrIndex(deletedIndex, oldIndexedItem.getValue());
                this.patchOperationList.add(new PatchOperation<T>(PatchOperation.OP_DEL, deletedIndex));
                markDeletedIndexOrOffset(this.oldToPatchedIndexMap, deletedIndex, deletedOffset);
                ++oldCursor;
            } else if (cmpRes > 0) {
                this.patchOperationList.add(new PatchOperation<>(PatchOperation.OP_ADD,
                        newIndexedItem.getKey(), newIndexedItem.getValue()));
                ++newCursor;
            } else {
                int oldIndex = oldIndexedItem.getKey();
                int newIndex = newIndexedItem.getKey();
                int oldOffset = getItemOffsetOrIndex(oldIndexedItem.getKey(), oldIndexedItem.getValue());
                int newOffset = getItemOffsetOrIndex(newIndexedItem.getKey(), newIndexedItem.getValue());

                if (oldIndex != newIndex) {
                    this.oldIndexToNewIndexMap.put(oldIndex, newIndex);
                }

                if (oldOffset != newOffset) {
                    this.oldOffsetToNewOffsetMap.put(oldOffset, newOffset);
                }

                ++oldCursor;
                ++newCursor;
            }
        }
    }

    // 未完
}
可以看到首先讀取oldDex和newDex對應區域的數據並排序,分別adjustedOldIndexedItems和adjustedNewIndexedItems。
接下來就開始遍歷了,直接看else部分:
分別根據當前的cursor,獲取oldItem和newItem,對其value對對比:
PatchOperation.OP_DEL,並記錄該oldItem index到PatchOperation對象,加入到patchOperationList中。PatchOperation.OP_ADD,並記錄該newItem index和value到PatchOperation對象,加入到patchOperationList中。經過上述,我們得到了一個patchOperationList對象。
繼續下半部分代碼:
public void execute() {
    // 接上...

    // 根據index排序,如果index一樣,則先DEL後ADD
    Collections.sort(this.patchOperationList, comparatorForPatchOperationOpt);

    Iterator<PatchOperation<T>> patchOperationIt = this.patchOperationList.iterator();
    PatchOperation<T> prevPatchOperation = null;
    while (patchOperationIt.hasNext()) {
        PatchOperation<T> patchOperation = patchOperationIt.next();
        if (prevPatchOperation != null
                && prevPatchOperation.op == PatchOperation.OP_DEL
                && patchOperation.op == PatchOperation.OP_ADD
                ) {
            if (prevPatchOperation.index == patchOperation.index) {
                prevPatchOperation.op = PatchOperation.OP_REPLACE;
                prevPatchOperation.newItem = patchOperation.newItem;
                patchOperationIt.remove();
                prevPatchOperation = null;
            } else {
                prevPatchOperation = patchOperation;
            }
        } else {
            prevPatchOperation = patchOperation;
        }
    }

    // Finally we record some information for the final calculations.
    patchOperationIt = this.patchOperationList.iterator();
    while (patchOperationIt.hasNext()) {
        PatchOperation<T> patchOperation = patchOperationIt.next();
        switch (patchOperation.op) {
            case PatchOperation.OP_DEL: {
                indexToDelOperationMap.put(patchOperation.index, patchOperation);
                break;
            }
            case PatchOperation.OP_ADD: {
                indexToAddOperationMap.put(patchOperation.index, patchOperation);
                break;
            }
            case PatchOperation.OP_REPLACE: {
                indexToReplaceOperationMap.put(patchOperation.index, patchOperation);
                break;
            }
        }
    }
}
indexToDelOperationMap,indexToAddOperationMap,indexToReplaceOperationMap。ok,經歷完成execute之後,我們主要的產物就是3個Map,分別記錄了:oldDex中哪些index需要刪除;newDex中新增了哪些item;哪些item需要替換為新item。
剛才說了每個算法除了execute()還有個simulatePatchOperation()
this.stringDataSectionDiffAlg
    .simulatePatchOperation(this.patchedStringDataItemsOffset);
傳入的偏移量為data區域的偏移量。
public void simulatePatchOperation(int baseOffset) {
    int oldIndex = 0;
    int patchedIndex = 0;
    int patchedOffset = baseOffset;
    while (oldIndex < this.oldItemCount || patchedIndex < this.newItemCount) {
        if (this.indexToAddOperationMap.containsKey(patchedIndex)) {
            //省略了一些代碼
            T newItem = patchOperation.newItem;
            int itemSize = getItemSize(newItem);
            ++patchedIndex;
            patchedOffset += itemSize;
        } else if (this.indexToReplaceOperationMap.containsKey(patchedIndex)) {
            //省略了一些代碼
            T newItem = patchOperation.newItem;
            int itemSize = getItemSize(newItem);
            ++patchedIndex;
            patchedOffset += itemSize;
        } else if (this.indexToDelOperationMap.containsKey(oldIndex)) {
            ++oldIndex;
        } else if (this.indexToReplaceOperationMap.containsKey(oldIndex)) {
            ++oldIndex;
        } else if (oldIndex < this.oldItemCount) {
            ++oldIndex;
            ++patchedIndex;
            patchedOffset += itemSize;
        }
    }

    this.patchedSectionSize = SizeOf.roundToTimesOfFour(patchedOffset - baseOffset);
}
遍歷oldIndex與newIndex,分別在indexToAddOperationMap,indexToReplaceOperationMap,indexToDelOperationMap中查找。
這裡關注一點最終的一個產物是this.patchedSectionSize,由patchedOffset-baseOffset所得。
這裡有幾種情況會造成patchedOffset+=itemSize:
其實很好理解,這個patchedSectionSize其實對應newDex的這個區域的size。所以,包含需要ADD的Item,會被替代的Item,以及OLD ITEMS中沒有被刪除和替代的Item。這三者相加即為newDex的itemList。
到這裡,一個算法就執行完畢了。
經過這樣的一個算法,我們得到了PatchOperationList和對應區域sectionSize。那麼執行完成所有的算法,應該會得到針對每個算法的PatchOperationList,和每個區域的sectionSize;每個區域的sectionSize實際上換算得到每個區域的offset。
每個區域的算法,execute和simulatePatchOperation代碼都是復用的,所以其他的都只有細微的變化,可以自己看了。
接下來看執行完成所有的算法後的writeResultToStream方法。
private void writeResultToStream(OutputStream os) throws IOException {
    DexDataBuffer buffer = new DexDataBuffer();
    buffer.write(DexPatchFile.MAGIC); // DEXDIFF
    buffer.writeShort(DexPatchFile.CURRENT_VERSION); /0x0002
    buffer.writeInt(this.patchedDexSize);
    // we will return here to write firstChunkOffset later.
    int posOfFirstChunkOffsetField = buffer.position();
    buffer.writeInt(0);
    buffer.writeInt(this.patchedStringIdsOffset);
    buffer.writeInt(this.patchedTypeIdsOffset);
    buffer.writeInt(this.patchedProtoIdsOffset);
    buffer.writeInt(this.patchedFieldIdsOffset);
    buffer.writeInt(this.patchedMethodIdsOffset);
    buffer.writeInt(this.patchedClassDefsOffset);
    buffer.writeInt(this.patchedMapListOffset);
    buffer.writeInt(this.patchedTypeListsOffset);
    buffer.writeInt(this.patchedAnnotationSetRefListItemsOffset);
    buffer.writeInt(this.patchedAnnotationSetItemsOffset);
    buffer.writeInt(this.patchedClassDataItemsOffset);
    buffer.writeInt(this.patchedCodeItemsOffset);
    buffer.writeInt(this.patchedStringDataItemsOffset);
    buffer.writeInt(this.patchedDebugInfoItemsOffset);
    buffer.writeInt(this.patchedAnnotationItemsOffset);
    buffer.writeInt(this.patchedEncodedArrayItemsOffset);
    buffer.writeInt(this.patchedAnnotationsDirectoryItemsOffset);
    buffer.write(this.oldDex.computeSignature(false));
    int firstChunkOffset = buffer.position();
    buffer.position(posOfFirstChunkOffsetField);
    buffer.writeInt(firstChunkOffset);
    buffer.position(firstChunkOffset);

    writePatchOperations(buffer, this.stringDataSectionDiffAlg.getPatchOperationList());
    // 省略其他14個writePatch...

    byte[] bufferData = buffer.array();
    os.write(bufferData);
    os.flush();
}
我們依舊只看stringDataSectionDiffAlg這個算法。
private <T extends Comparable<T>> void writePatchOperations(
        DexDataBuffer buffer, List<PatchOperation<T>> patchOperationList
) {
    List<Integer> delOpIndexList = new ArrayList<>(patchOperationList.size());
    List<Integer> addOpIndexList = new ArrayList<>(patchOperationList.size());
    List<Integer> replaceOpIndexList = new ArrayList<>(patchOperationList.size());

    List<T> newItemList = new ArrayList<>(patchOperationList.size());

    for (PatchOperation<T> patchOperation : patchOperationList) {
        switch (patchOperation.op) {
            case PatchOperation.OP_DEL: {
                delOpIndexList.add(patchOperation.index);
                break;
            }
            case PatchOperation.OP_ADD: {
                addOpIndexList.add(patchOperation.index);
                newItemList.add(patchOperation.newItem);
                break;
            }
            case PatchOperation.OP_REPLACE: {
                replaceOpIndexList.add(patchOperation.index);
                newItemList.add(patchOperation.newItem);
                break;
            }
        }
    }

    buffer.writeUleb128(delOpIndexList.size());
    int lastIndex = 0;
    for (Integer index : delOpIndexList) {
        buffer.writeSleb128(index - lastIndex);
        lastIndex = index;
    }

    buffer.writeUleb128(addOpIndexList.size());
    lastIndex = 0;
    for (Integer index : addOpIndexList) {
        buffer.writeSleb128(index - lastIndex);
        lastIndex = index;
    }

    buffer.writeUleb128(replaceOpIndexList.size());
    lastIndex = 0;
    for (Integer index : replaceOpIndexList) {
        buffer.writeSleb128(index - lastIndex);
        lastIndex = index;
    }

    for (T newItem : newItemList) {
        if (newItem instanceof StringData) {
            buffer.writeStringData((StringData) newItem);
        }
        // else 其他類型,write其他類型Data

    }
}
首先將我們的patchOperationList轉化為3個OpIndexList,分別對應DEL,ADD,REPLACE,以及將所有的item存入newItemList。
然後依次寫入:
這裡index都做了(這裡做了個index – lastIndex操作)
其他的算法也是執行了類似的操作。
最好來看看我們生成的patch是什麼樣子的:
那麼這麼看,我們猜測Patch的邏輯時這樣的:
即,newDex的某個區域的包含:
oldItems - del - replace + addItems + replaceItems
這麼看挺清晰的,下面看代碼咯~
與diff一樣,肯定有那麼一個類或者方法,接受old dex File 和 patch File,最後生成new Dex。不要陷在一堆安全校驗,apk解壓的代碼中。
這個類叫做DexPatchApplier,在tinker-commons中。
patch的相關代碼如下:
@Test
public void testPatch() throws IOException {
    File oldFile = new File("Hello.dex");
    File patchFile = new File("patch.dex");

    File newFile = new File("new.dex");

    DexPatchApplier dexPatchGenerator
            = new DexPatchApplier(oldFile, patchFile);
    dexPatchGenerator.executeAndSaveTo(newFile);
}
可以看到和diff代碼類似,下面看代碼去。
public DexPatchApplier(File oldDexIn, File patchFileIn) throws IOException {
    this(new Dex(oldDexIn), new DexPatchFile(patchFileIn));
}
oldDex會轉化為Dex對象,這個上面分析過,主要就是readHeader和readMap.注意我們的patchFile是轉為一個DexPatchFile對象。
public DexPatchFile(File file) throws IOException {
    this.buffer = new DexDataBuffer(ByteBuffer.wrap(FileUtils.readFile(file)));
    init();
}
首先將patch file讀取為byte[],然後調用init
private void init() {
    byte[] magic = this.buffer.readByteArray(MAGIC.length);
    if (CompareUtils.uArrCompare(magic, MAGIC) != 0) {
        throw new IllegalStateException("bad dex patch file magic: " + Arrays.toString(magic));
    }

    this.version = this.buffer.readShort();
    if (CompareUtils.uCompare(this.version, CURRENT_VERSION) != 0) {
        throw new IllegalStateException("bad dex patch file version: " + this.version + ", expected: " + CURRENT_VERSION);
    }

    this.patchedDexSize = this.buffer.readInt();
    this.firstChunkOffset = this.buffer.readInt();
    this.patchedStringIdSectionOffset = this.buffer.readInt();
    this.patchedTypeIdSectionOffset = this.buffer.readInt();
    this.patchedProtoIdSectionOffset = this.buffer.readInt();
    this.patchedFieldIdSectionOffset = this.buffer.readInt();
    this.patchedMethodIdSectionOffset = this.buffer.readInt();
    this.patchedClassDefSectionOffset = this.buffer.readInt();
    this.patchedMapListSectionOffset = this.buffer.readInt();
    this.patchedTypeListSectionOffset = this.buffer.readInt();
    this.patchedAnnotationSetRefListSectionOffset = this.buffer.readInt();
    this.patchedAnnotationSetSectionOffset = this.buffer.readInt();
    this.patchedClassDataSectionOffset = this.buffer.readInt();
    this.patchedCodeSectionOffset = this.buffer.readInt();
    this.patchedStringDataSectionOffset = this.buffer.readInt();
    this.patchedDebugInfoSectionOffset = this.buffer.readInt();
    this.patchedAnnotationSectionOffset = this.buffer.readInt();
    this.patchedEncodedArraySectionOffset = this.buffer.readInt();
    this.patchedAnnotationsDirectorySectionOffset = this.buffer.readInt();
    this.oldDexSignature = this.buffer.readByteArray(SizeOf.SIGNATURE);

    this.buffer.position(firstChunkOffset);
}
還記得我們寫patch的操作麼,先寫了MAGIC和Version用於校驗該文件是一個patch file;接下來為patchedDexSize和各種offset進行賦值;最後定位到數據區(firstChunkOffset),還記得寫的時候,該字段在第四個位置。
定位到該位置後,後面讀取的就是數據了,數據存的時候按照如下格式存儲的:
- del操作的個數,每個del的index
- add操作的個數,每個add的index
- replace操作的個數,每個需要replace的index
- 最後依次寫入newItemList.
簡單回憶下,我們繼續源碼分析。
public DexPatchApplier(File oldDexIn, File patchFileIn) throws IOException {
    this(new Dex(oldDexIn), new DexPatchFile(patchFileIn));
}

public DexPatchApplier(
        Dex oldDexIn,
        DexPatchFile patchFileIn) {
    this.oldDex = oldDexIn;
    this.patchFile = patchFileIn;
    this.patchedDex = new Dex(patchFileIn.getPatchedDexSize());
    this.oldToPatchedIndexMap = new SparseIndexMap();
}
除了oldDex,patchFile,還初始化了一個patchedDex作為我們最終輸出Dex對象。
構造完成後,直接執行了executeAndSaveTo方法。
public void executeAndSaveTo(File file) throws IOException {
    OutputStream os = null;
    try {
        os = new BufferedOutputStream(new FileOutputStream(file));
        executeAndSaveTo(os);
    } finally {
        if (os != null) {
            try {
                os.close();
            } catch (Exception e) {
                // ignored.
            }
        }
    }
}
直接到executeAndSaveTo(os),該方法代碼比較長,我們分3段講解:
public void executeAndSaveTo(OutputStream out) throws IOException {

    TableOfContents patchedToc = this.patchedDex.getTableOfContents();

    patchedToc.header.off = 0;
    patchedToc.header.size = 1;
    patchedToc.mapList.size = 1;

    patchedToc.stringIds.off
            = this.patchFile.getPatchedStringIdSectionOffset();
    patchedToc.typeIds.off
            = this.patchFile.getPatchedTypeIdSectionOffset();
    patchedToc.typeLists.off
            = this.patchFile.getPatchedTypeListSectionOffset();
    patchedToc.protoIds.off
            = this.patchFile.getPatchedProtoIdSectionOffset();
    patchedToc.fieldIds.off
            = this.patchFile.getPatchedFieldIdSectionOffset();
    patchedToc.methodIds.off
            = this.patchFile.getPatchedMethodIdSectionOffset();
    patchedToc.classDefs.off
            = this.patchFile.getPatchedClassDefSectionOffset();
    patchedToc.mapList.off
            = this.patchFile.getPatchedMapListSectionOffset();
    patchedToc.stringDatas.off
            = this.patchFile.getPatchedStringDataSectionOffset();
    patchedToc.annotations.off
            = this.patchFile.getPatchedAnnotationSectionOffset();
    patchedToc.annotationSets.off
            = this.patchFile.getPatchedAnnotationSetSectionOffset();
    patchedToc.annotationSetRefLists.off
            = this.patchFile.getPatchedAnnotationSetRefListSectionOffset();
    patchedToc.annotationsDirectories.off
            = this.patchFile.getPatchedAnnotationsDirectorySectionOffset();
    patchedToc.encodedArrays.off
            = this.patchFile.getPatchedEncodedArraySectionOffset();
    patchedToc.debugInfos.off
            = this.patchFile.getPatchedDebugInfoSectionOffset();
    patchedToc.codes.off
            = this.patchFile.getPatchedCodeSectionOffset();
    patchedToc.classDatas.off
            = this.patchFile.getPatchedClassDataSectionOffset();
    patchedToc.fileSize
            = this.patchFile.getPatchedDexSize();

    Arrays.sort(patchedToc.sections);

    patchedToc.computeSizesFromOffsets();

    // 未完待續...

}
這裡實際上,就是讀取patchFile中記錄的值給patchedDex的TableOfContent中各種Section(大致對應map list中各個map_list_item)賦值。
接下來排序呢,設置byteCount等字段信息。
繼續:
public void executeAndSaveTo(OutputStream out) throws IOException {

    // 省略第一部分代碼

    // Secondly, run patch algorithms according to sections' dependencies.
    this.stringDataSectionPatchAlg = new StringDataSectionPatchAlgorithm(
            patchFile, oldDex, patchedDex, oldToPatchedIndexMap
    );
    this.typeIdSectionPatchAlg = new TypeIdSectionPatchAlgorithm(
            patchFile, oldDex, patchedDex, oldToPatchedIndexMap
    );
    this.protoIdSectionPatchAlg = new ProtoIdSectionPatchAlgorithm(
            patchFile, oldDex, patchedDex, oldToPatchedIndexMap
    );
    this.fieldIdSectionPatchAlg = new FieldIdSectionPatchAlgorithm(
            patchFile, oldDex, patchedDex, oldToPatchedIndexMap
    );
    this.methodIdSectionPatchAlg = new MethodIdSectionPatchAlgorithm(
            patchFile, oldDex, patchedDex, oldToPatchedIndexMap
    );
    this.classDefSectionPatchAlg = new ClassDefSectionPatchAlgorithm(
            patchFile, oldDex, patchedDex, oldToPatchedIndexMap
    );
    this.typeListSectionPatchAlg = new TypeListSectionPatchAlgorithm(
            patchFile, oldDex, patchedDex, oldToPatchedIndexMap
    );
    this.annotationSetRefListSectionPatchAlg = new AnnotationSetRefListSectionPatchAlgorithm(
            patchFile, oldDex, patchedDex, oldToPatchedIndexMap
    );
    this.annotationSetSectionPatchAlg = new AnnotationSetSectionPatchAlgorithm(
            patchFile, oldDex, patchedDex, oldToPatchedIndexMap
    );
    this.classDataSectionPatchAlg = new ClassDataSectionPatchAlgorithm(
            patchFile, oldDex, patchedDex, oldToPatchedIndexMap
    );
    this.codeSectionPatchAlg = new CodeSectionPatchAlgorithm(
            patchFile, oldDex, patchedDex, oldToPatchedIndexMap
    );
    this.debugInfoSectionPatchAlg = new DebugInfoItemSectionPatchAlgorithm(
            patchFile, oldDex, patchedDex, oldToPatchedIndexMap
    );
    this.annotationSectionPatchAlg = new AnnotationSectionPatchAlgorithm(
            patchFile, oldDex, patchedDex, oldToPatchedIndexMap
    );
    this.encodedArraySectionPatchAlg = new StaticValueSectionPatchAlgorithm(
            patchFile, oldDex, patchedDex, oldToPatchedIndexMap
    );
    this.annotationsDirectorySectionPatchAlg = new AnnotationsDirectorySectionPatchAlgorithm(
            patchFile, oldDex, patchedDex, oldToPatchedIndexMap
    );

    this.stringDataSectionPatchAlg.execute();
    this.typeIdSectionPatchAlg.execute();
    this.typeListSectionPatchAlg.execute();
    this.protoIdSectionPatchAlg.execute();
    this.fieldIdSectionPatchAlg.execute();
    this.methodIdSectionPatchAlg.execute();
    this.annotationSectionPatchAlg.execute();
    this.annotationSetSectionPatchAlg.execute();
    this.annotationSetRefListSectionPatchAlg.execute();
    this.annotationsDirectorySectionPatchAlg.execute();
    this.debugInfoSectionPatchAlg.execute();
    this.codeSectionPatchAlg.execute();
    this.classDataSectionPatchAlg.execute();
    this.encodedArraySectionPatchAlg.execute();
    this.classDefSectionPatchAlg.execute();

    //未完待續...

}
這一部分很明顯初始化了一堆算法,然後分別去執行。我們依然是拿stringDataSectionPatchAlg來分析。
public void execute() {
    final int deletedItemCount = patchFile.getBuffer().readUleb128();
    final int[] deletedIndices = readDeltaIndiciesOrOffsets(deletedItemCount);

    final int addedItemCount = patchFile.getBuffer().readUleb128();
    final int[] addedIndices = readDeltaIndiciesOrOffsets(addedItemCount);

    final int replacedItemCount = patchFile.getBuffer().readUleb128();
    final int[] replacedIndices = readDeltaIndiciesOrOffsets(replacedItemCount);

    final TableOfContents.Section tocSec = getTocSection(this.oldDex);
    Dex.Section oldSection = null;

    int oldItemCount = 0;
    if (tocSec.exists()) {
        oldSection = this.oldDex.openSection(tocSec);
        oldItemCount = tocSec.size;
    }

    // Now rest data are added and replaced items arranged in the order of
    // added indices and replaced indices.
    doFullPatch(
            oldSection, oldItemCount, deletedIndices, addedIndices, replacedIndices
    );
}
再貼一下我們寫入時的規則:
- del操作的個數,每個del的index
- add操作的個數,每個add的index
- replace操作的個數,每個需要replace的index
- 最後依次寫入newItemList.
看代碼,讀取順序如下:
是不是和寫入時一致。
繼續,接下來獲取了oldDex中oldItems和oldItemCount。
那麼現在有了:
拿著我們擁有的,繼續執行doFullPatch
private void doFullPatch(
        Dex.Section oldSection,
        int oldItemCount,
        int[] deletedIndices,
        int[] addedIndices,
        int[] replacedIndices) {
    int deletedItemCount = deletedIndices.length;
    int addedItemCount = addedIndices.length;
    int replacedItemCount = replacedIndices.length;
    int newItemCount = oldItemCount + addedItemCount - deletedItemCount;

    int deletedItemCounter = 0;
    int addActionCursor = 0;
    int replaceActionCursor = 0;

    int oldIndex = 0;
    int patchedIndex = 0;

    while (oldIndex < oldItemCount || patchedIndex < newItemCount) {
        if (addActionCursor < addedItemCount && addedIndices[addActionCursor] == patchedIndex) {
            T addedItem = nextItem(patchFile.getBuffer());
            int patchedOffset = writePatchedItem(addedItem);
            ++addActionCursor;
            ++patchedIndex;
        } else
        if (replaceActionCursor < replacedItemCount && replacedIndices[replaceActionCursor] == patchedIndex) {
            T replacedItem = nextItem(patchFile.getBuffer());
            int patchedOffset = writePatchedItem(replacedItem);
            ++replaceActionCursor;
            ++patchedIndex;
        } else
        if (Arrays.binarySearch(deletedIndices, oldIndex) >= 0) {
            T skippedOldItem = nextItem(oldSection); // skip old item.

            ++oldIndex;
            ++deletedItemCounter;
        } else
        if (Arrays.binarySearch(replacedIndices, oldIndex) >= 0) {
            T skippedOldItem = nextItem(oldSection); // skip old item.

            ++oldIndex;
        } else
        if (oldIndex < oldItemCount) {
            T oldItem = adjustItem(this.oldToPatchedIndexMap, nextItem(oldSection));

            int patchedOffset = writePatchedItem(oldItem);

            ++oldIndex;
            ++patchedIndex;
        }
    }
}
先整體上看一下,這裡的目的就是往patchedDex的stringData區寫數據,寫的數據理論上應該是:
當然他們需要順序寫入。
所以看代碼,首先計算出newItemCount=oldItemCount + addCount - delCount,然後開始遍歷,遍歷條件為0~oldItemCount或0~newItemCount。
我們期望的是,在patchIndex從0~newItemCount之間都會寫入對應的Item。
Item寫入通過代碼我們可以看到:
上述1.2.4三個部分即可組成完整的newDex的該區域。
這樣的話就完成了stringData區域的patch算法。
其他剩下的14個算法的execute代碼是相同的(父類),執行的操作類似,都會完成各個部分的patch算法。
當所有的區域都完成恢復後,那麼剩下的就是header和mapList了,所以回到所有算法執行完成的地方:
public void executeAndSaveTo(OutputStream out) throws IOException {

    //1.省略了offset的各種賦值
    //2.省略了各個部分的patch算法

    // Thirdly, write header, mapList. Calculate and write patched dex's sign and checksum.
    Dex.Section headerOut = this.patchedDex.openSection(patchedToc.header.off);
    patchedToc.writeHeader(headerOut);

    Dex.Section mapListOut = this.patchedDex.openSection(patchedToc.mapList.off);
    patchedToc.writeMap(mapListOut);

    this.patchedDex.writeHashes();

    // Finally, write patched dex to file.
    this.patchedDex.writeTo(out);
}
定位到header區域,寫header相關數據;定位到map list區域,編寫map list相關數據。兩者都完成的時候,需要編寫header中比較特殊的兩個字段:簽名和checkSum,因為這兩個字段是依賴map list的,所以必須在編寫map list後。
這樣就完成了完整的dex的恢復,最後將內存中的所有數據寫到文件中。
剛才我們有個Hello.dex,我們再編寫一個類:
public class World{
    public static void main(String[] args){
        System.out.println("nani World");
    }
}
然後將這個類編譯以及打成dx文件。
javac -source 1.7 -target 1.7 World.java
dx --dex --output=World.dex World.class
這樣我們就准備好了兩個dex,Hello.dex和World.dex.
使用010 Editor分別打開兩個dex,我們主要關注string_id_item;
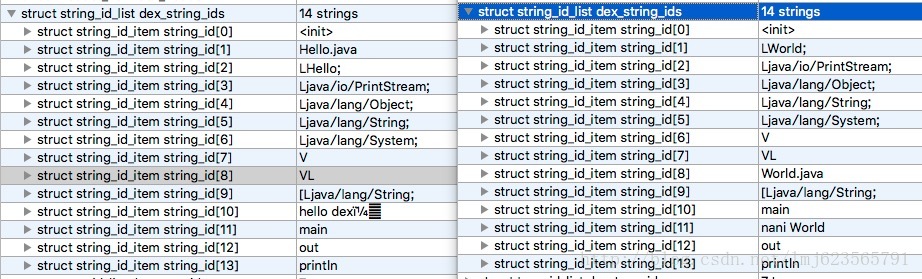
兩邊分別13個字符串,按照我們上面介紹的diff算法,我們可以得到以下操作:
兩邊的字符串分別開始遍歷對比:
- 如果<0 ,則認為該old Item被刪除了,記錄為
PatchOperation.OP_DEL,並記錄該oldItem index到PatchOperation對象,加入到patchOperationList中。- 如果>0,則認為該newItem是新增的,記錄為
PatchOperation.OP_ADD,並記錄該newItem index和value到PatchOperation對象,加入到patchOperationList中。- 如果=0,不會生成PatchOperation。
del 1
add 1 LWorld;
del 2
add 8 World.java
del 10
add 11 naniWorld
然後是根據索引排序,沒有變化;
接下來遍歷所有的操作,將index一致且DEL和ADD相鄰的操作替換為replace
replace 1 LWorld
del 2
add 8 World.java
del 10
add 11 naniWorld
最終在write時,會做一次遍歷,將操作按DEL,ADD,REPLACE進行分類,並且將出現的item放置到newItemList中。
del ops:
    del 2
    del 10
add ops:
    add 8
    add 11
replace ops:
    replace 1
newItemList變為:
LWorld //replace 1
World.java //add 8
naniWorld //add 11
然後寫入,那麼寫入的順序應該是:
2 //del size
2
8 // index - lastIndex
2 // add size
8
3 // index - lastIndex
1 //replace size
1
LWorld
World.java
naniWorld
這裡我們直接在DexPatchGenerator的writeResultToStream的相關位置打上日志:
buffer.writeUleb128(delOpIndexList.size());
System.out.println("del size = " + delOpIndexList.size());
int lastIndex = 0;
for (Integer index : delOpIndexList) {
    buffer.writeSleb128(index - lastIndex);
    System.out.println("del index = " + (index - lastIndex));
    lastIndex = index;
}
buffer.writeUleb128(addOpIndexList.size());
System.out.println("add size = " + addOpIndexList.size());
lastIndex = 0;
for (Integer index : addOpIndexList) {
    buffer.writeSleb128(index - lastIndex);
    System.out.println("add index = " + (index - lastIndex));
    lastIndex = index;
}
buffer.writeUleb128(replaceOpIndexList.size());
System.out.println("replace size = " + addOpIndexList.size());
lastIndex = 0;
for (Integer index : replaceOpIndexList) {
    buffer.writeSleb128(index - lastIndex);
    System.out.println("replace index = " + (index - lastIndex));

    lastIndex = index;
}

for (T newItem : newItemList) {
    if (newItem instanceof StringData) {
        buffer.writeStringData((StringData) newItem);
        System.out.println("stringdata  = " + ((StringData) newItem).value);
      }
}
可以看到輸出為:
del size = 2
del index = 2
del index = 8
add size = 2
add index = 8
add index = 3
replace size = 2
replace index = 1
stringdata  = LWorld;
stringdata  = World.java
stringdata  = nani World
與我們上述分析結果一致 ~~
那麼其他區域可以用類似的方式去驗證,patch的話也差不多,就不贅述了。
 Gradle for Android 第一篇( 從 Gradle 和 AS 開始 )
正如大家所見,這是本英文書,而由於國內的gradle翻譯資料不全,所以特次開辟專欄,翻譯gradle for android這本書,同時添加自己的心得體會以及在實
 Android應用AsyncTask處理機制詳解及源碼分析
1 背景 Android異步處理機制一直都是Android的一個核心,也是應用工程師面試的一個知識點。前面我們分析了Handler異步機制原理(不了解的可以閱讀我
 Android hook 技術淺析
前言 xposed框架 xposed,主頁:http://repo.xposed.info/module/de.robv.android.xposed.insta
 Android 存儲系統之架構篇
基於Android 6.0的源碼,剖析存儲架構的設計 Android 存儲系統之源碼篇 Android 存儲系統之架構篇 一、概述 本文講述Android存儲系統