編輯:Android資訊
最近在為自己Moto G定制Rom,順便重新讀了一遍Android 7.0的相關源碼,特此記錄當做筆記.
在開始正文之前,首先要明白冷啟動和熱啟動.所謂冷啟動就是啟動該應用時,後台沒有該應用的進程,此時系統會創建一個進程分配給它(AMS通過Socket和Zygote通信,Zygote通過forkAndSpecialize()方法向Linux內核申請新進程),之後會創建和初始化Application,然後通過反射執行ActivityThread中的main方法.而熱啟動則是,當啟動應用的時候,後台已經存在該應用的進程,比如按home鍵返回主界面再打開該應用,此時會從已有的進程中來啟動應用,這種方式下,不會重新走Application這一步.
那今天我們主要分析的是應用冷啟動的過程.在分析過程中,我發現從Android 2.3到Android 7.0的啟動流程總體變化不大,所以,無論你目前是用何版本,下文多是通用的.另外,在本文中,我省略掉了有關Binder這一部分,以便大部分人都能順利閱讀.
Launcher就是我們所說的桌面,它本質也是一個apk,當我們點擊桌面上的圖標時,會調用Activity的startActivity(),最終調用startActivityForResult():
public void startActivityForResult(Intent intent, int requestCode, @Nullable Bundle options) {
	if (mParent == null) {
		Instrumentation.ActivityResult ar =
			mInstrumentation.execStartActivity(
				this, mMainThread.getApplicationThread(), mToken, this,
				intent, requestCode, options);
		// 省略多行代碼
	} else {
	   // 省略多行代碼
	}
}
startActivityForResult將創建過程委托給Instrumenttation的execStartActivity():
public ActivityResult execStartActivity(
		Context who, IBinder contextThread, IBinder token, Activity target,
		Intent intent, int requestCode, Bundle options) {
	//重點關注IApplicationThread
	IApplicationThread whoThread = (IApplicationThread) contextThread;
	Uri referrer = target != null ? target.onProvideReferrer() : null;
	if (referrer != null) {
		intent.putExtra(Intent.EXTRA_REFERRER, referrer);
	}
	if (mActivityMonitors != null) {
		synchronized (mSync) {
			final int N = mActivityMonitors.size();
			for (int i=0; i<N; i++) {
				final ActivityMonitor am = mActivityMonitors.get(i);
				if (am.match(who, null, intent)) {
					am.mHits++;
					if (am.isBlocking()) {
						return requestCode >= 0 ? am.getResult() : null;
					}
					break;
				}
			}
		}
	}
	try {
		intent.migrateExtraStreamToClipData();
		intent.prepareToLeaveProcess();
		// 重點關注ActivityManagerNative
		int result = ActivityManagerNative.getDefault()
			.startActivity(whoThread, who.getBasePackageName(), intent,
					intent.resolveTypeIfNeeded(who.getContentResolver()),
					token, target != null ? target.mEmbeddedID : null,
					requestCode, 0, null, options);
		checkStartActivityResult(result, intent);
	} catch (RemoteException e) {
		throw new RuntimeException("Failure from system", e);
	}
	return null;
}
在該方法簽名中,我們看到第二個參數contextThread是IBinder類型,繼續往下看,發現contextThread實則是IApplicationThread的實現類.簡單來看IApplicationThread的定義:
public interface IApplicationThread extends IInterface {
    void schedulePauseActivity(IBinder token, boolean finished, boolean userLeaving,
            int configChanges, boolean dontReport) throws RemoteException;
    void scheduleStopActivity(IBinder token, boolean showWindow,
            int configChanges) throws RemoteException;
    void scheduleWindowVisibility(IBinder token, boolean showWindow) throws RemoteException;
    void scheduleSleeping(IBinder token, boolean sleeping) throws RemoteException;
    void scheduleResumeActivity(IBinder token, int procState, boolean isForward, Bundle resumeArgs)
            throws RemoteException;
    void scheduleSendResult(IBinder token, List<ResultInfo> results) throws RemoteException;
    void scheduleLaunchActivity(Intent intent, IBinder token, int ident,
            ActivityInfo info, Configuration curConfig, Configuration overrideConfig,
            CompatibilityInfo compatInfo, String referrer, IVoiceInteractor voiceInteractor,
            int procState, Bundle state, PersistableBundle persistentState,
            List<ResultInfo> pendingResults, List<ReferrerIntent> pendingNewIntents,
            boolean notResumed, boolean isForward, ProfilerInfo profilerInfo) throws RemoteException;
    void scheduleRelaunchActivity(IBinder token, List<ResultInfo> pendingResults,
            List<ReferrerIntent> pendingNewIntents, int configChanges, boolean notResumed,
            Configuration config, Configuration overrideConfig) throws RemoteException;
    void scheduleNewIntent(List<ReferrerIntent> intent, IBinder token) throws RemoteException;
    void scheduleDestroyActivity(IBinder token, boolean finished,
            int configChanges) throws RemoteException;
    void scheduleReceiver(Intent intent, ActivityInfo info, CompatibilityInfo compatInfo,
            int resultCode, String data, Bundle extras, boolean sync,
            int sendingUser, int processState) throws RemoteException;
    // 省略多個方法
    void scheduleBindService(IBinder token,
            Intent intent, boolean rebind, int processState) throws RemoteException;
    void scheduleUnbindService(IBinder token,
            Intent intent) throws RemoteException;
    //省略多個方法
    void scheduleStopService(IBinder token) throws RemoteException;
    //省略多個方法
    void bindApplication(String packageName, ApplicationInfo info, List<ProviderInfo> providers,
            ComponentName testName, ProfilerInfo profilerInfo, Bundle testArguments,
            IInstrumentationWatcher testWatcher, IUiAutomationConnection uiAutomationConnection,
            int debugMode, boolean openGlTrace, boolean restrictedBackupMode, boolean persistent,
            Configuration config, CompatibilityInfo compatInfo, Map<String, IBinder> services,
            Bundle coreSettings) throws RemoteException;
    void scheduleExit() throws RemoteException;
    // 省略多行代碼
    void scheduleRegisteredReceiver(IIntentReceiver receiver, Intent intent,
            int resultCode, String data, Bundle extras, boolean ordered,
            boolean sticky, int sendingUser, int processState) throws RemoteException;
    void scheduleLowMemory() throws RemoteException;
    void scheduleActivityConfigurationChanged(IBinder token, Configuration overrideConfig)
            throws RemoteException;
  //省略多個方法
    void scheduleTrimMemory(int level) throws RemoteException;
  //省略多個方法

}
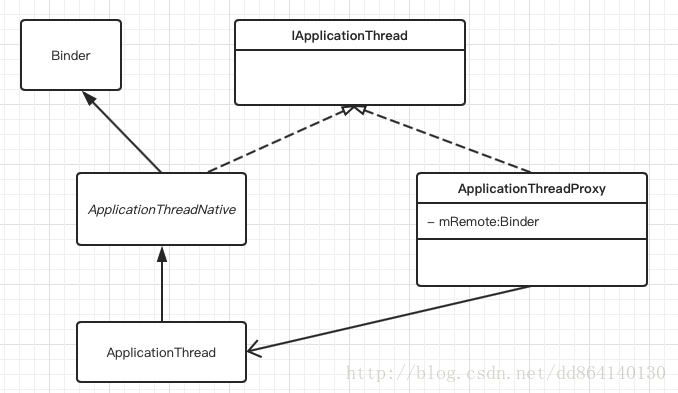
通過大體的閱讀IApplicationThread中代碼,我們隱約有些熟悉,比如schedulePauseActivity方法應該就是負責Activity中Pause()執行的,scheduleLaunchActivity()應該是負責Activity創建的,scheduleBindService()負責Service綁定的,到現在,我們心裡應該會想到IApplicationThread的真正實現類ApplicationThread(位於ActivityThread.java中)就是負責Activity,Service等的創建或其他操作,先來簡單的看起其類關系圖:
我們繼續看Instrumentation的execStartActivity()方法:
int result = ActivityManagerNative.getDefault()
                .startActivity(whoThread, who.getBasePackageName(), intent,
                        intent.resolveTypeIfNeeded(who.getContentResolver()),
                        token, target != null ? target.mEmbeddedID : null,
                        requestCode, 0, null, options);
此時啟動Activity這一操作交給了ActivityManagerNative.getDefault()的startActivity()方法.ActivityManagerNative是一個抽象類,繼承了Binder,同時它又實現了IActivityManager接口,其實現類是ActivityManagerService(AMS).
ActivityManagerNative.getDefault()方法返回IActivityManager類型對象,其實現類是ActivityManagerProxy,其構造函數接受一個IBinder類型,其實就是ActivityManagerService對象,此時你應該發現ActivityManagerNative,IActivityManager以及ActivityManagerProxy三者之間的聯系如下:
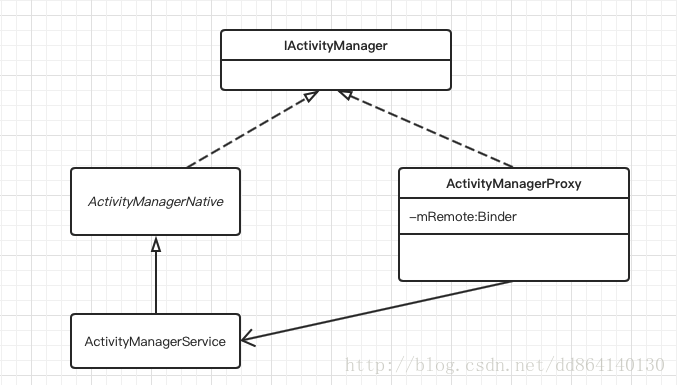
通過上圖,我們看到這三者就是一個典型的代理模式:ActivityManagerProxy就是ActivityManagerService的遠程代理,那麼此時ActivityManagerNative的作用也就很明顯:返回AMS的遠程代理對象,這樣Launcher應用就能和AMS服務通信了.
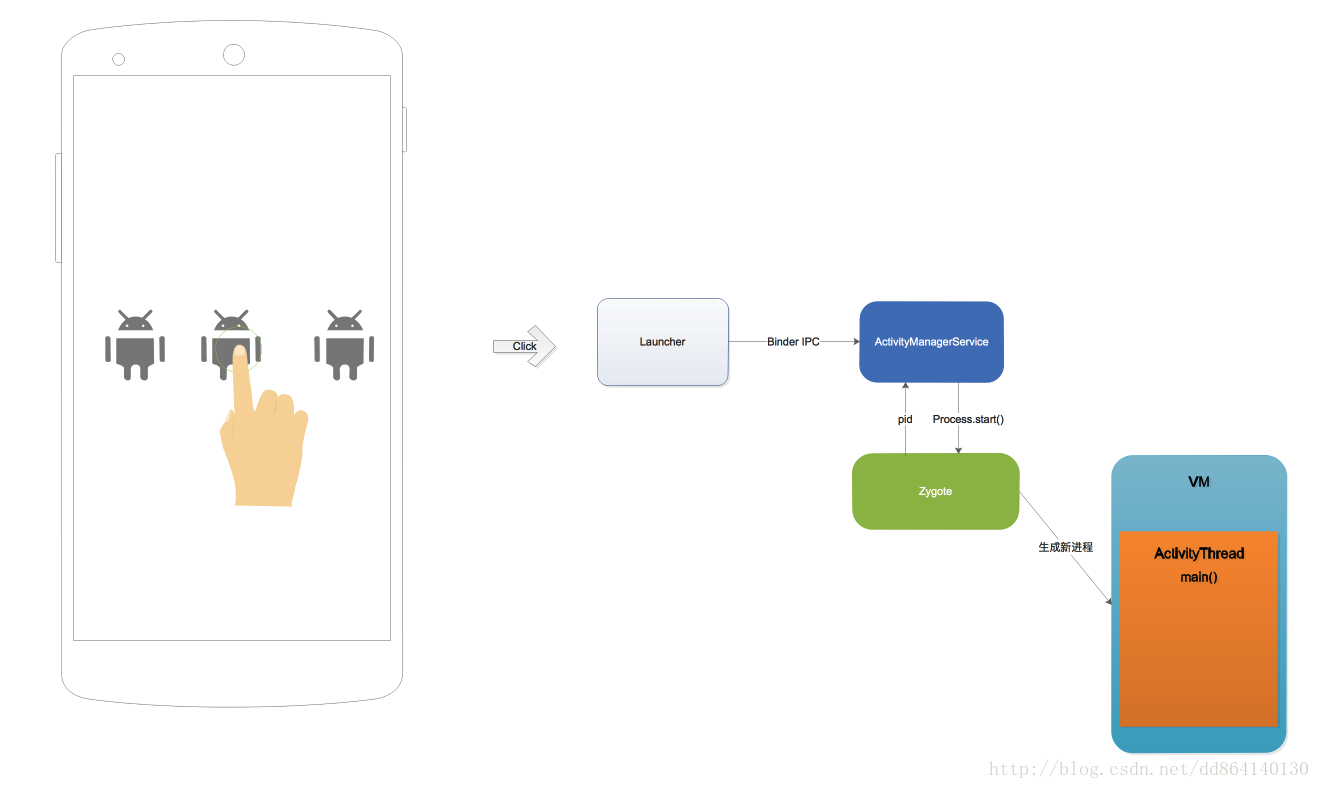
我們用一張圖來簡單的描述上述整個流程:
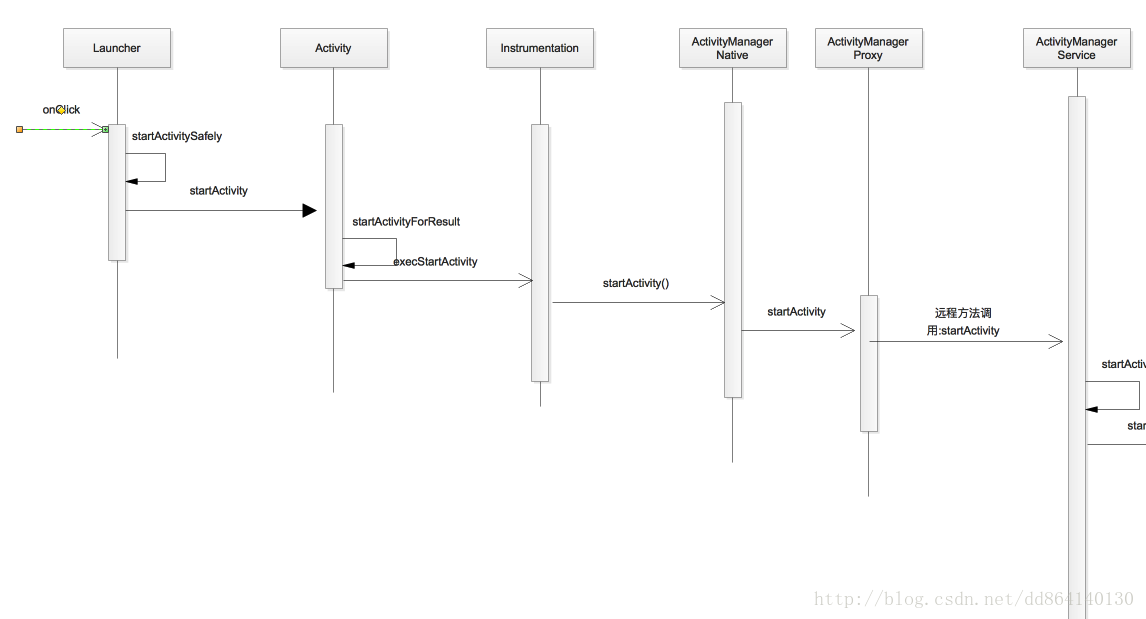
現在我們跳到AMS的startActivity()方法繼續往下看:
@Override
public int startActivity(IBinder whoThread, String callingPackage,
		Intent intent, String resolvedType, Bundle options) {
	checkCaller();

	int callingUser = UserHandle.getCallingUserId();
	TaskRecord tr;
	IApplicationThread appThread;
	synchronized (ActivityManagerService.this) {
		tr = mStackSupervisor.anyTaskForIdLocked(mTaskId);
		if (tr == null) {
			throw new IllegalArgumentException("Unable to find task ID " + mTaskId);
		}
		appThread = ApplicationThreadNative.asInterface(whoThread);
		if (appThread == null) {
			throw new IllegalArgumentException("Bad app thread " + appThread);
		}
	}
  //交給mStackSupervisor繼續
	return mStackSupervisor.startActivityMayWait(appThread, -1, callingPackage, intent,
			resolvedType, null, null, null, null, 0, 0, null, null,
			null, options, false, callingUser, null, tr);
}
首先我們注意到該方法的第一個參數是IBinder類型,其實質就是前邊ApplicationThread的實例,也就是ActivityThread中的mAppThread對象.接下來交給ActivityStackSupervisor實例的startActivityMayWait()繼續啟動:
final int startActivityMayWait(IApplicationThread caller, int callingUid,
            String callingPackage, Intent intent, String resolvedType,
            IVoiceInteractionSession voiceSession, IVoiceInteractor voiceInteractor,
            IBinder resultTo, String resultWho, int requestCode, int startFlags,
            ProfilerInfo profilerInfo, WaitResult outResult, Configuration config,
            Bundle options, boolean ignoreTargetSecurity, int userId,
            IActivityContainer iContainer, TaskRecord inTask) {
        // Refuse possible leaked file descriptors
        if (intent != null && intent.hasFileDescriptors()) {
            throw new IllegalArgumentException("File descriptors passed in Intent");
        }
        boolean componentSpecified = intent.getComponent() != null;

        // Don't modify the client's object!
        intent = new Intent(intent);

        // Collect information about the target of the Intent.
        ActivityInfo aInfo =
                resolveActivity(intent, resolvedType, startFlags, profilerInfo, userId);

        ActivityContainer container = (ActivityContainer)iContainer;
        synchronized (mService) {
            //省略多行代碼
            int res = startActivityLocked(caller, intent, resolvedType, aInfo,
                    voiceSession, voiceInteractor, resultTo, resultWho,
                    requestCode, callingPid, callingUid, callingPackage,
                    realCallingPid, realCallingUid, startFlags, options, ignoreTargetSecurity,
                    componentSpecified, null, container, inTask);
            // 省略多行代碼

            return res;
        }
    }
該方法看起來非常復雜,但是流程確實蠻清晰的,通過resolveActivity()方法來獲取ActivityInfo,接下來是一些其他操作(在不影響流程的前提下,省略多行),然後繼續調用startActivityLocked():
final int startActivityLocked(IApplicationThread caller,
            Intent intent, String resolvedType, ActivityInfo aInfo,
            IVoiceInteractionSession voiceSession, IVoiceInteractor voiceInteractor,
            IBinder resultTo, String resultWho, int requestCode,
            int callingPid, int callingUid, String callingPackage,
            int realCallingPid, int realCallingUid, int startFlags, Bundle options,
            boolean ignoreTargetSecurity, boolean componentSpecified, ActivityRecord[] outActivity,
            ActivityContainer container, TaskRecord inTask) {
        int err = ActivityManager.START_SUCCESS;
        //省略多行代碼
        err = startActivityUncheckedLocked(r, sourceRecord, voiceSession, voiceInteractor,
                startFlags, true, options, inTask);

        return err;
    }
在該方法中,又繼續調用了startActivityUncheckedLocked()方法,拋開其中細節,我們發現該方法中又繼續調用了ActivityStack的resumeTopActivityLocked()來繼續啟動流程:
 final boolean resumeTopActivityLocked(ActivityRecord prev, Bundle options) {
        if (mStackSupervisor.inResumeTopActivity) {
            // Don't even start recursing.
            return false;
        }

        boolean result = false;
        try {
            // Protect against recursion.
            mStackSupervisor.inResumeTopActivity = true;
            if (mService.mLockScreenShown == ActivityManagerService.LOCK_SCREEN_LEAVING) {
                mService.mLockScreenShown = ActivityManagerService.LOCK_SCREEN_HIDDEN;
                mService.updateSleepIfNeededLocked();
            }
            //繼續啟動
            result = resumeTopActivityInnerLocked(prev, options);
        } finally {
            mStackSupervisor.inResumeTopActivity = false;
        }
        return result;
    }
從上面的代碼看出,resumeTopActivitiesLocked()方法繼續調用了resumeTopActivityInnerLocked()方法,該方法內部又反過來調用了ActivityStackSupervisor的resumeTopActivitiesLocked()方法
private boolean resumeTopActivityInnerLocked(ActivityRecord prev, Bundle options) {
                //省略多行代碼

                mStackSupervisor.startSpecificActivityLocked(next, true, false);
                if (DEBUG_STACK) mStackSupervisor.validateTopActivitiesLocked();
                return true;
            }
在上述代碼中,由於應用是第一次啟動,因此這裡跳過了一些判斷代碼,最終又調用了ActivityStackSupervisor的startSpecificActivityLocked()來繼續啟動流程:
void startSpecificActivityLocked(ActivityRecord r,
            boolean andResume, boolean checkConfig) {
        // Is this activity's application already running?
        ProcessRecord app = mService.getProcessRecordLocked(r.processName,
                r.info.applicationInfo.uid, true);

        r.task.stack.setLaunchTime(r);
        //該應用的進程已經存在
        if (app != null && app.thread != null) {
            try {
                if ((r.info.flags&ActivityInfo.FLAG_MULTIPROCESS) == 0
                        || !"android".equals(r.info.packageName)) {

                    app.addPackage(r.info.packageName, r.info.applicationInfo.versionCode,
                            mService.mProcessStats);
                }
                realStartActivityLocked(r, app, andResume, checkConfig);
                return;
            } catch (RemoteException e) {
                Slog.w(TAG, "Exception when starting activity "
                        + r.intent.getComponent().flattenToShortString(), e);
            }
        }

        //該應用的進程尚未創建,調用AMS的startProcessLocked()
        mService.startProcessLocked(r.processName, r.info.applicationInfo, true, 0,
                "activity", r.intent.getComponent(), false, false, true);
    }
應用是第一次啟動,此時系統尚未為其創建進程,因此調用AMS的startProcessLocked()方法,如果該應用已經存在,則調用realStartActivityLocked().由於這裡我們的應用第一次啟動,所以從startProcessLocked()往下看:
final ProcessRecord startProcessLocked(String processName,
		ApplicationInfo info, boolean knownToBeDead, int intentFlags,
		String hostingType, ComponentName hostingName, boolean allowWhileBooting,
		boolean isolated, boolean keepIfLarge) {
	return startProcessLocked(processName, info, knownToBeDead, intentFlags, hostingType,hostingName, allowWhileBooting, isolated, 0 , keepIfLarge,null , null , null,null);
}
該方法直接調用了其對應的重載方法,並在該其中繼續調用了重載方法:
  private final void startProcessLocked(ProcessRecord app, String hostingType,
		String hostingNameStr, String abiOverride, String entryPoint, String[] entryPointArgs) {
	long startTime = SystemClock.elapsedRealtime();
		//省略多行代碼
		boolean isActivityProcess = (entryPoint == null);

		//默認情況下,entryPoint為null,此時虛擬機啟動後默認從ActivityThread的main()方法執行
		if (entryPoint == null) entryPoint = "android.app.ActivityThread";
		Trace.traceBegin(Trace.TRACE_TAG_ACTIVITY_MANAGER, "Start proc: " +
				app.processName);

		//要求Zygote進程為其創建進程
		checkTime(startTime, "startProcess: asking zygote to start proc");
		Process.ProcessStartResult startResult = Process.start(entryPoint,
				app.processName, uid, uid, gids, debugFlags, mountExternal,
				app.info.targetSdkVersion, app.info.seinfo, requiredAbi, instructionSet,
				app.info.dataDir, entryPointArgs);
		checkTime(startTime, "startProcess: returned from zygote!");
		Trace.traceEnd(Trace.TRACE_TAG_ACTIVITY_MANAGER);

	   //省略多行代碼
	} catch (RuntimeException e) {
		//省略
	}
}
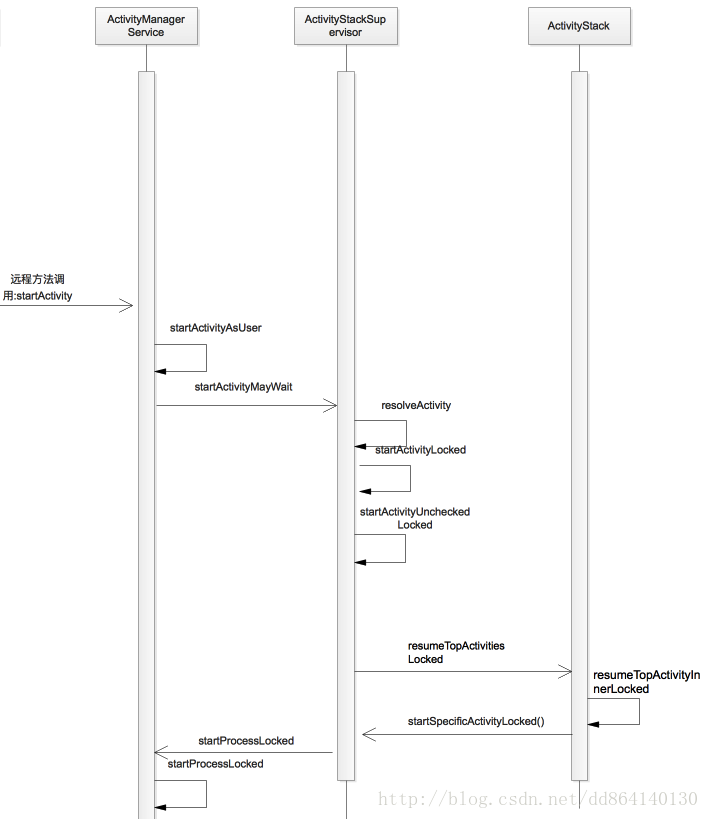
到現在我們同樣用一張圖來描述這過程:
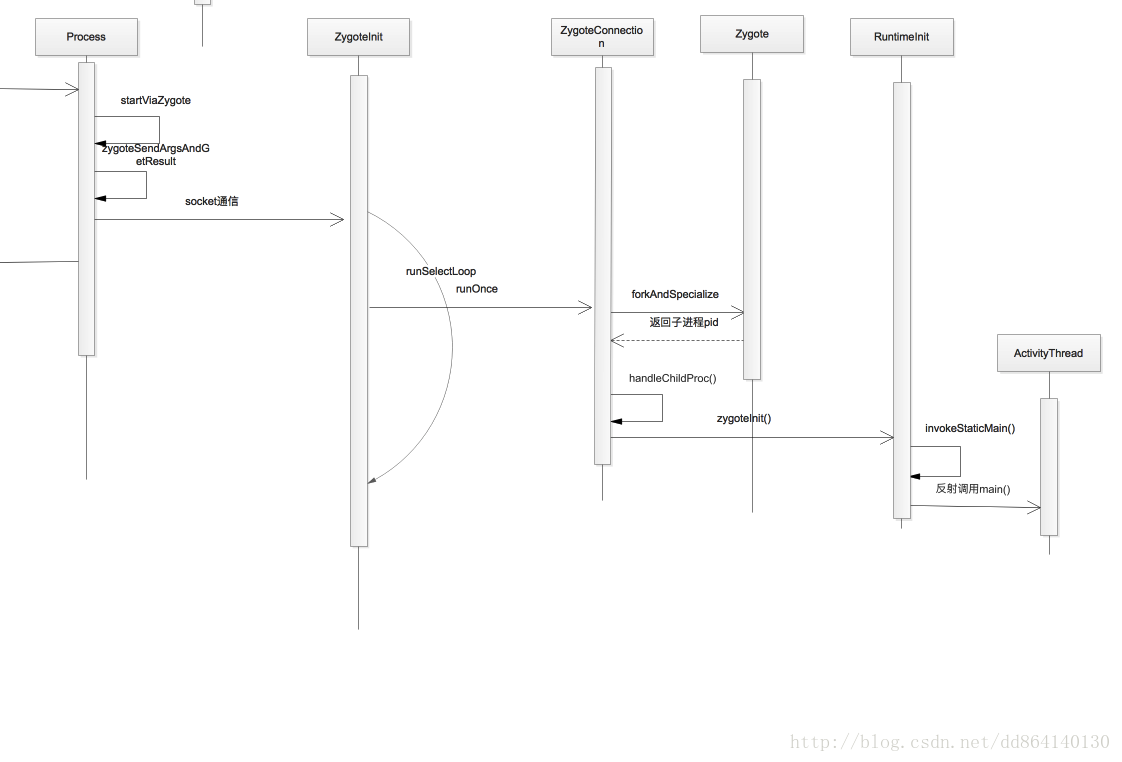
這裡通過Process的start()方法來請求Zygote進程為其生成新進程,在start()方法中又直接調用了startViaZygote():
//processClass是調用者傳的android.app.ActivityThread
private static ProcessStartResult startViaZygote(final String processClass,
                                  final String niceName,
                                  final int uid, final int gid,
                                  final int[] gids,
                                  int debugFlags, int mountExternal,
                                  int targetSdkVersion,
                                  String seInfo,
                                  String abi,
                                  String instructionSet,
                                  String appDataDir,
                                  String[] extraArgs)
                                  throws ZygoteStartFailedEx {
        synchronized(Process.class) {
            ArrayList<String> argsForZygote = new ArrayList<String>();

            // --runtime-args, --setuid=, --setgid=,
            // and --setgroups= must go first
            //--runtime-agrs決定了新建進程執行方式,
            argsForZygote.add("--runtime-args");
            argsForZygote.add("--setuid=" + uid);
            argsForZygote.add("--setgid=" + gid);
            if ((debugFlags & Zygote.DEBUG_ENABLE_JNI_LOGGING) != 0) {
                argsForZygote.add("--enable-jni-logging");
            }
            if ((debugFlags & Zygote.DEBUG_ENABLE_SAFEMODE) != 0) {
                argsForZygote.add("--enable-safemode");
            }
            if ((debugFlags & Zygote.DEBUG_ENABLE_DEBUGGER) != 0) {
                argsForZygote.add("--enable-debugger");
            }
            if ((debugFlags & Zygote.DEBUG_ENABLE_CHECKJNI) != 0) {
                argsForZygote.add("--enable-checkjni");
            }
            if ((debugFlags & Zygote.DEBUG_ENABLE_JIT) != 0) {
                argsForZygote.add("--enable-jit");
            }
            if ((debugFlags & Zygote.DEBUG_GENERATE_DEBUG_INFO) != 0) {
                argsForZygote.add("--generate-debug-info");
            }
            if ((debugFlags & Zygote.DEBUG_ENABLE_ASSERT) != 0) {
                argsForZygote.add("--enable-assert");
            }
            if (mountExternal == Zygote.MOUNT_EXTERNAL_DEFAULT) {
                argsForZygote.add("--mount-external-default");
            } else if (mountExternal == Zygote.MOUNT_EXTERNAL_READ) {
                argsForZygote.add("--mount-external-read");
            } else if (mountExternal == Zygote.MOUNT_EXTERNAL_WRITE) {
                argsForZygote.add("--mount-external-write");
            }
            argsForZygote.add("--target-sdk-version=" + targetSdkVersion);

            //TODO optionally enable debuger
            //argsForZygote.add("--enable-debugger");

            // --setgroups is a comma-separated list
            if (gids != null && gids.length > 0) {
                StringBuilder sb = new StringBuilder();
                sb.append("--setgroups=");

                int sz = gids.length;
                for (int i = 0; i < sz; i++) {
                    if (i != 0) {
                        sb.append(',');
                    }
                    sb.append(gids[i]);
                }

                argsForZygote.add(sb.toString());
            }

            if (niceName != null) {
                argsForZygote.add("--nice-name=" + niceName);
            }

            if (seInfo != null) {
                argsForZygote.add("--seinfo=" + seInfo);
            }

            if (instructionSet != null) {
                argsForZygote.add("--instruction-set=" + instructionSet);
            }

            if (appDataDir != null) {
                argsForZygote.add("--app-data-dir=" + appDataDir);
            }

            argsForZygote.add(processClass);

            if (extraArgs != null) {
                for (String arg : extraArgs) {
                    argsForZygote.add(arg);
                }
            }

            return zygoteSendArgsAndGetResult(openZygoteSocketIfNeeded(abi), argsForZygote);
        }
    }
上面的方法非常簡單,設置一堆參數後然後又調用了zygoteSendArgsAndGetResult()向Zygote發送創建進程請求,該方法內部就是和Zygote進行Socket通信.Zygote接受到該請求,並將該請求封裝為ZygoteConnection對象,具體代碼在ZygoteInit.java當中,來看runSelectLoop():
private static void runSelectLoop(String abiList) throws MethodAndArgsCaller {
	ArrayList<FileDescriptor> fds = new ArrayList<FileDescriptor>();
	ArrayList<ZygoteConnection> peers = new ArrayList<ZygoteConnection>();

	fds.add(sServerSocket.getFileDescriptor());
	peers.add(null);

	while (true) {
		StructPollfd[] pollFds = new StructPollfd[fds.size()];
		for (int i = 0; i < pollFds.length; ++i) {
			pollFds[i] = new StructPollfd();
			pollFds[i].fd = fds.get(i);
			pollFds[i].events = (short) POLLIN;
		}
		try {
			Os.poll(pollFds, -1);
		} catch (ErrnoException ex) {
			throw new RuntimeException("poll failed", ex);
		}
		for (int i = pollFds.length - 1; i >= 0; --i) {
			if ((pollFds[i].revents & POLLIN) == 0) {
				continue;
			}
			if (i == 0) {
			  //接受來自AMS的請求
				ZygoteConnection newPeer = acceptCommandPeer(abiList);
				peers.add(newPeer);
				fds.add(newPeer.getFileDesciptor());
			} else {
				boolean done = peers.get(i).runOnce();
				if (done) {
					peers.remove(i);
					fds.remove(i);
				}
			}
		}
	}
}
此時Zygote作為服務端不斷監聽來自AMS的請求,通過acceptCommandPeer()將請求封裝為ZygoteConection對象,並將Socket文件標識存在fds中,請求放在peers中.而runOnce()則在下一次循環中處理請求,具體代碼如下:
boolean runOnce() throws ZygoteInit.MethodAndArgsCaller {

	String args[];
	Arguments parsedArgs = null;
	FileDescriptor[] descriptors;

	try {
		//讀取請求中的參數
		args = readArgumentList();
		descriptors = mSocket.getAncillaryFileDescriptors();
	} catch (IOException ex) {
		Log.w(TAG, "IOException on command socket " + ex.getMessage());
		closeSocket();
		return true;
	}
	//省略多行代碼
	/** the stderr of the most recent request, if avail */

	PrintStream newStderr = null;

	if (descriptors != null && descriptors.length >= 3) {
		newStderr = new PrintStream(
				new FileOutputStream(descriptors[2]));
	}

	int pid = -1;
	FileDescriptor childPipeFd = null;
	FileDescriptor serverPipeFd = null;

	try {
		//將請求參數封裝成Arguments對象
		parsedArgs = new Arguments(args);

		//省略多行代碼
		//創建新進程或者說創建VM實例
		pid = Zygote.forkAndSpecialize(parsedArgs.uid, parsedArgs.gid, parsedArgs.gids,parsedArgs.debugFlags, rlimits, parsedArgs.mountExternal, parsedArgs.seInfo, parsedArgs.niceName, fdsToClose, parsedArgs.instructionSet,parsedArgs.appDataDir);
	} catch (ErrnoException ex) {
	   //省略多行代碼
	}

	try {

		if (pid == 0) {//pid=0表示剛才fork出的子進程
			IoUtils.closeQuietly(serverPipeFd);
			serverPipeFd = null;
			handleChildProc(parsedArgs, descriptors, childPipeFd, newStderr);

			// should never get here, the child is expected to either
			// throw ZygoteInit.MethodAndArgsCaller or exec().
			return true;
		} else {
			// in parent...pid of < 0 means failure
			IoUtils.closeQuietly(childPipeFd);
			childPipeFd = null;
			return handleParentProc(pid, descriptors, serverPipeFd, parsedArgs);
		}
	} finally {
		IoUtils.closeQuietly(childPipeFd);
		IoUtils.closeQuietly(serverPipeFd);
	}
}
上面的代碼比較簡單主要是讀取請求參數並將其封裝為Arguments對象,Arguments包含一下參數:
--setuid=
--setgid=
--target-sdk-version=
--enable-debugger
--enable-safemode
--enable-checkjni
--enable-jit
--generate-debug-info
--enable-jni-logging
--enable-assert
--runtime-args
--seinfo=
--capabilities=
--rlimit=
--setgroups=
--invoke-with
--nice-name=
--mount-external-default
--mount-external-read
--mount-external-write
--query-abi-list
--instruction-set=
--app-data-dir=
並通過Zygote的forkAndSpecialize()來生成新進程,成功後pid的值為0,這裡我們只關心創建成功的情況,接下來,在新的進程中關閉從Zygote繼承來的Socket,然後通過handleChildProc()繼續後續操作.
private void handleChildProc(Arguments parsedArgs,
		FileDescriptor[] descriptors, FileDescriptor pipeFd, PrintStream newStderr)
		throws ZygoteInit.MethodAndArgsCaller {
	//關閉AMS和Zygote之間的Socket連接
	closeSocket();
	ZygoteInit.closeServerSocket();

	if (descriptors != null) {
		try {
			Os.dup2(descriptors[0], STDIN_FILENO);
			Os.dup2(descriptors[1], STDOUT_FILENO);
			Os.dup2(descriptors[2], STDERR_FILENO);

			for (FileDescriptor fd: descriptors) {
				IoUtils.closeQuietly(fd);
			}
			newStderr = System.err;
		} catch (ErrnoException ex) {
			Log.e(TAG, "Error reopening stdio", ex);
		}
	}

	if (parsedArgs.niceName != null) {
		Process.setArgV0(parsedArgs.niceName);
	}

	// End of the postFork event.
	Trace.traceEnd(Trace.TRACE_TAG_ACTIVITY_MANAGER);
	if (parsedArgs.invokeWith != null) {
		//通過系統調用執行進程
		WrapperInit.execApplication(parsedArgs.invokeWith,
				parsedArgs.niceName, parsedArgs.targetSdkVersion,
				VMRuntime.getCurrentInstructionSet(),
				pipeFd, parsedArgs.remainingArgs);
	} else {
	  //尋找相應目標類的main()方法並執行
		RuntimeInit.zygoteInit(parsedArgs.targetSdkVersion,
				parsedArgs.remainingArgs, null /* classLoader */);
	}
}
這裡根據invokeWith參數決定使用哪種執行方式,invokeWith不為空則通過WrapperInit執行,否則通過RuntimeInit方式執行.對於這兩者不做過多的解釋,參數—runtime-args決定了新進程都是以RuntimeInit方式啟動,目前就記住SystemServer和apk都是通過RuntimeInit來的即可.
現在來看RuntimeInit的zygoteInit()方法:
public static final void zygoteInit(int targetSdkVersion, String[] argv, ClassLoader classLoader)
		throws ZygoteInit.MethodAndArgsCaller {
	if (DEBUG) Slog.d(TAG, "RuntimeInit: Starting application from zygote");

	Trace.traceBegin(Trace.TRACE_TAG_ACTIVITY_MANAGER, "RuntimeInit");
	redirectLogStreams();

	commonInit();
	nativeZygoteInit();
	applicationInit(targetSdkVersion, argv, classLoader);
}
commonInit()為VM設置默認了線程異常處理器,然後調用了本地方法nativeZygoteInit(),其具體實現在AndroidRuntime.cpp下,位於frameworks/base/core/jni/AndroidRuntime.cpp
static void com_android_internal_os_RuntimeInit_nativeZygoteInit(JNIEnv* env, jobject clazz)
{
    gCurRuntime->onZygoteInit();
}
在該方法中又調用了其子類AppRutime的onZygoteInit()方法,AppRuntime位於frameworks/base/cmds/app_process/app_main.cpp
virtual void onZygoteInit()
{
	sp<ProcessState> proc = ProcessState::self();
	ALOGV("App process: starting thread pool.\n");
	proc->startThreadPool();
}
為了不影響後文,我們先回到RuntimeInit的applicationInit():
private static void applicationInit(int targetSdkVersion, String[] argv, ClassLoader classLoader)
		throws ZygoteInit.MethodAndArgsCaller {

	nativeSetExitWithoutCleanup(true);
	//VM設置
	VMRuntime.getRuntime().setTargetHeapUtilization(0.75f);
	VMRuntime.getRuntime().setTargetSdkVersion(targetSdkVersion);

	final Arguments args;
	try {
		args = new Arguments(argv);
	} catch (IllegalArgumentException ex) {
		Slog.e(TAG, ex.getMessage());
		// let the process exit
		return;
	}
	Trace.traceEnd(Trace.TRACE_TAG_ACTIVITY_MANAGER);

	//反射執行ActivityThread的main函數
	invokeStaticMain(args.startClass, args.startArgs, classLoader);
}
其中最關鍵的就是invokeStaticMain()方法:
private static void invokeStaticMain(String className, String[] argv, ClassLoader classLoader)
            throws ZygoteInit.MethodAndArgsCaller {
        Class<?> cl;

        try {
            cl = Class.forName(className, true, classLoader);
        } catch (ClassNotFoundException ex) {
            throw new RuntimeException(
                    "Missing class when invoking static main " + className,
                    ex);
        }

        Method m;
        try {
            m = cl.getMethod("main", new Class[] { String[].class });
        } catch (NoSuchMethodException ex) {
            throw new RuntimeException(
                    "Missing static main on " + className, ex);
        } catch (SecurityException ex) {
            throw new RuntimeException(
                    "Problem getting static main on " + className, ex);
        }

        int modifiers = m.getModifiers();
        if (! (Modifier.isStatic(modifiers) && Modifier.isPublic(modifiers))) {
            throw new RuntimeException(
                    "Main method is not public and static on " + className);
        }

        //該異常會在ZygoteInit.main()中被捕獲,然後在異常處理中調用MethodAndArgsCaller的run()
        //方法,這樣就清除了進程中所有的棧幀
        throw new ZygoteInit.MethodAndArgsCaller(m, argv);
    }
在上面的代碼中,最終的執行是通過拋出MethodAndArgsCaller的方式,來看一下MethodAndArgsCaller類的定義:
public static class MethodAndArgsCaller extends Exception
		implements Runnable {
	/** method to call */
	private final Method mMethod;

	/** argument array */
	private final String[] mArgs;

	public MethodAndArgsCaller(Method method, String[] args) {
		mMethod = method;
		mArgs = args;
	}

	public void run() {
		try {
			mMethod.invoke(null, new Object[] { mArgs });
		} catch (IllegalAccessException ex) {
			throw new RuntimeException(ex);
		} catch (InvocationTargetException ex) {
			Throwable cause = ex.getCause();
			if (cause instanceof RuntimeException) {
				throw (RuntimeException) cause;
			} else if (cause instanceof Error) {
				throw (Error) cause;
			}
			throw new RuntimeException(ex);
		}
	}
}
MethodAndArgsCaller繼承Exception類並實現Runnable接口.但不管如何,現在最終開始執行ActivityThread的入口函數main():
public static void main(String[] args) {
	Trace.traceBegin(Trace.TRACE_TAG_ACTIVITY_MANAGER, "ActivityThreadMain");
	SamplingProfilerIntegration.start();
	CloseGuard.setEnabled(false);

	Environment.initForCurrentUser();
	EventLogger.setReporter(new EventLoggingReporter());

	AndroidKeyStoreProvider.install();
	final File configDir = Environment.getUserConfigDirectory(UserHandle.myUserId());
	TrustedCertificateStore.setDefaultUserDirectory(configDir);

	Process.setArgV0("<pre-initialized>");

	Looper.prepareMainLooper();

	ActivityThread thread = new ActivityThread();
	thread.attach(false);

	if (sMainThreadHandler == null) {
		sMainThreadHandler = thread.getHandler();
	}

	if (false) {
		Looper.myLooper().setMessageLogging(new
				LogPrinter(Log.DEBUG, "ActivityThread"));
	}

	// End of event ActivityThreadMain.
	Trace.traceEnd(Trace.TRACE_TAG_ACTIVITY_MANAGER);
	Looper.loop();

	throw new RuntimeException("Main thread loop unexpectedly exited");
}
當main()開始運行時,主線程正式開始運行,這也就是我們所說的UI線程.同樣我們用一張簡單的圖來描述上述過程:
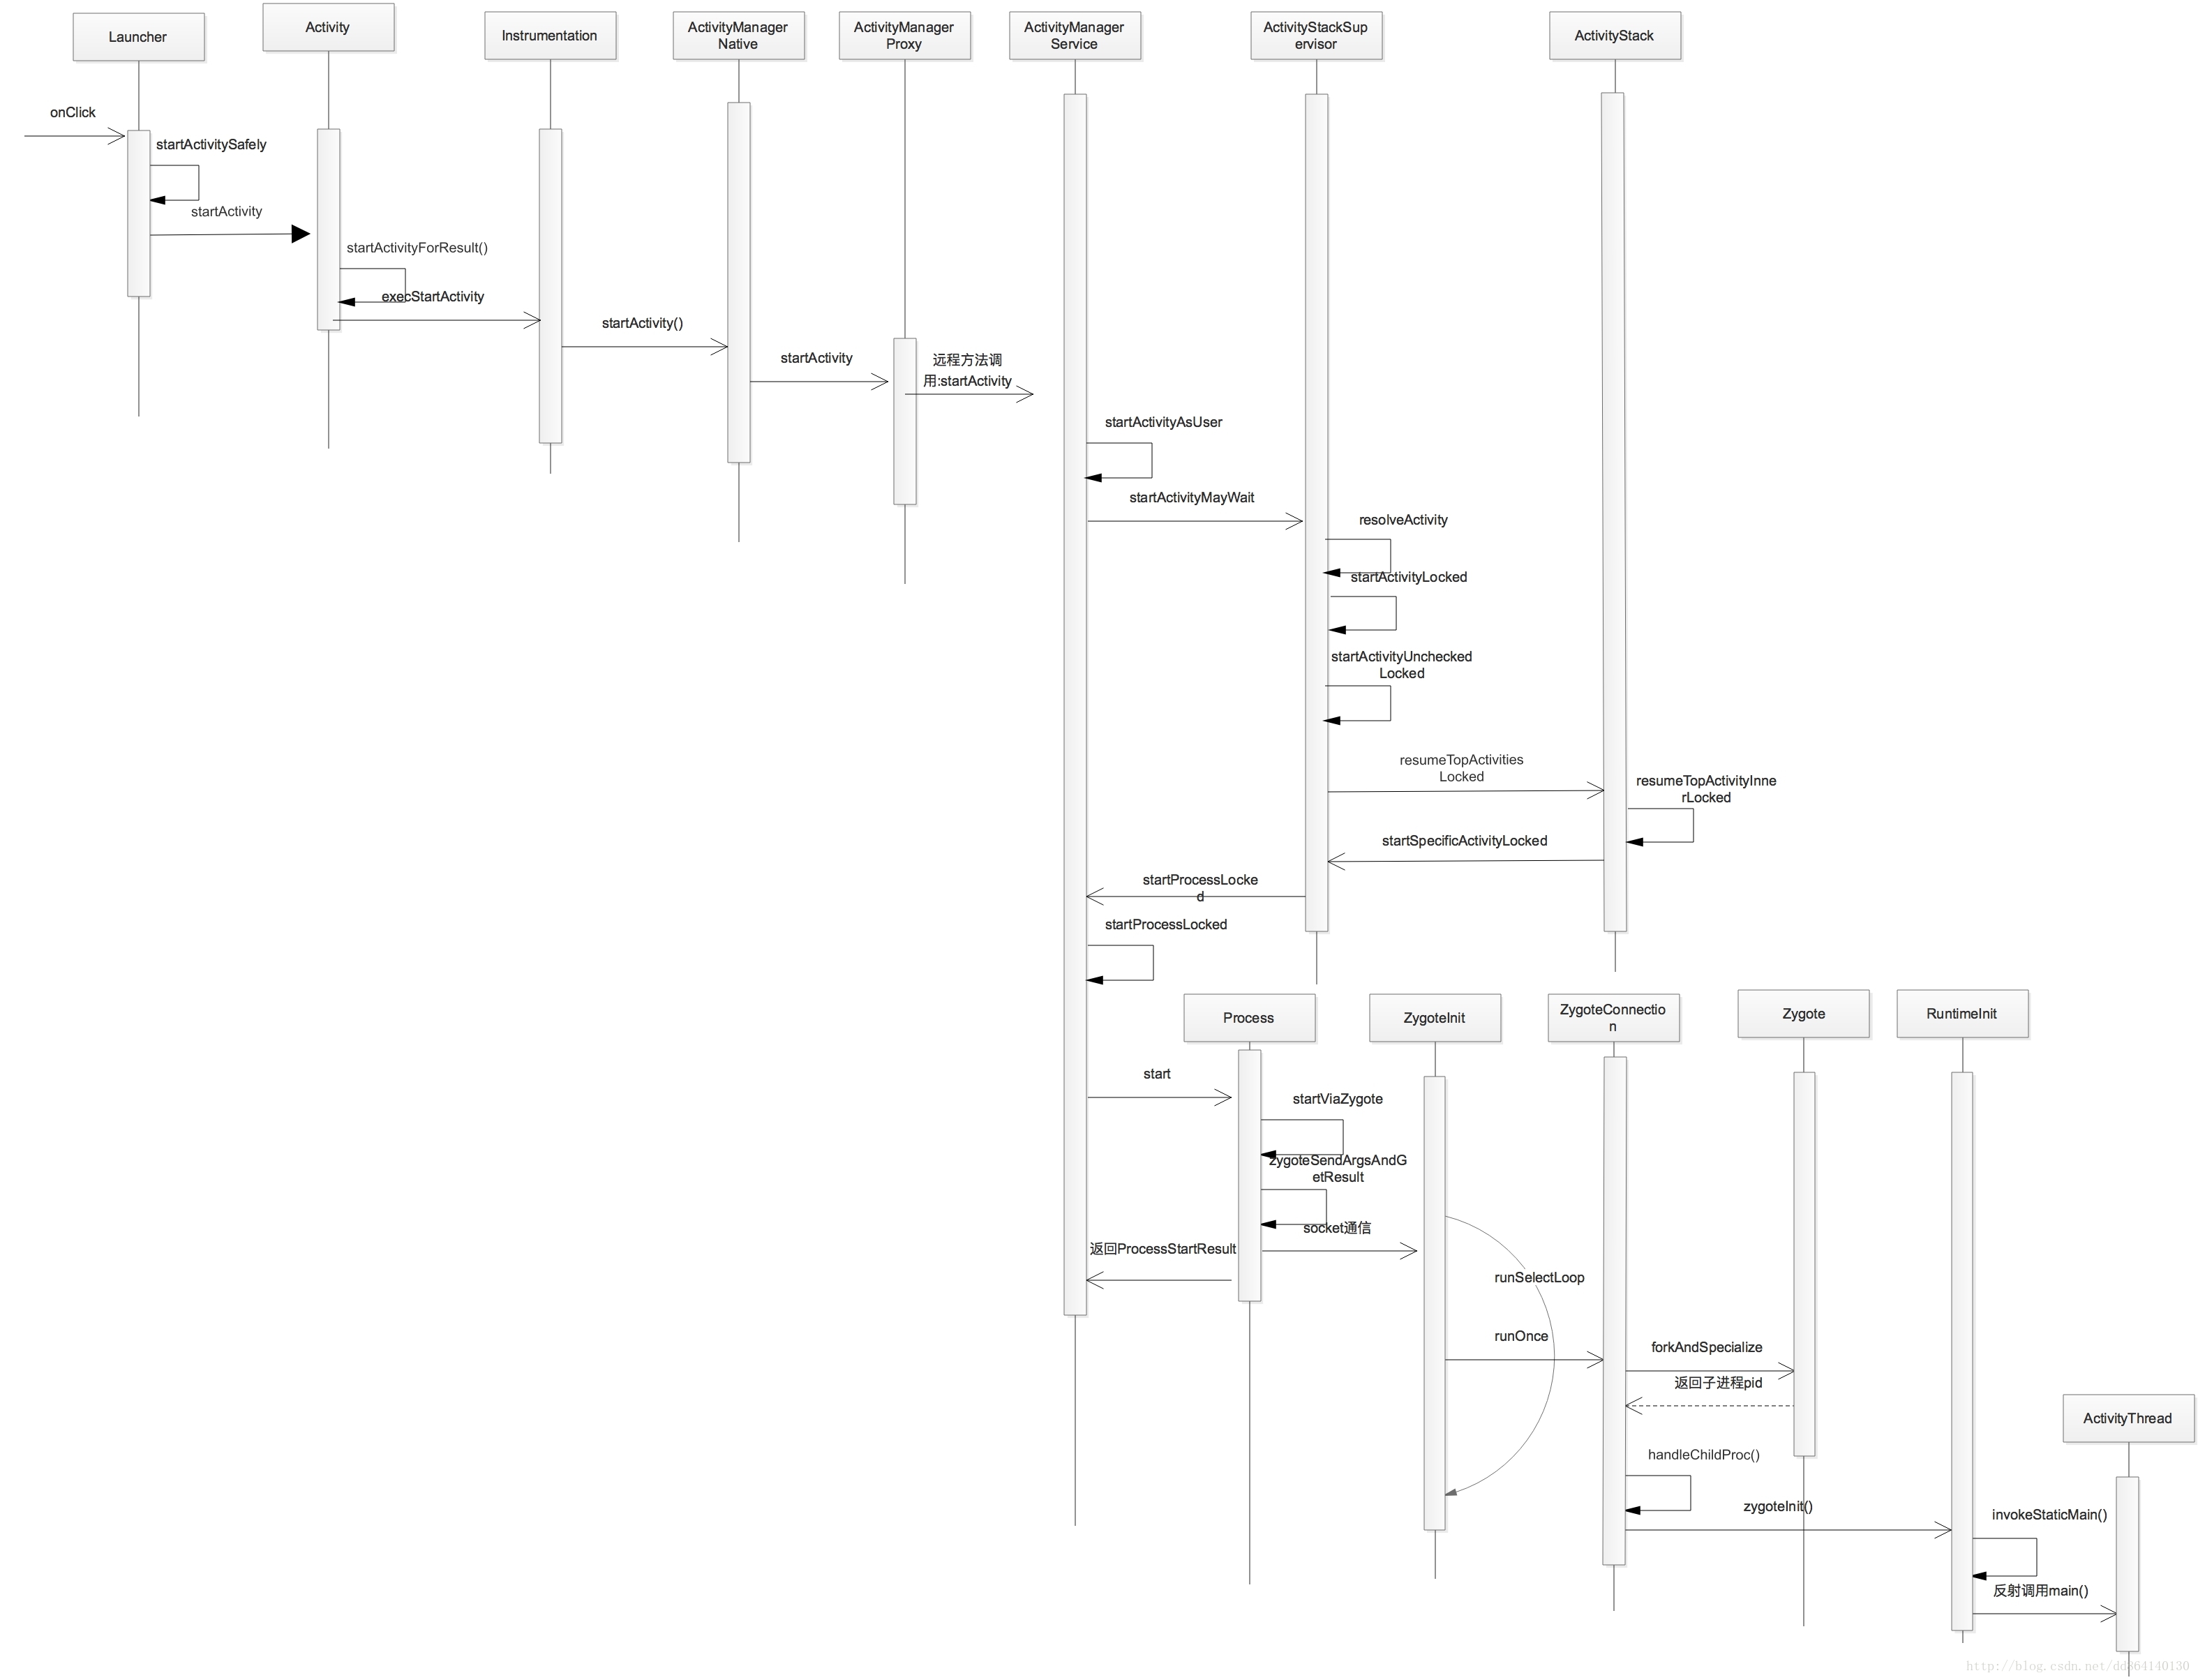
到現在,我們已經完全走完應用冷啟動的流程,上面的過程看起來繁瑣,但是結合時序圖來看應該是比較清晰的.拋開細節不看,那麼上述的整個流程可以用下圖概括:
最後為了方便系統理解整個流程,附上一張相對完整的時序圖:
 提高Android開發效率的9個Web工具
在Google的廣大支持下,便捷開發Android程序的Native工具層出不窮。其實Android開發涉及到的范圍也不小,一些Web工具有時候也會帶來事半功倍的
 Android異步消息處理機制詳解及源碼分析
最近相對來說比較閒,加上養病,所以沒事干就撸些自己之前的知識點為博客,方便自己也方便別人。 1 背景 之所以選擇這個知識點來分析有以下幾個原因: 逛GitHub
 Android性能優化之電量篇
Google近期在Udacity上發布了Android性能優化的在線課程,分別從渲染,運算與內存,電量幾個方面介紹了如何去優化性能,這些課程是Google之前在Y
 徹底理解 Android Binder 通信架構
roid 6.0的源碼剖析, 本文深度剖析Binder IPC過程, 這絕對是一篇匠心巨作,從Java framework到Native,再到Linux Kern