編輯:關於android開發
首先,簡單的說一下,這個底部框架的實現步驟。
1,自定義一個類,繼承LinearLayout就好了 ,因為我喜歡用LinearLayout, 當然你也可以繼承RelativeLayout。
2,重寫它兩個帶參數的構造方法。
3,進入內容的編寫,布局文件的處理,數據的處理。
4,給底部容器添加view,底部菜單實現的一個頁面切換。
好了,由於個人的表訴能力 。直接上代碼好了
package com.weight.tabbottomlib.view;
import java.util.ArrayList;
import android.content.Context;
import android.graphics.Color;
import android.util.AttributeSet;
import android.view.LayoutInflater;
import android.view.View;
import android.widget.LinearLayout;
import android.widget.TextView;
/**
* 底部切換框架
*
* @author Administrator
*
*/
public class MyBottomLayout extends LinearLayout {
static ArrayList<Item> itemData = new ArrayList<Item>();
static ArrayList<View> viewArryItem = new ArrayList<View>();
LayoutInflater inflater; // 布局管理器
View mainView; // 這個是底部的容器
View viewItem;
int itemSize = 0;
public MyBottomLayout(Context context, AttributeSet attrs) {
super(context, attrs);
}
/**
* 給底部的容器添加view
*
* @param view
*/
public void addBottomLayoutValue(ArrayList<Item> itemData) {
LayoutInflater inflater = LayoutInflater.from(getContext());
this.itemData = itemData;
this.itemSize = itemData.size();
for (int i = 0; i < itemData.size(); i++) {
View viewItem = inflater.inflate(R.layout.layout_tab_item, null);
viewItem.findViewById(R.id.tabImg).setBackgroundResource(
itemData.get(i).getDrawableNormalId());
TextView textView = ((TextView) (viewItem
.findViewById(R.id.tabText)));
textView.setText(itemData.get(i).getName());
textView.setTextColor(Color.WHITE);
this.addView(viewItem, new LinearLayout.LayoutParams(
LayoutParams.FILL_PARENT, LayoutParams.FILL_PARENT, 1.0f));
viewItem.setId(i);
viewArryItem.add(viewItem);
viewItem.setOnClickListener(new lister());
}
// 處理一下整理的數據
changeDataState();
}
/**
* 改變一下那個數據的狀態
*/
private void changeDataState() {
if (itemSize != 5) { // 不需要處理
for (int i = itemSize; i < 5; i++) {
itemData.add(new Item());
LayoutInflater inflater = LayoutInflater.from(getContext());
View viewItem = inflater
.inflate(R.layout.layout_tab_item, null);
viewArryItem.add(viewItem);
}
}
}
public interface ICallbackLister {
public void click(int id);
}
ICallbackLister callbackLister = null;
public void setOnCallbackLister(ICallbackLister callbackLister) {
this.callbackLister = callbackLister;
}
/**
*
* @ClassName: lister
* @Description:tab點擊事件的處理
* @author lumin
* @date 2015-10-25 下午12:53:36
*
*/
private class lister implements OnClickListener {
@Override
public void onClick(View clickView) {
callbackLister.click(clickView.getId());
initBottom(clickView.getId());
}
}
public static void initBottom(int id) {
switch (id) {
case 0:
// 第二步:實現頁面的一個切換
initData(itemData.get(0).getDrawableSelectId(), itemData.get(1)
.getDrawableNormalId(), itemData.get(2)
.getDrawableNormalId(), itemData.get(3)
.getDrawableNormalId(), itemData.get(4)
.getDrawableNormalId());
changeTextColor(
(TextView) (viewArryItem.get(0).findViewById(R.id.tabText)),
(TextView) (viewArryItem.get(1).findViewById(R.id.tabText)),
(TextView) (viewArryItem.get(2).findViewById(R.id.tabText)),
(TextView) (viewArryItem.get(3).findViewById(R.id.tabText)),
(TextView) (viewArryItem.get(4).findViewById(R.id.tabText)));
break;
case 1:
initData(itemData.get(0).getDrawableNormalId(), itemData.get(1)
.getDrawableSelectId(), itemData.get(2)
.getDrawableNormalId(), itemData.get(3)
.getDrawableNormalId(), itemData.get(4)
.getDrawableNormalId());
changeTextColor(
(TextView) (viewArryItem.get(1).findViewById(R.id.tabText)),
(TextView) (viewArryItem.get(0).findViewById(R.id.tabText)),
(TextView) (viewArryItem.get(2).findViewById(R.id.tabText)),
(TextView) (viewArryItem.get(3).findViewById(R.id.tabText)),
(TextView) (viewArryItem.get(4).findViewById(R.id.tabText)));
break;
case 2:
initData(itemData.get(0).getDrawableNormalId(), itemData.get(1)
.getDrawableNormalId(), itemData.get(2)
.getDrawableSelectId(), itemData.get(3)
.getDrawableNormalId(), itemData.get(4)
.getDrawableNormalId());
changeTextColor(
(TextView) (viewArryItem.get(2).findViewById(R.id.tabText)),
(TextView) (viewArryItem.get(0).findViewById(R.id.tabText)),
(TextView) (viewArryItem.get(1).findViewById(R.id.tabText)),
(TextView) (viewArryItem.get(3).findViewById(R.id.tabText)),
(TextView) (viewArryItem.get(4).findViewById(R.id.tabText)));
break;
case 3:
initData(itemData.get(0).getDrawableNormalId(), itemData.get(1)
.getDrawableNormalId(), itemData.get(2)
.getDrawableNormalId(), itemData.get(3)
.getDrawableSelectId(), itemData.get(4)
.getDrawableNormalId());
changeTextColor(
(TextView) (viewArryItem.get(3).findViewById(R.id.tabText)),
(TextView) (viewArryItem.get(0).findViewById(R.id.tabText)),
(TextView) (viewArryItem.get(1).findViewById(R.id.tabText)),
(TextView) (viewArryItem.get(2).findViewById(R.id.tabText)),
(TextView) (viewArryItem.get(4).findViewById(R.id.tabText)));
break;
case 4:
initData(itemData.get(0).getDrawableNormalId(), itemData.get(1)
.getDrawableNormalId(), itemData.get(2)
.getDrawableNormalId(), itemData.get(3)
.getDrawableNormalId(), itemData.get(4)
.getDrawableSelectId());
changeTextColor(
(TextView) (viewArryItem.get(4).findViewById(R.id.tabText)),
(TextView) (viewArryItem.get(0).findViewById(R.id.tabText)),
(TextView) (viewArryItem.get(1).findViewById(R.id.tabText)),
(TextView) (viewArryItem.get(2).findViewById(R.id.tabText)),
(TextView) (viewArryItem.get(3).findViewById(R.id.tabText)));
break;
}
}
/**
*
* @param resIdOne
* @param resIdTwo
* @param resIdThree
* @param resIdFour
* @param resIdFive
*/
public static void initData(int resIdOne, int resIdTwo, int resIdThree,
int resIdFour, int resIdFive) {
try {
viewArryItem.get(0).findViewById(R.id.tabImg)
.setBackgroundResource(resIdOne);
viewArryItem.get(1).findViewById(R.id.tabImg)
.setBackgroundResource(resIdTwo);
viewArryItem.get(2).findViewById(R.id.tabImg)
.setBackgroundResource(resIdThree);
viewArryItem.get(3).findViewById(R.id.tabImg)
.setBackgroundResource(resIdFour);
viewArryItem.get(4).findViewById(R.id.tabImg)
.setBackgroundResource(resIdFive);
} catch (Exception err) {
err.printStackTrace();
// 報錯的時候說明已經沒有那麼多的item了
}
}
/**
*
* @param txtOne
* 這個就是默認的需要改變的圖片的顏色
* @param txtTwo
* @param txtThree
* @param txtFour
* @param txtFive
*/
public static void changeTextColor(TextView txtOne, TextView txtTwo,
TextView txtThree, TextView txtFour, TextView txtFive) {
txtOne.setTextColor(Color.MAGENTA);
txtTwo.setTextColor(Color.BLUE);
txtThree.setTextColor(Color.BLUE);
txtFour.setTextColor(Color.BLUE);
txtFive.setTextColor(Color.BLUE);
}
}
好了 ,這樣就完成了框架的編寫, 缺少了什麼昵 。。。
下面就給出當前頁面的item 。。 和實體。。
首先是布局文件
<RelativeLayout xmlns:android="http://schemas.android.com/apk/res/android"
xmlns:tools="http://schemas.android.com/tools"
android:layout_width="match_parent"
android:layout_height="match_parent" >
<RelativeLayout
android:layout_width="wrap_content"
android:layout_height="wrap_content"
android:layout_centerInParent="true" >
<ImageView
android:id="@+id/tabImg"
android:layout_width="wrap_content"
android:layout_height="wrap_content"
android:layout_centerHorizontal="true"
/>
<TextView
android:id="@+id/tabText"
android:layout_width="wrap_content"
android:layout_height="wrap_content"
android:layout_below="@id/tabImg"
android:layout_centerHorizontal="true"
android:textColor="#ffffff"
android:textSize="16dp" />
</RelativeLayout>
</RelativeLayout>
接著是。。實體文件
package com.weight.tabbottomlib.view;
public class Item {
private int drawableNormalId;
private int drawableSelectId;
private String name;
public Item(int drawableNormalId, int drawableSelectId, String name) {
super();
this.drawableNormalId = drawableNormalId;
this.drawableSelectId = drawableSelectId;
this.name = name;
}
public Item() {
super();
}
public int getDrawableNormalId() {
return drawableNormalId;
}
public void setDrawableNormalId(int drawableNormalId) {
this.drawableNormalId = drawableNormalId;
}
public int getDrawableSelectId() {
return drawableSelectId;
}
public void setDrawableSelectId(int drawableSelectId) {
this.drawableSelectId = drawableSelectId;
}
public String getName() {
return name;
}
public void setName(String name) {
this.name = name;
}
}
這樣就全部實現了。使用的話 要作為一個庫的哦,右鍵你的工程 點擊Build Path 下的Config Build Path,進入Android,選擇isLibrary 點擊ok,就完成了。
然後具體的使用方法,接下來的文章裡 我會告訴大家的。
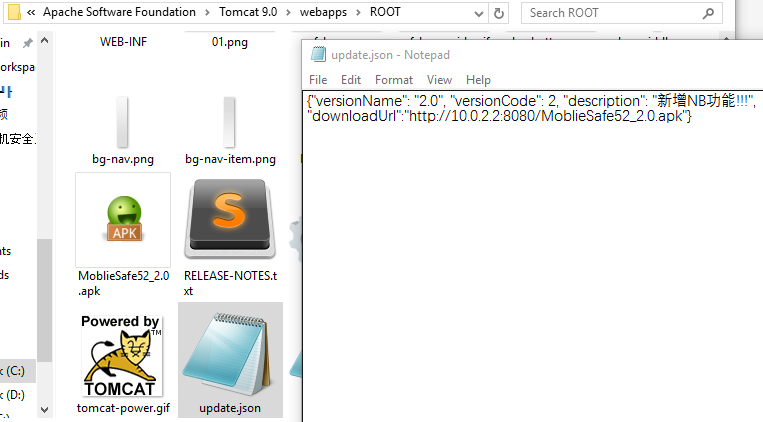 手機安全衛士——閃屏頁相關處理,手機安全衛士
手機安全衛士——閃屏頁相關處理,手機安全衛士根據功能模塊劃分(Android開發推薦此方法) - Activity mo
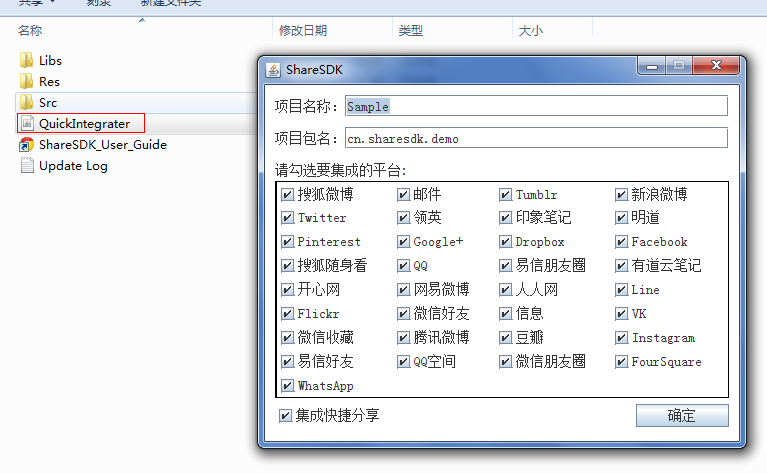 Android ShareSDK快速實現分享功能,androidsharesdk
Android ShareSDK快速實現分享功能,androidsharesdk第一步 :獲取ShareSDK 為了集成ShareSDK,您首先需要到ShareSDK
 android FrameLayout詳解,androidframelayout
android FrameLayout詳解,androidframelayout首先看演示: FrameLayou
 android 嵌套的listview示例(可參考實現朋友圈評論)
android 嵌套的listview示例(可參考實現朋友圈評論) 最近在項目中用到listview中再嵌套一個listview,兩層也有監聽,都沒有問題。其實,主要
 模擬QQ側滑控件 實現三種界面切換效果(知識點:回調機制,解析網絡json數據,fragment用法等)。,jsonfragment
模擬QQ側滑控件 實現三種界面切換效果(知識點:回調機制,解析網絡jso