編輯:關於android開發
本文轉載於:http://www.cnblogs.com/tianzhijiexian/p/4254110.html
Bitmap是引起OOM的罪魁禍首之一,當我們從網絡上下載圖片的時候無法知道網絡圖片的准確大小,所以為了節約內存,一般會在服務器上緩存一個縮略圖,提升下載速度。除此之外,我們還可以在本地顯示圖片前將圖片進行壓縮,使其完全符合imageview的大小,這樣就不會浪費內存了。
一、思路
思路:計算出要顯示bitmap的imageview大小,根據imageview的大小壓縮bitmap,最終讓bitmap和imageview一樣大。
二、獲得ImageView的寬高
int android.view.View.getWidth() // 返回:The width of your view, in pixels. int android.view.View.getWidth() // 返回:The height of your view, in pixels.通過這兩個方法我就能得到imageview實際的大小了,單位是pix。這個方法請在imageview加載完畢後再調用,否則一致返回空。如果你不知道什麼時候會加載完畢,你可以將其放入view.post方法中。

       view.post(new Runnable() {

                @Override
                public void run() {
                    // TODO 自動生成的方法存根
                }
            })
三、通過BitmapFactory得到壓縮後的bitmap
3.1 BitmapFactory.Options
BitmapFactory這個類提供了多個解析方法(decodeByteArray, decodeFile, decodeResource等)用於創建Bitmap對象,我們應該根據圖片的來源選擇合適的方法。
這些方法都會為一個bitmap分配內存,如果你的圖片太大就很容易造成bitmap。為此,這裡面都可以傳入一個BitmapFactory.Options對象,用來進行配置。
BitmapFactory.Options options = new BitmapFactory.Options();
BitmapFactory.Options中有個inJustDecodeBounds屬性,這個屬性為true時,調用上面三個方法返回的就不是一個完整的bitmap對象,而是null。這是因為它禁止這些方法為bitmap分配內存。那麼它有什麼用呢?設置inJustDecodeBounds=true後,BitmapFactory.Options的outWidth、outHeight和outMimeType屬性都會被賦值。這個技巧讓我們可以在加載圖片之前就獲取到圖片的長寬值和MIME類型,從而根據情況對圖片進行壓縮。就等於不讀取圖片,但獲得圖片的各種參數,大大節約內存。
BitmapFactory.Options options = new BitmapFactory.Options();
options.inJustDecodeBounds = true;
BitmapFactory.decodeResource(getResources(), R.id.myimage, options);
int imageHeight = options.outHeight;
int imageWidth = options.outWidth;
String imageType = options.outMimeType;
3.2 初步計算壓縮比率
BitmapFactory.Options中有個inSampleSize屬性,可以理解為壓縮比率。設定好壓縮比率後,調用上面的decodexxxx()就能得到一個縮略圖了。比如inSampleSize=4,載入的縮略圖是原圖大小的1/4。
為了避免OOM異常,最好在解析每張圖片的時候都先檢查一下圖片的大小,以下幾個因素是我們需要考慮的:
預估一下加載整張圖片所需占用的內存
為了加載這一張圖片你所願意提供多少內存
用於展示這張圖片的控件的實際大小
當前設備的屏幕尺寸和分辨率
比如,你的ImageView只有128*96像素的大小,只是為了顯示一張縮略圖,這時候把一張1024*768像素的圖片完全加載到內存中顯然是不值得的。比如我們有一張2048*1536像素的圖片,將inSampleSize的值設置為4,就可以把這張圖片壓縮成512*384像素。原本加載這張圖片需要占用13M的內存,壓縮後就只需要占用0.75M了(假設圖片是ARGB_8888類型,即每個像素點占用4個字節)。
同理,假設原圖是1500x700的,我們給縮略圖留出的空間是100x100的。那麼inSampleSize=min(1500/100, 700/100)=7。我們可以得到的縮略圖是原圖的1/7。
下面的代碼可以用來計算這個inSampleSize的值:
public static int calculateInSampleSize(BitmapFactory.Options options,
                int reqWidth, int reqHeight) {
    // 源圖片的高度和寬度
    final int height = options.outHeight;
    final int width = options.outWidth;
    int inSampleSize = 1;
    if (height > reqHeight || width > reqWidth) {
        // 計算出實際寬高和目標寬高的比率
        final int heightRatio = Math.round((float) height / (float) reqHeight);
        final int widthRatio = Math.round((float) width / (float) reqWidth);
        // 選擇寬和高中最小的比率作為inSampleSize的值,這樣可以保證最終圖片的寬和高
        // 一定都會大於等於目標的寬和高。
        inSampleSize = heightRatio < widthRatio ? heightRatio : widthRatio;
    }
    return inSampleSize;
}
然而,事實不如我們現象的那麼美好。inSampleSize的注釋中有一個需要注意的一點。
If set to a value > 1, requests the decoder to subsample the original image, returning a smaller image to save memory. The sample size is the number of pixels in either dimension that correspond to a single pixel in the decoded bitmap. For example, inSampleSize == 4 returns an image that is 1/4 the width/height of the original, and 1/16 the number of pixels. Any value <= 1 is treated the same as 1.
Note: the decoder uses a final value based on powers of 2, any other value will be rounded down to the nearest power of 2.
即使設置了inSampleSize=7,但是得到的縮略圖卻是原圖的1/4,原因是inSampleSize只能是2的整數次冪,如果不是的話,向下取得最大的2的整數次冪,7向下尋找2的整數次冪,就是4。這樣設計的原因很可能是為了漸變bitmap壓縮,畢竟按照2的次方進行壓縮會比較高效和方便。
3.3 再次計算壓縮比率
通過上面的分析我們知道,bitmap是可以被壓縮的,我們可以根據需要來壓縮bitmap,但壓縮得到的bitmap可能會比我需要的大。因此,還得改進方法!然後我們發現了Bitmap中的這個方法:
Bitmap android.graphics.Bitmap.createScaledBitmap(Bitmap src, int dstWidth, int dstHeight, boolean filter)
createScaledBitmap()可以給我們一個按照要求拉伸/縮小後的bitmap,我們可以通過這個方法把我們之前得到的較大的縮略圖進行縮小,讓其完全符合實際顯示的大小。好了,現在我們開始寫代碼:
    /**
     * @description 計算圖片的壓縮比率
     *
     * @param options 參數
     * @param reqWidth 目標的寬度
     * @param reqHeight 目標的高度
     * @return
     */
    private static int calculateInSampleSize(BitmapFactory.Options options, int reqWidth, int reqHeight) {
        // 源圖片的高度和寬度
        final int height = options.outHeight;
        final int width = options.outWidth;
        int inSampleSize = 1;
        if (height > reqHeight || width > reqWidth) {
            // 計算出實際寬高和目標寬高的比率
            final int halfHeight = height / 2;
            final int halfWidth = width / 2;
            while ((halfHeight / inSampleSize) > reqHeight && (halfWidth / inSampleSize) > reqWidth) {
                inSampleSize *= 2;
            }
        }
        return inSampleSize;
    }
    /**
     * @description 通過傳入的bitmap,進行壓縮,得到符合標准的bitmap
     *
     * @param src
     * @param dstWidth
     * @param dstHeight
     * @return
     */
    private static Bitmap createScaleBitmap(Bitmap src, int dstWidth, int dstHeight, int inSampleSize) {
    // 如果是放大圖片,filter決定是否平滑,如果是縮小圖片,filter無影響,我們這裡是縮小圖片,所以直接設置為false
        Bitmap dst = Bitmap.createScaledBitmap(src, dstWidth, dstHeight, false);
        if (src != dst) { // 如果沒有縮放,那麼不回收
            src.recycle(); // 釋放Bitmap的native像素數組
        }
        return dst;
    }
現在我們就完成了如下的四個過程。
1. 使用inJustDecodeBounds,僅僅讀bitmap的長和寬。
2. 根據bitmap的長款和目標縮略圖的長和寬,計算出inSampleSize的大小。
3. 使用inSampleSize,載入一個比imageview大一點的縮略圖A
4. 使用createScaseBitmap再次壓縮A,將縮略圖A生成我們需要的縮略圖B。
5. 回收縮略圖A(如果A和B的比率一樣,就不回收A)。
有朋友問,為啥要先從inSampleSize產生一個縮略圖A,而不是直接把原始的bitmap通過createScaseBitmap()縮放為目標圖片呢?
因為如果要從原始的bitmap直接進行縮放的話,就需要將原始圖片放入內存中,十分危險!!!現在通過計算得到一個縮略圖A,這個縮略圖A比原圖可以小了很多,完全可以直接加載到內存中,這樣再進行拉伸就比較安全了。
四、產生工具類
現在已經把所有的技術難點攻克了,完全可以寫一個工具類來產生縮略圖。工具類中應該包含生成縮略圖的重要方法:
    /**
     * @description 從Resources中加載圖片
     *
     * @param res
     * @param resId
     * @param reqWidth
     * @param reqHeight
     * @return
     */
    public static Bitmap decodeSampledBitmapFromResource(Resources res, int resId, int reqWidth, int reqHeight) {
        final BitmapFactory.Options options = new BitmapFactory.Options();
        options.inJustDecodeBounds = true; // 設置成了true,不占用內存,只獲取bitmap寬高
        BitmapFactory.decodeResource(res, resId, options); // 第一次解碼,目的是:讀取圖片長寬
        options.inSampleSize = calculateInSampleSize(options, reqWidth, reqHeight); // 調用上面定義的方法計算inSampleSize值
        // 使用獲取到的inSampleSize值再次解析圖片
        options.inJustDecodeBounds = false;
        Bitmap src = BitmapFactory.decodeResource(res, resId, options); // 產生一個稍大的縮略圖
        return createScaleBitmap(src, reqWidth, reqHeight, options.inSampleSize); // 通過得到的bitmap進一步產生目標大小的縮略圖
    }

    /**
     * @description 從SD卡上加載圖片
     *
     * @param pathName
     * @param reqWidth
     * @param reqHeight
     * @return
     */
    public static Bitmap decodeSampledBitmapFromFile(String pathName, int reqWidth, int reqHeight) {
        final BitmapFactory.Options options = new BitmapFactory.Options();
        options.inJustDecodeBounds = true;
        BitmapFactory.decodeFile(pathName, options);
        options.inSampleSize = calculateInSampleSize(options, reqWidth, reqHeight);
        options.inJustDecodeBounds = false;
        Bitmap src = BitmapFactory.decodeFile(pathName, options);
        return createScaleBitmap(src, reqWidth, reqHeight, options.inSampleSize);
    }
這兩個方法的過程完全一致,產生一個option對象,設置inJustDecodeBounds參數,開始第一次解析bitmap,獲得bitmap的寬高數據,然後通過寬高數據計算縮略圖的比率。得到縮略圖比率後,我們把inJustDecodeBounds設置為false,開始正式解析bitmap,最終得到的是一個可能比想要的縮略圖略大的bitmap。最後一部是檢查bitmap是否是我們想要的bitmap,如果是就返回,不是的話就開始拉伸,總之最終會返回一個完全符合imageview大小的bitmap,不浪費一點點內存。
完整的工具類代碼如下:
package com.kale.bitmaptest;

import android.content.res.Resources;
import android.graphics.Bitmap;
import android.graphics.BitmapFactory;


/**
 * @author:Jack Tony
 * @description  :
 * @web :
 * http://developer.android.com/training/displaying-bitmaps/load-bitmap.html
 * http://www.cnblogs.com/kobe8/p/3877125.html
 *
 * @date  :2015年1月27日
 */
public class BitmapUtils {

    /**
     * @description 計算圖片的壓縮比率
     *
     * @param options 參數
     * @param reqWidth 目標的寬度
     * @param reqHeight 目標的高度
     * @return
     */
    private static int calculateInSampleSize(BitmapFactory.Options options, int reqWidth, int reqHeight) {
        // 源圖片的高度和寬度
        final int height = options.outHeight;
        final int width = options.outWidth;
        int inSampleSize = 1;
        if (height > reqHeight || width > reqWidth) {
            final int halfHeight = height / 2;
            final int halfWidth = width / 2;
            // Calculate the largest inSampleSize value that is a power of 2 and keeps both
            // height and width larger than the requested height and width.
            while ((halfHeight / inSampleSize) > reqHeight && (halfWidth / inSampleSize) > reqWidth) {
                inSampleSize *= 2;
            }
        }
        return inSampleSize;
    }

    /**
     * @description 通過傳入的bitmap,進行壓縮,得到符合標准的bitmap
     *
     * @param src
     * @param dstWidth
     * @param dstHeight
     * @return
     */
    private static Bitmap createScaleBitmap(Bitmap src, int dstWidth, int dstHeight, int inSampleSize) {
     // 如果是放大圖片,filter決定是否平滑,如果是縮小圖片,filter無影響,我們這裡是縮小圖片,所以直接設置為false
        Bitmap dst = Bitmap.createScaledBitmap(src, dstWidth, dstHeight, false);
        if (src != dst) { // 如果沒有縮放,那麼不回收
            src.recycle(); // 釋放Bitmap的native像素數組
        }
        return dst;
    }

    /**
     * @description 從Resources中加載圖片
     *
     * @param res
     * @param resId
     * @param reqWidth
     * @param reqHeight
     * @return
     */
    public static Bitmap decodeSampledBitmapFromResource(Resources res, int resId, int reqWidth, int reqHeight) {
        final BitmapFactory.Options options = new BitmapFactory.Options();
        options.inJustDecodeBounds = true; // 設置成了true,不占用內存,只獲取bitmap寬高
        BitmapFactory.decodeResource(res, resId, options); // 讀取圖片長寬,目的是得到圖片的寬高
        options.inSampleSize = calculateInSampleSize(options, reqWidth, reqHeight); // 調用上面定義的方法計算inSampleSize值
        // 使用獲取到的inSampleSize值再次解析圖片
        options.inJustDecodeBounds = false;
        Bitmap src = BitmapFactory.decodeResource(res, resId, options); // 載入一個稍大的縮略圖
        return createScaleBitmap(src, reqWidth, reqHeight, options.inSampleSize); // 通過得到的bitmap,進一步得到目標大小的縮略圖
    }

    /**
     * @description 從SD卡上加載圖片
     *
     * @param pathName
     * @param reqWidth
     * @param reqHeight
     * @return
     */
    public static Bitmap decodeSampledBitmapFromFile(String pathName, int reqWidth, int reqHeight) {
        final BitmapFactory.Options options = new BitmapFactory.Options();
        options.inJustDecodeBounds = true;
        BitmapFactory.decodeFile(pathName, options);
        options.inSampleSize = calculateInSampleSize(options, reqWidth, reqHeight);
        options.inJustDecodeBounds = false;
        Bitmap src = BitmapFactory.decodeFile(pathName, options);
        return createScaleBitmap(src, reqWidth, reqHeight, options.inSampleSize);
    }
}
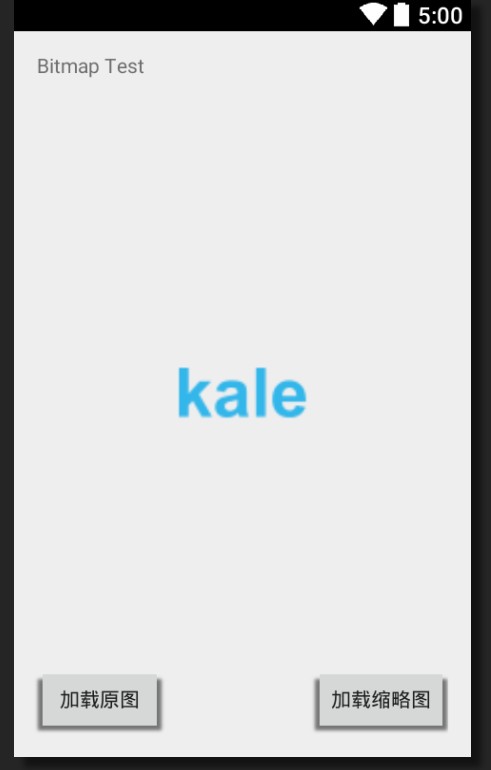
五、測試
我在布局中建立一個100x100dp的imageview,然後在res中放一張圖片。
5.1 布局文件
放入兩個按鈕,一個按鈕啟動的是用常規的方法加載bitmap,不壓縮;另一個啟動壓縮算法。
 View Code
5.2 java代碼
    public void butonListener(View v) {
        switch (v.getId()) {
        case R.id.original_button:
            loadBitmap(false); // 加載原圖
            break;

        case R.id.clip_button:
            loadBitmap(true); // 加載縮略圖
            break;
        }
    }

    public void loadBitmap(boolean exactable) {
        int bmSize = 0;
        Bitmap bm = null;
        if (exactable) {
            // 通過工具類來產生一個符合ImageView的縮略圖,因為ImageView的大小是50x50,所以這裡得到的縮略圖也應該是一樣大小的
            bm = BitmapUtils.decodeSampledBitmapFromResource(getResources(), R.drawable.saber, iv.getWidth(), iv.getHeight());
        } else {
            // 直接加載原圖
            bm = BitmapFactory.decodeResource(getResources(), R.drawable.saber);
        }
        iv.setImageBitmap(bm);
        bmSize += bm.getByteCount(); // 得到bitmap的大小
        int kb = bmSize / 1024;
        int mb = kb / 1024;
        Toast.makeText(this, "bitmap size = " + mb + "MB" + kb + "KB", Toast.LENGTH_LONG).show();
    }
根據點擊不同的按鈕,觸發不同的方法,最終把得到的bitmap放入imageview,並且顯示當前的bitmap大小。運行後可以發現,經過壓縮算法得到的bitmap要小很多,更加節約內存。
結果:原圖:1M+;縮略圖:156kb。
注意:當你的imageview遠遠小於bitmap原圖大小的時候這種壓縮算法十分有效,但是如果的bitmap和imageview大小差不多,你會發現這個算法的作用就不那麼明顯了,而且不要認為用了壓縮就永遠不會出現OOM了。
PS:實際使用中我們的bitmap經常是大於imageview的,所以推薦采用此方法。
源碼下載:http://download.csdn.net/detail/shark0017/8402227
參考自:
http://www.cnblogs.com/kobe8/p/3877125.html
https://developer.android.com/training/displaying-bitmaps/load-bitmap.html
http://stormzhang.com/android/2013/11/20/android-display-bitmaps-efficiently/
 【原創+譯文】官方文檔中聲明的如何創建抽屜導航欄(Navigation Drawer),navigationdrawer
【原創+譯文】官方文檔中聲明的如何創建抽屜導航欄(Navigation Drawer),navigationdrawer如需轉載請注明出處:http://www.cnbl
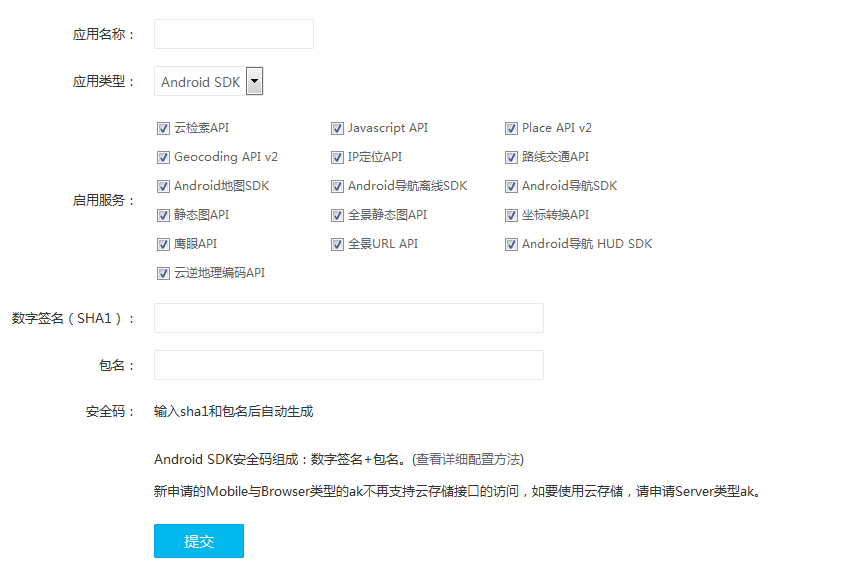 Android studio 百度地圖開發(1)配置工程、顯示地圖
Android studio 百度地圖開發(1)配置工程、顯示地圖 Android studio 百度地圖開發(1)配置工程、顯示地圖 email:chentravell
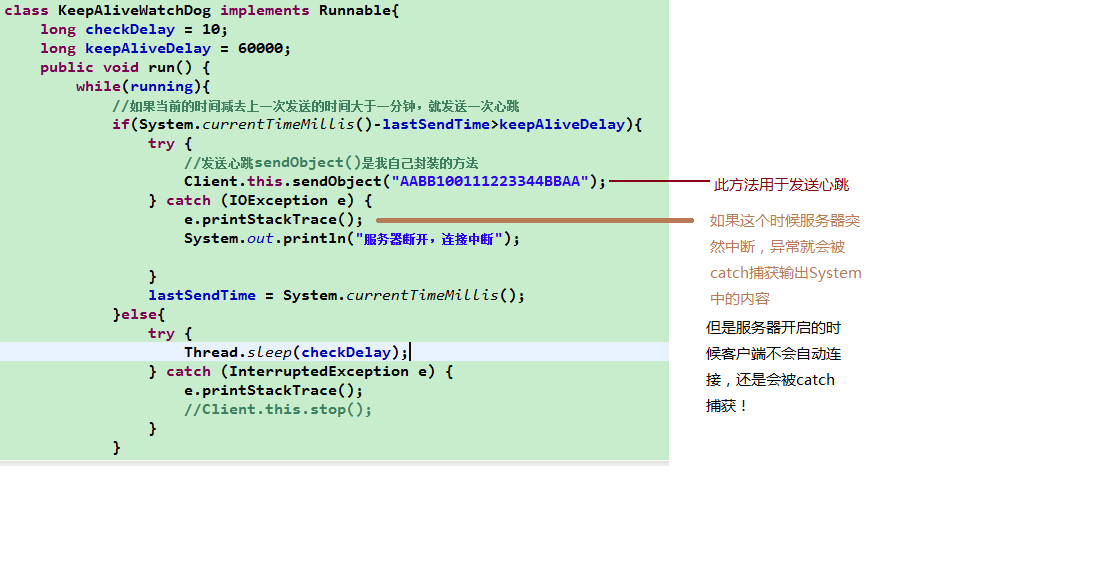 Android-socket服務端斷重啟後,android客戶端自動重連,androidsocket服務端
Android-socket服務端斷重啟後,android客戶端自動重連,androidsocket服務端今天研究這個問題搞了整整一天啊!終於出來了,不過我沒有多大的成就
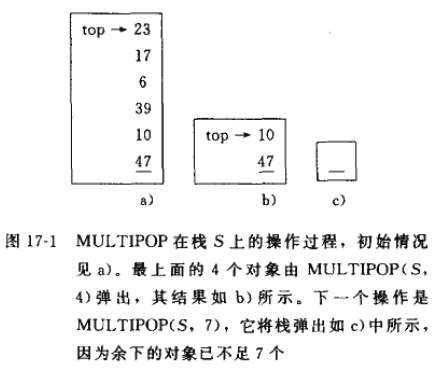 算法導論--平攤分析之聚集分析,算法導論--平攤
算法導論--平攤分析之聚集分析,算法導論--平攤在平攤分析中,執行一系列數據結構操作所需要的時間是通過對執行的所有操作求平均而得出的。 平攤分析可以用來證明在一系列操作中
 集成websocket即時通訊 java聊天源碼 代碼下載 java後台框架源碼 websocket源碼 IM,websocket即時通訊
集成websocket即時通訊 java聊天源碼 代碼下載 java後台