編輯:關於android開發
相信大多數朋友對Service這個名詞都不會陌生,沒錯,一個老練的Android程序員如果連Service都沒聽說過的話,那確實也太遜了。Service作為Android四大組件之一,在每一個應用程序中都扮演著非常重要的角色。它主要用於在後台處理一些耗時的邏輯,或者去執行某些需要長期運行的任務。必要的時候我們甚至可以在程序退出的情況下,讓Service在後台繼續保持運行狀態。
不過,雖然Service幾乎被每一個Android程序員所熟知,但並不是每個人都已經將Service的各個知識點都掌握得非常透徹。那麼今天我就將帶著大家對Service進行一次全面、深入的探究,希望每個人在讀完本篇文章後都能對Service有更深一層的理解。
關於Service最基本的用法自然就是如何啟動一個Service了,啟動Service的方法和啟動Activity很類似,都需要借助Intent來實現,下面我們就通過一個具體的例子來看一下。
新建一個Android項目,項目名就叫ServiceTest,這裡我選擇使用4.0的API。
然後新建一個MyService繼承自Service,並重寫父類的onCreate()、onStartCommand()和onDestroy()方法,如下所示:
public class MyService extends Service {

    public static final String TAG = "MyService";

    @Override
    public void onCreate() {
        super.onCreate();
        Log.d(TAG, "onCreate() executed");
    }

    @Override
    public int onStartCommand(Intent intent, int flags, int startId) {
        Log.d(TAG, "onStartCommand() executed");
        return super.onStartCommand(intent, flags, startId);
    }

    @Override
    public void onDestroy() {
        super.onDestroy();
        Log.d(TAG, "onDestroy() executed");
    }

    @Override
    public IBinder onBind(Intent intent) {
        return null;
    }

}
可以看到,我們只是在onCreate()、onStartCommand()和onDestroy()方法中分別打印了一句話,並沒有進行其它任何的操作。
然後打開或新建activity_main.xml作為程序的主布局文件,代碼如下所示:
<LinearLayout xmlns:android="http://schemas.android.com/apk/res/android"
    android:layout_width="match_parent"
    android:layout_height="match_parent"
    android:orientation="vertical" >

    <Button
        android:id="@+id/start_service"
        android:layout_width="match_parent"
        android:layout_height="wrap_content"
        android:text="Start Service" />

    <Button
        android:id="@+id/stop_service"
        android:layout_width="match_parent"
        android:layout_height="wrap_content"
        android:text="Stop Service" />

</LinearLayout>
我們在布局文件中加入了兩個按鈕,一個用於啟動Service,一個用於停止Service。
然後打開或新建MainActivity作為程序的主Activity,在裡面加入啟動Service和停止Service的邏輯,代碼如下所示:
public class MainActivity extends Activity implements OnClickListener {

    private Button startService;

    private Button stopService;

    @Override
    protected void onCreate(Bundle savedInstanceState) {
        super.onCreate(savedInstanceState);
        setContentView(R.layout.activity_main);
        startService = (Button) findViewById(R.id.start_service);
        stopService = (Button) findViewById(R.id.stop_service);
        startService.setOnClickListener(this);
        stopService.setOnClickListener(this);
    }

    @Override
    public void onClick(View v) {
        switch (v.getId()) {
        case R.id.start_service:
            Intent startIntent = new Intent(this, MyService.class);
            startService(startIntent);
            break;
        case R.id.stop_service:
            Intent stopIntent = new Intent(this, MyService.class);
            stopService(stopIntent);
            break;
        default:
            break;
        }
    }

}
可以看到,在Start Service按鈕的點擊事件裡,我們構建出了一個Intent對象,並調用startService()方法來啟動MyService。然後在Stop Serivce按鈕的點擊事件裡,我們同樣構建出了一個Intent對象,並調用stopService()方法來停止MyService。代碼的邏輯非常簡單,相信不需要我再多做解釋了吧。
另外需要注意,項目中的每一個Service都必須在AndroidManifest.xml中注冊才行,所以還需要編輯AndroidManifest.xml文件,代碼如下所示:
<?xml version="1.0" encoding="utf-8"?>
<manifest xmlns:android="http://schemas.android.com/apk/res/android"
    package="com.example.servicetest"
    android:versionCode="1"
    android:versionName="1.0" >

    <uses-sdk
        android:minSdkVersion="14"
        android:targetSdkVersion="17" />

    <application
        android:allowBackup="true"
        android:icon="@drawable/ic_launcher"
        android:label="@string/app_name"
        android:theme="@style/AppTheme" >

    ……

        <service android:name="com.example.servicetest.MyService" >
        </service>
    </application>

</manifest>
這樣的話,一個簡單的帶有Service功能的程序就寫好了,現在我們將程序運行起來,並點擊一下Start Service按鈕,可以看到LogCat的打印日志如下:
也就是說,當啟動一個Service的時候,會調用該Service中的onCreate()和onStartCommand()方法。
那麼如果我再點擊一次Start Service按鈕呢?這個時候的打印日志如下:
可以看到,這次只有onStartCommand()方法執行了,onCreate()方法並沒有執行,為什麼會這樣呢?這是由於onCreate()方法只會在Service第一次被創建的時候調用,如果當前Service已經被創建過了,不管怎樣調用startService()方法,onCreate()方法都不會再執行。因此你可以再多點擊幾次Start Service按鈕試一次,每次都只會有onStartCommand()方法中的打印日志。
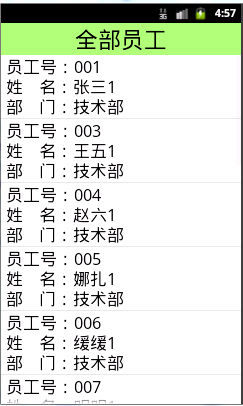
我們還可以到手機的應用程序管理界面來檢查一下MyService是不是正在運行,如下圖所示:
恩,MyService確實是正在運行的,即使它的內部並沒有執行任何的邏輯。
回到ServiceTest程序,然後點擊一下Stop Service按鈕就可以將MyService停止掉了。
上面我們學習了Service的基本用法,啟動Service之後,就可以在onCreate()或onStartCommand()方法裡去執行一些具體的邏輯了。不過這樣的話Service和Activity的關系並不大,只是Activity通知了Service一下:“你可以啟動了。”然後Service就去忙自己的事情了。那麼有沒有什麼辦法能讓它們倆的關聯更多一些呢?比如說在Activity中可以指定讓Service去執行什麼任務。當然可以,只需要讓Activity和Service建立關聯就好了。
觀察MyService中的代碼,你會發現一直有一個onBind()方法我們都沒有使用到,這個方法其實就是用於和Activity建立關聯的,修改MyService中的代碼,如下所示:
public class MyService extends Service {

    public static final String TAG = "MyService";

    private MyBinder mBinder = new MyBinder();

    @Override
    public void onCreate() {
        super.onCreate();
        Log.d(TAG, "onCreate() executed");
    }

    @Override
    public int onStartCommand(Intent intent, int flags, int startId) {
        Log.d(TAG, "onStartCommand() executed");
        return super.onStartCommand(intent, flags, startId);
    }

    @Override
    public void onDestroy() {
        super.onDestroy();
        Log.d(TAG, "onDestroy() executed");
    }

    @Override
    public IBinder onBind(Intent intent) {
        return mBinder;
    }

    class MyBinder extends Binder {

        public void startDownload() {
            Log.d("TAG", "startDownload() executed");
            // 執行具體的下載任務
        }

    }

}
這裡我們新增了一個MyBinder類繼承自Binder類,然後在MyBinder中添加了一個startDownload()方法用於在後台執行下載任務,當然這裡並不是真正地去下載某個東西,只是做個測試,所以startDownload()方法只是打印了一行日志。
然後修改activity_main.xml中的代碼,在布局文件中添加用於綁定Service和取消綁定Service的按鈕:
<LinearLayout xmlns:android="http://schemas.android.com/apk/res/android"
    android:layout_width="match_parent"
    android:layout_height="match_parent"
    android:orientation="vertical" >

    <Button
        android:id="@+id/start_service"
        android:layout_width="match_parent"
        android:layout_height="wrap_content"
        android:text="Start Service" />

    <Button
        android:id="@+id/stop_service"
        android:layout_width="match_parent"
        android:layout_height="wrap_content"
        android:text="Stop Service" />

    <Button
        android:id="@+id/bind_service"
        android:layout_width="match_parent"
        android:layout_height="wrap_content"
        android:text="Bind Service" />

    <Button
        android:id="@+id/unbind_service"
        android:layout_width="match_parent"
        android:layout_height="wrap_content"
        android:text="Unbind Service"
        />

</LinearLayout>
接下來再修改MainActivity中的代碼,讓MainActivity和MyService之間建立關聯,代碼如下所示:
public class MainActivity extends Activity implements OnClickListener {

    private Button startService;

    private Button stopService;

    private Button bindService;

    private Button unbindService;

    private MyService.MyBinder myBinder;

    private ServiceConnection connection = new ServiceConnection() {

        @Override
        public void onServiceDisconnected(ComponentName name) {
        }

        @Override
        public void onServiceConnected(ComponentName name, IBinder service) {
            myBinder = (MyService.MyBinder) service;
            myBinder.startDownload();
        }
    };

    @Override
    protected void onCreate(Bundle savedInstanceState) {
        super.onCreate(savedInstanceState);
        setContentView(R.layout.activity_main);
        startService = (Button) findViewById(R.id.start_service);
        stopService = (Button) findViewById(R.id.stop_service);
        bindService = (Button) findViewById(R.id.bind_service);
        unbindService = (Button) findViewById(R.id.unbind_service);
        startService.setOnClickListener(this);
        stopService.setOnClickListener(this);
        bindService.setOnClickListener(this);
        unbindService.setOnClickListener(this);
    }

    @Override
    public void onClick(View v) {
        switch (v.getId()) {
        case R.id.start_service:
            Intent startIntent = new Intent(this, MyService.class);
            startService(startIntent);
            break;
        case R.id.stop_service:
            Intent stopIntent = new Intent(this, MyService.class);
            stopService(stopIntent);
            break;
        case R.id.bind_service:
            Intent bindIntent = new Intent(this, MyService.class);
            bindService(bindIntent, connection, BIND_AUTO_CREATE);
            break;
        case R.id.unbind_service:
            unbindService(connection);
            break;
        default:
            break;
        }
    }

}
可以看到,這裡我們首先創建了一個ServiceConnection的匿名類,在裡面重寫了onServiceConnected()方法和onServiceDisconnected()方法,這兩個方法分別會在Activity與Service建立關聯和解除關聯的時候調用。在onServiceConnected()方法中,我們又通過向下轉型得到了MyBinder的實例,有了這個實例,Activity和Service之間的關系就變得非常緊密了。現在我們可以在Activity中根據具體的場景來調用MyBinder中的任何public方法,即實現了Activity指揮Service干什麼Service就去干什麼的功能。
當然,現在Activity和Service其實還沒關聯起來了呢,這個功能是在Bind Service按鈕的點擊事件裡完成的。可以看到,這裡我們仍然是構建出了一個Intent對象,然後調用bindService()方法將Activity和Service進行綁定。bindService()方法接收三個參數,第一個參數就是剛剛構建出的Intent對象,第二個參數是前面創建出的ServiceConnection的實例,第三個參數是一個標志位,這裡傳入BIND_AUTO_CREATE表示在Activity和Service建立關聯後自動創建Service,這會使得MyService中的onCreate()方法得到執行,但onStartCommand()方法不會執行。
然後如何我們想解除Activity和Service之間的關聯怎麼辦呢?調用一下unbindService()方法就可以了,這也是Unbind Service按鈕的點擊事件裡實現的邏輯。
現在讓我們重新運行一下程序吧,在MainActivity中點擊一下Bind Service按鈕,LogCat裡的打印日志如下圖所示:
另外需要注意,任何一個Service在整個應用程序范圍內都是通用的,即MyService不僅可以和MainActivity建立關聯,還可以和任何一個Activity建立關聯,而且在建立關聯時它們都可以獲取到相同的MyBinder實例。
在Service的基本用法這一部分,我們介紹了銷毀Service最簡單的一種情況,點擊Start Service按鈕啟動Service,再點擊Stop Service按鈕停止Service,這樣MyService就被銷毀了,可以看到打印日志如下所示:
那麼如果我們是點擊的Bind Service按鈕呢?由於在綁定Service的時候指定的標志位是BIND_AUTO_CREATE,說明點擊Bind Service按鈕的時候Service也會被創建,這時應該怎麼銷毀Service呢?其實也很簡單,點擊一下Unbind Service按鈕,將Activity和Service的關聯解除就可以了。
先點擊一下Bind Service按鈕,再點擊一下Unbind Service按鈕,打印日志如下所示:
以上這兩種銷毀的方式都很好理解。那麼如果我們既點擊了Start Service按鈕,又點擊了Bind Service按鈕會怎麼樣呢?這個時候你會發現,不管你是單獨點擊Stop Service按鈕還是Unbind Service按鈕,Service都不會被銷毀,必要將兩個按鈕都點擊一下,Service才會被銷毀。也就是說,點擊Stop Service按鈕只會讓Service停止,點擊Unbind Service按鈕只會讓Service和Activity解除關聯,一個Service必須要在既沒有和任何Activity關聯又處理停止狀態的時候才會被銷毀。
為了證實一下,我們在Stop Service和Unbind Service按鈕的點擊事件裡面加入一行打印日志:
public void onClick(View v) {
    switch (v.getId()) {
    case R.id.start_service:
        Intent startIntent = new Intent(this, MyService.class);
        startService(startIntent);
        break;
    case R.id.stop_service:
        Log.d("MyService", "click Stop Service button");
        Intent stopIntent = new Intent(this, MyService.class);
        stopService(stopIntent);
        break;
    case R.id.bind_service:
        Intent bindIntent = new Intent(this, MyService.class);
        bindService(bindIntent, connection, BIND_AUTO_CREATE);
        break;
    case R.id.unbind_service:
        Log.d("MyService", "click Unbind Service button");
        unbindService(connection);
        break;
    default:
        break;
    }
}
然後重新運行程序,先點擊一下Start Service按鈕,再點擊一下Bind Service按鈕,這樣就將Service啟動起來,並和Activity建立了關聯。然後點擊Stop Service按鈕後Service並不會銷毀,再點擊一下Unbind Service按鈕,Service就會銷毀了,打印日志如下所示:
我們應該始終記得在Service的onDestroy()方法裡去清理掉那些不再使用的資源,防止在Service被銷毀後還會有一些不再使用的對象仍占用著內存。
不少Android初學者都可能會有這樣的疑惑,Service和Thread到底有什麼關系呢?什麼時候應該用Service,什麼時候又應該用Thread?答案可能會有點讓你吃驚,因為Service和Thread之間沒有任何關系!
之所以有不少人會把它們聯系起來,主要就是因為Service的後台概念。Thread我們大家都知道,是用於開啟一個子線程,在這裡去執行一些耗時操作就不會阻塞主線程的運行。而Service我們最初理解的時候,總會覺得它是用來處理一些後台任務的,一些比較耗時的操作也可以放在這裡運行,這就會讓人產生混淆了。但是,如果我告訴你Service其實是運行在主線程裡的,你還會覺得它和Thread有什麼關系嗎?讓我們看一下這個殘酷的事實吧。
在MainActivity的onCreate()方法裡加入一行打印當前線程id的語句:
Log.d("MyService", "MainActivity thread id is " + Thread.currentThread().getId());
然後在MyService的onCreate()方法裡也加入一行打印當前線程id的語句:
Log.d("MyService", "MyService thread id is " + Thread.currentThread().getId());
現在重新運行一下程序,並點擊Start Service按鈕,會看到如下打印日志:
可以看到,它們的線程id完全是一樣的,由此證實了Service確實是運行在主線程裡的,也就是說如果你在Service裡編寫了非常耗時的代碼,程序必定會出現ANR的。
你可能會驚呼,這不是坑爹麼!?那我要Service又有何用呢?其實大家不要把後台和子線程聯系在一起就行了,這是兩個完全不同的概念。Android的後台就是指,它的運行是完全不依賴UI的。即使Activity被銷毀,或者程序被關閉,只要進程還在,Service就可以繼續運行。比如說一些應用程序,始終需要與服務器之間始終保持著心跳連接,就可以使用Service來實現。你可能又會問,前面不是剛剛驗證過Service是運行在主線程裡的麼?在這裡一直執行著心跳連接,難道就不會阻塞主線程的運行嗎?當然會,但是我們可以在Service中再創建一個子線程,然後在這裡去處理耗時邏輯就沒問題了。
額,既然在Service裡也要創建一個子線程,那為什麼不直接在Activity裡創建呢?這是因為Activity很難對Thread進行控制,當Activity被銷毀之後,就沒有任何其它的辦法可以再重新獲取到之前創建的子線程的實例。而且在一個Activity中創建的子線程,另一個Activity無法對其進行操作。但是Service就不同了,所有的Activity都可以與Service進行關聯,然後可以很方便地操作其中的方法,即使Activity被銷毀了,之後只要重新與Service建立關聯,就又能夠獲取到原有的Service中Binder的實例。因此,使用Service來處理後台任務,Activity就可以放心地finish,完全不需要擔心無法對後台任務進行控制的情況。
一個比較標准的Service就可以寫成:
@Override
public int onStartCommand(Intent intent, int flags, int startId) {
    new Thread(new Runnable() {
        @Override
        public void run() {
            // 開始執行後台任務
        }
    }).start();
    return super.onStartCommand(intent, flags, startId);
}

class MyBinder extends Binder {

    public void startDownload() {
        new Thread(new Runnable() {
            @Override
            public void run() {
                // 執行具體的下載任務
            }
        }).start();
    }

}
Service幾乎都是在後台運行的,一直以來它都是默默地做著辛苦的工作。但是Service的系統優先級還是比較低的,當系統出現內存不足情況時,就有可能會回收掉正在後台運行的Service。如果你希望Service可以一直保持運行狀態,而不會由於系統內存不足的原因導致被回收,就可以考慮使用前台Service。前台Service和普通Service最大的區別就在於,它會一直有一個正在運行的圖標在系統的狀態欄顯示,下拉狀態欄後可以看到更加詳細的信息,非常類似於通知的效果。當然有時候你也可能不僅僅是為了防止Service被回收才使用前台Service,有些項目由於特殊的需求會要求必須使用前台Service,比如說墨跡天氣,它的Service在後台更新天氣數據的同時,還會在系統狀態欄一直顯示當前天氣的信息,如下圖所示:
那麼我們就來看一下如何才能創建一個前台Service吧,其實並不復雜,修改MyService中的代碼,如下所示:
public class MyService extends Service {

    public static final String TAG = "MyService";

    private MyBinder mBinder = new MyBinder();

    @Override
    public void onCreate() {
        super.onCreate();
        Notification notification = new Notification(R.drawable.ic_launcher,
                "有通知到來", System.currentTimeMillis());
        Intent notificationIntent = new Intent(this, MainActivity.class);
        PendingIntent pendingIntent = PendingIntent.getActivity(this, 0,
                notificationIntent, 0);
        notification.setLatestEventInfo(this, "這是通知的標題", "這是通知的內容",
                pendingIntent);
        startForeground(1, notification);
        Log.d(TAG, "onCreate() executed");
    }

    .........

}
這裡只是修改了MyService中onCreate()方法的代碼。可以看到,我們首先創建了一個Notification對象,然後調用了它的setLatestEventInfo()方法來為通知初始化布局和數據,並在這裡設置了點擊通知後就打開MainActivity。然後調用startForeground()方法就可以讓MyService變成一個前台Service,並會將通知的圖片顯示出來。
現在重新運行一下程序,並點擊Start Service或Bind Service按鈕,MyService就會以前台Service的模式啟動了,並且在系統狀態欄會彈出一個通欄圖標,下拉狀態欄後可以看到通知的詳細內容,如下圖所示。
好了,由於篇幅的原因,本篇文章就先寫到這裡。目前我們已經把關於Service的很多重要知識點都梳理完了,下一篇文章會承接這篇文章,介紹Android Service中剩下的一個非常重要且復雜的知識點 —— 遠程Service的使用,感興趣的朋友請繼續閱讀 Android Service完全解析,關於服務你所需知道的一切(下) 。
本文轉載於:http://blog.csdn.net/guolin_blog/article/details/11952435
 Android WebView遠程代碼執行漏洞簡析
Android WebView遠程代碼執行漏洞簡析 0x00 本文參考Android WebView 遠程代碼執行漏洞簡析。代碼地址為,https://github.
 Android入門(一),Android入門(
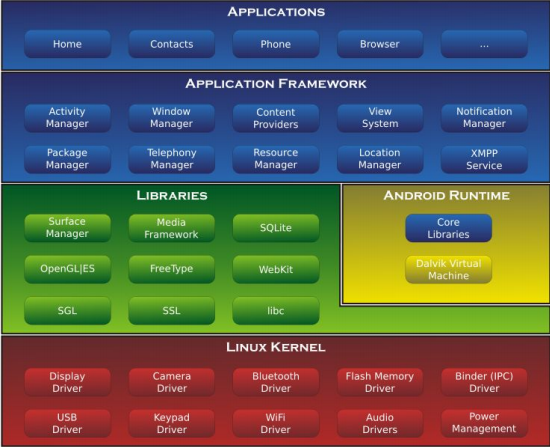
Android入門(一),Android入門(原文鏈接:http://www.orlion.ga/387/ 一、安卓的系統架構 &nb
 Android5.0開發范例大全 讀書筆記(三),android5.0范例
Android5.0開發范例大全 讀書筆記(三),android5.0范例(二)用戶交互 2.14轉發觸摸事件 1.TouchDelegate很適合簡單的觸摸轉發,它指定
 React Native之ViewPagerAndroid仿淘寶首頁頂部分類布局效果實現
React Native之ViewPagerAndroid仿淘寶首頁頂部分類布局效果實現 大家好,趁著現在別人都去吃飯的時間,來給大家講一講React Native中An