我們可以通過設置ACTION_CALL或者ACTION_DIAL完成在Android中進行電話撥號。
二者區別在於:
(1)ACTION_CALL:直接撥號;
(2)ACTION_DIAL:調用撥號程序,手工撥出。
一、設計界面
1、MainActivity布局文件
打開res/layout/activity_main.xml文件。
輸入以下代碼:
[html] view plain copy
- <?xml version="1.0" encoding="utf-8"?>
- <LinearLayout
- xmlns:android="http://schemas.android.com/apk/res/android"
- android:layout_width="match_parent"
- android:layout_height="match_parent"
- android:orientation="vertical" >
-
- <TextView
- android:id="@+id/tel"
- android:layout_width="wrap_content"
- android:layout_height="wrap_content"
- android:text="請輸入電話號碼:" />
-
- <EditText
- android:id="@+id/telphone"
- android:layout_width="match_parent"
- android:layout_height="wrap_content"
- android:ems="10" >
-
- <requestFocus />
- </EditText>
-
- <Button
- android:id="@+id/call"
- android:layout_width="wrap_content"
- android:layout_height="wrap_content"
- android:text="呼叫" />
-
- </LinearLayout>
二、程序文件
打開“src/com.genwoxue.intenttel/MainActivity.java”文件。
然後輸入以下代碼:
[java] view plain copy
- package com.genwoxue.intenttel;
-
-
- import android.net.Uri;
- import android.os.Bundle;
- import android.app.Activity;
- import android.content.Intent;
- import android.view.View;
- import android.view.View.OnClickListener;
- import android.widget.Button;
- import android.widget.TextView;
-
- public class MainActivity extends Activity {
-
- private TextView tvTelphone=null;
- private Button btnCall=null;
- @Override
- public void onCreate(Bundle savedInstanceState)
- {
- super.onCreate(savedInstanceState);
- setContentView(R.layout.activity_main);
- tvTelphone=(TextView)super.findViewById(R.id.telphone);
- btnCall=(Button)super.findViewById(R.id.call);
- btnCall.setOnClickListener(new OnClickListener(){
- public void onClick(View v)
- {
- String Telphone=tvTelphone.getText().toString();
- Uri uri=Uri.parse("tel:"+Telphone);
- Intent intent=new Intent();
- intent.setAction(Intent.ACTION_CALL);
- intent.setData(uri);
- MainActivity.this.startActivity(intent);
- }
- });
- }
-
- }
三、配置文件
打開“AndroidManifest.xml”文件。
然後輸入以下代碼:
[html] view plain copy
- <?xml version="1.0" encoding="utf-8"?>
- <manifest xmlns:android="http://schemas.android.com/apk/res/android"
- package="com.genwoxue.intenttel"
- android:versionCode="1"
- android:versionName="1.0" >
-
- <uses-sdk
- android:minSdkVersion="8"
- android:targetSdkVersion="15" />
-
- <span style="color:#ff0000;"><strong><uses-permission android:name="android.permission.CALL_PHONE"/></strong>
- </span>
- <application
- android:allowBackup="true"
- android:icon="@drawable/ic_launcher"
- android:label="@string/app_name"
- android:theme="@style/AppTheme" >
- <activity
- android:name="com.genwoxue.intenttel.MainActivity"
- android:label="@string/app_name" >
- <intent-filter>
- <action android:name="android.intent.action.MAIN" />
- <category android:name="android.intent.category.LAUNCHER" />
- </intent-filter>
- </activity>
- </application>
-
- </manifest>
注意:需要在AndroidManifest.xml文件中添加權限:
<uses-permission android:name="android.permission.CALL_PHONE"/>
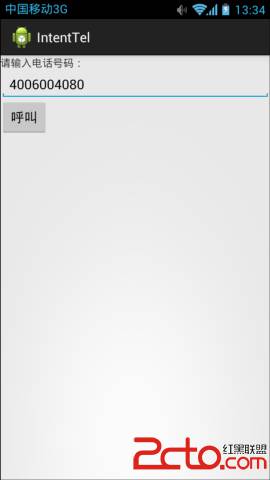
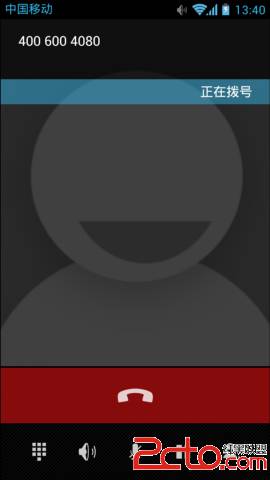
四、運行結果
 7.5.3 Android 4.4後WebView的一些注意事項
 2.3.9 RatingBar(星級評分條)
 8.3.15 Paint API之——Typeface(字型)
 第104章、Android訪問WebService(從零開始學Android)