編輯:Android技術基礎
前面我們已經學習了平時實際開發中用得較多的線性布局(LinearLayout)與相對布局(RelativeLayout), 其實學完這兩個基本就夠用了,筆者在實際開發中用得比較多的也是這兩個,當然作為一個好學的程序猿, 都是喜歡刨根問題的,所以雖說用得不多,但是還是有必要學習一下基本的用法的,說不定哪一天能用得上呢! 你說是吧,學多點東西沒什麼的,又不吃虧!好了,扯淡就扯到這裡,開始這一節的學習吧,這一節我們會學習 Android中的第三個布局:TableLayout(表格布局)!
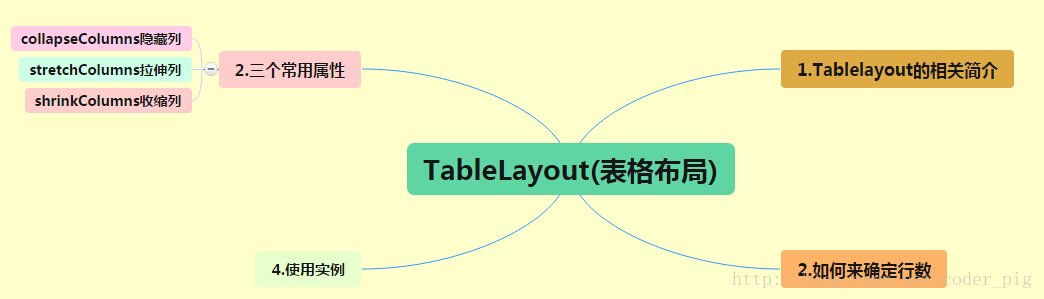
路線圖分析: 從上面的路線圖,可以看出TableLayout的用法還是很簡單的,無非就是確定表格的行數,以及使用 那三個屬性來設置每一行中的第某列的元素隱藏,拉伸,或者收縮即可!
相信學過HTML的朋友都知道,我們可以通過< table >< tr >< td >就可以生成一個HTML的表格, 而Android中也允許我們使用表格的方式來排列組件,就是行與列的方式,就說我們這節的TableLayout! 但卻不像我們後面會講到的Android 4.0後引入的GridLayout(網格)布局一樣,直接就可以設置多少行與多少列!
- ①如果我們直接往TableLayout中添加組件的話,那麼這個組件將占滿一行!!!
- ②如果我們想一行上有多個組件的話,就要添加一個TableRow的容器,把組件都丟到裡面!
- ③tablerow中的組件個數就決定了該行有多少列,而列的寬度由該列中最寬的單元格決定
- ④tablerow的layout_width屬性,默認是fill_parent的,我們自己設置成其他的值也不會生效!!! 但是layout_height默認是wrapten——content的,我們卻可以自己設置大小!
- ⑤整個表格布局的寬度取決於父容器的寬度(占滿父容器本身)
- ⑥有多少行就要自己數啦,一個tablerow一行,一個單獨的組件也一行!多少列則是看tableRow中 的組件個數,組件最多的就是TableLayout的列數
android:collapseColumns:設置需要被隱藏的列的序號
android:shrinkColumns:設置允許被收縮的列的列序號
android:stretchColumns:設置運行被拉伸的列的列序號以上這三個屬性的列號都是從0開始算的,比如shrinkColunmns = "2",對應的是第三列!
可以設置多個,用逗號隔開比如"0,2",如果是所有列都生效,則用"*"號即可
除了這三個常用屬性,還有兩個屬性,分別就是跳格子以及合並單元格,這和HTML中的Table類似:android:layout_column="2":表示的就是跳過第二個,直接顯示到第三個格子處,從1開始算的!
android:layout_span="4":表示合並4個單元格,也就說這個組件占4個單元格
屬性使用示例:
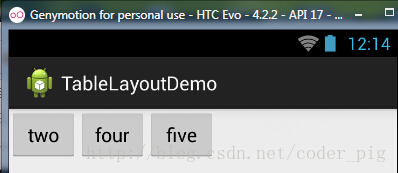
流程:在TableRow中定義5個按鈕後,接著在最外層的TableLayout中添加以下屬性: android:collapseColumns = "0,2",就是隱藏第一與第三列,代碼如下:
<TableLayout
    android:id="@+id/TableLayout2"
    android:layout_width="fill_parent"
    android:layout_height="wrap_content"
    android:collapseColumns="0,2" >

    <TableRow>

        <Button
            android:layout_width="wrap_content"
            android:layout_height="wrap_content"
            android:text="one" />

        <Button
            android:layout_width="wrap_content"
            android:layout_height="wrap_content"
            android:text="two" />

        <Button
            android:layout_width="wrap_content"
            android:layout_height="wrap_content"
            android:text="three" />

        <Button
            android:layout_width="wrap_content"
            android:layout_height="wrap_content"
            android:text="four" />

        <Button
            android:layout_width="wrap_content"
            android:layout_height="wrap_content"
            android:text="five" />
    </TableRow>
</TableLayout>
運行效果圖:
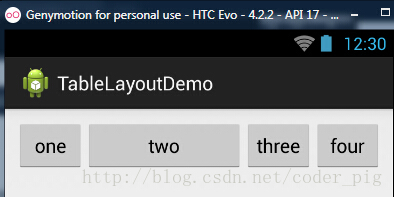
流程:在TableLayout中設置了四個按鈕,接著在最外層的TableLayout中添加以下屬性: android:stretchColumns = "1"
設置第二列為可拉伸列,讓該列填滿這一行所有的剩余空間,代碼如下:
<TableLayout
    android:id="@+id/TableLayout2"
    android:layout_width="fill_parent"
    android:layout_height="wrap_content"
    android:stretchColumns="1" >

    <TableRow>

        <Button
            android:layout_width="wrap_content"
            android:layout_height="wrap_content"
            android:text="one" />

        <Button
            android:layout_width="wrap_content"
            android:layout_height="wrap_content"
            android:text="two" />

        <Button
            android:layout_width="wrap_content"
            android:layout_height="wrap_content"
            android:text="three" />

        <Button
            android:layout_width="wrap_content"
            android:layout_height="wrap_content"
            android:text="four" />
    </TableRow>
</TableLayout>
運行效果圖:
步驟:這裡為了演示出效果,設置了5個按鈕和一個文本框,在最外層的TableLayout中添加以下屬性: android:shrinkColumns = "1"
設置第二個列為可收縮列,代碼如下:
<TableLayout
    android:id="@+id/TableLayout2"
    android:layout_width="fill_parent"
    android:layout_height="wrap_content"
    android:shrinkColumns="1" >

    <TableRow>

        <Button
            android:layout_width="wrap_content"
            android:layout_height="wrap_content"
            android:text="one" />

        <Button
            android:layout_width="wrap_content"
            android:layout_height="wrap_content"
            android:text="two" />

        <Button
            android:layout_width="wrap_content"
            android:layout_height="wrap_content"
            android:text="three" />

        <Button
            android:layout_width="wrap_content"
            android:layout_height="wrap_content"
            android:text="four" />

        <Button
            android:layout_width="wrap_content"
            android:layout_height="wrap_content"
            android:text="five" />

        <TextView
            android:layout_width="wrap_content"
            android:layout_height="wrap_content"
            android:text="文本XX" />
    </TableRow>
</TableLayout>
運行截圖:
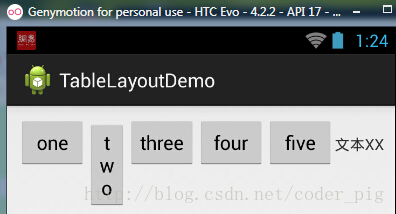
從圖中我們可以看到two這個按鈕被擠壓成條條狀,這個就是收縮,為了保證表格能適應 父容器的寬度!至於另外兩個屬性就不講解了,用法和HTML相同!有興趣的可以研究下!
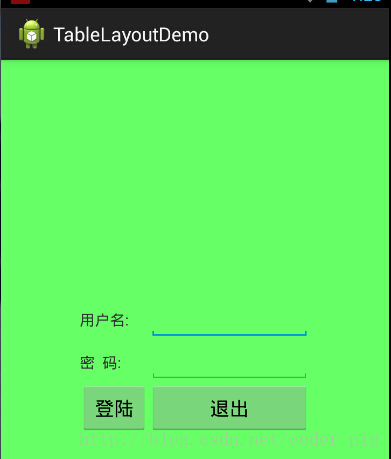
使用TableLayout來完成簡單的登錄界面,運行效果圖如下:
流程解析:
①調用gravity屬性,設置為center_vertical,讓布局裡面的組件在豎直方向上居中
②將TableLayout中的第一和第四列設置為可拉伸
③在每個TableRow中添加兩個TextView,用於拉伸填滿該行,這樣可以讓表格水平居中
android:stretchColumns="0,3" 設置為0.3,是為了讓兩邊都充滿,那麼中間部分就可以居中了
詳細代碼如下:
<TableLayout xmlns:android="http://schemas.android.com/apk/res/android"
    xmlns:tools="http://schemas.android.com/tools"
    android:id="@+id/TableLayout1"
    android:layout_width="match_parent"
    android:layout_height="match_parent"
    tools:context=".MainActivity"
    android:stretchColumns="0,3"
    android:gravity="center_vertical"
    android:background="#66FF66"
    >

    <TableRow>
        <TextView />
        <TextView
            android:layout_width="wrap_content"
            android:layout_height="wrap_content"
            android:text="用戶名:"/>
        <EditText
            android:layout_width="wrap_content"
            android:layout_height="wrap_content"
            android:minWidth="150dp"/>
        <TextView />
    </TableRow>

    <TableRow>
        <TextView />
        <TextView
            android:layout_width="wrap_content"
            android:layout_height="wrap_content"
            android:text="密  碼:"
        />
        <EditText
            android:layout_width="wrap_content"
            android:layout_height="wrap_content"
            android:minWidth="150dp"
        />
        <TextView />
    </TableRow>

    <TableRow>
        <TextView />
        <Button
            android:layout_width="wrap_content"
            android:layout_height="wrap_content"
            android:text="登陸"/>
        <Button
            android:layout_width="wrap_content"
            android:layout_height="wrap_content"
            android:text="退出"/>
        <TextView />
    </TableRow>

</TableLayout>
6.發現的問題
相信大家在使用這個這TableLayout的TableRow的時候會遇到這個警告:
當然,程序還是可以運行的,不過或許你是強迫症患者,看到黃色感歎號你就不爽的話! 而解決這個警告的方法也是很奇葩的:只要你的TableLayout裡面有2個或以上的TableRow就可以了!
本節小結:
好的,關於Android的第三個布局:TableLayout就到這裡~無非就是五個屬性的使用而已,實際開發 表格布局我們用的不多,知道簡單的用法就可以了!
 第11章、日期DatePicker與時間TimePicker控件(從零開始學Android)
在Android App應用中,設置日期和時間時間也是經常遇見的,下面我們一起學習一下。 我們需要學習Android中的基本控件:(1)日期選擇控件DatePicker
 第25章、OnTouchListener觸摸事件(從零開始學Android)
在Android App應用中,OnTouch事件表示觸摸事件,本章我們通過滑過圖像獲取當前位置理解其具體用法。 知識點:OnTouch 一、設計界面
 2.3.1 TextView(文本框)詳解
本節引言:學習完Android中的六大布局,從本節開始我們來一個個講解Android中的UI控件,本節給大家帶來的UI控件是:TextView(文本
 第17章、布局Layouts之嵌套布局(從零開始學Android)
Android布局我們已經學完了,你應該有一個深刻的體會:這幾種布局沒有哪一種最好,各有所長,也各有所短。那麼各個布局嵌套使用不失為一種好辦法,嵌套布局不是一種新的布局,