編輯:Android技術基礎
今天要介紹的布局是Android 4.0以後引入的一個新的布局,和前面所學的TableLayout(表格布局) 有點類似,不過他有很多前者沒有的東西,也更加好用,
- 可以自己設置布局中組件的排列方式
- 可以自定義網格布局有多少行,多少列
- 可以直接設置組件位於某行某列
- 可以設置組件橫跨幾行或者幾列
另外,除了上述內容外,本節還會給大家使用gridLayout時會遇到的問題,以及如何解決低版本 sdk如何使用GridLayout的方法!接下來就開始本節的課程吧!
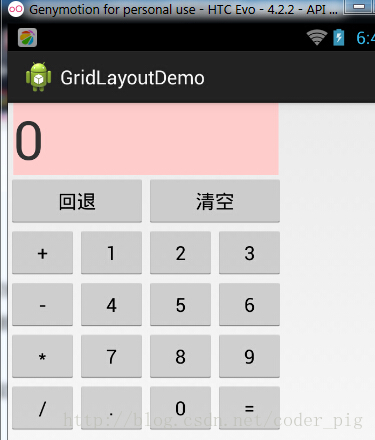
運行效果圖:
實現代碼:
<GridLayout xmlns:android="http://schemas.android.com/apk/res/android"
    xmlns:tools="http://schemas.android.com/tools"
    android:id="@+id/GridLayout1"
    android:layout_width="wrap_content"
    android:layout_height="wrap_content"
    android:columnCount="4"
    android:orientation="horizontal"
    android:rowCount="6" >

    <TextView
        android:layout_columnSpan="4"
        android:layout_gravity="fill"
        android:layout_marginLeft="5dp"
        android:layout_marginRight="5dp"
        android:background="#FFCCCC"
        android:text="0"
        android:textSize="50sp" />

    <Button
        android:layout_columnSpan="2"
        android:layout_gravity="fill"
        android:text="回退" />

    <Button
        android:layout_columnSpan="2"
        android:layout_gravity="fill"
        android:text="清空" />

    <Button android:text="+" />

    <Button android:text="1" />

    <Button android:text="2" />

    <Button android:text="3" />

    <Button android:text="-" />

    <Button android:text="4" />

    <Button android:text="5" />

    <Button android:text="6" />

    <Button android:text="*" />

    <Button android:text="7" />

    <Button android:text="8" />

    <Button android:text="9" />

    <Button android:text="/" />

    <Button
        android:layout_width="wrap_content"
        android:text="." />

    <Button android:text="0" />

    <Button android:text="=" />

</GridLayout>
代碼解析: 代碼很簡單,只是回退與清楚按鈕橫跨兩列,而其他的都是直接添加的,默認每個組件都是 占一行一列,另外還有一點要注意的: 我們通過:android:layout_rowSpan與android:layout_columnSpan設置了組件橫跨 多行或者多列的話,如果你要讓組件填滿橫越過的行或列的話,需要添加下面這個屬性: android:layout_gravity = "fill"!!!就像這個計算機顯示數字的部分!
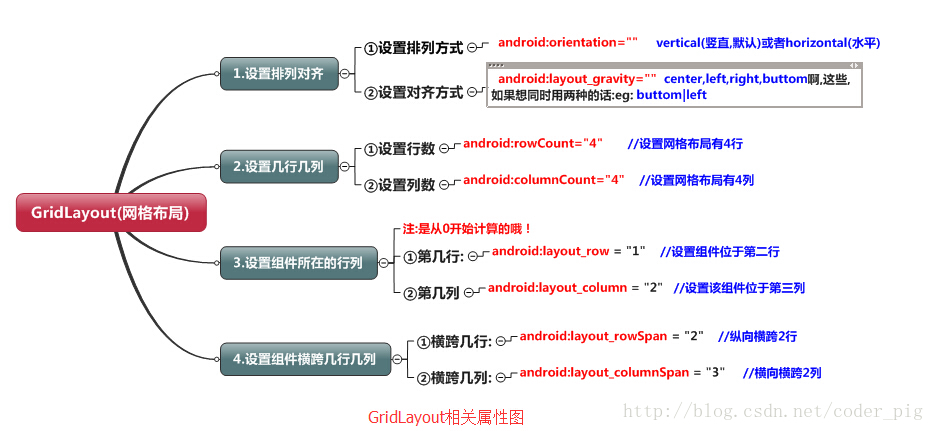
①GridLayout使用虛細線將布局劃分為行,列和單元格,同時也支持在行,列上進行交錯排列 ②使用流程:
- step 1:先定義組件的對其方式 android:orientation 水平或者豎直,設置多少行與多少列
- step 2:設置組件所在的行或者列,記得是從0開始算的,不設置默認每個組件占一行一列
- step 3:設置組件橫跨幾行或者幾列;設置完畢後,需要在設置一個填充:android:layout_gravity = "fill"
因為GirdLayout是4.0後才推出的,所以minSDK版本要改為14或者以上的版本, 不然寫布局代碼的時候,這玩意就會莫名其妙地出錯,說找不到這個GridLayout, 當然,如果你要低版本兼容的話,就要看下面的內容了!
解決方法很簡單:只需要導入v7包的gridlayout包即可! v7包一般在sdk下的:sdk\extras\android\support\v7\gridlayout目錄下 如果你沒有的話,也可以到這裡下載: gridlayout_v7_jay.rar 但是用的時候,標簽卻是這樣寫的:
<android.support.v7.widget.GridLayout>`
關於GridLayout的介紹就到這裡~
 4.4.1 ContentProvider初探
本節引言:本節給大家帶來的是Android四大組件中的最後一個——ContentProvider(內容提供者),可能部分讀者有疑問了,Android
 第53章、Matrix圖形處理(從零開始學Android)
在android中通過Canvas顯示圖像我們已經明白了,但如果想讓圖像旋轉、縮放、透明……,我們則要使用Matrix。 本案例讓位圖放大3
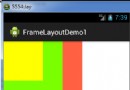 2.2.4 FrameLayout(幀布局)
本節引言FrameLayout(幀布局)可以說是六大布局中最為簡單的一個布局,這個布局直接在屏幕上開辟出一塊空白的區域,當我們往裡面添加控件的時候,
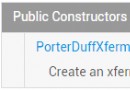 8.3.5 Paint API之—— Xfermode與PorterDuff詳解(二)
本節引言:上一節,我們學習了Xfermode兩個已經過世(過時)的兒子:AvoidXfermode, PixelXorXfermode,雖然說有點用