在Android應用中,有多種對話框:Dialog、AlertDialog、ProgressDialog、時間、日期等對話框。
(1)Dialog類,是一切對話框的基類,需要注意的是,Dialog類雖然可以在界面上顯示,但是並非繼承與習慣的View類,而是直接從java.lang.Object開始構造出來的,類似於Activity,Dialog也是有生命周期的,它的生命周期由Activity來維護。Activity負責生產,保存,回復它,在生命周期的每個階段都有一些回調函數供系統方向調用。
(2)AlertDialog是Dialog的一個直接子類,AlertDialog也是Android系統當中最常用的對話框之一。一個AlertDialog可以有兩個Button或3個Button,可以對一個AlertDialog設置title和message.不能直接通過AlertDialog的構造函數來生成一個AlertDialog.一般生成AlertDialog的時候都是通過它的一個內部靜態類AlertDialog.builder來構造的。
(3)顧名思義,這個Dialog負責給用戶顯示進度的相關情況,它是AlertDialog的一個子類。
本章我們著重講解一下AlertDialog!
AlertDialog的構造方法全部是Protected的,所以不能直接通過new一個AlertDialog來創建出一個AlertDialog。
要創建一個AlertDialog,就要用到AlertDialog.Builder中的create()方法。
使用AlertDialog.Builder創建對話框需要了解以下幾個方法:
setTitle :為對話框設置標題
setIcon :為對話框設置圖標
setMessage:為對話框設置內容
setView : 給對話框設置自定義樣式
setItems :設置對話框要顯示的一個list,一般用於顯示幾個命令時
setMultiChoiceItems :用來設置對話框顯示一系列的復選框
setNeutralButton :普通按鈕
setPositiveButton :給對話框添加"Yes"按鈕
setNegativeButton :對話框添加"No"按鈕
create : 創建對話框
show :顯示對話框
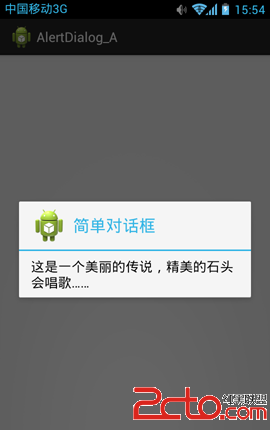
一、簡單對話框
Dialog類雖然可以在界面上顯示,但是並非繼承與習慣的View類,而是直接從java.lang.Object開始構造出來的。
1、打開“src/com.genwoxue.alertdialog_a/MainActivity.java”文件。
然後輸入以下代碼:
[java] view plain copy
- package com.example.alertdialog_a;
-
- import android.os.Bundle;
- import android.app.Activity;
- import android.app.AlertDialog.Builder;
- import android.app.AlertDialog;
-
- public class MainActivity extends Activity {
-
- @Override
- protected void onCreate(Bundle savedInstanceState) {
- super.onCreate(savedInstanceState);
- setContentView(R.layout.activity_main);
- //AlertDialog的構造方法全部是Protected的,所以不能直接通過new一個AlertDialog來創建出一個AlertDialog。
- //要創建一個AlertDialog,就要用到AlertDialog.Builder中的create()方法
- Builder adInfo=new AlertDialog.Builder(this);
- adInfo.setTitle("簡單對話框"); //設置標題
- adInfo.setMessage("這是一個美麗的傳說,精美的石頭會唱歌……"); //設置內容
- adInfo.setIcon(R.drawable.ic_launcher); //設置圖標
- adInfo.create();
- adInfo.show();
-
- }
- }
2、運行,顯示界面:
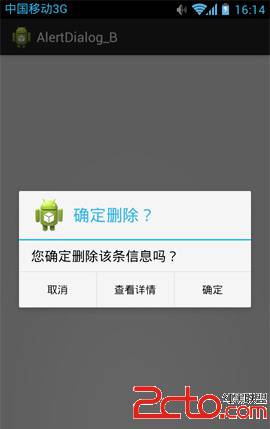
二、帶按鈕的AlertDialog
我們在執行刪除、確認等操作時,常常在對話框中單擊按鈕,AlertDialog可以顯示3個按鈕。
1、打開“src/com.genwoxue.alertdialog_bMainActivity.java”文件。
然後輸入以下代碼:
[java] view plain copy
- package com.example.alertdialog_b;
-
- import android.os.Bundle;
- import android.app.Activity;
- import android.app.AlertDialog.Builder;
- import android.app.AlertDialog;
- import android.content.DialogInterface;
-
- public class MainActivity extends Activity {
-
- @Override
- protected void onCreate(Bundle savedInstanceState) {
- super.onCreate(savedInstanceState);
- setContentView(R.layout.activity_main);
-
- Builder dialog = new AlertDialog.Builder(this);
- dialog.setTitle("確定刪除?");
- dialog.setMessage("您確定刪除該條信息嗎?");
- dialog.setIcon(R.drawable.ic_launcher);
- //為“確定”按鈕注冊監聽事件
- dialog.setPositiveButton("確定", new DialogInterface.OnClickListener() {
- @Override
- public void onClick(DialogInterface dialog, int which) {
- // 根據實際情況編寫相應代碼。
- }
- });
- //為“取消”按鈕注冊監聽事件
- dialog.setNegativeButton("取消", new DialogInterface.OnClickListener() {
- @Override
- public void onClick(DialogInterface dialog, int which) {
- // 根據實際情況編寫相應代碼。
- }
- });
- //為“查看詳情”按鈕注冊監聽事件
- dialog.setNeutralButton("查看詳情", new DialogInterface.OnClickListener() {
- @Override
- public void onClick(DialogInterface dialog, int which) {
- // 根據實際情況編寫相應代碼。
- }
- });
- dialog.create();
- dialog.show();
- }
- }
2、運行,顯示界面:
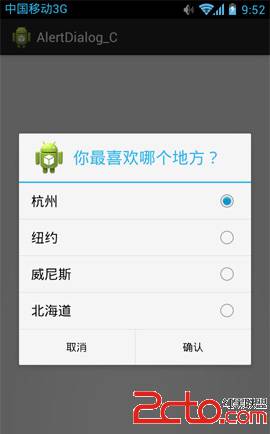
三、帶有單選按鈕、類似ListView的AlertDialog對話框
setSingleChoiceItems(CharSequence[] items, int checkedItem,final OnClickListener listener)方法來實現類似ListView的AlertDialog,第一個參數是要顯示的數據的數組,第二個參數指定默認選中項,第三個參數設置監聽處理事件。
1、打開“src/com.genwoxue.alertdialog_c/MainActivity.java”文件。
然後輸入以下代碼:
[java] view plain copy
- package com.genwoxue.alertdialog_c;
-
- import android.app.Activity;
- import android.app.AlertDialog;
- import android.app.Dialog;
- import android.content.DialogInterface;
- import android.os.Bundle;
- import android.widget.Toast;
-
- public class MainActivity extends Activity {
- //聲明選中項變量
- private int selectedCityIndex = 0;
-
- @Override
- public void onCreate(Bundle savedInstanceState) {
- super.onCreate(savedInstanceState);
- setContentView(R.layout.activity_main);
- //定義城市數組
- final String[] arrayCity = new String[] { "杭州", "紐約", "威尼斯", "北海道" };
-
- //實例化AlertDialog對話框
- Dialog alertDialog = new AlertDialog.Builder(this)
- .setTitle("你最喜歡哪個地方?") //設置標題
- .setIcon(R.drawable.ic_launcher) //設置圖標
- //設置對話框顯示一個單選List,指定默認選中項,同時設置監聽事件處理
- .setSingleChoiceItems(arrayCity, 0, new DialogInterface.OnClickListener() {
-
- @Override
- public void onClick(DialogInterface dialog, int which) {
- selectedCityIndex = which; //選中項的索引保存到選中項變量
- }
- })
- //添加取消按鈕並增加監聽處理
- .setNegativeButton("取消", new DialogInterface.OnClickListener() {
- @Override
- public void onClick(DialogInterface dialog, int which) {
- // TODO Auto-generated method stub
- }
- })
- //添加確定按鈕並增加監聽處理
- .setPositiveButton("確認", new DialogInterface.OnClickListener() {
- @Override
- public void onClick(DialogInterface dialog, int which) {
- Toast.makeText(getApplication(), arrayCity[selectedCityIndex], Toast.LENGTH_SHORT).show();
- }
- })
- .create();
- alertDialog.show();
- }
- }
2、運行,顯示界面:
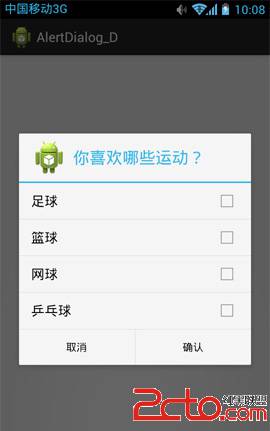
四、帶有復選框、類似ListView的AlertDialog對話框
setMultiChoiceItems(CharSequence[] items, boolearn[] checkedItems,final OnMultiChoiceClickListener listener)方法來實現類似ListView的AlertDialog,第一個參數是要顯示的數據的數組,第二個參數指定默認選中項,第在個參數設置監聽處理事件。
1、打開“src/com.genwoxue.alertdialog_d/MainActivity.java”文件。
然後輸入以下代碼:
[java] view plain copy
- package com.genwoxue.alertdialog_d;
-
- import android.app.Activity;
- import android.app.AlertDialog;
- import android.app.Dialog;
- import android.content.DialogInterface;
- import android.os.Bundle;
- import android.widget.Toast;
-
-
- public class MainActivity extends Activity {
-
- @Override
- public void onCreate(Bundle savedInstanceState) {
- super.onCreate(savedInstanceState);
- setContentView(R.layout.activity_main);
- //定義運動數組
- final String[] arraySport = new String[] { "足球", "籃球", "網球", "乒乓球" };
- final boolean[] arraySportSelected = new boolean[] {false, false, false, false};
-
- //實例化AlertDialog對話框
- Dialog alertDialog = new AlertDialog.Builder(this)
- .setTitle("你喜歡哪些運動?") //設置標題
- .setIcon(R.drawable.ic_launcher) //設置圖標
- //設置對話框顯示一個復選List,指定默認選中項,同時設置監聽事件處理
- .setMultiChoiceItems(arraySport, arraySportSelected, new DialogInterface.OnMultiChoiceClickListener() {
-
- @Override
- public void onClick(DialogInterface dialog, int which, boolean isChecked) {
- arraySportSelected[which] = isChecked; //選中項的布爾真假保存到選中項變量
- }
- })
- //添加取消按鈕並增加監聽處理
- .setPositiveButton("確認", new DialogInterface.OnClickListener() {
-
- @Override
- public void onClick(DialogInterface dialog, int which) {
- StringBuilder stringBuilder = new StringBuilder();
- for (int i = 0; i < arraySportSelected.length; i++) {
- if (arraySportSelected[i] == true){
- stringBuilder.append(arraySport[i] + "、");
- }
- }
- Toast.makeText(getApplication(), stringBuilder.toString(), Toast.LENGTH_SHORT).show();
- }
- })
-
- //添加確定按鈕並增加監聽處理
- .setNegativeButton("取消", new DialogInterface.OnClickListener() {
-
- @Override
- public void onClick(DialogInterface dialog, int which) {
- // TODO Auto-generated method stub
- }
- })
- .create();
-
- alertDialog.show();
- }
- }
2、運行,顯示界面:
 2.4.4 Adapter基礎講解
 第4章、打包Android應用(從零開始學Android)
 4.3.1 BroadcastReceiver牛刀小試
 第91章、廣播之二自定義電台與聽眾(從零開始學Android)