編輯:關於Android編程
前段時間客戶要求在高通7系列上加camera的差值,所以個人研究了一下這個差值的做法。
首先貼上要加載的文件的地址:
vendor/qcom/android-open/libcamera2/QualcommCameraHardware.cpp
vendor/qcom/proprietary/mm-camera/apps/appslib/snapshot.c
vendor/qcom/proprietary/mm-camera/common/mm_camera_interface.h
1.首先看mm_camera_interface.h
typedef struct {
struct camera_size_type mIn;
struct camera_size_type mOut;
int8_t mEnable;
}interpolaton_info_t;
interpolaton_info_t *p_interpolaton_info;
//添加差值結構體定義interpolaton_info_t並申請變量*p_interpolaton_info。
2. 查看QualcommCameraHardware.cpp
static interpolaton_info_t mInterpolatonInfo; //定義變量
bool QualcommCameraHardware::startCamera()
{
LOGV("startCamera E");
。。。
if (pthread_join(mDeviceOpenThread, NULL) != 0) {
LOGE("openCamera thread exit failed");
return false;
}
mCfgControl.mm_camera_query_parms(CAMERA_PARM_PICT_SIZE, (void **)&picture_sizes, &PICTURE_SIZE_COUNT);
#ifdef HAVE_SW_CAM_IMAGE_INTERPOLATION
/* max pict size supported by cureent yuv sensor is 5M,how to change?
* eg:if(picture_sizes->width == 2592 && picture_sizes->height == 1944)---->8MP
* if(picture_sizes->width == 3200 && picture_sizes->height == 2400)---->12MP
* ......
* and so on
* { 4000, 3000}, // 12MP
* { 3200, 2400}, // 8MP
* { 2592, 1944}, // 5MP
* { 2048, 1536}, // 3MP QXGA
* { 1920, 1080}, //HD1080
* { 1600, 1200}, // 2MP UXGA
* { 1280, 768}, //WXGA
* { 1280, 720}, //HD720
* { 1024, 768}, // 1MP XGA
* { 800, 600}, //SVGA
* { 800, 480}, // WVGA
* { 640, 480}, // VGA
* { 352, 288}, //CIF
* { 320, 240}, // QVGA
* { 176, 144} // QCIF
*
*/
memset(&mInterpolatonInfo,0,sizeof(interpolaton_info_t));
if(picture_sizes->width == 640 && picture_sizes->height == 480) //這裡是添加差值的起步點,從拍照640x480開始差值,即30萬開始。
{
LOGE("zzb change the supported pict sizes before(%d,%d)",picture_sizes->width,picture_sizes->height);
mInterpolatonInfo.mIn = *picture_sizes;
picture_sizes -= 1; //把拍照的指針向前移一位(根據要求可以移自己想要的位置)
PICTURE_SIZE_COUNT += 1; //這個是和上面的picture_sizes相對應的
mInterpolatonInfo.mOut = *picture_sizes; //這個是差值的輸出分辨率
mInterpolatonInfo.mEnable = false;
LOGE("zm change the supported pict sizes after(%d,%d)",picture_sizes->width,picture_sizes->height);
}
#endif
if ((picture_sizes == NULL) || (!PICTURE_SIZE_COUNT)) {
LOGE("startCamera X: could not get snapshot sizes");
return false;
}
。。。
} // END startCamera()
bool QualcommCameraHardware::initImageEncodeParameters(int size)
{
LOGV("%s: E", __FUNCTION__);
memset(&mImageEncodeParms, 0, sizeof(encode_params_t));
int jpeg_quality = mParameters.getInt("jpeg-quality");
bool ret;
#ifdef HAVE_SW_CAM_IMAGE_INTERPOLATION
//zm
mImageEncodeParms.p_interpolaton_info = &mInterpolatonInfo;
#endif
if (jpeg_quality >= 0) {
LOGV("initJpegParameters, current jpeg main img quality =%d",
jpeg_quality);
//Application can pass quality of zero
//when there is no back sensor connected.
//as jpeg quality of zero is not accepted at
//camera stack, pass default value.
if(jpeg_quality == 0) jpeg_quality = 85;
mImageEncodeParms.quality = jpeg_quality;
ret = native_set_parms(CAMERA_PARM_JPEG_MAINIMG_QUALITY, sizeof(int), &jpeg_quality);
if(!ret){
LOGE("initJpegParametersX: failed to set main image quality");
return false;
}
}
。。。
} //END initImageEncodeParameters(int size)
CameraParameters QualcommCameraHardware::getParameters() const
{
LOGV("getParameters: EX");
#ifdef HAVE_SW_CAM_IMAGE_INTERPOLATION
//zm
LOGE("zm:getParameters:state%d,in(%d,%d),out(%d,%d)",mInterpolatonInfo.mEnable,mInterpolatonInfo.mIn.width,mInterpolatonInfo.mIn.height,mInterpolatonInfo.mOut.width,mInterpolatonInfo.mOut.height);
if(mInterpolatonInfo.mEnable)
{
CameraParameters para = mParameters;
para.setPictureSize(mInterpolatonInfo.mOut.width,mInterpolatonInfo.mOut.height); //設置為輸出差值分辨率的值
return para;
}
#endif
return mParameters;
} //END getParameters()
status_t QualcommCameraHardware::setPictureSize(const CameraParameters& params)
{
int width, height;
params.getPictureSize(&width, &height);
LOGV("requested picture size %d x %d", width, height);
#ifdef HAVE_SW_CAM_IMAGE_INTERPOLATION
LOGE("zm requested picture size %d x %d", width, height);
//zm
//support 1MP XGA-> SVGA -> WVGA modify by zhangmin 2013.4.25 {begain
if(width == 1024 && height == 768) //根據要求菜單的拍照分辨率導出差值分辨率的值
//if(mInterpolatonInfo.mOut.width == width && mInterpolatonInfo.mOut.height == height)
{
mInterpolatonInfo.mEnable = true;
width = mInterpolatonInfo.mIn.width; //這個是基值(即差值的起始點)
height = mInterpolatonInfo.mIn.height;
mInterpolatonInfo.mOut.width = 1024; //這個是輸出要差值的分辨率
mInterpolatonInfo.mOut.height = 768;
LOGE("zm chg picture size %d x %d", width, height);
}
else if(width == 1280 && height == 960) // output 1280x960
{
mInterpolatonInfo.mEnable = true;
width = mInterpolatonInfo.mIn.width;
height = mInterpolatonInfo.mIn.height;
mInterpolatonInfo.mOut.width = 1280;
mInterpolatonInfo.mOut.height = 960;
LOGE("zm chg picture size %d x %d", width, height);
}
else if(width == 800 && height == 600)
{
mInterpolatonInfo.mEnable = true;
width = mInterpolatonInfo.mIn.width;
height = mInterpolatonInfo.mIn.height;
mInterpolatonInfo.mOut.width = 800;
mInterpolatonInfo.mOut.height = 600;
LOGE("zm 600 chg picture size %d x %d", width, height);
}
else if(width == 800 && height == 480)
{
mInterpolatonInfo.mEnable = true;
width = mInterpolatonInfo.mIn.width;
height = mInterpolatonInfo.mIn.height;
mInterpolatonInfo.mOut.width = 800;
mInterpolatonInfo.mOut.height = 480;
LOGE("zm 480 chg picture size %d x %d", width, height);
}
else
{
mInterpolatonInfo.mEnable = false;
}
//support 1MP XGA-> SVGA -> WVGA modify by zhangmin 2013.4.25 }end
#endif
// Validate the picture size
for (int i = 0; i < supportedPictureSizesCount; ++i) {
if (width == picture_sizes_ptr[i].width
&& height == picture_sizes_ptr[i].height) {
mParameters.setPictureSize(width, height);
mDimension.picture_width = width;
mDimension.picture_height = height;
return NO_ERROR;
}
}
。。。
} END setPictureSize(const CameraParameters& params)
3. 添加snapshot.c //主要是差值圖像的編碼
void* encode_thread_func(void *data)
{
mm_camera_status_t status = MM_CAMERA_SUCCESS;
snapshot_context_t* context = (snapshot_context_t *)data;
struct msm_frame* main_frame = NULL;
struct msm_frame* thumb_frame = NULL;
。。。
pthread_mutex_lock(&encode_thread_mutex);
if (context->encode_thread_exit) {
pthread_mutex_unlock(&encode_thread_mutex);
CDBG("%s encode_thread_exit", __func__);
goto encode_func_end;
}
#ifdef HAVE_SW_CAM_IMAGE_INTERPOLATION
//zm
{
common_crop_t * crop1 = (common_crop_t *)main_frame->cropinfo;
CDBG("zzb:buffer %d vaddr %p \n", main_frame->path,(void *)main_frame->buffer);
CDBG("zzb: Scaling params thumb in1_w %d in1_h %d out1_w %d out1_h %d "
"main_img in2_w %d in2_h %d out2_w %d out2_h %d\n",
crop1->in1_w, crop1->in1_h,
crop1->out1_w, crop1->out1_h,
crop1->in2_w, crop1->in2_h,
crop1->out2_w, crop1->out2_h);
}
if(main_frame != NULL && context->encode_params.p_interpolaton_info != NULL && context->encode_params.p_interpolaton_info->mEnable)
{
common_crop_t * crop = (common_crop_t *)main_frame->cropinfo;
CDBG("zzb change the crop info");
if(crop->in2_w ==0 && crop->in2_h == 0)
{
crop->in2_w = context->encode_params.p_interpolaton_info->mIn.width;
crop->in2_h = context->encode_params.p_interpolaton_info->mIn.height;
}
crop->out2_w = context->encode_params.p_interpolaton_info->mOut.width;
crop->out2_h = context->encode_params.p_interpolaton_info->mOut.height;
}
#endif
#ifdef _TARGET_7x2x_
status = snapshot_jpeg_encode(context, main_frame, thumb_frame);
#else
status = snapshot_jpeg_encode(context, main_frame);
#endif
。。。
} // End encode_thread_func(void *data)
這樣整個差值添加的就做完了,美妙的差值就實現了!嘿嘿。。。
上面實現了camera的差值,現在又有一個難題,什麼呢?還不是客戶成天沒事做想些東西折騰我們苦逼的工程師,
比如我們差值到720p的了(1280x720),客戶覺得預覽的黑邊太大,要求拍照分辨率為(1280x960)這個是130萬的。
腫麼辦?現在現有的如下
static struct camera_size_type default_picture_sizes[] = {
{ 4000, 3000}, // 12MP
{ 3200, 2400}, // 8MP
{ 2592, 1944}, // 5MP
{ 2048, 1536}, // 3MP QXGA
{ 1920, 1080}, //HD1080
{ 1600, 1200}, // 2MP UXGA
{ 1280, 768}, //WXGA
{ 1280, 720}, //HD720
{ 1024, 768}, // 1MP XGA
{ 800, 600}, //SVGA
{ 800, 480}, // WVGA
{ 640, 480}, // VGA
{ 352, 288}, //CIF
{ 320, 240}, // QVGA
{ 176, 144} // QCIF
};
現在只有1280x768 和 1600x1200,中間少了1280x960。所以我們又要滿足人家要求呗,添加。。。
首先在這個數組裡面添加一項 1280x960 //在文件vendor/qcom/properietary/mm-camera/apps/appslib/mm_camera_inerface.c
然後在packages/apps/Camera/res/values/文件夾下修改arrays.xml strings.xml
這兩個問價屬於camera的菜單項,需要在這裡把菜單加進去。
首先修改arrays.xml
紅色代表新添加的菜單
<!-- Camera Preferences Picture size dialog box entries -->
<string-array name="pref_camera_picturesize_entries" translatable="false">
<!-- TODO: Change to a better name of the preference.
The first element of the array sould be
"pref_camera_picturesize_entry_2592x1944". However, we are too
late for the translation. Since we show the same label as the
second item, we just use the second one instead.
-->
<item>@string/pref_camera_picturesize_entry_4000x3000</item>
<item>@string/pref_camera_picturesize_entry_3200x2400</item>
<item>@string/pref_camera_picturesize_entry_2592x1936</item>
<item>@string/pref_camera_picturesize_entry_2592x1936</item>
<item>@string/pref_camera_picturesize_entry_2592x1936</item>
<item>@string/pref_camera_picturesize_entry_2048x1536</item>
<item>@string/pref_camera_picturesize_entry_1920x1080</item>
<item>@string/pref_camera_picturesize_entry_1600x1200</item>
<item>@string/pref_camera_picturesize_entry_1280x768</item>
<item>@string/pref_camera_picturesize_entry_1280x720</item>
<item>@string/pref_camera_picturesize_entry_1024x768</item>
<item>@string/pref_camera_picturesize_entry_800x600</item>
<item>@string/pref_camera_picturesize_entry_800x480</item>
<item>@string/pref_camera_picturesize_entry_1280x960</item>
<item>@string/pref_camera_picturesize_entry_640x480</item>
<item>@string/pref_camera_picturesize_entry_352x288</item>
<item>@string/pref_camera_picturesize_entry_320x240</item>
<item>@string/pref_camera_picturesize_entry_176x144</item>
</string-array>
<!-- When launching the camera app first time, we will set the picture
size to the first one in the list that is also supported by the
driver -->
<string-array name="pref_camera_picturesize_entryvalues" translatable="false">
<item>4000x3000</item>
<item>3200x2400</item>
<item>2592x1944</item>
<item>2592x1936</item>
<item>2560x1920</item>
<item>2048x1536</item>
<item>1920x1080</item>
<item>1600x1200</item>
<item>1280x768</item>
<item>1280x720</item>
<item>1024x768</item>
<item>800x600</item>
<item>800x480</item>
<item>1280x960</item>
<item>640x480</item>
<item>352x288</item>
<item>320x240</item>
<item>176x144</item>
</string-array>
<!-- Camera Preferences Picture format dialog box entries -->
其次修改 strings.xml
紅色是添加的菜單
<!-- Settings screen, Picture size dialog radio button choices -->
<string name="pref_camera_picturesize_entry_4000x3000">12M Pixels</string>
<string name="pref_camera_picturesize_entry_3200x2400">8M Pixels</string>
<string name="pref_camera_picturesize_entry_2592x1936">5M Pixels</string>
<string name="pref_camera_picturesize_entry_2048x1536">3M Pixels</string>
<string name="pref_camera_picturesize_entry_1920x1080">HD1080</string>
<string name="pref_camera_picturesize_entry_1600x1200">2M Pixels</string>
<string name="pref_camera_picturesize_entry_1280x960">1.3M Pixels</string>
<string name="pref_camera_picturesize_entry_1280x768">WXGA</string>
<string name="pref_camera_picturesize_entry_1280x720">HD720</string>
<string name="pref_camera_picturesize_entry_1024x768">1M Pixels</string>
<string name="pref_camera_picturesize_entry_800x600">SVGA</string>
<string name="pref_camera_picturesize_entry_800x480">WVGA</string>
<string name="pref_camera_picturesize_entry_640x480">VGA</string>
<string name="pref_camera_picturesize_entry_352x288">CIF</string>
<string name="pref_camera_picturesize_entry_320x240">QVGA</string>
<string name="pref_camera_picturesize_entry_176x144">QCIF</string>
這樣又有一個神奇的1.3M的菜單顯現在你面前。
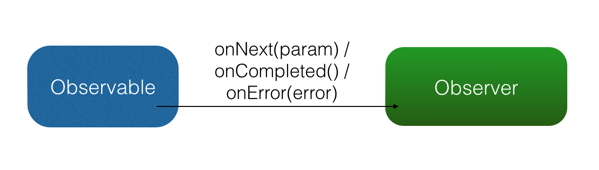 RxJava菜鳥驿站(一)
前言終究沒有經受住RxJava的誘惑,只恨自己來的比較晚,走起~RxJava 是什麼?一個在 Java VM 上使用可觀測的序列來組成異步的、基於事件的程序的庫~Rx J
 Android四大基本組件介紹與生命周期
Android四大基本組件分別是Activity,Service服務,Content Provider內容提供者,BroadcastReceiver廣播接收器。Activ
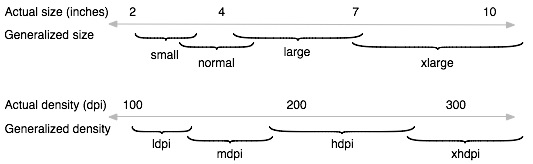 Android分辨率適配
Android的分辨率適配問題一直是Android所讓人诟病的主要問題,這裡參考了官方的開發文檔和實際開發中的一些處理分辨率的技巧來和大家交流一下。官方的關於分辨率適配的
 Android菜鳥的成長筆記(27)——SurfaceView的使用
前面有關自定義View中進行了繪圖,但View的繪圖機制存在如下缺陷:1、View缺乏雙緩沖機制。2、當程序需要更新View上的圖像時,程序必須重繪View上顯示的整張圖