編輯:關於Android編程
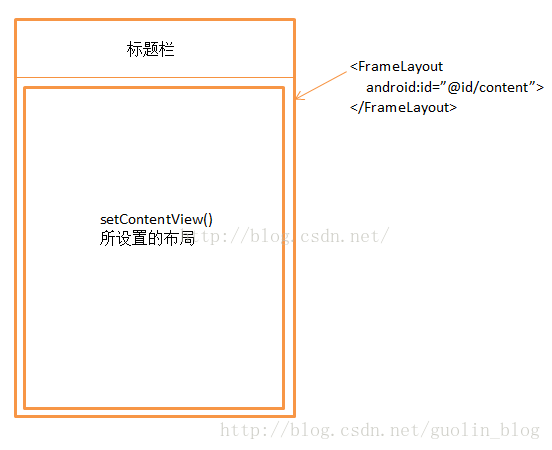
首先借用郭神的一張圖
平時我們初始化一個activity的使用會用到下面的代碼:
@Override
	protected void onCreate(Bundle savedInstanceState) {
		super.onCreate(savedInstanceState);
		setContentView(R.layout.main_layout);
		}
Activity#setContentView源碼如下:
public void setContentView(@LayoutRes int layoutResID) {
        getWindow().setContentView(layoutResID);
        initWindowDecorActionBar();
    }
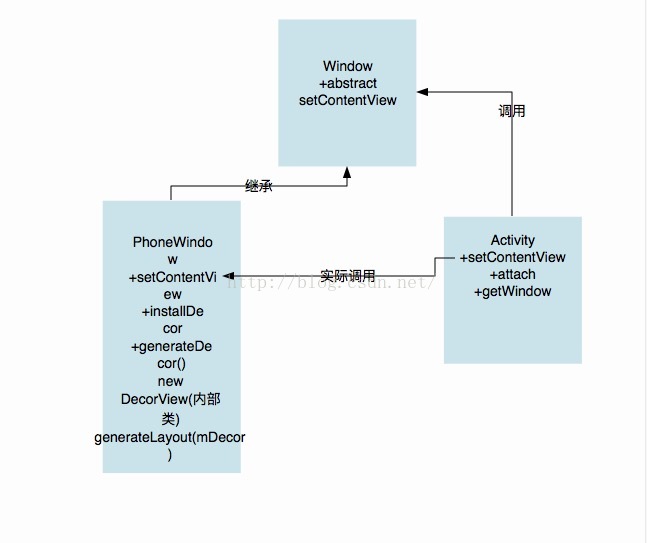
字面意思:看方法第一行代碼,做了兩件事:1)獲得一個window對象,2)調用對象的setContentView方法。
Activity#getWindow源碼如下:
public Window getWindow() {
        return mWindow;
    }
返回一個mWindow對象實例。
private Window mWindow;是一個Window對象。
Window#setContentView源碼如下:
public abstract void setContentView(@LayoutRes int layoutResID);抽象方法?回過頭再看一下,原來Window對象是一個抽象類:
public abstract class Window {...}
那麼它實例的方法,必須要找到它在哪實例化的,不能僅僅看它的聲明類型了。
那麼,回到Acitivity類中,找了老大一圈,發現一個attach方法中存在Window對象的實例方法。
Activitiy#attach源碼如下:
 final void attach(Context context, ActivityThread aThread,
            Instrumentation instr, IBinder token, int ident,
            Application application, Intent intent, ActivityInfo info,
            CharSequence title, Activity parent, String id,
            NonConfigurationInstances lastNonConfigurationInstances,
            Configuration config, String referrer, IVoiceInteractor voiceInteractor) {
        attachBaseContext(context);

        mFragments.attachHost(null /*parent*/);

        mWindow = new PhoneWindow(this);
        mWindow.setCallback(this);
        mWindow.setOnWindowDismissedCallback(this);
        mWindow.getLayoutInflater().setPrivateFactory(this);
        if (info.softInputMode != WindowManager.LayoutParams.SOFT_INPUT_STATE_UNSPECIFIED) {
            mWindow.setSoftInputMode(info.softInputMode);
        }
        if (info.uiOptions != 0) {
            mWindow.setUiOptions(info.uiOptions);
        }
        mUiThread = Thread.currentThread();

        mMainThread = aThread;
        mInstrumentation = instr;
        mToken = token;
        mIdent = ident;
        mApplication = application;
        mIntent = intent;
        mReferrer = referrer;
        mComponent = intent.getComponent();
        mActivityInfo = info;
        mTitle = title;
        mParent = parent;
        mEmbeddedID = id;
        mLastNonConfigurationInstances = lastNonConfigurationInstances;
        if (voiceInteractor != null) {
            if (lastNonConfigurationInstances != null) {
                mVoiceInteractor = lastNonConfigurationInstances.voiceInteractor;
            } else {
                mVoiceInteractor = new VoiceInteractor(voiceInteractor, this, this,
                        Looper.myLooper());
            }
        }

        mWindow.setWindowManager(
                (WindowManager)context.getSystemService(Context.WINDOW_SERVICE),
                mToken, mComponent.flattenToString(),
                (info.flags & ActivityInfo.FLAG_HARDWARE_ACCELERATED) != 0);
        if (mParent != null) {
            mWindow.setContainer(mParent.getWindow());
        }
        mWindowManager = mWindow.getWindowManager();
        mCurrentConfig = config;
    }
在上述源碼中發現:mWindow = new PhoneWindow(this);
可能有人會在想:Acitivity的attach方法是在哪調用的?先放放,下篇文章馬上就講。其實這也是一個思路,研究源碼,一條線研究的,分支不要亂開,否則很容易混亂。
原來我們在setContentView中的getWindow對象獲取的是一個PhoneWindow對象。
看看PhoneWindow對象的代碼結構:
public class PhoneWindow extends Window implements MenuBuilder.Callback {...}
能看出PhoneWindow繼承了Window對象,並實現了Window對象的抽象方法。
然後我整理了一下
總結一下:
Acitivity的setContentView獲取了一個PhoneWindow對象,並調用PhoneWindow的setContView方法。
到這兒,拿到了真正調用的setcontentview方法了:
PhoneWindow#setContentView源碼如下:
public void setContentView(int layoutResID) {
        // Note: FEATURE_CONTENT_TRANSITIONS may be set in the process of installing the window
        // decor, when theme attributes and the like are crystalized. Do not check the feature
        // before this happens.
        if (mContentParent == null) {
            installDecor();
        } else if (!hasFeature(FEATURE_CONTENT_TRANSITIONS)) {
            mContentParent.removeAllViews();
        }

        if (hasFeature(FEATURE_CONTENT_TRANSITIONS)) {
            final Scene newScene = Scene.getSceneForLayout(mContentParent, layoutResID,
                    getContext());
            transitionTo(newScene);
        } else {
            mLayoutInflater.inflate(layoutResID, mContentParent);
        }
        mContentParent.requestApplyInsets();
        final Callback cb = getCallback();
        if (cb != null && !isDestroyed()) {
            cb.onContentChanged();
        }
    }
看到這個方法裡面內容這麼少,這麼清晰簡單的判斷邏輯我就放心了。主題feature的代碼這些我們都忽略不看。直接看方法內第一段代碼:
if (mContentParent == null) {
            installDecor();
        }
如果mContentParent是空,那麼執行括號內的代碼。那麼mContentParent是什麼呢?發現是一個ViewGroup對象。
private ViewGroup mContentParent;
不難想象,也就是說當我這個viewGroup對象為空,即沒有實例化的時候,就對它進行實例化。那麼猜想:
installDecor方法內肯定有一個mContentParent的實例化方法。
PhoneWindow#installDecor源碼如下:(源碼超長,對後面部分精簡了一下,見源碼省略處)
private void installDecor() {
        if (mDecor == null) {
            mDecor = generateDecor();
            mDecor.setDescendantFocusability(ViewGroup.FOCUS_AFTER_DESCENDANTS);
            mDecor.setIsRootNamespace(true);
            if (!mInvalidatePanelMenuPosted && mInvalidatePanelMenuFeatures != 0) {
                mDecor.postOnAnimation(mInvalidatePanelMenuRunnable);
            }
        }
        if (mContentParent == null) {
            mContentParent = generateLayout(mDecor);

            // Set up decor part of UI to ignore fitsSystemWindows if appropriate.
            mDecor.makeOptionalFitsSystemWindows();

            final DecorContentParent decorContentParent = (DecorContentParent) mDecor.findViewById(
                    R.id.decor_content_parent);

            if (decorContentParent != null) {
                mDecorContentParent = decorContentParent;
                mDecorContentParent.setWindowCallback(getCallback());
                if (mDecorContentParent.getTitle() == null) {
                    mDecorContentParent.setWindowTitle(mTitle);
                }

                final int localFeatures = getLocalFeatures();
                for (int i = 0; i < FEATURE_MAX; i++) {
                    if ((localFeatures & (1 << i)) != 0) {
                        mDecorContentParent.initFeature(i);
                    }
                }

                mDecorContentParent.setUiOptions(mUiOptions);

                if ((mResourcesSetFlags & FLAG_RESOURCE_SET_ICON) != 0 ||
                        (mIconRes != 0 && !mDecorContentParent.hasIcon())) {
                    mDecorContentParent.setIcon(mIconRes);
                } else if ((mResourcesSetFlags & FLAG_RESOURCE_SET_ICON) == 0 &&
                        mIconRes == 0 && !mDecorContentParent.hasIcon()) {
                    mDecorContentParent.setIcon(
                            getContext().getPackageManager().getDefaultActivityIcon());
                    mResourcesSetFlags |= FLAG_RESOURCE_SET_ICON_FALLBACK;
                }
                if ((mResourcesSetFlags & FLAG_RESOURCE_SET_LOGO) != 0 ||
                        (mLogoRes != 0 && !mDecorContentParent.hasLogo())) {
                    mDecorContentParent.setLogo(mLogoRes);
                }

                // Invalidate if the panel menu hasn't been created before this.
                // Panel menu invalidation is deferred avoiding application onCreateOptionsMenu
                // being called in the middle of onCreate or similar.
                // A pending invalidation will typically be resolved before the posted message
                // would run normally in order to satisfy instance state restoration.
                PanelFeatureState st = getPanelState(FEATURE_OPTIONS_PANEL, false);
                if (!isDestroyed() && (st == null || st.menu == null) && !mIsStartingWindow) {
                    invalidatePanelMenu(FEATURE_ACTION_BAR);
                }
            } else {
                mTitleView = (TextView)findViewById(R.id.title);
                if (mTitleView != null) {
                    mTitleView.setLayoutDirection(mDecor.getLayoutDirection());
                    if ((getLocalFeatures() & (1 << FEATURE_NO_TITLE)) != 0) {
                        View titleContainer = findViewById(
                                R.id.title_container);
                        if (titleContainer != null) {
                            titleContainer.setVisibility(View.GONE);
                        } else {
                            mTitleView.setVisibility(View.GONE);
                        }
                        if (mContentParent instanceof FrameLayout) {
                            ((FrameLayout)mContentParent).setForeground(null);
                        }
                    } else {
                        mTitleView.setText(mTitle);
                    }
                }
            }

            if (mDecor.getBackground() == null && mBackgroundFallbackResource != 0) {
                mDecor.setBackgroundFallback(mBackgroundFallbackResource);
            }

            ...(省略)...
        }
    }
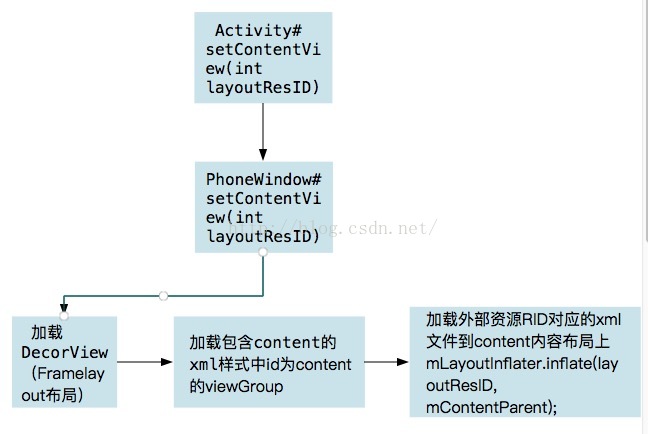
首先我們結合回到最開始的圖。源碼中mDecor對應整個PhoneWindow外框,mContentParent對應圖中setContentView的內容框。(即不含標題部分區域)

把上面的源碼拆開來看,先看第一部分:
if (mDecor == null) {
            mDecor = generateDecor();
            mDecor.setDescendantFocusability(ViewGroup.FOCUS_AFTER_DESCENDANTS);
            mDecor.setIsRootNamespace(true);
            if (!mInvalidatePanelMenuPosted && mInvalidatePanelMenuFeatures != 0) {
                mDecor.postOnAnimation(mInvalidatePanelMenuRunnable);
            }
        }
如果mDecor==null則對它進行實例化。看一眼PhoneWindow源碼:
// This is the top-level view of the window, containing the window decor.
    private DecorView mDecor;
在看我所說的mDecor的實例化方法:
protected DecorView generateDecor() {
        return new DecorView(getContext(), -1);
    }
調用構造方法:看看構造方法源碼:(簡單說一下:DecorView是PhoneWindow的一個內部類)
public DecorView(Context context, int featureId) {
            super(context);
            mFeatureId = featureId;

            mShowInterpolator = AnimationUtils.loadInterpolator(context,
                    android.R.interpolator.linear_out_slow_in);
            mHideInterpolator = AnimationUtils.loadInterpolator(context,
                    android.R.interpolator.fast_out_linear_in);

            mBarEnterExitDuration = context.getResources().getInteger(
                    R.integer.dock_enter_exit_duration);
        }
(裡面沒什麼東西:一個主題的int型id,動畫漸入漸出的插值器,一個動畫進入消失的時長int型的初始化。都並沒有什麼用。)看作一個普通的父類FrameLayout的構造方法即可。就是一個普通的FrameLayout布局。
沒有圖片的博客不是好博客:如下圖:
總結一下:
PhoneWindow的setContView方法:第一步:在當前手機屏幕PhoneWindow上加載了DecorView(最底層FrameLayout布局)。
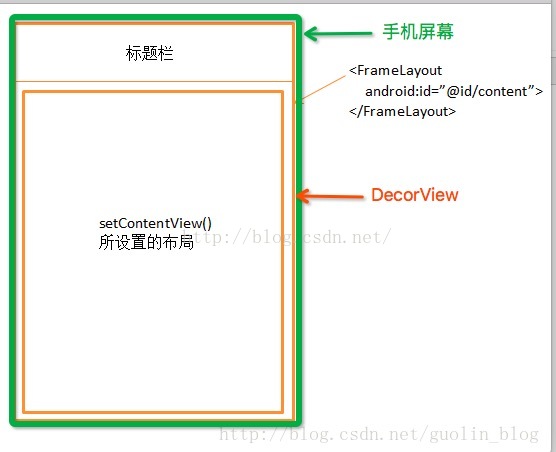
然後:我們在DecorView上繪制:
繼續看installDecor源碼第二部分:
if (mContentParent == null) {
            mContentParent = generateLayout(mDecor);

            // Set up decor part of UI to ignore fitsSystemWindows if appropriate.
            mDecor.makeOptionalFitsSystemWindows();

            final DecorContentParent decorContentParent = (DecorContentParent) mDecor.findViewById(
                    R.id.decor_content_parent);

            if (decorContentParent != null) {
                mDecorContentParent = decorContentParent;
                mDecorContentParent.setWindowCallback(getCallback());
                if (mDecorContentParent.getTitle() == null) {
                    mDecorContentParent.setWindowTitle(mTitle);
                }

                final int localFeatures = getLocalFeatures();
                for (int i = 0; i < FEATURE_MAX; i++) {
                    if ((localFeatures & (1 << i)) != 0) {
                        mDecorContentParent.initFeature(i);
                    }
                }

                mDecorContentParent.setUiOptions(mUiOptions);

                if ((mResourcesSetFlags & FLAG_RESOURCE_SET_ICON) != 0 ||
                        (mIconRes != 0 && !mDecorContentParent.hasIcon())) {
                    mDecorContentParent.setIcon(mIconRes);
                } else if ((mResourcesSetFlags & FLAG_RESOURCE_SET_ICON) == 0 &&
                        mIconRes == 0 && !mDecorContentParent.hasIcon()) {
                    mDecorContentParent.setIcon(
                            getContext().getPackageManager().getDefaultActivityIcon());
                    mResourcesSetFlags |= FLAG_RESOURCE_SET_ICON_FALLBACK;
                }
                if ((mResourcesSetFlags & FLAG_RESOURCE_SET_LOGO) != 0 ||
                        (mLogoRes != 0 && !mDecorContentParent.hasLogo())) {
                    mDecorContentParent.setLogo(mLogoRes);
                }

                // Invalidate if the panel menu hasn't been created before this.
                // Panel menu invalidation is deferred avoiding application onCreateOptionsMenu
                // being called in the middle of onCreate or similar.
                // A pending invalidation will typically be resolved before the posted message
                // would run normally in order to satisfy instance state restoration.
                PanelFeatureState st = getPanelState(FEATURE_OPTIONS_PANEL, false);
                if (!isDestroyed() && (st == null || st.menu == null) && !mIsStartingWindow) {
                    invalidatePanelMenu(FEATURE_ACTION_BAR);
                }
            } else {
                mTitleView = (TextView)findViewById(R.id.title);
                if (mTitleView != null) {
                    mTitleView.setLayoutDirection(mDecor.getLayoutDirection());
                    if ((getLocalFeatures() & (1 << FEATURE_NO_TITLE)) != 0) {
                        View titleContainer = findViewById(
                                R.id.title_container);
                        if (titleContainer != null) {
                            titleContainer.setVisibility(View.GONE);
                        } else {
                            mTitleView.setVisibility(View.GONE);
                        }
                        if (mContentParent instanceof FrameLayout) {
                            ((FrameLayout)mContentParent).setForeground(null);
                        }
                    } else {
                        mTitleView.setText(mTitle);
                    }
                }
            }

            if (mDecor.getBackground() == null && mBackgroundFallbackResource != 0) {
                mDecor.setBackgroundFallback(mBackgroundFallbackResource);
            }
...省略...
}
發現還是好多代碼:那麼我們繼續拆分:
if (mContentParent == null) {
            mContentParent = generateLayout(mDecor);
........
}
mContentParent不知道大家有沒有印象,之前我說的它會在installDecor中實例化。就是它了。
看到這個實例方法:generateLayout(mDecor),再聯系之前的generateDecor方法。
這個實例方法不打算多講:簡單提一句用來根據不同的設置參數,來動態加載不同的樣式的。再將這個樣式添加到mDecor這個framelayout上。
比如我們常見的一個用法:設置不加標題欄:FEATURE_NO_TITLE。那麼這兒加載的布局樣式就是無標題欄的布局樣式。
generateLayout(mDecor)摘抄部分代碼:
protected ViewGroup generateLayout(DecorView decor) {
...省略...
View in = mLayoutInflater.inflate(layoutResource, null);
        decor.addView(in, new ViewGroup.LayoutParams(MATCH_PARENT, MATCH_PARENT));
        mContentRoot = (ViewGroup) in;
 ViewGroup contentParent = (ViewGroup)findViewById(ID_ANDROID_CONTENT);
...省略...
return contentParent;}
我們看一下screenSimple.xml這個系統提供的加載的簡單的樣式:(在上面的generateLayout(mDecor)用到過)
    <framelayout android:foreground="?android:attr/windowContentOverlay" android:foregroundgravity="fill_horizontal|top" android:foregroundinsidepadding="false" android:id="@android:id/content" android:layout_height="match_parent" android:layout_width="match_parent">
</framelayout>
/**
     * The ID that the main layout in the XML layout file should have.
     */
    public static final int ID_ANDROID_CONTENT = com.android.internal.R.id.content;
這樣子,我們就獲得了content布局,也就是我們平時寫的布局代碼的內容布局部分的底部。上個布局加載流程圖。
最後則是通過infalate加載我們的資源id對應的xml資源文件。
over~
 Android熱補丁技術—dexposed原理簡析(手機淘寶采用方案)
本文由嵌入式企鵝圈原創團隊成員、阿裡資深工程師Hao分享。上篇文章《Android無線開發的幾種常用技術》我們介紹了幾種android移動應用開發中的常用技術,其中的熱補
 Android項目研發之多分辨率適配
Android多終端適配是我們在實際開發中必然會遇到也必然要解決的問題,解決多終端適配的方法有很多,比如使用百分比布局庫(percent-support-lib)、在re
 Android系統篇之----Android中的智能指針
一、前言今天我們開啟Android系統篇的文章了,其實一直想弄,只是之前一直沒有太多深入的了解,最近又把這塊拿出來好好看了一下,所以想從新梳理一下,來看看Android中
 Android RecyclerView 和 CardView簡單使用
Android 5.0之後Android新增加的兩個UI控件RecyclerView,CardView。RecyclerView可以看出是ListView的加強版,能夠更