編輯:關於Android編程
ClipDrawable代表從其它位圖上截取一個“圖片片段”。在XML文件中使用<clip.../>元素定義ClipDrawable對象,可指定如下三個屬性:
android:drawable:指定截取的源Drawable對象
android:clipOrientation:指定截取的方向,可設置為水平截取或垂直截取
android:gravity:指定截取時的對齊方式
使用ClipDrawable對象時可以調用setLevel(int level)方法來設置截取的區域大小,當level為0時,截取的圖片片段為空;當level為10000時,截取整張圖片。
通過以上說明,我們發現,可以使用ClipDrawable的這種性質控制截取圖片的區域大小,讓程序不斷調用setLevel方法並改變level的值,達到讓圖片慢慢展開的效果。
首先,我們定義一個ClipDrawable對象:
[html]
<?xml version="1.0" encoding="UTF-8"?>
<clip
xmlns:android="http://schemas.android.com/apk/res/android"
android:drawable="@drawable/muller"
android:clipOrientation="horizontal"
android:gravity="center" >
</clip>
<?xml version="1.0" encoding="UTF-8"?>
<clip
xmlns:android="http://schemas.android.com/apk/res/android"
android:drawable="@drawable/muller"
android:clipOrientation="horizontal"
android:gravity="center" >
</clip>
接下來,簡單設置下布局文件,使得圖片能夠顯示在屏幕上(注意ImageView的src屬性的選擇):
[html]
<LinearLayout xmlns:android="http://schemas.android.com/apk/res/android"
xmlns:tools="http://schemas.android.com/tools"
android:layout_width="match_parent"
android:layout_height="match_parent"
android:orientation="vertical"
tools:context=".MainActivity" >
<ImageView
android:id="@+id/view"
android:layout_width="match_parent"
android:layout_height="match_parent"
android:src="@drawable/clip" />
</LinearLayout>
下面在主程序中設置一個定時器來改變level值:
[java]
public class MainActivity extends Activity
{
private ImageView view=null;
@Override
protected void onCreate(Bundle savedInstanceState)
{
super.onCreate(savedInstanceState);
super.setContentView(R.layout.activity_main);
this.view=(ImageView)super.findViewById(R.id.view);
//獲取圖片所顯示的ClipDrawable對象
final ClipDrawable drawable=(ClipDrawable) view.getDrawable();
final Handler handler=new Handler()
{
@Override
public void handleMessage(Message msg)
{
//如果消息是本程序發送的
if(msg.what==0x123)
{
//修改ClipDrawable的level值
drawable.setLevel(drawable.getLevel()+200);
}
}
};
final Timer timer=new Timer();
timer.schedule(new TimerTask()
{
@Override
public void run()
{
Message msg=new Message();
msg.what=0x123;
//發送消息,通知應用修改ClipDrawable的level的值
handler.sendMessage(msg);
//取消定時器
if(drawable.getLevel()>=10000)
{
timer.cancel();
}
}
}, 0,300);
}
}
程序運行效果截圖:
 詳解Android中AsyncTask的使用方法
在Android中實現異步任務機制有兩種方式,Handler和AsyncTask。Handler模式需要為每一個任務創建一個新的線程,任務完成後通過Handler實例向U
 TextSwticher 與 TextView 實現上下滾動和跑馬燈效果
太久沒寫博客了,主要是想寫一些有質量的,今天碰到這個需求覺得挺有意思的,即像標題寫的那樣,這裡記錄一下,廢話不多說,先上一個效果圖:單行顯示:大於一行顯示:即,單行上下滾
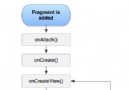 實例探究Android應用編寫時Fragment的生命周期問題
管理fragment的生命周期有些像管理activity的生命周期。Fragment可以生存在三種狀態:Resumed:Fragment在一個運行中的activity中並
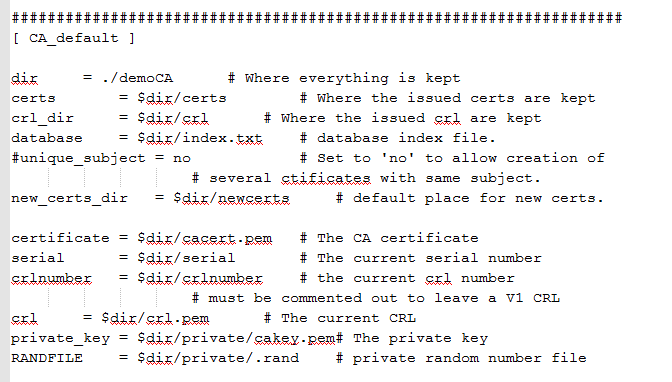 Openssl CA證書生成以及雙向認證,及windows系統證書批量導出,android cer轉bks
只是途中有些問題折騰了一下,比如openssl.cnf如何來的,這個文件在編譯完openssl後,應該openssl根目錄下/apps/demoCA有個,可以把他拷貝到o