編輯:關於Android編程
上文我們介紹怎樣管理和刪除通知,以及怎樣實現保存用戶預期導航體驗的通知。本文作為Android平台Notification的最終章,我們將會給通知融入更多DIY的元素,大膽地在這把“倚天劍”上烙下自己的印記^-^。在此之前,先來看下如何在通知中顯示一個進度條。
一、顯示進度的通知
通知可以包括一個動畫進度指示器以顯示用戶正在運行的操作的進度狀態。如果你能估計這種操作需要花費多長時間,可以使用“determinate”形式的指示器(一個progress bar)。如果你不能估計花費的時間,那就使用“indeterminate”形式的指示器。
1.顯示一個固定的時間進度指示器
(1).技術要點
調用setProgress()方法添加進度指示器到你的通知中。
(2).代碼陳列
[java]
final NotificationCompat.Builder builder = new NotificationCompat.Builder(this)
.setContentInfo(String.valueOf(++progressNum))
.setContentTitle("Picture Download")
.setContentText("Download in progress")
.setDefaults(Notification.DEFAULT_ALL)
.setLargeIcon(icon)
.setSmallIcon(R.drawable.stat_notify_gmail)
.setTicker("Progress Notification")
.setOngoing(true);
// Start a lengthy operation in a background thread
new Thread(new Runnable() {
@Override
public void run() {
int incr;
// Do the "lengthy" operation 20 times
for (incr = 0; incr <= 100; incr+=5) {
builder.setProgress(100, incr, false);
mNotiMgr.notify(PROGRESS_NOTI_ID, builder.build());
try {
Thread.sleep(1000);
} catch (InterruptedException e) {
Log.d(TAG, "sleep failure");
}
}
builder.setContentText("Download complete")
.setProgress(0, 0, false)
.setOngoing(false);
mNotiMgr.notify(PROGRESS_NOTI_ID, builder.build());
}
}).start();
final NotificationCompat.Builder builder = new NotificationCompat.Builder(this)
.setContentInfo(String.valueOf(++progressNum))
.setContentTitle("Picture Download")
.setContentText("Download in progress")
.setDefaults(Notification.DEFAULT_ALL)
.setLargeIcon(icon)
.setSmallIcon(R.drawable.stat_notify_gmail)
.setTicker("Progress Notification")
.setOngoing(true);
// Start a lengthy operation in a background thread
new Thread(new Runnable() {
@Override
public void run() {
int incr;
// Do the "lengthy" operation 20 times
for (incr = 0; incr <= 100; incr+=5) {
builder.setProgress(100, incr, false);
mNotiMgr.notify(PROGRESS_NOTI_ID, builder.build());
try {
Thread.sleep(1000);
} catch (InterruptedException e) {
Log.d(TAG, "sleep failure");
}
}
builder.setContentText("Download complete")
.setProgress(0, 0, false)
.setOngoing(false);
mNotiMgr.notify(PROGRESS_NOTI_ID, builder.build());
}
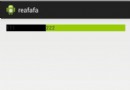
}).start();(3).效果展示

2.顯示一個持續的Activity指示器
(1).技術要點
調用setProgress(0, 0, true)添加Activity指示器到你的通知中,前面兩個參數可以忽略。
(2).代碼陳列
[java]
builder.setProgress(100, incr, false);
builder.setProgress(100, incr, false);[java] view plaincopyprint?
mNotiMgr.notify(0, mBuilder.build());
mNotiMgr.notify(0, mBuilder.build());(3).效果展示
二、自定義樣式的通知
通知框架允許你自定義通知布局,它在一個RemoteViews對象中定義了通知的布局。自定義布局通知和正常的通知類似,它們都是基於一個RemoteViews定義在一個XML布局文件中。自定義通知的可用高度取決於通知view的布局。正常view布局限制為64dp,展開view布局限制為256dp。自定義通知布局,通過實例化一個RemoteViews對象然後inflates一個xml布局文件啟動。不再調用setContentTitle()方法,而使用setContent()方法來設置自定義通知的內容細節。使用這個方法在RemoteViews中來設置view子類的值。
1.技術要點
(1).為通知創建一個單獨的xml布局文件。
(2).在你的應用程序中,使用RemoteViews方法來定義你通知的icon和文本。調用setContent()方法put這個RemoteViews對象到你的NotificationCompat.Builder中。避免正在RemoteViews對象中設置Drawable背景,因為你的文本顏色可能會變的看不清。
2.代碼陳列
工程包目錄
自定義樣式通知創建和發布方法:showCustomNoti()
[java]
/**
* 自定義樣式通知
*/
private void showCustomNoti() {
RemoteViews views = new RemoteViews(getPackageName(), R.layout.custom);
Intent intent = new Intent(INTENT_ACTION);
intent.putExtra("isPlay", true);
PendingIntent pendingIntent = PendingIntent.getBroadcast(this, 0, intent, 0);
views.setOnClickPendingIntent(R.id.play_pause_music, pendingIntent);
NotificationCompat.Builder builder = new NotificationCompat.Builder(this)
.setContent(views)
.setDefaults(Notification.DEFAULT_ALL)
.setLargeIcon(icon)
.setSmallIcon(R.drawable.music_icon)
.setTicker("Custom Notification")
.setOngoing(true);
mNotiMgr.notify(CUSTOM_NOTI_ID, builder.build());
}
/**
* 自定義樣式通知
*/
private void showCustomNoti() {
RemoteViews views = new RemoteViews(getPackageName(), R.layout.custom);
Intent intent = new Intent(INTENT_ACTION);
intent.putExtra("isPlay", true);
PendingIntent pendingIntent = PendingIntent.getBroadcast(this, 0, intent, 0);
views.setOnClickPendingIntent(R.id.play_pause_music, pendingIntent);
NotificationCompat.Builder builder = new NotificationCompat.Builder(this)
.setContent(views)
.setDefaults(Notification.DEFAULT_ALL)
.setLargeIcon(icon)
.setSmallIcon(R.drawable.music_icon)
.setTicker("Custom Notification")
.setOngoing(true);
mNotiMgr.notify(CUSTOM_NOTI_ID, builder.build());
}自定義通知布局文件:custom.xml
[html]
<?xml version="1.0" encoding="utf-8"?>
<LinearLayout xmlns:android="http://schemas.android.com/apk/res/android"
android:layout_width="match_parent"
android:layout_height="match_parent"
android:gravity="center_vertical" >
<ImageView
android:id="@+id/songer"
android:layout_width="64dp"
android:layout_height="64dp"
android:src="@drawable/songer" />
<LinearLayout
android:layout_width="0dp"
android:layout_height="match_parent"
android:gravity="center_vertical"
android:orientation="vertical"
android:layout_weight="1">
<TextView
android:layout_width="match_parent"
android:layout_height="wrap_content"
android:text="@string/song_name"
android:textSize="18sp"
android:gravity="center_horizontal" />
<TextView
android:layout_width="match_parent"
android:layout_height="wrap_content"
android:text="@string/songer_name"
android:textSize="14sp"
android:gravity="center_horizontal" />
</LinearLayout>
<LinearLayout
android:layout_width="0dp"
android:layout_height="match_parent"
android:gravity="center_vertical"
android:layout_weight="1" >
<ImageView
android:id="@+id/last_music"
android:layout_width="0dp"
android:layout_height="48dp"
android:layout_weight="1"
android:src="@drawable/music_previous" />
<ImageView
android:id="@+id/play_pause_music"
android:layout_width="0dp"
android:layout_height="48dp"
android:layout_weight="1"
android:src="@drawable/music_play" />
<ImageView
android:id="@+id/next_music"
android:layout_width="0dp"
android:layout_height="48dp"
android:layout_weight="1"
android:src="@drawable/music_next" />
</LinearLayout>
</LinearLayout>
 Android TextView裡直接顯示圖片的三種方法
方法一:重寫TextView的onDraw方法,也挺直觀就是不太好控制顯示完圖片後再顯示字體所占空間的位置關系。一般如果字體是在圖片上重疊的推薦這樣寫。時間關系,這個不付
 Android 實現仿網絡直播彈幕功能詳解及實例
Android 網絡直播彈幕
 Android Composite(ListView)詳解
目錄:1.ListView概述2.ListView使用中的重要角色(Adapter,ViewHolder,數據集,布局)3.ListView常用屬性4.ListView+
 Android基礎之使用Fragment適應不同屏幕和分辨率(分享)
最近事情很忙,一個新項目趕著出來,但是很多功能都要重新做,一直在編寫代碼、Debug。今天因為一個新程序要使用Fragment來做,雖然以前也使用過Fragment,不過