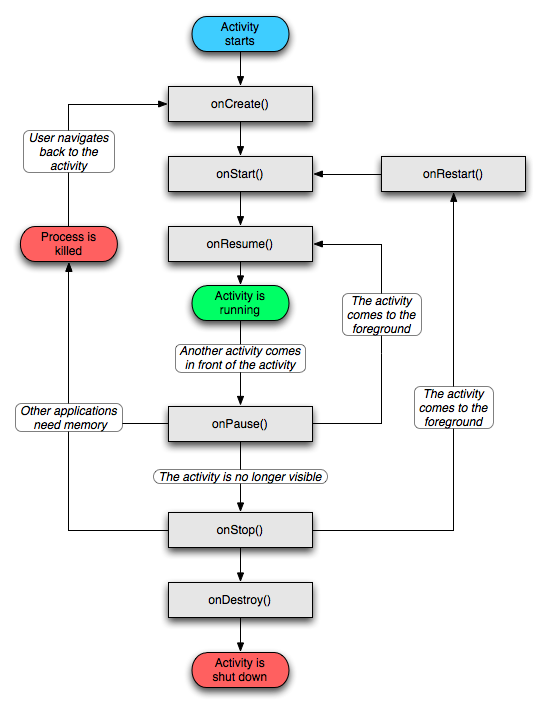
編輯:關於Android編程
Intent代表了Android應用的啟動“意圖”,Android應用將會根據Intent來啟動指定組件,至於到底啟動哪個組件,取決於Intent的各個屬性。
一、顯式的Intent
明確指定了要啟動的組件的Intent我們稱為顯式的Intent
例如:
package com.example.testintent;

import android.app.Activity;
import android.content.ComponentName;
import android.content.Intent;
import android.os.Bundle;
import android.view.View;
import android.view.View.OnClickListener;
import android.widget.Button;

public class MainActivity extends Activity {
	Button button;
	@Override
	protected void onCreate(Bundle savedInstanceState) {
		super.onCreate(savedInstanceState);
		setContentView(R.layout.activity_main);
		button = (Button)findViewById(R.id.button1);
		button.setOnClickListener(new OnClickListener() {

			@Override
			public void onClick(View arg0) {
				ComponentName comp = new ComponentName(MainActivity.this, SecondActivity.class);
				Intent intent = new Intent();
				intent.setComponent(comp);
				startActivity(intent);
			}
		});
	}
}
注意在manifest文件裡注冊SecondActivity
Intent的Componet屬性需要接收一個ComponentName對象,ComponetName對象其實是一個指定包和要啟動的Activity路徑的類,有如下幾個構造
componentName(String pkg, String cls)
componentName(Context pkg, String cls)
componentName(Context pkg, Class cls)
componentName(Parcel in)
除了這個屬性之外Intent還包含了如下三個方法:
setClass(Context packageContext, Class cls )
setClassName(Context packageContext, String className)
setClassName(String packageName, String className )
上面的代碼可以簡化為如下代碼:
Intent intent = new Intent(MainActivity.this, SecondActivity.class);
startActivity(intent);
二、隱式的Intent
沒有明確指定要啟動的組件的Intent我們稱為隱式的Intent
Intent除了上面的Componet屬性外還有Action、Category屬性
Action代表Intent所要完成的一個抽象動作,而Category則是動作附加的類別信息。
例如:
package com.example.testintent;

import android.app.Activity;
import android.content.ComponentName;
import android.content.Intent;
import android.os.Bundle;
import android.view.View;
import android.view.View.OnClickListener;
import android.widget.Button;

public class MainActivity extends Activity {
	Button button;
	@Override
	protected void onCreate(Bundle savedInstanceState) {
		super.onCreate(savedInstanceState);
		setContentView(R.layout.activity_main);
		button = (Button)findViewById(R.id.button1);
		button.setOnClickListener(new OnClickListener() {

			@Override
			public void onClick(View arg0) {
				Intent intent = new Intent();
				intent.setAction("com.example.intent.action.TEST_ACTION");
				startActivity(intent);
			}
		});
	}
}
manifest文件中配置
一個Intent只能指定一個Action屬性,可以包含多個Category屬性,當程序創建時,默認啟動category為DEFAULT的組件。
接下來我們來看看Category屬性的用法
public void onClick(View arg0) {
	Intent intent = new Intent();
	intent.setAction("com.example.intent.action.TEST_ACTION");
	intent.addCategory("android.intent.category.TEST_CATEGERY");
	startActivity(intent);
}
manifest文件中配置
可以看出其實是根據Action和Category兩個屬性共同決定啟動哪個Activity的,Category可以有多個,只要滿足其中的一個即可。
實際上Intent不僅可以啟動我們定義的Activity,也可以啟動系統和其他應用的Activity
ACTION_MAIN 應用程序入口ACTION_VIEW 顯示指定數據ACTION_ATTACH_DATA 指定某塊數據將被附加到其他地方ACTION_EDIT 編輯指定數據
ACTION_PICK 從列表中選擇某項,並返回所選數據
ACTION_CHOOSER 顯示一個Activity選擇器
ACTION_GET_CONTENT 讓用戶選擇數據,並返回所選數據
ACTION_DIAL 顯示撥號面板
ACTION_CALL 直接向指定用戶打電話
ACTION_SEND 向其他人發送數據
ACTION_SENDTO 向其他人發送消息
ACTION_ANSWER 應答電話
ACTION_INSERT 插入數據
ACTION_DELETE 刪除數據
ACTION_RUN 運行數據
ACTION_SYNC 執行數據同步
ACTION_PICK_ACTIVITY 用於選擇Activity
ACTION_SEARCH 執行搜索
ACTION_WEB_SEARCH 執行web搜索
ACTION_FACTORY_TEST 工廠測試的入口點
這裡僅列出部分更多關於Action和Category屬性請參閱:http://developer.android.com/reference/android/content/Intent.html
三、一個獲取通訊錄的實例:
package com.example.testintent;

import android.app.Activity;
import android.content.Intent;
import android.database.Cursor;
import android.net.Uri;
import android.os.Bundle;
import android.provider.ContactsContract;
import android.provider.ContactsContract.Contacts;
import android.support.v4.content.CursorLoader;
import android.util.Log;
import android.view.View;
import android.view.View.OnClickListener;
import android.widget.Button;

public class MainActivity extends Activity {
	private static final String TAG = "MainActivity";
	Button button;
	final int PICK_CONTACT = 0;
	@Override
	protected void onCreate(Bundle savedInstanceState) {
		super.onCreate(savedInstanceState);
		setContentView(R.layout.activity_main);
		button = (Button)findViewById(R.id.button1);
		button.setOnClickListener(new OnClickListener() {

			@Override
			public void onClick(View arg0) {
				Intent intent = new Intent();
				intent.setAction(Intent.ACTION_GET_CONTENT);
				intent.setType("vnd.android.cursor.item/phone");
				startActivityForResult(intent, PICK_CONTACT);
			}
		});
	}

	@Override
	protected void onActivityResult(int requestCode, int resultCode, Intent data) {
		super.onActivityResult(requestCode, resultCode, data);
		switch (requestCode) {
			case PICK_CONTACT:
				if(resultCode == Activity.RESULT_OK){
					//獲取返回數據
					Uri contactData = data.getData();
					CursorLoader cursorLoader = new CursorLoader(this, contactData, null, null, null, null);
					Cursor cursor = cursorLoader.loadInBackground();
					if(cursor.moveToFirst()){
						String contactId = cursor.getString(cursor.getColumnIndex(ContactsContract.Contacts._ID));
						String name = cursor.getString(cursor.getColumnIndexOrThrow(ContactsContract.Contacts.DISPLAY_NAME));
						Log.i(TAG, "姓名:" + name);
						//根據聯系人查看詳細信息
						Cursor phones = getContentResolver().query(ContactsContract.CommonDataKinds.Phone.CONTENT_URI, null,
									ContactsContract.CommonDataKinds.Phone.CONTACT_ID + " = " + contactId, null, null);
						if(phones.moveToFirst()){
							System.out.println("進來了");
							String phoneNumber = phones.getString(phones.getColumnIndex(ContactsContract.CommonDataKinds.Phone.NUMBER));
							Log.i(TAG, "電話:" + phoneNumber);
						}
						//關閉游標
						phones.close();
					}
					//關閉游標
					cursor.close();
				}
				break;

		default:
			break;
		}
	}
}
 Android studio環境下的 NDK(jni)開發
前言1、什麼是NDK?NDK全稱是Native Development Kit,NDK提供了一系列的工具,幫助開發者快速開發C(或C++)的動態庫,並能自動將so和jav
 進程的啟動過程分析
1.前言分析完Zygote和SystemServer的啟動過程後,接著我們來分析Android進程的啟動過程。前面一篇文章有提到Zygote是通過復制自身的方式來穿件一個
 Android 圖片開發內幕第一篇
前言:本來我是做電視應用的,但是因為公司要出手機,人員緊張,所以就抽調我去支援一下,誰叫俺是雷鋒呢!我做的一個功能就是處理手機中的應用ICON,處理無非就是美化一下,重新
 Android 如何修改APK的默認名稱
Android 如何修改APK的默認名稱用Android Studio 打包App時生成的名稱默認是 app-release.apk(已簽名) 或 app-debug.a