編輯:關於Android編程
分析完Zygote和SystemServer的啟動過程後,接著我們來分析Android進程的啟動過程。
前面一篇文章有提到Zygote是通過復制自身的方式來穿件一個新的進程,由於Zygote在啟動時會在內部創建一個虛擬機實例、消息循環和Binder線程池,因此,通過復制它而得到的應用程序進程就很自然的獲得了一個他們的拷貝。有了這個虛擬機實例後,進程就可以使用java語言來開發了。獲得消息循環和Binder線程池後,就可以使用消息循環機制和Binder來實現自己的業務邏輯了。
接著我們就來開始一個個分析進程的啟動過程、Binder和消息循環啟動的過程。
在之前分析四大組件的時候,我們會調用ActivityManagerService.startProcessLocked來向Zygote發送一個創建進程的請求。
    private final void startProcessLocked(ProcessRecord app, String hostingType,
            String hostingNameStr, String abiOverride, String entryPoint, String[] entryPointArgs) {
        ...
        try {
            try {
                if (AppGlobals.getPackageManager().isPackageFrozen(app.info.packageName)) {
                    // This is caught below as if we had failed to fork zygote
                    throw new RuntimeException("Package " + app.info.packageName + " is frozen!");
                }
            } catch (RemoteException e) {
                throw e.rethrowAsRuntimeException();
            }

            int uid = app.uid;
            int[] gids = null;
            int mountExternal = Zygote.MOUNT_EXTERNAL_NONE;
            if (!app.isolated) {
                int[] permGids = null;
                try {
                    checkTime(startTime, "startProcess: getting gids from package manager");
                    final IPackageManager pm = AppGlobals.getPackageManager();
                    permGids = pm.getPackageGids(app.info.packageName, app.userId);
                    MountServiceInternal mountServiceInternal = LocalServices.getService(
                            MountServiceInternal.class);
                    mountExternal = mountServiceInternal.getExternalStorageMountMode(uid,
                            app.info.packageName);
                } catch (RemoteException e) {
                    throw e.rethrowAsRuntimeException();
                }

            ...

            Process.ProcessStartResult startResult = Process.start(entryPoint,
                    app.processName, uid, uid, gids, debugFlags, mountExternal,
                    app.info.targetSdkVersion, app.info.seinfo, requiredAbi, instructionSet,
                    app.info.dataDir, entryPointArgs);
           ...
        } catch (RuntimeException e) {
         ...
        }
    }
在代碼的一開始就先獲取需要創建的應用程序的UID和ID,接著就調用Process.start來啟動新的進程了,在他的參數裡面我們可以知道,他將進程的入口設定為ActivityThread.main。
    public static final ProcessStartResult start(final String processClass,
                                  final String niceName,
                                  int uid, int gid, int[] gids,
                                  int debugFlags, int mountExternal,
                                  int targetSdkVersion,
                                  String seInfo,
                                  String abi,
                                  String instructionSet,
                                  String appDataDir,
                                  String[] zygoteArgs) {
        try {
            return startViaZygote(processClass, niceName, uid, gid, gids,
                    debugFlags, mountExternal, targetSdkVersion, seInfo,
                    abi, instructionSet, appDataDir, zygoteArgs);
        } catch (ZygoteStartFailedEx ex) {
            Log.e(LOG_TAG,
                    "Starting VM process through Zygote failed");
            throw new RuntimeException(
                    "Starting VM process through Zygote failed", ex);
        }
    }
這個沒什麼好說的,直接調用Process.startViaZygote
    private static ProcessStartResult startViaZygote(final String processClass,
                                  final String niceName,
                                  final int uid, final int gid,
                                  final int[] gids,
                                  int debugFlags, int mountExternal,
                                  int targetSdkVersion,
                                  String seInfo,
                                  String abi,
                                  String instructionSet,
                                  String appDataDir,
                                  String[] extraArgs)
                                  throws ZygoteStartFailedEx {
        synchronized(Process.class) {
            ArrayList argsForZygote = new ArrayList();

            // --runtime-args, --setuid=, --setgid=,
            // and --setgroups= must go first
            argsForZygote.add("--runtime-args");
            argsForZygote.add("--setuid=" + uid);
            argsForZygote.add("--setgid=" + gid);
            if ((debugFlags & Zygote.DEBUG_ENABLE_JNI_LOGGING) != 0) {
                argsForZygote.add("--enable-jni-logging");
            }
            if ((debugFlags & Zygote.DEBUG_ENABLE_SAFEMODE) != 0) {
                argsForZygote.add("--enable-safemode");
            }
            if ((debugFlags & Zygote.DEBUG_ENABLE_DEBUGGER) != 0) {
                argsForZygote.add("--enable-debugger");
            }
            if ((debugFlags & Zygote.DEBUG_ENABLE_CHECKJNI) != 0) {
                argsForZygote.add("--enable-checkjni");
            }
            if ((debugFlags & Zygote.DEBUG_ENABLE_JIT) != 0) {
                argsForZygote.add("--enable-jit");
            }
            if ((debugFlags & Zygote.DEBUG_GENERATE_DEBUG_INFO) != 0) {
                argsForZygote.add("--generate-debug-info");
            }
            if ((debugFlags & Zygote.DEBUG_ENABLE_ASSERT) != 0) {
                argsForZygote.add("--enable-assert");
            }
            if (mountExternal == Zygote.MOUNT_EXTERNAL_DEFAULT) {
                argsForZygote.add("--mount-external-default");
            } else if (mountExternal == Zygote.MOUNT_EXTERNAL_READ) {
                argsForZygote.add("--mount-external-read");
            } else if (mountExternal == Zygote.MOUNT_EXTERNAL_WRITE) {
                argsForZygote.add("--mount-external-write");
            }
            argsForZygote.add("--target-sdk-version=" + targetSdkVersion);

            //TODO optionally enable debuger
            //argsForZygote.add("--enable-debugger");

            // --setgroups is a comma-separated list
            if (gids != null && gids.length > 0) {
                StringBuilder sb = new StringBuilder();
                sb.append("--setgroups=");

                int sz = gids.length;
                for (int i = 0; i < sz; i++) {
                    if (i != 0) {
                        sb.append(',');
                    }
                    sb.append(gids[i]);
                }

                argsForZygote.add(sb.toString());
            }

            if (niceName != null) {
                argsForZygote.add("--nice-name=" + niceName);
            }

            if (seInfo != null) {
                argsForZygote.add("--seinfo=" + seInfo);
            }

            if (instructionSet != null) {
                argsForZygote.add("--instruction-set=" + instructionSet);
            }

            if (appDataDir != null) {
                argsForZygote.add("--app-data-dir=" + appDataDir);
            }

            argsForZygote.add(processClass);

            if (extraArgs != null) {
                for (String arg : extraArgs) {
                    argsForZygote.add(arg);
                }
            }

            return zygoteSendArgsAndGetResult(openZygoteSocketIfNeeded(abi), argsForZygote);
        }
    }
該過程主要工作是將進程的uid、gid、groups、target-sdk、nice-name等一系列的參數保存到argsForZygote數組中。然後就進入Process.zygoteSendArgsAndGetResult了
    /**
     * Sends an argument list to the zygote process, which starts a new child
     * and returns the child's pid. Please note: the present implementation
     * replaces newlines in the argument list with spaces.
     *
     * @throws ZygoteStartFailedEx if process start failed for any reason
     */
    private static ProcessStartResult zygoteSendArgsAndGetResult(
            ZygoteState zygoteState, ArrayList args)
            throws ZygoteStartFailedEx {
        try {
            /**
             * See com.android.internal.os.ZygoteInit.readArgumentList()
             * Presently the wire format to the zygote process is:
             * a) a count of arguments (argc, in essence)
             * b) a number of newline-separated argument strings equal to count
             *
             * After the zygote process reads these it will write the pid of
             * the child or -1 on failure, followed by boolean to
             * indicate whether a wrapper process was used.
             */
            final BufferedWriter writer = zygoteState.writer;
            final DataInputStream inputStream = zygoteState.inputStream;

            writer.write(Integer.toString(args.size()));
            writer.newLine();

            int sz = args.size();
            for (int i = 0; i < sz; i++) {
                String arg = args.get(i);
                if (arg.indexOf('\n') >= 0) {
                    throw new ZygoteStartFailedEx(
                            "embedded newlines not allowed");
                }
                writer.write(arg);
                writer.newLine();
            }

            writer.flush();

            // Should there be a timeout on this?
            ProcessStartResult result = new ProcessStartResult();
            result.pid = inputStream.readInt();
            if (result.pid < 0) {
                throw new ZygoteStartFailedEx("fork() failed");
            }
            result.usingWrapper = inputStream.readBoolean();
            return result;
        } catch (IOException ex) {
            zygoteState.close();
            throw new ZygoteStartFailedEx(ex);
        }
    }
注釋寫的其實蠻清楚的。通過socket向Zygote進程發送一個參數列表後進入阻塞等待狀態,直到遠端的socket服務端發送回來新創建的進程pid才進入運行狀態。所以接下來的操作便是在Zygote進程中執行。
public static void main(String argv[]) {
    try {
        runSelectLoop(abiList);
        ....
    } catch (MethodAndArgsCaller caller) {
        caller.run(); //【見流程13】
    } catch (RuntimeException ex) {
        closeServerSocket();
        throw ex;
    }
}
進一步跟進到runSelectLoop
private static void runSelectLoop(String abiList) throws MethodAndArgsCaller {
    ...

    ArrayList peers = new ArrayList();
    while (true) {
        for (int i = pollFds.length - 1; i >= 0; --i) {
            if ((pollFds[i].revents & POLLIN) == 0) {
                continue;
            }
            if (i == 0) {
                ZygoteConnection newPeer = acceptCommandPeer(abiList);
                peers.add(newPeer);
                fds.add(newPeer.getFileDesciptor());
            } else {
                boolean done = peers.get(i).runOnce();
                if (done) {
                    peers.remove(i);
                    fds.remove(i);
                }
            }
        }
    }
}
根據代碼可以看出,在沒有連接請求時會Zygote會處於休眠狀態,當有創建新進程的連接請求時,喚醒Zygote進程,創建Socket通道ZygoteConnection,然後執行ZygoteConnection的runOnce()方法。
    /**
     * Reads one start command from the command socket. If successful,
     * a child is forked and a {@link ZygoteInit.MethodAndArgsCaller}
     * exception is thrown in that child while in the parent process,
     * the method returns normally. On failure, the child is not
     * spawned and messages are printed to the log and stderr. Returns
     * a boolean status value indicating whether an end-of-file on the command
     * socket has been encountered.
     *
     * @return false if command socket should continue to be read from, or
     * true if an end-of-file has been encountered.
     * @throws ZygoteInit.MethodAndArgsCaller trampoline to invoke main()
     * method in child process
     */
    boolean runOnce() throws ZygoteInit.MethodAndArgsCaller {

        String args[];
        Arguments parsedArgs = null;
        FileDescriptor[] descriptors;

        try {
            args = readArgumentList();
            descriptors = mSocket.getAncillaryFileDescriptors();
        } catch (IOException ex) {
            Log.w(TAG, "IOException on command socket " + ex.getMessage());
            closeSocket();
            return true;
        }

        if (args == null) {
            // EOF reached.
            closeSocket();
            return true;
        }

        /** the stderr of the most recent request, if avail */
        PrintStream newStderr = null;

        if (descriptors != null && descriptors.length >= 3) {
            newStderr = new PrintStream(
                    new FileOutputStream(descriptors[2]));
        }

        int pid = -1;
        FileDescriptor childPipeFd = null;
        FileDescriptor serverPipeFd = null;

        try {
            parsedArgs = new Arguments(args);

            if (parsedArgs.abiListQuery) {
                return handleAbiListQuery();
            }

            if (parsedArgs.permittedCapabilities != 0 || parsedArgs.effectiveCapabilities != 0) {
                throw new ZygoteSecurityException("Client may not specify capabilities: " +
                        "permitted=0x" + Long.toHexString(parsedArgs.permittedCapabilities) +
                        ", effective=0x" + Long.toHexString(parsedArgs.effectiveCapabilities));
            }

            applyUidSecurityPolicy(parsedArgs, peer);
            applyInvokeWithSecurityPolicy(parsedArgs, peer);

            applyDebuggerSystemProperty(parsedArgs);
            applyInvokeWithSystemProperty(parsedArgs);

            int[][] rlimits = null;

            if (parsedArgs.rlimits != null) {
                rlimits = parsedArgs.rlimits.toArray(intArray2d);
            }

            if (parsedArgs.invokeWith != null) {
                FileDescriptor[] pipeFds = Os.pipe2(O_CLOEXEC);
                childPipeFd = pipeFds[1];
                serverPipeFd = pipeFds[0];
                Os.fcntlInt(childPipeFd, F_SETFD, 0);
            }

            /**
             * In order to avoid leaking descriptors to the Zygote child,
             * the native code must close the two Zygote socket descriptors
             * in the child process before it switches from Zygote-root to
             * the UID and privileges of the application being launched.
             *
             * In order to avoid "bad file descriptor" errors when the
             * two LocalSocket objects are closed, the Posix file
             * descriptors are released via a dup2() call which closes
             * the socket and substitutes an open descriptor to /dev/null.
             */

            int [] fdsToClose = { -1, -1 };

            FileDescriptor fd = mSocket.getFileDescriptor();

            if (fd != null) {
                fdsToClose[0] = fd.getInt$();
            }

            fd = ZygoteInit.getServerSocketFileDescriptor();

            if (fd != null) {
                fdsToClose[1] = fd.getInt$();
            }

            fd = null;

            pid = Zygote.forkAndSpecialize(parsedArgs.uid, parsedArgs.gid, parsedArgs.gids,
                    parsedArgs.debugFlags, rlimits, parsedArgs.mountExternal, parsedArgs.seInfo,
                    parsedArgs.niceName, fdsToClose, parsedArgs.instructionSet,
                    parsedArgs.appDataDir);
        } catch (ErrnoException ex) {
            logAndPrintError(newStderr, "Exception creating pipe", ex);
        } catch (IllegalArgumentException ex) {
            logAndPrintError(newStderr, "Invalid zygote arguments", ex);
        } catch (ZygoteSecurityException ex) {
            logAndPrintError(newStderr,
                    "Zygote security policy prevents request: ", ex);
        }

        try {
            if (pid == 0) {
                // in child
                IoUtils.closeQuietly(serverPipeFd);
                serverPipeFd = null;
                handleChildProc(parsedArgs, descriptors, childPipeFd, newStderr);

                // should never get here, the child is expected to either
                // throw ZygoteInit.MethodAndArgsCaller or exec().
                return true;
            } else {
                // in parent...pid of < 0 means failure
                IoUtils.closeQuietly(childPipeFd);
                childPipeFd = null;
                return handleParentProc(pid, descriptors, serverPipeFd, parsedArgs);
            }
        } finally {
            IoUtils.closeQuietly(childPipeFd);
            IoUtils.closeQuietly(serverPipeFd);
        }
    }
這裡先將參數保存在一個Arguments對象parsedArgs中,接著就調用forkAndSpecialize來創建這個應用程序進程了。Zygote.forkAndSpecialize實際上就是調用fork來創建子進程的
public static int forkAndSpecialize(int uid, int gid, int[] gids, int debugFlags,
      int[][] rlimits, int mountExternal, String seInfo, String niceName, int[] fdsToClose,
      String instructionSet, String appDataDir) {
    VM_HOOKS.preFork();
    int pid = nativeForkAndSpecialize(
              uid, gid, gids, debugFlags, rlimits, mountExternal, seInfo, niceName, fdsToClose,
              instructionSet, appDataDir);
    ...
    VM_HOOKS.postForkCommon();
    return pid;
}
這裡的VM_HOOKS = new ZygoteHooks()是做什麼的呢?
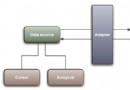
先說說Zygote進程,如下圖:

從圖中可知Zygote進程有4個子線程,分別是ReferenceQueueDaemon、FinalizerDaemon、FinalizerWatchdogDaemon、HeapTaskDaemon,此處稱為為Zygote的4個Daemon子線程。圖中線程名顯示的並不完整是由於底層的進程結構體task_struct是由長度為16的char型數組保存,超過15個字符便會截斷。
可能有人會問zygote64進程不是還有system_server,com.android.phone等子線程,怎麼會只有4個呢?那是因為這些並不是Zygote子線程,而是Zygote的子進程。在圖中用紅色圈起來的是進程的VSIZE,virtual size),代表的是進程虛擬地址空間大小。線程與進程的最為本質的區別便是是否共享內存空間,圖中VSIZE和Zygote進程相同的才是Zygote的子線程,否則就是Zygote的子進程。
 public void preFork() {
    Daemons.stop(); //停止4個Daemon子線程
    waitUntilAllThreadsStopped(); //等待所有子線程結束
    token = nativePreFork(); //完成gc堆的初始化工作
}
我們一個個分析preFork裡面的三個操作,首先是Daemons.stop
public static void stop() {
    HeapTaskDaemon.INSTANCE.stop(); //Java堆整理線程
    ReferenceQueueDaemon.INSTANCE.stop(); //引用隊列線程
    FinalizerDaemon.INSTANCE.stop(); //析構線程
    FinalizerWatchdogDaemon.INSTANCE.stop(); //析構監控線程
}
此處守護線程Stop方式是先調用目標線程interrrupt()方法,然後再調用目標線程join()方法,等待線程執行完成。
private static void waitUntilAllThreadsStopped() {
    File tasks = new File("/proc/self/task");
    // 當/proc中線程數大於1,就出讓CPU直到只有一個線程,才退出循環
    while (tasks.list().length > 1) {
        Thread.yield();
    }
}
nativePreFork通過JNI最終調用的是dalvik_system_ZygoteHooks.cc中的ZygoteHooks_nativePreFork()方法,如下:
static jlong ZygoteHooks_nativePreFork(JNIEnv* env, jclass) {
    Runtime* runtime = Runtime::Current();
    CHECK(runtime->IsZygote()) << "runtime instance not started with -Xzygote";
    runtime->PreZygoteFork();
    if (Trace::GetMethodTracingMode() != TracingMode::kTracingInactive) {
      Trace::Pause();
    }
    //將線程轉換為long型並保存到token,該過程是非安全的
    return reinterpret_cast(ThreadForEnv(env));
}
void Runtime::PreZygoteFork() {
    // 堆的初始化工作。這裡就不繼續再往下追了,等後續有空專門看看art虛擬機
    heap_->PreZygoteFork();
}
VM_HOOKS.preFork()的主要功能便是停止Zygote的4個Daemon子線程的運行,等待並確保Zygote是單線程(用於提升fork效率),並等待這些線程的停止,初始化gc堆的工作。
nativeForkAndSpecialize()通過JNI最終調用的是com_android_internal_os_Zygote.cpp中的 com_android_internal_os_Zygote_nativeForkAndSpecialize()方法,如下:
static jint com_android_internal_os_Zygote_nativeForkAndSpecialize(
    JNIEnv* env, jclass, jint uid, jint gid, jintArray gids,
    jint debug_flags, jobjectArray rlimits,
    jint mount_external, jstring se_info, jstring se_name,
    jintArray fdsToClose, jstring instructionSet, jstring appDataDir) {
    // 將CAP_WAKE_ALARM賦予藍牙進程
    jlong capabilities = 0;
    if (uid == AID_BLUETOOTH) {
        capabilities |= (1LL << CAP_WAKE_ALARM);
    }
    return ForkAndSpecializeCommon(env, uid, gid, gids, debug_flags,
            rlimits, capabilities, capabilities, mount_external, se_info,
            se_name, false, fdsToClose, instructionSet, appDataDir);
}
來看ForkAndSpecializeCommon
static pid_t ForkAndSpecializeCommon(JNIEnv* env, uid_t uid, gid_t gid, jintArray javaGids,
                                     jint debug_flags, jobjectArray javaRlimits,
                                     jlong permittedCapabilities, jlong effectiveCapabilities,
                                     jint mount_external,
                                     jstring java_se_info, jstring java_se_name,
                                     bool is_system_server, jintArray fdsToClose,
                                     jstring instructionSet, jstring dataDir) {
  //設置子進程的signal信號處理函數
  SetSigChldHandler();
  //fork子進程
  pid_t pid = fork();
  if (pid == 0) {
    //進入子進程
    DetachDescriptors(env, fdsToClose); //關閉並清除文件描述符

    if (!is_system_server) {
        //對於非system_server子進程,則創建進程組
        int rc = createProcessGroup(uid, getpid());
    }
    SetGids(env, javaGids); //設置設置group
    SetRLimits(env, javaRlimits); //設置資源limit

    int rc = setresgid(gid, gid, gid);
    rc = setresuid(uid, uid, uid);

    SetCapabilities(env, permittedCapabilities, effectiveCapabilities);
    SetSchedulerPolicy(env); //設置調度策略

     //selinux上下文
    rc = selinux_android_setcontext(uid, is_system_server, se_info_c_str, se_name_c_str);

    if (se_info_c_str == NULL && is_system_server) {
      se_name_c_str = "system_server";
    }
    if (se_info_c_str != NULL) {
      SetThreadName(se_name_c_str); //設置線程名為system_server,方便調試
    }
    //在Zygote子進程中,設置信號SIGCHLD的處理器恢復為默認行為
    UnsetSigChldHandler();
    //等價於調用zygote.callPostForkChildHooks() 【見流程6-2-2-1】
    env->CallStaticVoidMethod(gZygoteClass, gCallPostForkChildHooks, debug_flags,
                              is_system_server ? NULL : instructionSet);
    ...

  } else if (pid > 0) {
    //進入父進程,即Zygote進程
  }
  return pid;
}
fork()采用copy on write技術,這是linux創建進程的標准方法,調用一次,返回兩次,返回值有3種類型。
父進程中,fork返回新創建的子進程的pid;
子進程中,fork返回0;
當出現錯誤時,fork返回負數。(當進程數超過上限或者系統內存不足時會出錯)
fork()的主要工作是尋找空閒的進程號pid,然後從父進程拷貝進程信息,例如數據段和代碼段空間等,當然也包含拷貝fork()代碼之後的要執行的代碼到新的進程。
下面,說說zygote的fork()過程:

Zygote進程是所有Android進程的母體,包括system_server進程以及App進程都是由Zygote進程孵化而來。zygote利用fork()方法生成新進程,對於新進程A復用Zygote進程本身的資源,再加上新進程A相關的資源,構成新的應用進程A。何為copy on write(寫時復制)?當進程A執行修改某個內存數據時(這便是on write時機),才發生缺頁中斷,從而分配新的內存地址空間(這便是copy操作),對於copy on write是基於內存頁,而不是基於進程的。
private static void callPostForkChildHooks(int debugFlags, boolean isSystemServer,
        String instructionSet) {
    //【見下文】
    VM_HOOKS.postForkChild(debugFlags, isSystemServer, instructionSet);
}
public void postForkChild(int debugFlags, String instructionSet) {
    nativePostForkChild(token, debugFlags, instructionSet);
    Math.setRandomSeedInternal(System.currentTimeMillis());
}
在這裡,設置了新進程Random隨機數種子為當前系統時間,也就是在進程創建的那一刻就決定了未來隨機數的情況,也就是偽隨機。
最終調用dalvik_system_ZygoteHooks的ZygoteHooks_nativePostForkChild
static void ZygoteHooks_nativePostForkChild(JNIEnv* env, jclass, jlong token, jint debug_flags,
                                            jstring instruction_set) {
    Thread* thread = reinterpret_cast(token);
    //設置新進程的主線程id
    thread->InitAfterFork();
    ..
    if (instruction_set != nullptr) {
      ScopedUtfChars isa_string(env, instruction_set);
      InstructionSet isa = GetInstructionSetFromString(isa_string.c_str());
      Runtime::NativeBridgeAction action = Runtime::NativeBridgeAction::kUnload;
      if (isa != kNone && isa != kRuntimeISA) {
        action = Runtime::NativeBridgeAction::kInitialize;
      }
      //見下文
      Runtime::Current()->DidForkFromZygote(env, action, isa_string.c_str());
    } else {
      Runtime::Current()->DidForkFromZygote(env, Runtime::NativeBridgeAction::kUnload, nullptr);
    }
}
void Runtime::DidForkFromZygote(JNIEnv* env, NativeBridgeAction action, const char* isa) {
  is_zygote_ = false;
  if (is_native_bridge_loaded_) {
    switch (action) {
      case NativeBridgeAction::kUnload:
        UnloadNativeBridge(); //卸載用於跨平台的橋連庫
        is_native_bridge_loaded_ = false;
        break;
      case NativeBridgeAction::kInitialize:
        InitializeNativeBridge(env, isa);//初始化用於跨平台的橋連庫
        break;
    }
  }
  //創建Java堆處理的線程池
  heap_->CreateThreadPool();
  //重置gc性能數據,以保證進程在創建之前的GCs不會計算到當前app上。
  heap_->ResetGcPerformanceInfo();
  if (jit_.get() == nullptr && jit_options_->UseJIT()) {
    //當flag被設置,並且還沒有創建JIT時,則創建JIT
    CreateJit();
  }
  //設置信號處理函數
  StartSignalCatcher();
  //啟動JDWP線程,當命令debuger的flags指定"suspend=y"時,則暫停runtime
  Dbg::StartJdwp();
}
public void postForkCommon() {
    Daemons.start();
}
public static void start() {
    ReferenceQueueDaemon.INSTANCE.start();
    FinalizerDaemon.INSTANCE.start();
    FinalizerWatchdogDaemon.INSTANCE.start();
    HeapTaskDaemon.INSTANCE.start();
}
VM_HOOKS.postForkCommon的主要功能是在fork新進程後,啟動Zygote的4個Daemon線程,java堆整理,引用隊列,以及析構線程。

到此App進程已完成了創建的所有工作,接下來開始新創建的App進程的工作。在前面ZygoteConnection.runOnce方法中,zygote進程執行完fZ喎?/kf/ware/vc/" target="_blank" class="keylink">vcmtBbmRTcGVjaWFsaXplKCm686Os0MK0tL2otcRBcHC9+LPMseO9+MjraGFuZGxlQ2hpbGRQcm9jKCm3vbeoo6zPwsPmtcSy2df31MvQ0NTaQXBwvfizzKGjPC9wPg0KPGgzIGlkPQ=="28-zygoteconnectionhandlechildproc">2.8 ZygoteConnection.handleChildProc
private void handleChildProc(Arguments parsedArgs,
        FileDescriptor[] descriptors, FileDescriptor pipeFd, PrintStream newStderr)
        throws ZygoteInit.MethodAndArgsCaller {

    //關閉Zygote的socket兩端的連接
    closeSocket();
    ZygoteInit.closeServerSocket();

    if (descriptors != null) {
        try {
            Os.dup2(descriptors[0], STDIN_FILENO);
            Os.dup2(descriptors[1], STDOUT_FILENO);
            Os.dup2(descriptors[2], STDERR_FILENO);
            for (FileDescriptor fd: descriptors) {
                IoUtils.closeQuietly(fd);
            }
            newStderr = System.err;
        } catch (ErrnoException ex) {
            Log.e(TAG, "Error reopening stdio", ex);
        }
    }

    if (parsedArgs.niceName != null) {
        //設置進程名
        Process.setArgV0(parsedArgs.niceName);
    }

    if (parsedArgs.invokeWith != null) {
        //據說這是用於檢測進程內存洩露或溢出時場景而設計,後續還需要進一步分析。
        WrapperInit.execApplication(parsedArgs.invokeWith,
                parsedArgs.niceName, parsedArgs.targetSdkVersion,
                VMRuntime.getCurrentInstructionSet(),
                pipeFd, parsedArgs.remainingArgs);
    } else {
        //執行目標類的main()方法
        RuntimeInit.zygoteInit(parsedArgs.targetSdkVersion,
                parsedArgs.remainingArgs, null);
    }
}
public static final void zygoteInit(int targetSdkVersion, String[] argv, ClassLoader classLoader)
        throws ZygoteInit.MethodAndArgsCaller {

    Trace.traceBegin(Trace.TRACE_TAG_ACTIVITY_MANAGER, "RuntimeInit");
    redirectLogStreams(); //重定向log輸出

    commonInit(); // 通用的一些初始化
    nativeZygoteInit(); // zygote初始化
    applicationInit(targetSdkVersion, argv, classLoader); // 應用初始化【見流程11】
}
在這裡調用nativeZygoteInit來啟動一個Binder線程池。
在之前ActivityManagerService指定了新的引用程序進程的入口為ActivityThread.main。因此實際上通過invokeStaticMain進入到ActivityThread.main來,至此一個新的進程就ok了。
接下來分析Binder線程池的啟動過程。
public class RuntimeInit {
    private static final native void nativeZygoteInit();
}
nativeZygoteInit實際上是一個JNI方法,調用C++層的com_android_internal_os_Zygote
static void com_android_internal_os_RuntimeInit_nativeZygoteInit(JNIEnv* env, jobject clazz)
{
    gCurRuntime->onZygoteInit();
}
其中gCurRuntime為一個AppRuntime對象,接下來就進入onZygoteInit
91    virtual void onZygoteInit()
92    {
93        sp proc = ProcessState::self();
94        ALOGV("App process: starting thread pool.\n");
95        proc->startThreadPool();
96    }
直接調用ProcessState.startThreadPool
void ProcessState::startThreadPool()
{
    AutoMutex _l(mLock);
    if (!mThreadPoolStarted) {
        mThreadPoolStarted = true;
        spawnPooledThread(true);
    }
}
mThreadPoolStarted為false的時候就會調用spawnPooledThread(true),至於Binder是怎麼啟動的這裡就不分析了。接著注冊到ActivityManagerService就完成分析了。
新的進程建好後就調用RuntimeInit.invokeStaticMain將新建的進程入口設定為ActivityThread.main。
private static void invokeStaticMain(String className, String[] argv, ClassLoader classLoader)
        throws ZygoteInit.MethodAndArgsCaller {
    Class cl;

    try {
        cl = Class.forName(className, true, classLoader);
    } catch (ClassNotFoundException ex) {
        throw new RuntimeException(
                "Missing class when invoking static main " + className, ex);
    }

    Method m;
    try {
        m = cl.getMethod("main", new Class[] { String[].class });
    } catch (NoSuchMethodException ex) {
        throw new RuntimeException( "Missing static main on " + className, ex);
    } catch (SecurityException ex) {
        throw new RuntimeException(
                "Problem getting static main on " + className, ex);
    }

    int modifiers = m.getModifiers();
    if (! (Modifier.isStatic(modifiers) && Modifier.isPublic(modifiers))) {
        throw new RuntimeException(
                "Main method is not public and static on " + className);
    }

    //通過拋出異常,回到ZygoteInit.main()。這樣做好處是能清空棧幀,提高棧幀利用率。
    throw new ZygoteInit.MethodAndArgsCaller(m, argv);
}
ZygoteInit.main()接到MethodAndArgsCaller異常後就進入ZygoteInit.main,進一步再進入MethodAndArgsCaller.run
public static class MethodAndArgsCaller extends Exception
        implements Runnable {

    public void run() {
        try {
            //根據傳遞過來的參數,可知此處通過反射機制調用的是ActivityThread.main()方法
            mMethod.invoke(null, new Object[] { mArgs });
        } catch (IllegalAccessException ex) {
            throw new RuntimeException(ex);
        } catch (InvocationTargetException ex) {
            Throwable cause = ex.getCause();
            if (cause instanceof RuntimeException) {
                throw (RuntimeException) cause;
            } else if (cause instanceof Error) {
                throw (Error) cause;
            }
            throw new RuntimeException(ex);
        }
    }
}
繞了一圈最後通過反射終於回到ActivityThread.main。之前在分析的過程中有看到ActivityThread.main裡面進入Looper.loop進入到前面所穿件的一個消息循環中了。
至此進程創建的所有過程就分析完了。可以看出進程啟動完後就自動的進入一個消息循環,這樣就方便在消息處理機制裡面來實現自己的業務邏輯了。
“`
 Android ListView適配器(Adapter)優化方法詳解
Android ListView的優化,在做Android項目的時候,在用到ListView 界面及數據顯示,這個時候如果資源過大,對項目來說,用戶體驗肯定是不好的,這裡
 Android——Tuch測試+MyView+MySwiperLayout
xml version="1.0" encoding="utf-8"?><RelativeLayout xmlns:a
 Java的進化? Kotlin初探與集成Android項目
介紹:Statically typed programming language for the JVM, Android and the browser. 100% i
 Android使用WindowManager構造懸浮view
一般在android顯示一個View都是通過Activity的setContentView設置的,但是還有一種方法,可以直接使用WindowManager在整個應用的最上