編輯:關於Android編程
最近做些和通訊相關的東西,源於網上這塊知識比較匮乏,所以我就整理下自己的思路,正好梳理下流程,以備不需之用;俗話說得好“好腦子比不了爛筆頭”;
通話記錄有幾種動作,插入(insert),刪除(delete) ,查詢(query),因為通話記錄不需要更改,所以就不用update(更新了);
一、先來看看Insert插入;
首先通話記錄是在電話掛斷以後,才進行的操作,這個操作是異步的操作,在後台悄悄的插入到Calls中去的,通話記錄的Uri是“content://call_log/calls”;
Step 1:電話掛斷後,即在CallNotifier.java類(管理電話通話狀態的類)的onDisconnect()方法中:
onDisconnect()是電話主動掛斷、被動掛斷後調用的方法,即和通話方已經斷開連接後觸發的方法。在這個方法中有
段代碼如下:
 if (okToLogThisCall) {
                    CallLogAsync.AddCallArgs args;
                    int simIdEx = CALL_TYPE_NONE;

                    if (!GeminiUtils.isGeminiSupport() || isSipCall) { //Single Card
                        if (isSipCall) {
                            simIdEx = CALL_TYPE_SIP;
                        } else {
                            simIdEx = CALL_TYPE_NONE;
                            if (PhoneGlobals.getInstance().phoneMgr.hasIccCard()) {
                                SimInfoRecord info = SIMInfoWrapper.getDefault().getSimInfoBySlot(0);
                                if (info != null) {
                                    simIdEx = (int)info.mSimInfoId;
                                } else {
                                    //Give an default simId, in most case, this is invalid
                                    simIdEx = 1;
                                }
                            }
                        }
                        if (FeatureOption.MTK_VT3G324M_SUPPORT) {
                            args = new CallLogAsync.AddCallArgs(
                                mApplication, ci, logNumber, presentation,
                                callLogType, date, duration, simIdEx, vtCall);
                        } else {
                            args = new CallLogAsync.AddCallArgs(
                                mApplication, ci, logNumber, presentation,
                                callLogType, date, duration, simIdEx);
                        }
} else { //dual SIMargs = new CallLogAsync.AddCallArgs(
mApplication, ci, logNumber, presentation,
callLogType, date, duration, simIdEx, vtCall);這個方法即為初始化的證據。插入的證據在這:
try {
                        mCallLog.addCall(args);
                    } catch (SQLiteDiskIOException e) {
                        // TODO Auto-generated catch block
                        Log.e(LOG_TAG, "Error!! - onDisconnect() Disk Full!");
                        e.printStackTrace();
}addCall(),即為插入DB的證據;Step 2:在addCall()方法中執行的代碼如下:
 public AsyncTask addCall(AddCallArgs args) {
        assertUiThread();
        return new AddCallTask().execute(args);
    }
這個就是後台悄悄的插入DB的罪魁禍首: private class AddCallTask extends AsyncTask {
@Override
protected Uri[] doInBackground(AddCallArgs... callList) {
int count = callList.length;
Uri[] result = new Uri[count];
for (int i = 0; i < count; i++) {
AddCallArgs c = callList[i];
try {
// May block.
result[i] = Calls.addCall(
c.ci, c.context, c.number, c.presentation,
c.callType, c.timestamp, c.durationInSec, c.simId, c.vtCall);
} catch (Exception e) {
// This must be very rare but may happen in legitimate cases.
// e.g. If the phone is encrypted and thus write request fails, it may
// cause some kind of Exception (right now it is IllegalArgumentException, but
// might change).
//
// We don't want to crash the whole process just because of that.
// Let's just ignore it and leave logs instead.
Log.e(TAG, "Exception raised during adding CallLog entry: " + e);
result[i] = null;
}
Log.d(TAG, "Calls.addCall, number=" + c.number + " vtCall=" + c.vtCall
+ " presentation:" + c.presentation + " callType:" + c.callType
+ " timestamp:" + c.timestamp + " durationInSec:" + c.durationInSec
+ " simId: " + c.simId + " vtCall:" + c.vtCall);
}
return result;
}
// Perform a simple sanity check to make sure the call was
// written in the database. Typically there is only one result
// per call so it is easy to identify which one failed.
@Override
protected void onPostExecute(Uri[] result) {
for (Uri uri : result) {
if (uri == null) {
Log.e(TAG, "Failed to write call to the log.");
}
}
}
}路徑:frameworks/base/core/java/android/provider/CallLog.java.
方法如下:
public static Uri addCall(CallerInfo ci, Context context, String number,
                int presentation, int callType, long start, int duration, int simId, int vtCall) {
            final ContentResolver resolver = context.getContentResolver();


            // If this is a private number then set the number to Private, otherwise check
            // if the number field is empty and set the number to Unavailable
            if (presentation == PhoneConstants.PRESENTATION_RESTRICTED) {
                number = CallerInfo.PRIVATE_NUMBER;
                if (ci != null) ci.name = "";
            } else if (presentation == PhoneConstants.PRESENTATION_PAYPHONE) {
                number = CallerInfo.PAYPHONE_NUMBER;
                if (ci != null) ci.name = "";
            } else if (TextUtils.isEmpty(number)
                    || presentation == PhoneConstants.PRESENTATION_UNKNOWN) {
                number = CallerInfo.UNKNOWN_NUMBER;
                if (ci != null) ci.name = "";
            }


            ContentValues values = new ContentValues(5);


            values.put(NUMBER, number);
            values.put(TYPE, Integer.valueOf(callType));
            values.put(DATE, Long.valueOf(start));
            values.put(DURATION, Long.valueOf(duration));
            values.put(NEW, Integer.valueOf(1));
            if (callType == MISSED_TYPE) {
                values.put(IS_READ, Integer.valueOf(0));
            }
            if (ci != null) {
                values.put(CACHED_NAME, ci.name);
                values.put(CACHED_NUMBER_TYPE, ci.numberType);
                values.put(CACHED_NUMBER_LABEL, ci.numberLabel);
            }
            /// M: @{
            values.put(SIM_ID, simId);
            if (vtCall >= 0) {
                values.put(VTCALL, vtCall);
            }
            /// @}
            if ((ci != null) && (ci.person_id > 0)) {
                // Update usage information for the number associated with the contact ID.
                // We need to use both the number and the ID for obtaining a data ID since other
                // contacts may have the same number.


                final Cursor cursor;


                // We should prefer normalized one (probably coming from
                // Phone.NORMALIZED_NUMBER column) first. If it isn't available try others.
                if (ci.normalizedNumber != null) {
                    final String normalizedPhoneNumber = ci.normalizedNumber;
                    cursor = resolver.query(Phone.CONTENT_URI,
                            new String[] { Phone._ID },
                            Phone.CONTACT_ID + " =? AND " + Phone.NORMALIZED_NUMBER + " =?",
                            new String[] { String.valueOf(ci.person_id), normalizedPhoneNumber},
                            null);
                } else {
                    final String phoneNumber = ci.phoneNumber != null ? ci.phoneNumber : number;
                    cursor = resolver.query(
                            Uri.withAppendedPath(Callable.CONTENT_FILTER_URI,
                                    Uri.encode(phoneNumber)),
                            new String[] { Phone._ID },
                            Phone.CONTACT_ID + " =?",
                            new String[] { String.valueOf(ci.person_id) },
                            null);
                }


                if (cursor != null) {
                    try {
                        if (cursor.getCount() > 0 && cursor.moveToFirst()) {
                            final Uri feedbackUri = DataUsageFeedback.FEEDBACK_URI.buildUpon()
                                    .appendPath(cursor.getString(0))
                                    .appendQueryParameter(DataUsageFeedback.USAGE_TYPE,
                                                DataUsageFeedback.USAGE_TYPE_CALL)
                                    .build();
                            resolver.update(feedbackUri, new ContentValues(), null, null);
                        }
                    } finally {
                        cursor.close();
                    }
                }
            }


            /// M: new feature:IP dial enhancement start @{
            String ipPrefix = null;
            if (FeatureOption.MTK_GEMINI_SUPPORT) {
                ipPrefix = Settings.System.getString(resolver, "ipprefix" + simId);
            } else {
                ipPrefix = Settings.System.getString(resolver, "ipprefix");
            }
            if (null != ipPrefix && null != number && number.startsWith(ipPrefix)
                    && !number.equals(ipPrefix) && callType == Calls.OUTGOING_TYPE) {
                values.put(IP_PREFIX, ipPrefix);
                String tmpNumber = number.substring(ipPrefix.length(), number.length());
                values.put(NUMBER, tmpNumber);
            }
            /// @}


            //這個才是Insert的地方,和我們普通的insert是一樣的
            Uri result = resolver.insert(CONTENT_URI, values);


            removeExpiredEntries(context);


            return result;
        }
這個insert就說到這裡,未完待續。。。 。。。
 Android之實現“抽獎大輪盤”
這個實例可以幫助我們學習旋轉動畫和計時器這兩個知識點,廢話不多說,上主程序: package com.bear.lotterywheel; import java.u
 Android的Adapter用法總結
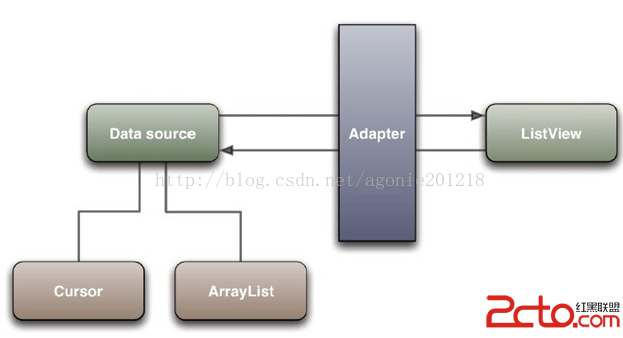
Android之Adapter用法總結1.Adapter概念定義為將一個類的接口變換成客戶端所期待的一種接口,從而使原本因接口不匹配而無法在一起工作的兩個類能夠在一起工作
 android按鈕圖片和文本居中的代碼
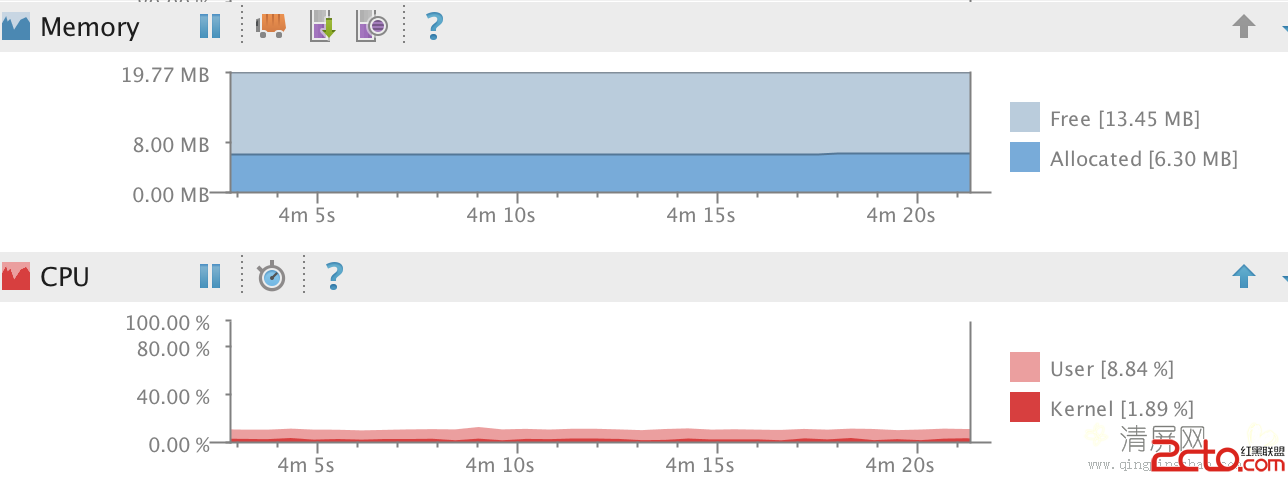
最近優化項目代碼時,發現一個比較詭異的現象:每當界面進入ActivityA時,cpu在不斷的消耗,內存在不斷的緩慢增長(雖然每次增長的量非常小)。如下圖:最後經過仔細排查
 Android實戰教程 Chronometer實現倒計時
Android提供了實現按照秒計時的API,今天就是用這個API實現簡單的倒計時。來個布局: 對應活動中的代碼如下: pa