編輯:關於Android編程
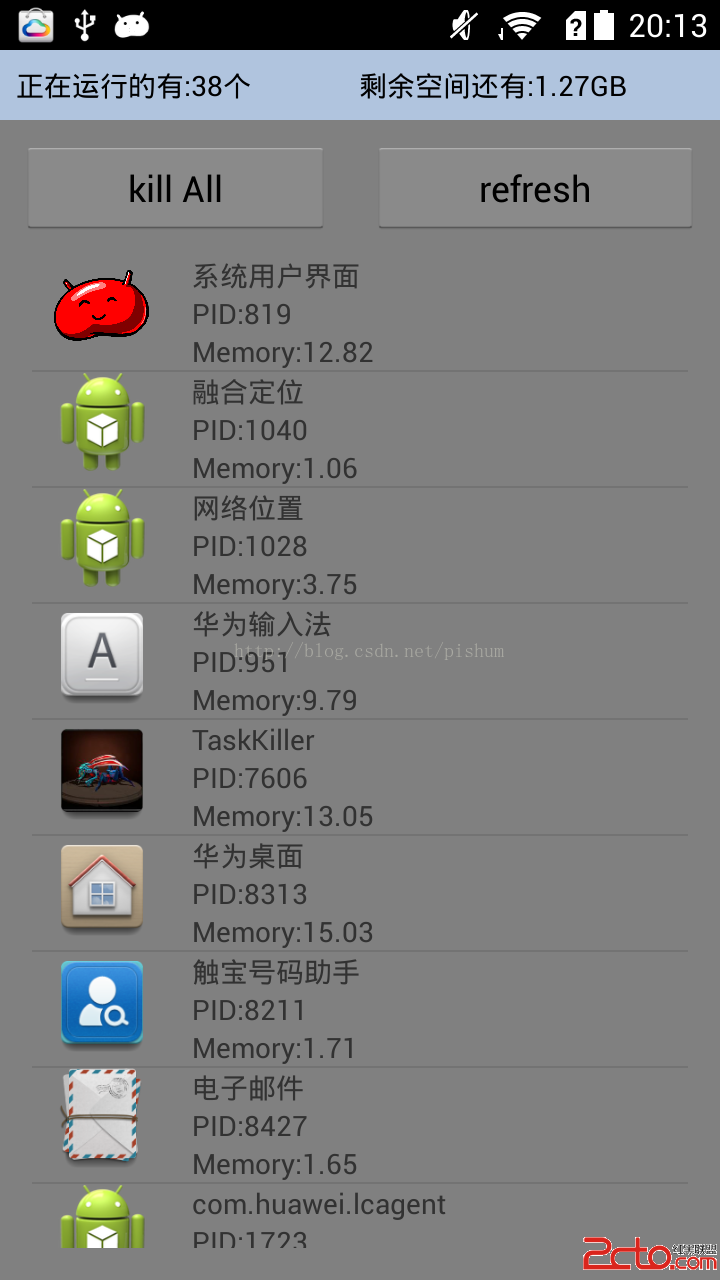
獲取正在運行的程序並把它加入到一個listview的adapter類面,方法如下:
// 正在運行的 public ListgetRunningProcess() { pi = new PackagesInfo(this); am = (ActivityManager) getSystemService(ACTIVITY_SERVICE); // 獲取正在運行的應用 run = am.getRunningAppProcesses(); // 獲取包管理器,在這裡主要通過包名獲取程序的圖標和程序名 pm = this.getPackageManager(); List list = new ArrayList (); for (RunningAppProcessInfo ra : run) { // 這裡主要是過濾系統的應用和電話應用,當然你也可以把它注釋掉。 if (ra.processName.equals("system") || ra.processName.equals("com.android.phone")) { continue; } if (pi.getInfo(ra.processName) == null) { continue; } int[] myMempid = new int[] { ra.pid }; Programe pr = new Programe(); String xx = "" + ra.processName; Log.d("zphlog", "ra.processName=" + xx); pr.setIcon(pi.getInfo(ra.processName).loadIcon(pm)); pr.setName(pi.getInfo(ra.processName).loadLabel(pm).toString()); System.out.println(pi.getInfo(ra.processName).loadLabel(pm) .toString()); // PID pr.setPID("PID:" + ra.pid); // memory Debug.MemoryInfo[] memoryInfo = am.getProcessMemoryInfo(myMempid); double memSize = memoryInfo[0].dalvikPrivateDirty / 1024.0; int temp = (int) (memSize * 100); memSize = temp / 100.0; pr.setMemory("Memory:" + memSize); list.add(pr); } return list; }
// 更新可用內存信息
public void upDateMemAndPakInfo() {
// 獲得MemoryInfo對象
ActivityManager.MemoryInfo memoryInfo = new ActivityManager.MemoryInfo();
// 獲得系統可用內存,保存在MemoryInfo對象上
am.getMemoryInfo(memoryInfo);
long memSize = memoryInfo.availMem;
// 字符類型轉換
String restMemSize = Formatter
.formatFileSize(getBaseContext(), memSize);
mRestMemory.setText("剩余空間還有:" + restMemSize);
// mPakcgeNums.setText(run.size());
mPakcgeNums.setText("正在運行的有:" + run.size() + "個");
}
下面是詳細代碼:
ActivityMain.java
public class ActivityMain extends Activity {
private static final int MSG_REFRESH = 555;
private static final int MSG_KILL = 444;
private ListView mListView;
private Button mKillBtn;
private Button mRefreshBtn;
private TextView mPakcgeNums;
private TextView mRestMemory;
private PackagesInfo pi;
private ActivityManager am;
private List run;
private PackageManager pm;
private long mExitTime;
private static final int EXIT = 0x113;
private static final int ABOUT = 0x114;
private static final int INFO = 0x115;
private static final int SHARE = 0x116;
@Override
public void onCreate(Bundle savedInstanceState) {
super.onCreate(savedInstanceState);
requestWindowFeature(Window.FEATURE_INDETERMINATE_PROGRESS);
this.requestWindowFeature(Window.FEATURE_NO_TITLE);
setContentView(R.layout.activity_main);
mListView = (ListView) findViewById(R.id.list);
mKillBtn = (Button) findViewById(R.id.kill_all);
mRefreshBtn = (Button) findViewById(R.id.refresh_run);
mPakcgeNums = (TextView) findViewById(R.id.packagenums);
mRestMemory = (TextView) findViewById(R.id.restmemory);
List list = getRunningProcess();
ListAdapter adapter = new ListAdapter(list, this);
mListView.setAdapter(adapter);
upDateMemAndPakInfo();// 顯示Memory信息
// getListView().setAdapter(adapter);
mKillBtn.setOnClickListener(new View.OnClickListener() {
@Override
public void onClick(View arg0) {
// TODO Auto-generated method stub
handler.sendEmptyMessage(MSG_KILL);
}
});
mRefreshBtn.setOnClickListener(new View.OnClickListener() {
@Override
public void onClick(View arg0) {
// TODO Auto-generated method stub
new Thread() {
public void run() {
handler.sendEmptyMessage(MSG_REFRESH);
}
}.start();
}
});
}
	// 正在運行的
	public List getRunningProcess() {
		pi = new PackagesInfo(this);

		am = (ActivityManager) getSystemService(ACTIVITY_SERVICE);
		// 獲取正在運行的應用
		run = am.getRunningAppProcesses();
		// 獲取包管理器,在這裡主要通過包名獲取程序的圖標和程序名
		pm = this.getPackageManager();
		List list = new ArrayList();

		for (RunningAppProcessInfo ra : run) {
			// 這裡主要是過濾系統的應用和電話應用,當然你也可以把它注釋掉。
			if (ra.processName.equals("system")
					|| ra.processName.equals("com.android.phone")) {
				continue;
			}
			if (pi.getInfo(ra.processName) == null) {
				continue;
			}
			int[] myMempid = new int[] { ra.pid };
			Programe pr = new Programe();
			String xx = "" + ra.processName;
			Log.d("zphlog", "ra.processName=" + xx);
			pr.setIcon(pi.getInfo(ra.processName).loadIcon(pm));
			pr.setName(pi.getInfo(ra.processName).loadLabel(pm).toString());

			System.out.println(pi.getInfo(ra.processName).loadLabel(pm)
					.toString());
			// PID
			pr.setPID("PID:" + ra.pid);
			// memory
			Debug.MemoryInfo[] memoryInfo = am.getProcessMemoryInfo(myMempid);
			double memSize = memoryInfo[0].dalvikPrivateDirty / 1024.0;
			int temp = (int) (memSize * 100);
			memSize = temp / 100.0;
			pr.setMemory("Memory:" + memSize);

			list.add(pr);
		}
		return list;
	}
Handler handler = new Handler() {
public void handleMessage(Message msg) {
super.handleMessage(msg);
switch (msg.what) {
case MSG_REFRESH:
List list = getRunningProcess();
ListAdapter adapter = new ListAdapter(list, ActivityMain.this);
mListView.setAdapter(adapter);
upDateMemAndPakInfo();
Toast.makeText(ActivityMain.this, "刷新成功", Toast.LENGTH_SHORT)
.show();
break;
case MSG_KILL:
for (RunningAppProcessInfo ra : run) {
// 這裡主要是過濾系統的應用和電話應用,當然你也可以把它注釋掉。
if (ra.processName.equals("system")
|| ra.processName.equals("com.android.phone")) {
continue;
}
if (pi.getInfo(ra.processName) == null) {
continue;
}
am.killBackgroundProcesses(ra.processName);
// Log.d("zphlog","pid="+ra.pid);
}
Toast.makeText(ActivityMain.this, "kill 成功", Toast.LENGTH_SHORT)
.show();
break;
}
}
};
	// 更新可用內存信息
	public void upDateMemAndPakInfo() {
		// 獲得MemoryInfo對象
		ActivityManager.MemoryInfo memoryInfo = new ActivityManager.MemoryInfo();
		// 獲得系統可用內存,保存在MemoryInfo對象上
		am.getMemoryInfo(memoryInfo);
		long memSize = memoryInfo.availMem;
		// 字符類型轉換
		String restMemSize = Formatter
				.formatFileSize(getBaseContext(), memSize);
		mRestMemory.setText("剩余空間還有:" + restMemSize);
		// mPakcgeNums.setText(run.size());
		mPakcgeNums.setText("正在運行的有:" + run.size() + "個");
	}
// 點擊手機返回鍵返回到上一個界面
public boolean onKeyDown(int keyCode, KeyEvent event) {
if (keyCode == KeyEvent.KEYCODE_BACK) {
if ((System.currentTimeMillis() - mExitTime) > 2000) {
Toast.makeText(this, "再按一次退出程序", Toast.LENGTH_SHORT).show();
mExitTime = System.currentTimeMillis();
} else {
finish();
}
return true;
}
return super.onKeyDown(keyCode, event);
}
@Override
public boolean onCreateOptionsMenu(Menu menu) {
menu.add(0, ABOUT, 0, "關於應用");
menu.add(0, INFO, 0, "系統信息");
menu.add(0, SHARE, 0, "分享應用");
menu.add(0, EXIT, 0, "退出應用");
return super.onCreateOptionsMenu(menu);
}
@Override
public boolean onOptionsItemSelected(MenuItem mi){
switch (mi.getItemId()){
case ABOUT:
about_info();
break;
case INFO:
system_info();
break;
case SHARE:
share();
break;
case EXIT:
finish();
break;
}
return true;
}
public void about_info(){
Intent intent = new Intent(this, AboutTaskKiller.class);
startActivity(intent);
}
public void system_info(){
Intent intent = new Intent(this, SystemInfo.class);
startActivity(intent);
}
public void share(){
Intent intent=new Intent(Intent.ACTION_SEND);
intent.setType("text/plain"); //純文本
intent.putExtra(Intent.EXTRA_SUBJECT, "分享");
intent.putExtra(Intent.EXTRA_TEXT, "我發現了一個好用的TaskKiller");
startActivity(intent);
}
}
ListAdapter.java
public class ListAdapter extends BaseAdapter {
	List list = new ArrayList();
	LayoutInflater la;
	Context context;

	public ListAdapter(List list, Context context) {
		this.list = list;
		this.context = context;
	}

	@Override
	public int getCount() {
		// TODO Auto-generated method stub
		return list.size();
	}

	@Override
	public Object getItem(int position) {
		// TODO Auto-generated method stub
		return list.get(position);
	}

	@Override
	public long getItemId(int position) {
		// TODO Auto-generated method stub
		return position;
	}

	@Override
	public View getView(int position, View convertView, ViewGroup parent) {
		ViewHolder holder;
		if (convertView == null) {
			la = LayoutInflater.from(context);
			convertView = la.inflate(R.layout.list_item, null);

			holder = new ViewHolder();
			holder.imgage = (ImageView) convertView.findViewById(R.id.image);
			holder.text = (TextView) convertView.findViewById(R.id.text);
			holder.PID = (TextView) convertView.findViewById(R.id.pid);
			holder.memory = (TextView) convertView.findViewById(R.id.memory);
			convertView.setTag(holder);
		} else {
			holder = (ViewHolder) convertView.getTag();
		}
		final Programe pr = (Programe) list.get(position);
		// 設置圖標
		holder.imgage.setImageDrawable(pr.getIcon());
		// 設置程序名
		holder.text.setText(pr.getName());
		// 設置PID
		holder.PID.setText(pr.getPID());
		// 設置memory
		holder.memory.setText(pr.getMemory());
		return convertView;
	}
}

class ViewHolder {
	TextView text;
	ImageView imgage;
	TextView memory;
	TextView PID;
} public class Programe {
// 圖標
private Drawable icon;
// 程序名
private String name;
private String pID;
private String memory;
public Drawable getIcon() {
return icon;
}
public void setIcon(Drawable icon) {
this.icon = icon;
}
public String getName() {
return name;
}
public void setName(String name) {
this.name = name;
}
public void setPID(String id){
this.pID = id;
}
public String getPID(){
return pID;
}
public void setMemory(String m){
this.memory = m;
}
public String getMemory(){
return memory;
}
}list_item.xml
首先就是最開始我談到的獲取正在運行的程序信息。
可以通過下面的方式得到
// 正在運行的
public List
pi = new PackagesInfo(this);
am = (ActivityManager) getSystemService(ACTIVITY_SERVICE);
// 獲取正在運行的應用
run = am.getRunningAppProcesses();
// 獲取包管理器,在這裡主要通過包名獲取程序的圖標和程序名
pm = this.getPackageManager();
List
for (RunningAppProcessInfo ra : run) {
// 這裡主要是過濾系統的應用和電話應用,當然你也可以把它注釋掉。
if (ra.processName.equals("system")
|| ra.processName.equals("com.android.phone")) {
continue;
}
if (pi.getInfo(ra.processName) == null) {
continue;
}
int[] myMempid = new int[] { ra.pid };
Programe pr = new Programe();
String xx = "" + ra.processName;
Log.d("zphlog", "ra.processName=" + xx);
pr.setIcon(pi.getInfo(ra.processName).loadIcon(pm));
pr.setName(pi.getInfo(ra.processName).loadLabel(pm).toString());
System.out.println(pi.getInfo(ra.processName).loadLabel(pm)
.toString());
// PID
pr.setPID("PID:" + ra.pid);
// memory
Debug.MemoryInfo[] memoryInfo = am.getProcessMemoryInfo(myMempid);
double memSize = memoryInfo[0].dalvikPrivateDirty / 1024.0;
int temp = (int) (memSize * 100);
memSize = temp / 100.0;
pr.setMemory("Memory:" + memSize);
list.add(pr);
}
return list;
}
然後就是把得到的信息保存在listview的一個Adapter裡面。
接著就是kill掉他們,我在網上看到有三種方式可以kill程序,我這裡用的方法是
	for (RunningAppProcessInfo ra : run) {
					// 這裡主要是過濾系統的應用和電話應用,當然你也可以把它注釋掉。
					if (ra.processName.equals("system")
							|| ra.processName.equals("com.android.phone")) {
						continue;
					}
					if (pi.getInfo(ra.processName) == null) {
						continue;
					}
					am.killBackgroundProcesses(ra.processName);
//					Log.d("zphlog","pid="+ra.pid);
				}
當然是在for循環裡面進行的,後面就是加了一些其他的東西,比如啟動的時候要掃描正在運行的程序需要一段時間,我們可以給程序啟動的時候讓它讀取一個圖片,停留兩秒或者三秒來爭取加載運行程序列表信息的時間。
我用的是一個Activity 命名StartUI.java
public class StartUI extends Activity {
	@Override
	public void onCreate(Bundle savedInstanceState) {
		super.onCreate(savedInstanceState);
		requestWindowFeature(Window.FEATURE_NO_TITLE);
		getWindow().setFlags(WindowManager.LayoutParams.FLAG_FULLSCREEN,
				WindowManager.LayoutParams.FLAG_FULLSCREEN);
		setContentView(R.layout.welcome_activity);
		new Handler().postDelayed(new Runnable() {

			@Override
			public void run() {
				Intent intent = new Intent(StartUI.this, ActivityMain.class);
				startActivity(intent);
				StartUI.this.finish();
			}
		}, 2500);

	}
}
它的布局文件其實就是個簡單的ImageView。
下面附上我寫的一個簡單Demo,源碼下載地址
http://download.csdn.net/detail/u010443618/7829959做好的Apk下載地址
http://download.csdn.net/detail/u010443618/7829977
如有疑問或者建議我樂意和大家交流
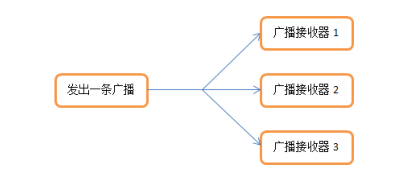 廣播——broadcast
廣播機制簡介 廣播是一種可以跨進程的通信方式(比如:接收系統廣播)。 Android 廣播不關心接收者是否收到處理或者如何處理廣播,可以說是一種單向的通知。Android
 android Handler的使用(一)
Handler的使用(一) Handler基本概念: Handler主要用於異步消息的處理:當發出一個消息之後,首先進入一個消息隊
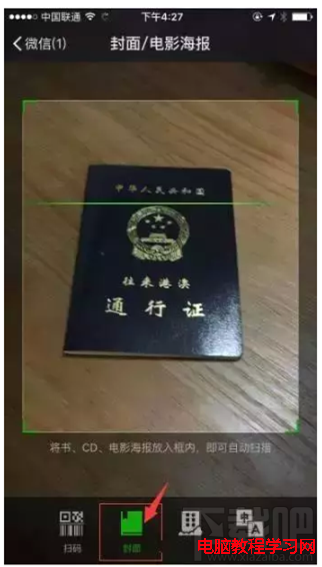 微信怎麼辦理港澳通行證續簽 手把手教你辦理港澳通行證續簽方法
微信可以辦護照、續簽港澳通行證,只有1%的人知道!你也趕快來學習吧!對於需要經常出行出差的朋友來說,這個新get一定能帶來極大的方便。微信怎麼辦理港澳通行證
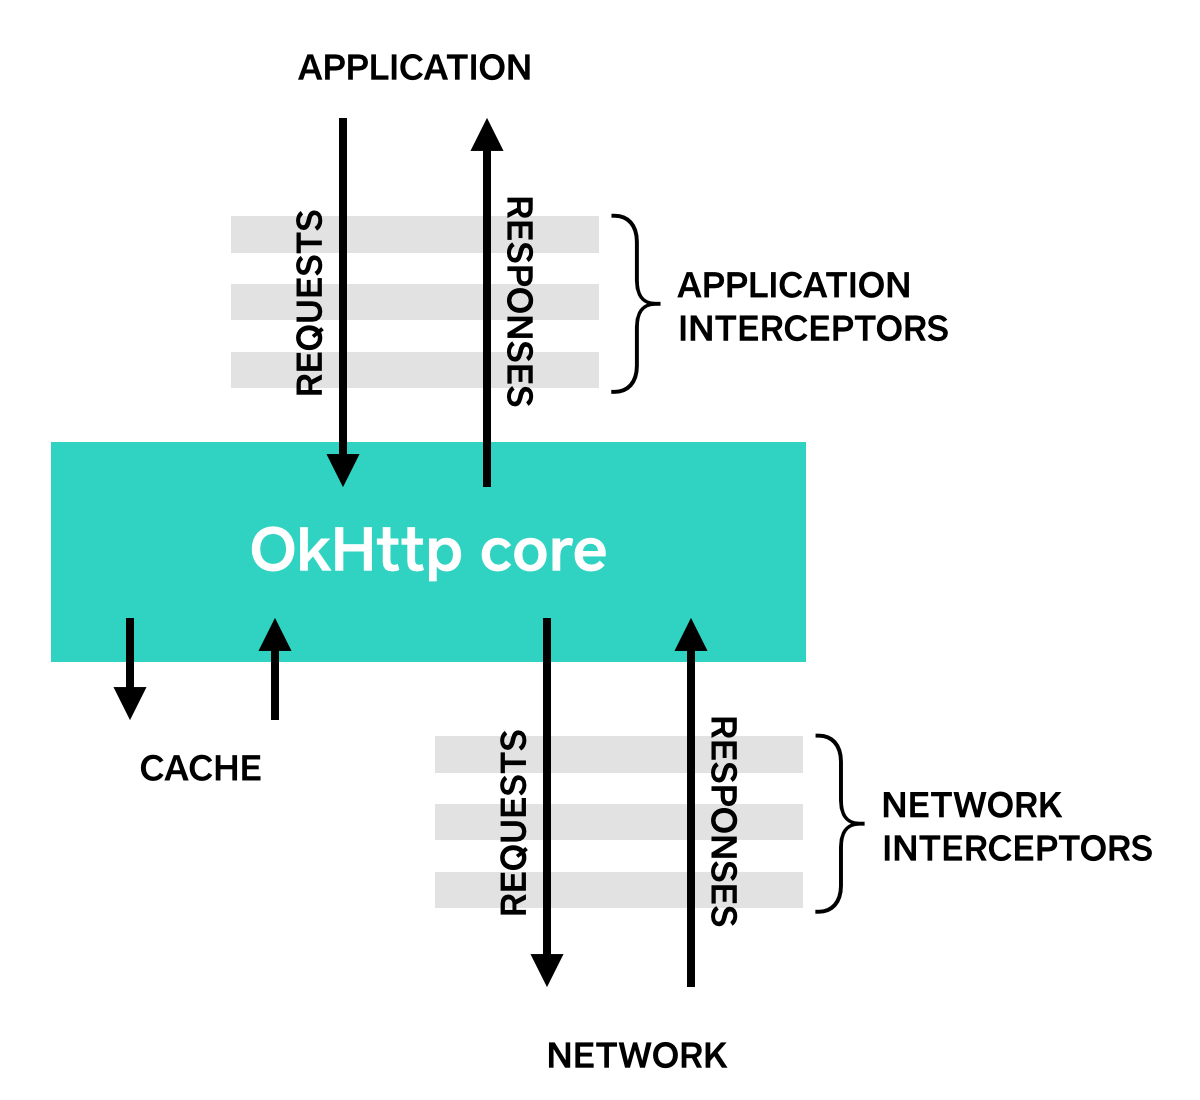 Android的OkHttp包中的HTTP攔截器Interceptor用法示例
OkHttp(GitHub:https://github.com/square/okhttp) 的 Interceptor 就如同名稱「攔截器」一樣,攔截你的 Reque