編輯:關於Android編程
Android Http 客戶端編程之GET
說起Http編程,不盡然想起GET和POST兩種請求方式,本文以簡潔明了的的步驟和說明,將Android中常用的Http編程的方式列舉出來,給剛剛在Android路上起步的奮斗者參考和指引,希望快速上手應用Android Http編程的同仁可以先繞過下面一段話。
做一件事之前,我們是否能駐足想一下要做這件事,我們需要做哪些工作,然後在經驗中積累出模板思路和步驟,在程序界通常用設計模式來概括這些工作良好的解決方案。有了這些總結積累,這樣我們就能舉一反三,面對新的問題不再 無所適從,這是一個優秀程序員必須養成的能力,所以每個愛好編程的同仁都有責任讓自己成為一個優秀的程序員程序員。
Android Http 客戶端編程設計模式(步驟):
1.網絡權限:添加INTERNET用戶權限。
2.UI設計:設計用戶界面。
3.發出請求:客戶端提交HTTP請求,提交數據,切記不能在UI線程完成。
4.接收響應:接收服務器端的響應,獲取服務器返回數據。
5.UI更新:客戶端業務處理,更新UI。
此模式是我初學Android給自己總結的一套模式,這樣能夠幫助我在涉及到HTTP編程的時候能夠編寫出良好工作的代碼,歡迎同仁給出寶貴的意見。下面是根據這套模式實現的HTTP編程實踐。
1.網絡權限,添加用戶權限:
2.UI設計,登陸界面的UI,文本框*1+密碼框*1+按鈕*1,UI較為簡單,布局文件內容略,這個之所以寫成中文,後面會有一個中文亂碼的問題,為了簡化篇幅,此處EditText和Button的Text直接寫好,這是一個很不好的編碼習慣,強烈建議實際中抽離出來,在string.xml中定義,以此為鑒。
3.發出請求:編寫客戶端HTTP請求,並提交數據,中文用戶名需要進行URL編碼,見代碼。(此步驟不能在UI線程進行)
4.接收響應:接收服務器端的響應,請求成功後獲取響應輸入流。(此步驟不能在UI線程進行)
	public static final String URL_PREFIX = "http://191.168.2.177:8080/LoginServer/LoginServlet";
	/**
	 * Get方式提交請求,此方法只能在非UI線程進行調用
	 *
	 * @param userName
	 * @param password
	 * @return
	 */
	public static String loginByGet(String userName, String password) {
		try {
			// 對中文進行編碼
			String path = URL_PREFIX + "?user="
					+ URLEncoder.encode(userName, "UTF-8") + "&pass="
					+ URLEncoder.encode(password, "UTF-8");
			URL url = new URL(path);
			HttpURLConnection conn = (HttpURLConnection) url.openConnection();
			conn.setRequestMethod("GET");
			conn.setConnectTimeout(5000);
			int code = conn.getResponseCode();
			if (code == 200) {
				InputStream is = conn.getInputStream();
				return readStream(is);
			}
		} catch (Exception e) {
			e.printStackTrace();
		}
		return null;
	}

	/**
	 * 讀取流中數據
	 *
	 * @param is
	 * @return
	 */
	public static String readStream(InputStream is) {
		ByteArrayOutputStream baos = new ByteArrayOutputStream();
		byte[] values = new byte[1024];
		try {
			try {
				int length = 0;
				while ((length = is.read(values)) != -1) {
					baos.write(values, 0, length);
				}
				return new String(baos.toByteArray());
			} finally {
				if (baos != null) {
					baos.close();
				}
				if (is != null) {
					is.close();
				}
			}
		} catch (IOException e) {
			e.printStackTrace();
			return "解析失敗";
		}
	}
5.UI更新:解析服務器響應輸入流數據後,將數據內容Toast顯示出來,Android中Activity類中的runOnUiThread方法,適當使用可以簡化Handler的編程。 public void loginByGet(View view) {
final String userName = etUserName.getText().toString();
final String password = etPassword.getText().toString();
if (TextUtils.isEmpty(userName) || TextUtils.isEmpty(password)) {
Toast.makeText(this, "用戶名或密碼不能為空", Toast.LENGTH_LONG).show();
return;
}
ExecutorService executorService = Executors.newSingleThreadExecutor();
executorService.execute(new Runnable() {
@Override
public void run() {
// 調用LoginService中的方法
final String result = LoginService.loginByGet(userName,
password);
/*
* 利用這個方法可以方便更新UI,如果當前線程是ui線程,會立即執行,否則會被放到UI線程的事件隊列中 Runs the
* specified action on the UI thread. If the current thread is
* the UI thread, then the action is executed immediately. If
* the current thread is not the UI thread, the action is posted
* to the event queue of the UI thread.
*/
runOnUiThread(new Runnable() {
public void run() {
Toast.makeText(getApplicationContext(),
result + "-------", Toast.LENGTH_LONG).show();
}
});
}
});
executorService.shutdown();
}通過這篇文章,有沒有引發你對HTTP編程的一些思考和總結,當我們要實現HTTP客戶端的時候,只需要記住簡單的設計模式中的五個步驟,這只是一個簡單的GET請求的例子,後面會繼續退出此設計模式下的POST請求,以及HTTP一些框架的使用,敬請期待。
文章來源:http://blog.csdn.net/ysjian_pingcx/article/details/25915047
 Android研究之游戲開發主角與地圖的滾動
人物移動地圖的平滑滾動處理 玩過rpg游戲的朋友應該都知道RPG的游戲地圖一般都比較大 今天我和大家分享一下在RPG游戲
 Android時間選擇器、日期選擇器實現代碼
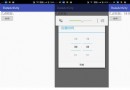
本文為大家分享了兩款選擇器,一款可以針對時間進行選擇、一款可以針對日期進行選擇,供大家參考,具體內容如下一、時間選擇器1.1.布局<?xml version
 android動畫——屬性動畫(Property Animation)
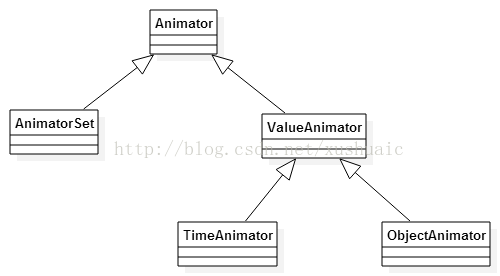
相對與視圖動畫 ,屬性動畫(android3.0提出的) 使用條件:完全彌補了View anim System的缺陷,你可以為一個對象的任何屬性添加動畫,(View或者非
 對MobSF的源碼進行分析
前言首先我們需要分析MobSF的源碼,明白一個apk的靜態分析的步驟是什麼。經過分析,如何將apk文件解壓就是進行apk行為分析的第一步,確切的說應該是第二步,第一步應該