編輯:關於Android編程
上次我寫了一個類似前言的東西,向大家粗略介紹了一下什麼是適配器,並且舉了一個最簡單的例子幫助大家理解,使用了安卓原生的ArrayAdapter,現在我們繼續向下學習,同時也繼續在我們上次的Demo項目中繼續添加例子,一步步的向下深入學習。
這次要講解的是另外一個常用的安卓原生適配器—SimpleCursorAdapter:
關於SimpleCursorAdapter,sdk的解釋是這樣的:
An easyadapter to map columns from a cursor to TextViews or ImageViews defined in anXML file. You can specify which columns you want, which views you want todisplay the columns, and the XML file that defines the appearance of theseviews。
簡單的說就是方便把從游標得到的數據進行列表顯示,並可以把指定的列映射到對應的TextView中。
下面要寫的程序是從電話簿中把聯系人顯示到類表中獲得一個指向數據庫的Cursor並且定義一個布局文件(當然也可以使用系統自帶的)將數據展示出來!
項目開始!
(1)還是先在activity_main.xml裡添加一個button,一會跳轉的時候使用。
(2)然後新建一個類SimpleCursorAdapterDemo繼承自Activity作為我們第二個例子的Activity,並且
@Override 我們的onCreate方法。
(3)新建一個xml文件simplecursoradapterdemo.xml作為我們的布局文件,其中也是包含一個文本域和一個ListView:
代碼如下
simplecursoradapterdemo.xml:
(4)回到SimpleCursorAdapterDemo,定義一個Listview暫且叫做lv,並使用剛才的ID,setContentView()為剛才的xml布局,然後為lv設置一個適配器:
SimpleCursorAdapter(Context context,int
layout,Cursor c, String[] from, int[] to)
第一個參數this,第二個layout的參數是ListView中單行的布局, c是你數據的游標。剛開始其實from和to比較讓人不熟悉,From是你查詢出的數據,to是單行布局中的單獨控件,一對一的關系,用起來非常方便。
再說一下需要用到的Cursor:
我們用:
Cursor cursor = getContentResolver().query(People.CONTENT_URI, null, null, null,null);
先獲得一個指向系統通訊錄數據庫的Cursor對象獲得數據來源。
再使用:
startManagingCursor(cursor);
將獲得的Cursor對象交由Activity管理,這樣Cursor的生命周期和Activity便能夠自動同步,省去自己手動管理Cursor。
SimpleCursorAdapter 構造函數前面3個參數和ArrayAdapter是一樣的,最後兩個參數:一個包含數據庫的列的String型數組,一個包含布局文件中對應組件id的int型數組。其作用是自動的將String型數組所表示的每一列數據映射到布局文件對應id的組件上。上面的代碼,將NAME列的數據一次映射到布局文件的id為text1的組件上。
注意:需要在AndroidManifest.xml中如權限:
具體代碼如下:
package com.example.adapterdemo;

import android.app.Activity;
import android.database.Cursor;
import android.os.Bundle;
import android.provider.Contacts.People;
import android.widget.ListAdapter;
import android.widget.ListView;
import android.widget.SimpleCursorAdapter;

public class SimpleCursorAdapterDemo extends Activity{

	private ListView lv;
	@Override
	protected void onCreate(Bundle savedInstanceState) {
        super.onCreate(savedInstanceState);
        setContentView(R.layout.simplecursoradapterdemo);
        lv = (ListView)findViewById(R.id.simplecursoradapterlistview);
        Cursor cursor = getContentResolver().query(People.CONTENT_URI, null, null, null, null);
        startManagingCursor(cursor);

        ListAdapter listAdapter = new SimpleCursorAdapter(this, android.R.layout.simple_expandable_list_item_1,
                cursor,
                new String[]{People.NAME},
                new int[]{android.R.id.text1});

        lv.setAdapter(listAdapter);
	}
}
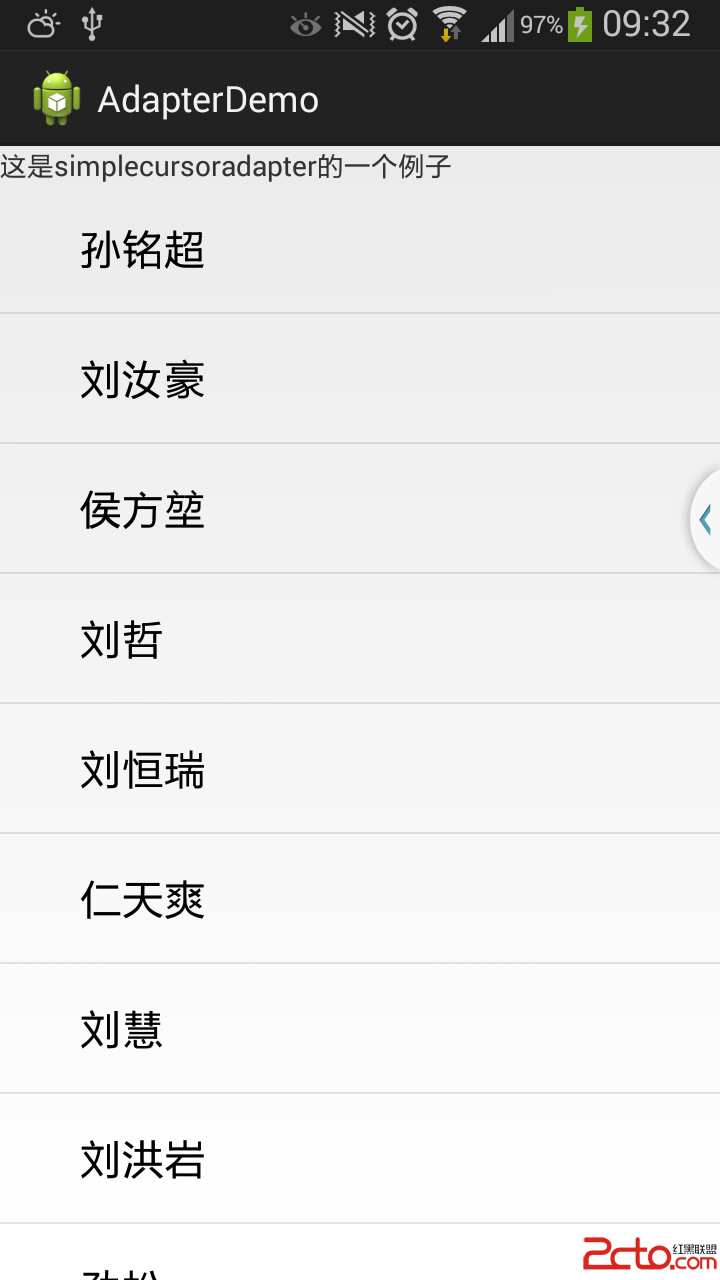
最終的效果圖:
 源碼會在最後一篇寫完的時候傳上來,我也是邊寫博客,邊寫代碼,我覺得這樣思路比較清晰。
我也是學生,水平有限,還望大家多多指教~
 Android植物大戰僵屍小游戲
Android植物大戰僵屍小游戲全部內容如下:相關下載:Android植物大戰僵屍小游戲 具體代碼如下所示:package com.example.liu.mygame;
 Android實戰教程第四篇之簡單實現短信發送器
本文實例為大家分享了Android發短信功能的實現方法,供大家參考,具體內容如下首先配置一個布局:<LinearLayout xmlns:android=http:
 Android ORMLite數據庫詳解
OrmLite是一個數據庫操作輔助的開源框架,底層還是Sqlite。O-R-M是Object relational mapping(對象關系映射)的縮寫,即業務實體對象與
 Android仿微信朋友圈全文收起功能示例(附源碼)
在眾多的社交類軟件中,朋友圈是必不可少的,可以與好友、同學等分享自己的日常和有意思的事情,在開發社交類App時,朋友圈發表的內容你不可能讓他全部顯示,全部顯示的話用戶體驗