編輯:關於Android編程
Android 自定義輸入支付密碼的軟鍵盤
有項目需求需要做一個密碼鎖功能,還有自己的軟鍵盤,類似與支付寶那種,這裡是整理的資料,大家可以看下,如有錯誤,歡迎留言指正
需求:要實現類似支付寶的輸入支付密碼的功能,效果圖如下:
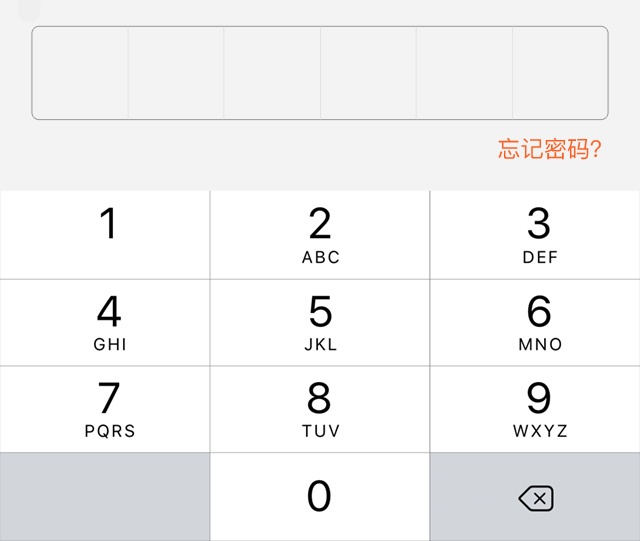
軟鍵盤效果圖
使用 android.inputmethodservice.KeyboardView 這個類自定義軟鍵盤
軟鍵盤的實現
1. 自定義只輸入數字的軟鍵盤 PasswordKeyboardView 類,繼承自 android.inputmethodservice.KeyboardView
/**
 * 輸入數字密碼的鍵盤布局控件。
 */
public class PasswordKeyboardView extends KeyboardView implements
    android.inputmethodservice.KeyboardView.OnKeyboardActionListener {

  // 用於區分左下角空白的按鍵
  private static final int KEYCODE_EMPTY = -10;

  private int   mDeleteBackgroundColor;
  private Rect   mDeleteDrawRect;
  private Drawable mDeleteDrawable;

  private IOnKeyboardListener mOnKeyboardListener;

  public PasswordKeyboardView(Context context, AttributeSet attrs) {
    super(context, attrs);
    init(context, attrs, 0);
  }

  public PasswordKeyboardView(Context context, AttributeSet attrs,
      int defStyleAttr) {
    super(context, attrs, defStyleAttr);
    init(context, attrs, defStyleAttr);
  }

  private void init(Context context, AttributeSet attrs,
      int defStyleAttr) {
    TypedArray a = context.obtainStyledAttributes(attrs,
        R.styleable.PasswordKeyboardView, defStyleAttr, 0);
    mDeleteDrawable = a.getDrawable(
        R.styleable.PasswordKeyboardView_pkvDeleteDrawable);
    mDeleteBackgroundColor = a.getColor(
        R.styleable.PasswordKeyboardView_pkvDeleteBackgroundColor,
        Color.TRANSPARENT);
    a.recycle();

    // 設置軟鍵盤按鍵的布局
    Keyboard keyboard = new Keyboard(context,
        R.xml.keyboard_number_password);
    setKeyboard(keyboard);

    setEnabled(true);
    setPreviewEnabled(false);
    setOnKeyboardActionListener(this);
  }

  @Override
  public void onDraw(Canvas canvas) {
    super.onDraw(canvas);

    // 遍歷所有的按鍵
    List<Keyboard.Key> keys = getKeyboard().getKeys();
    for (Keyboard.Key key : keys) {
      // 如果是左下角空白的按鍵,重畫按鍵的背景
      if (key.codes[0] == KEYCODE_EMPTY) {
        drawKeyBackground(key, canvas, mDeleteBackgroundColor);
      }
      // 如果是右下角的刪除按鍵,重畫背景,並且繪制刪除的圖標
      else if (key.codes[0] == Keyboard.KEYCODE_DELETE) {
        drawKeyBackground(key, canvas, mDeleteBackgroundColor);
        drawDeleteButton(key, canvas);
      }
    }
  }

  // 繪制按鍵的背景
  private void drawKeyBackground(Keyboard.Key key, Canvas canvas,
      int color) {
    ColorDrawable drawable = new ColorDrawable(color);
    drawable.setBounds(key.x, key.y,
        key.x + key.width, key.y + key.height);
    drawable.draw(canvas);
  }

  // 繪制刪除按鍵
  private void drawDeleteButton(Keyboard.Key key, Canvas canvas) {
    if (mDeleteDrawable == null)
      return;

    // 計算刪除圖標繪制的坐標
    if (mDeleteDrawRect == null || mDeleteDrawRect.isEmpty()) {
      int intrinsicWidth = mDeleteDrawable.getIntrinsicWidth();
      int intrinsicHeight = mDeleteDrawable.getIntrinsicHeight();
      int drawWidth = intrinsicWidth;
      int drawHeight = intrinsicHeight;

      // 限制圖標的大小,防止圖標超出按鍵
      if (drawWidth > key.width) {
        drawWidth = key.width;
        drawHeight = drawWidth * intrinsicHeight / intrinsicWidth;
      }
      if (drawHeight > key.height) {
        drawHeight = key.height;
        drawWidth = drawHeight * intrinsicWidth / intrinsicHeight;
      }

      // 獲取刪除圖標繪制的坐標
      int left = key.x + (key.width - drawWidth) / 2;
      int top = key.y + (key.height - drawHeight) / 2;
      mDeleteDrawRect = new Rect(left, top,
          left + drawWidth, top + drawHeight);
    }

    // 繪制刪除的圖標
    if (mDeleteDrawRect != null && !mDeleteDrawRect.isEmpty()) {
      mDeleteDrawable.setBounds(mDeleteDrawRect.left,
          mDeleteDrawRect.top, mDeleteDrawRect.right,
          mDeleteDrawRect.bottom);
      mDeleteDrawable.draw(canvas);
    }
  }

  @Override
  public void onKey(int primaryCode, int[] keyCodes) {
    // 處理按鍵的點擊事件
    // 點擊刪除按鍵
    if (primaryCode == Keyboard.KEYCODE_DELETE) {
      if (mOnKeyboardListener != null) {
        mOnKeyboardListener.onDeleteKeyEvent();
      }
    }
    // 點擊了非左下角按鍵的其他按鍵
    else if (primaryCode != KEYCODE_EMPTY) {
      if (mOnKeyboardListener != null) {
        mOnKeyboardListener.onInsertKeyEvent(
            Character.toString((char) primaryCode));
      }
    }
  }

  @Override
  public void onPress(int primaryCode) {

  }

  @Override
  public void onRelease(int primaryCode) {

  }

  @Override
  public void onText(CharSequence text) {

  }

  @Override
  public void swipeLeft() {

  }

  @Override
  public void swipeRight() {

  }

  @Override
  public void swipeDown() {

  }

  @Override
  public void swipeUp() {

  }

  /**
   * 設置鍵盤的監聽事件。
   *
   * @param listener
   *     監聽事件
   */
  public void setIOnKeyboardListener(IOnKeyboardListener listener) {
    this.mOnKeyboardListener = listener;
  }

  public interface IOnKeyboardListener {

    void onInsertKeyEvent(String text);

    void onDeleteKeyEvent();
  }
}
2. 自定義屬性:
values/attrs.xml
<declare-styleable name="PasswordKeyboardView">
  <attr name="pkvDeleteDrawable" format="reference"/>
  <attr name="pkvDeleteBackgroundColor" format="color|reference"/>
</declare-styleable>
3. 軟鍵盤按鍵的布局文件 res/xml/keyboard_number_password:
說明:
<?xml version="1.0" encoding="utf-8"?>
<Keyboard
  xmlns:android="http://schemas.android.com/apk/res/android"
  android:keyWidth="33.33333%p"
  android:keyHeight="8%p"
  android:horizontalGap="1dp"
  android:verticalGap="1dp">
  <Row>
    <Key
      android:codes="49"
      android:keyLabel="1"/>
    <Key
      android:codes="50"
      android:keyLabel="2"/>
    <Key
      android:codes="51"
      android:keyLabel="3"/>
  </Row>

  <Row>
    <Key
      android:codes="52"
      android:keyLabel="4"/>
    <Key
      android:codes="53"
      android:keyLabel="5"/>
    <Key
      android:codes="54"
      android:keyLabel="6"/>
  </Row>

  <Row>
    <Key
      android:codes="55"
      android:keyLabel="7"/>
    <Key
      android:codes="56"
      android:keyLabel="8"/>
    <Key
      android:codes="57"
      android:keyLabel="9"/>
  </Row>

  <Row>
    <Key
      android:codes="-10"
      android:keyLabel=""/>
    <Key
      android:codes="48"
      android:keyLabel="0"/>
    <Key
      android:codes="-5"
      android:keyIcon="@mipmap/keyboard_backspace"/>
  </Row>
</Keyboard>
3. 在布局中引用軟鍵盤控件:
<[包名].PasswordKeyboardView
  android:layout_width="match_parent"
  android:layout_height="wrap_content"
  android:background="#b0b0b0"
  android:focusable="true"
  android:focusableInTouchMode="true"
  android:keyBackground="#ffffff"
  android:keyTextColor="#000000"
  android:shadowColor="#00000000"
  android:shadowRadius="0"
  app:pkvDeleteBackgroundColor="#d2d2d2"
  app:pkvDeleteDrawable="@drawable/keyboard_backspace" />
隨機數字鍵盤的實現
目前能想到的有兩種實現方式:
1. 在 onDraw 方法裡重新繪制鍵盤上的文字,覆蓋掉原來的鍵盤,這種實現方式相對比較麻煩。
2. 調用 KeyboardView.setKeyboard() 方法重新設置鍵盤,實現的代碼如下:
// 0-9 的數字
private final List<Character> keyCodes = Arrays.asList(
    '0', '1', '2', '3', '4', '5', '6', '7', '8', '9');

/**
 * 隨機打亂數字鍵盤上顯示的數字順序。
 */
public void shuffleKeyboard() {
  Keyboard keyboard = getKeyboard();
  if (keyboard != null && keyboard.getKeys() != null
      && keyboard.getKeys().size() > 0) {
    // 隨機排序數字
    Collections.shuffle(keyCodes);

    // 遍歷所有的按鍵
    List<Keyboard.Key> keys = getKeyboard().getKeys();
    int index = 0;
    for (Keyboard.Key key : keys) {
      // 如果按鍵是數字
      if (key.codes[0] != KEYCODE_EMPTY
          && key.codes[0] != Keyboard.KEYCODE_DELETE) {
        char code = keyCodes.get(index++);
        key.codes[0] = code;
        key.label = Character.toString(code);
      }
    }
    // 更新鍵盤
    setKeyboard(keyboard);
  }
}
調用 shuffleKeyboard 即可生成隨機的鍵盤。
最終實現的效果如下:
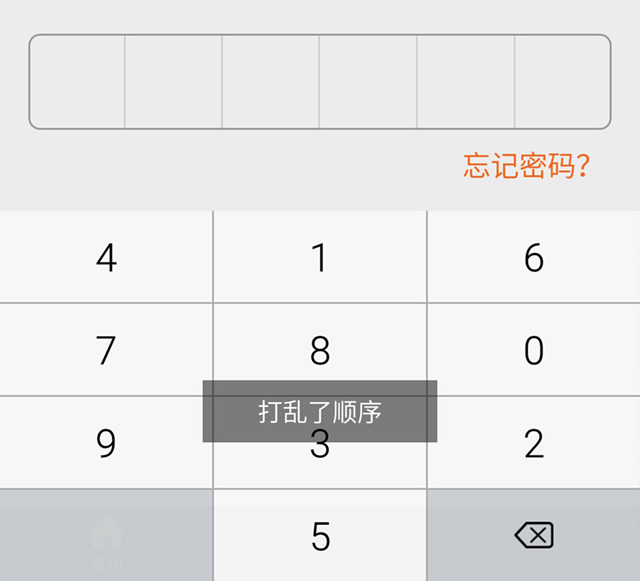
隨機鍵盤
踩坑
1. 點擊按鍵的放大鏡效果提示
軟鍵盤默認點擊按鍵時會顯示放大鏡效果的提示,如果不需要可以使用 setPreviewEnabled(false) 設置不顯示提示。
可以在布局中使用 android:keyPreviewLayout 指定提示文字的布局。
2. 按鍵文字不清晰
軟鍵盤按鍵默認帶有陰影效果,會導致文字不清楚,可以使用下面方式去掉陰影:
<[包名].PasswordKeyboardView
  android:shadowColor="@color/transparent"
  android:shadowRadius="0"
  ...
  />
感謝閱讀,希望能幫助到大家,謝謝大家對本站的支持!
 sqlite的基本使用
一:基本操作1繼承SQLiteOpenHelperpublic class UserSqliteOpenHelper extends SQLiteOpenHe
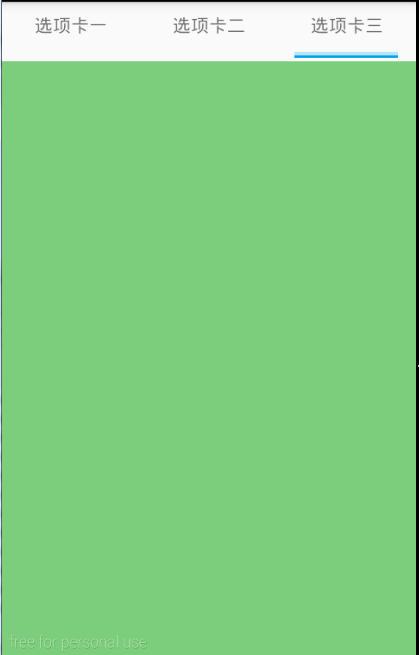 Android Tab -- 使用ViewPager、Fragment、FragmentPagerAdapter來實現
效果:滑動切換;點擊標簽切換。 代碼:https://github.com/ldb-github/Layout_Tab1、布局:使用LinearLayout布置
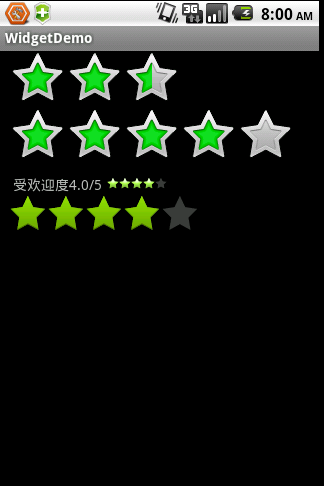 Android控件之RatingBar自定義星級評分樣式
一、RatingBar簡單介紹RatingBar是基於SeekBar(拖動條)和ProgressBar(狀態條)的擴展,用星形來顯示等級評定,在使用默認RatingBar
 Android定時器實現的幾種方式整理及removeCallbacks失效問題解決
實現定時器有很多種方式,在這裡我簡單的介紹幾種方式 (1)使用Handler + Runnable的方式 復制代碼 代碼如下: Handler handler = new