編輯:關於Android編程
說到handler大家都很熟悉,自己也用了很久,再此總結一下 從handler的源碼角度看看handler是如何執行的。
這些東西還是挺多的。那麼我們先看一個栗子吧
public class MainActivity extends Activity {
    private static final String TAG = "MainActivity";

    @Override
    protected void onCreate(Bundle savedInstanceState) {
        super.onCreate(savedInstanceState);
        setContentView(R.layout.activity_main);
        findViewById(R.id.btn_http).setOnClickListener(new View.OnClickListener() {
            @Override
            public void onClick(View v) {
                text();
            }
        });

    }

    private void text() {
        new Thread(new Runnable() {
            @Override
            public void run() {
                Looper.prepare();
                Handler handler1 = new Handler() {//為了說明問題的寫法
                    @Override
                    public void handleMessage(Message msg) {
                        super.handleMessage(msg);
                        Log.e(TAG, "handle1: " + msg.what + "-thread1-" + Thread.currentThread().getName());
                    }
                };
                Message msg = new Message();
                msg.what = 2;
                handler1.sendMessage(msg);
                handler2.obtainMessage(1).sendToTarget();
                handler2.obtainMessage(4).sendToTarget();
                Looper.loop();
                Log.e(TAG, "loop 執行完畢");
                handler2.obtainMessage(3).sendToTarget();
            }
        }).start();
    }

    Handler handler2 = new Handler() {//普通寫法
        @Override
        public void handleMessage(Message msg) {
            super.handleMessage(msg);
            Log.e(TAG, "handle2: " + msg.what + "-thread2-" + Thread.currentThread().getName());
        }
    };
}
兩種寫法: 普通寫法 和 為了說明問題的寫法。 先不管為什麼這麼寫。先執行下代碼。你們覺得會怎麼執行呢。
結果是這樣的
E/MainActivity: handle1: 2-thread1-Thread-18270   :handler1 先發送消息,並且獲取到消息。都發生在子線程
E/MainActivity: handle2: 1-thread2-main         : handler2 發送消息 獲取消息
E/MainActivity: handle2: 4-thread2-main         : handler2 發送消息 獲取消息
但我們的兩行代碼沒有執行
                這兩行代碼沒有執行
                Log.e(TAG, "loop 執行完畢");
                handler2.obtainMessage(3).sendToTarget();
先看一下new Handler();的源碼 帶我們了解looper;
  public Handler() {
        this(null, false);
    }

  public Handler(Callback callback, boolean async) {
      ...省略部分代碼..
        mLooper = Looper.myLooper();//這裡獲取一個mLooper
        if (mLooper == null) {//如果mLooper為null拋出異常
            throw new RuntimeException(
                "Can't create handler inside thread that has not called Looper.prepare()");
        }
        mQueue = mLooper.mQueue;
        mCallback = callback;
        mAsynchronous = async;
    }
看到這裡知道了。在使用new Handler()之前必須要有一個mLooper這個對象。不然的話會拋出異常。
接著看
  public static @Nullable Looper myLooper() {//這裡就返回一個mLooper 了
        return sThreadLocal.get();
    }

       // sThreadLocal.get() will return null unless you've called prepare().
    static final ThreadLocal sThreadLocal = new ThreadLocal();
這裡有個注意的就是ThreadLocal 這個類 是static和 final的類型 就是 沒創建一次都會有一個單獨的而且唯一的ThreadLocal
比如主線程的ThreadLocal 就只有一個。 你開啟一百個new Handler()。就會有100個不同的ThreadLocal。他們之前不顧干擾。
我們現在已經有了獲取looper的方法了。肯定也得有set的方法。
看 Looper.prepare();方法
   public static void prepare() {
        prepare(true);
     }

    private static void prepare(boolean quitAllowed) {//這個參數的意思就是這個messagequeue是否可以銷毀
        if (sThreadLocal.get() != null) {//這裡執行了獲取ThreadLocal方法。如果已經存在了拋異常。所以 prepare方法在一個線程裡只能執行一遍。
            throw new RuntimeException("Only one Looper may be created per thread");
        }
        sThreadLocal.set(new Looper(quitAllowed)); //這裡執行了我們想要的set方法。
    }

//這個looper方法裡面直接new出來了 MessageQueue() 和獲取當前線程作為 標示
    private Looper(boolean quitAllowed) {
        mQueue = new MessageQueue(quitAllowed);
        mThread = Thread.currentThread();
    }


  // True if the message queue can be quit.
    private final boolean mQuitAllowed;//這裡是判斷該messageQueue是否可銷毀
     MessageQueue(boolean quitAllowed) {
        mQuitAllowed = quitAllowed;//賦值
        mPtr = nativeInit();
    }
從這裡我們可以看出來 new Handler();10次。會有10個Threadlocal,會有10個MessageQueue。
到這裡我們還有個疑問就是為什麼主線程沒有寫Looper.prepare();
我們新來看ActivityThread這個類。這個類創建主線程。
    public static void main(String[] args) {
        。。。。
        Looper.prepareMainLooper();//有點兒類似prepare的方法

        ActivityThread thread = new ActivityThread();
        thread.attach(false);

        if (sMainThreadHandler == null) {
            sMainThreadHandler = thread.getHandler();
        }

        if (false) {
            Looper.myLooper().setMessageLogging(new
                    LogPrinter(Log.DEBUG, "ActivityThread"));
        }

        // End of event ActivityThreadMain.
        Trace.traceEnd(Trace.TRACE_TAG_ACTIVITY_MANAGER);
        Looper.loop();//這裡也出現了loop的方法了。

        throw new RuntimeException("Main thread loop unexpectedly exited");//loop()方法後面只有一句異常。好像loop不會被停止一樣。
    }

    public static void prepareMainLooper() {
        prepare(false);//這裡穿的值是false。說明該線程中的messageQueue是不可以被銷毀的。
        synchronized (Looper.class) {
            if (sMainLooper != null) {
                throw new IllegalStateException("The main Looper has already been prepared.");
            }
            sMainLooper = myLooper();//prepare裡面執行set方法。這裡執行get方法獲取Looper
        }
    }
到這裡就明白了為什麼 子線程執行 Looper.prepare()方法了。
再來看Looper.loop();
 public static void loop() {
        final Looper me = myLooper();//獲取looper
        if (me == null) {
            throw new RuntimeException("No Looper; Looper.prepare() wasn't called on this thread.");
        }
        final MessageQueue queue = me.mQueue;//獲取該looper下的queue

                。。。。。。
        for (;;) {//死循環。我看的源碼是api 23的。記得以前是while(true)。為什麼捏
            Message msg = queue.next(); // might block
            if (msg == null) {
                // No message indicates that the message queue is quitting.
                return;
            }
            。。。。。
            msg.target.dispatchMessage(msg);//這個方法很重要

            if (logging != null) {
                logging.println("<<<<< Finished to " + msg.target + " " + msg.callback);
            }

            // Make sure that during the course of dispatching the
            // identity of the thread wasn't corrupted.
            final long newIdent = Binder.clearCallingIdentity();
            if (ident != newIdent) {
                Log.wtf(TAG, "Thread identity changed from 0x"
                        + Long.toHexString(ident) + " to 0x"
                        + Long.toHexString(newIdent) + " while dispatching to "
                        + msg.target.getClass().getName() + " "
                        + msg.callback + " what=" + msg.what);
            }

            msg.recycleUnchecked();
        }
    }
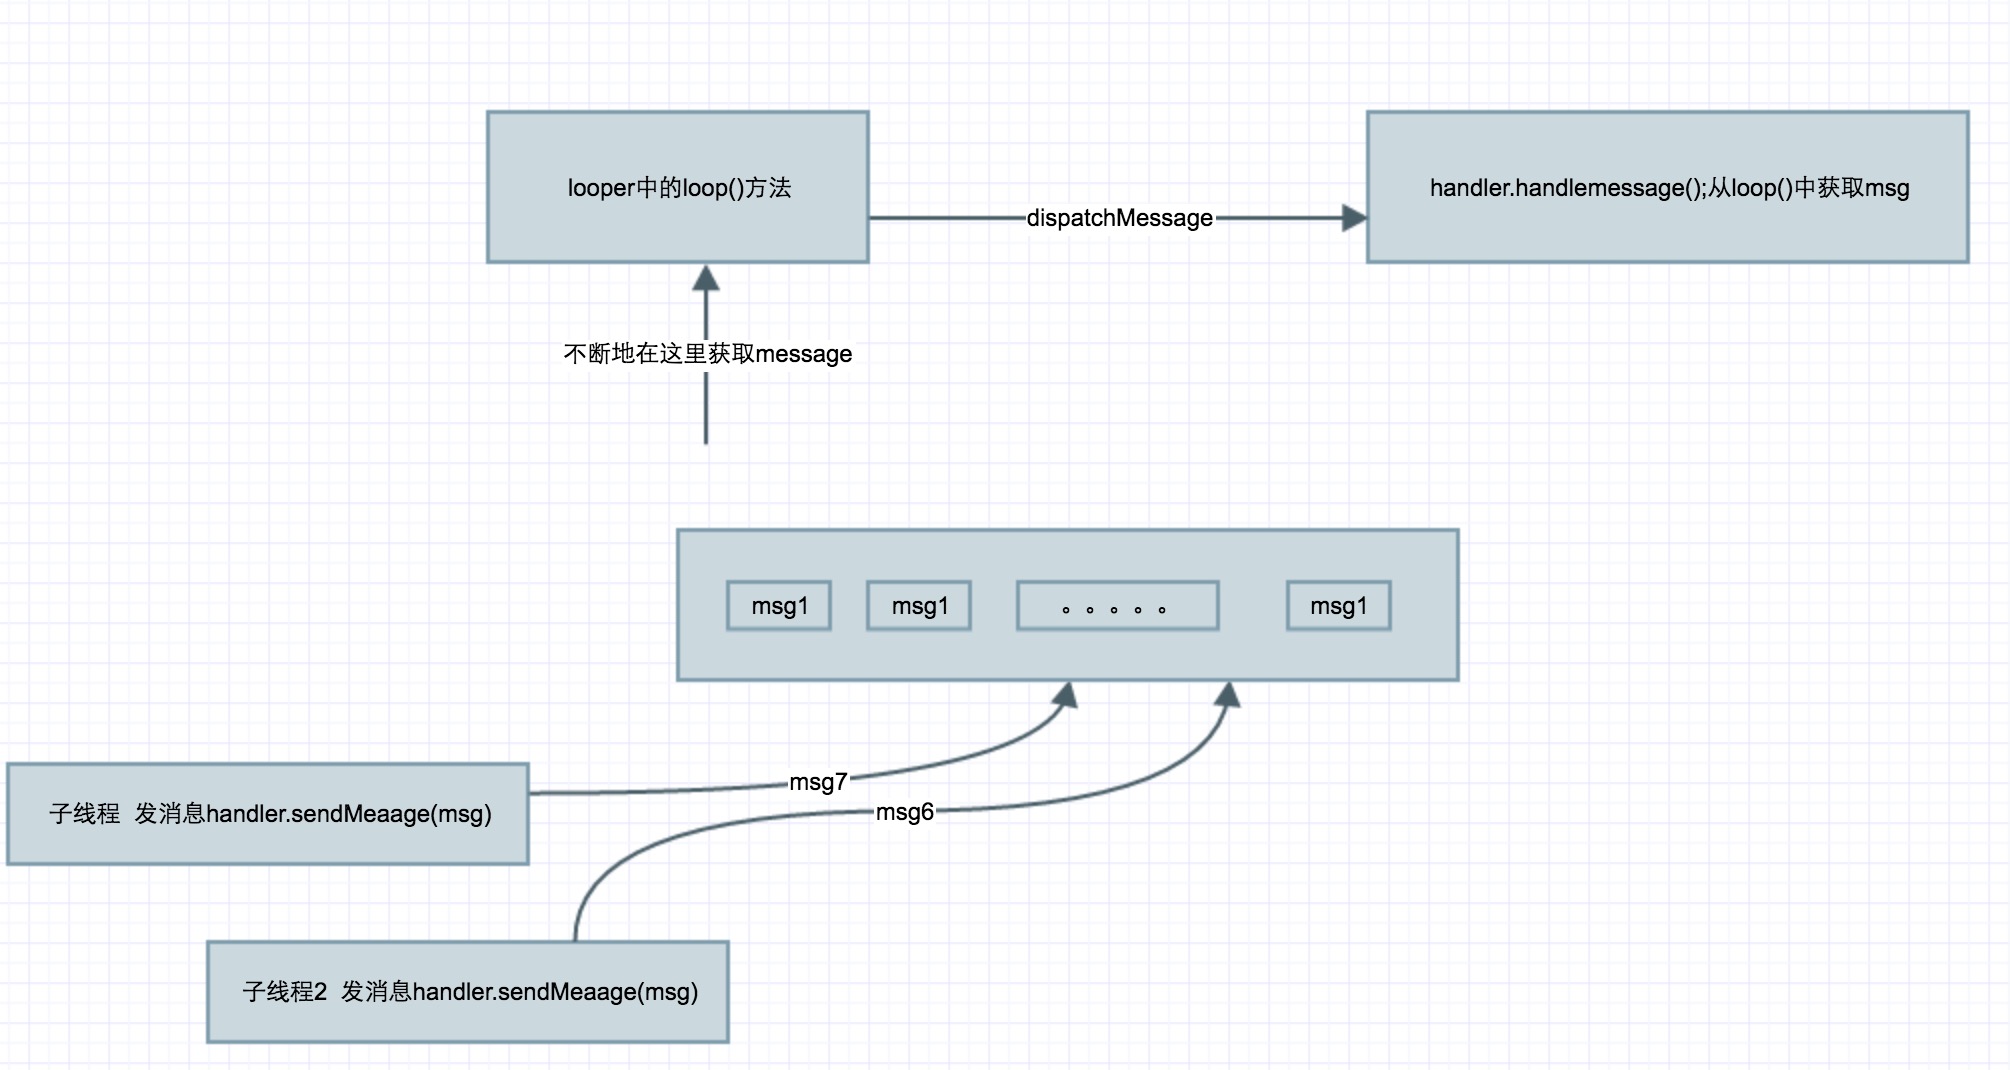
這個Looper.loop()方法就是一個死循環不斷地從messageQueue中獲取msg
這裡就是到了我們上面說的兩行代碼 沒有執行的原因是因為loop()是死循環。後面的代碼不會執行了
我們發現了這裡有一個
 /**
     * Subclasses must implement this to receive messages.
     */
    public void handleMessage(Message msg) {
    }

    /**
     * Handle system messages here.
     */
    public void dispatchMessage(Message msg) {
        if (msg.callback != null) {
            handleCallback(msg);
        } else {
            if (mCallback != null) {
                if (mCallback.handleMessage(msg)) {
                    return;
                }
            }
            handleMessage(msg);
        }
    }
到這裡呢。我們就理解了。
 Handler handler1 = new Handler() {
                    @Override
                    public void handleMessage(Message msg) {
                        super.handleMessage(msg);

                    }
                };
這裡其實每次就是重寫了一個handlermessage()的方法。來更新我們的線程。
handler發消息有兩類方法:sendMessage()和obtainmessage() 其他的什麼延遲啊。
所有sendMessage()類的方法都會執行到這裡
    public boolean sendMessageAtTime(Message msg, long uptimeMillis) {
        MessageQueue queue = mQueue;
        if (queue == null) {
            RuntimeException e = new RuntimeException(
                    this + " sendMessageAtTime() called with no mQueue");
            Log.w("Looper", e.getMessage(), e);
            return false;
        }
        return enqueueMessage(queue, msg, uptimeMillis);
    }

     private boolean enqueueMessage(MessageQueue queue, Message msg, long uptimeMillis) {
        msg.target = this;
        if (mAsynchronous) {
            msg.setAsynchronous(true);
        }
        return queue.enqueueMessage(msg, uptimeMillis);//忘messageQueue裡面插入msg。
    }
這個Message呢是類似於鏈表的寫法。(覺得算法終於有用了)
什麼事鏈表捏

就是這樣。msg不斷地只想下一個msg。
  boolean enqueueMessage(Message msg, long when) {
     。。
        synchronized (this) {
            if (mQuitting) {
                IllegalStateException e = new IllegalStateException(
                        msg.target + " sending message to a Handler on a dead thread");
                Log.w(TAG, e.getMessage(), e);
                msg.recycle();
                return false;
            }

            msg.markInUse();
            msg.when = when;//獲取時間
            Message p = mMessages;//獲取msg
            boolean needWake;
            if (p == null || when == 0 || when < p.when) { //不斷地把msg添加到msg鏈表的最後面
                // New head, wake up the event queue if blocked.
                msg.next = p;
                mMessages = msg;
                needWake = mBlocked;
            } else { //意思是 後來傳入的消息 要執行在 之前消息之前。。就是在鏈表的都一處插入一條消息
                // Inserted within the middle of the queue.  Usually we don't have to wake
                // up the event queue unless there is a barrier at the head of the queue
                // and the message is the earliest asynchronous message in the queue.
                needWake = mBlocked && p.target == null && msg.isAsynchronous();
                Message prev;
                for (;;) {
                    prev = p;
                    p = p.next;
                    if (p == null || when < p.when) {
                        break;
                    }
                    if (needWake && p.isAsynchronous()) {
                        needWake = false;
                    }
                }
                msg.next = p; // invariant: p == prev.next
                prev.next = msg;
            }

            // We can assume mPtr != 0 because mQuitting is false.
            if (needWake) {
                nativeWake(mPtr);
            }
        }
        return true;
    }
再看一下obtainmessage();
 public static Message obtain() {
        synchronized (sPoolSync) {
            if (sPool != null) {
                Message m = sPool;
                sPool = m.next;
                m.next = null;
                m.flags = 0; // clear in-use flag
                sPoolSize--;
                return m;
            }
        }
        return new Message();//消息池裡面沒有消息就new 一個新的消息  所有的消息鏈表在messageQueue中
    }
這個呢就是鏈表的形式,把消息池裡的第一條數據取出來,然後把第二條數據變為第一條。這樣循環的取數據

一個循環之後呢

然後都會執行sendToTarget();把消息發出去
 public void sendToTarget() {
        target.sendMessage(this);這樣就是sendMessage()一樣啦。
    }
可以看到obtainmessage()這樣呢就減少了message的創建。
new Handler的時候Handler就已經拿到了線程的Looper 。MessagQueue
handler發送消息:
把Handler保存到Message裡。
把Message保存到messageQueue裡。
ActivityThread.java主線程入口類
在main()方法中存入了Looper.prepareMainLooper();(這裡已經創建了Looper,messagequeue)
然後不斷地執行獲取消息的方法:Looper.loop();去出message,然後調用handler的dispatchMessage(msg);
一張圖解決所有問題
 Android4.4 Telephony流程分析——SIM卡開機時的初始化
本文代碼以MTK平台Android 4.4為分析對象,與Google原生AOSP有些許差異,請讀者知悉。 本文主要介紹MTK Android開機時,SIM卡的Fram
 android apk反編譯到java源碼的實現方法
Android由於其代碼是放在dalvik虛擬機上的托管代碼,所以能夠很容易的將其反編譯為我們可以識別的代碼。之前我寫過一篇文章反編譯Android的apk包到smali
 Android自定義View——仿1號店垂直滾動廣告條實現
效果圖展示,圖片有點卡,耐心看會,原程序是很流暢的實現步驟: 聲明變量 初始化畫筆、文本大小和坐標 onMeasure()適配wrap_content的寬高 onDraw
 Android自制彈幕
今天要實現的效果如下:1.彈幕垂直方向固定2.彈幕垂直方向隨機上面效果圖中白色的背景就是彈幕本身,是一個自定義的FrameLayout,我這裡是為了更好的展示彈幕的位置才