編輯:關於Android編程
在編程中經常會遇到數據庫的操作,而Android系統內置了SQLite,它是一款輕型數據庫,遵守事務ACID的關系型數據庫管理系統,它占用的資源非常低,能夠支持Windows/Linux/Unix等主流操作系統,同時能夠跟很多程序語言如C#、PHP、Java等相結合.下面先回顧SQL的基本語句,再講述Android的基本操作.
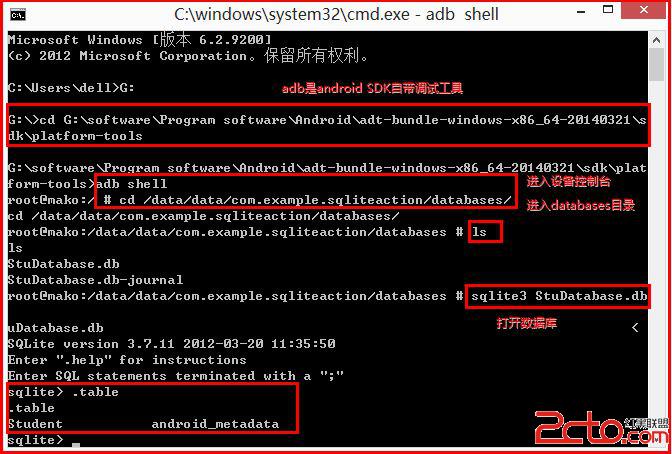
首先,我感覺自己整個大學印象最深的幾門課就包括《數據庫》,所以想先回顧SQL增刪改查的基本語句.而在Android SDK中adb是自帶的調試工具,它存放在sdk的platform-tools目錄下,通過adb shell可以進入設備控制台,操作SQL語句.
G:
cd G:\software\Program software\Android\adt-bundle-windows-x86_64-20140321\sdk\platform-tools
adb shell
cd /data/data/com.example.sqliteaction/databases/
sqlite3 StuDatabase.db
.table
.schema
如下所示我先創建了SQLiteAction工程,同時在工程中創建了StuDatabase.db數據庫.輸入adb shell進入設備控制台,調用"sqlite3+數據庫名"打開數據庫,如果沒有db文件則創建.
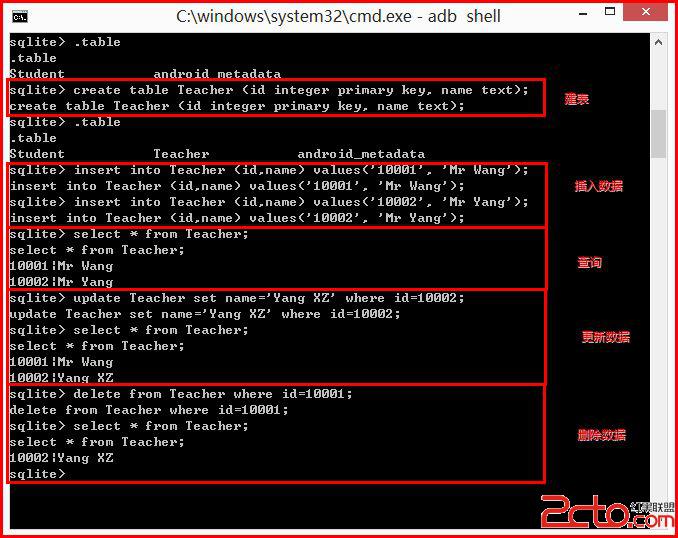
--創建Teacher表
create table Teacher (id integer primary key, name text);
--向表中插入數據
insert into Teacher (id,name) values('10001', 'Mr Wang');
insert into Teacher (id,name) values('10002', 'Mr Yang');
--查詢數據
select * from Teacher;
--更新數據
update Teacher set name='Yang XZ' where id=10002;
--刪除數據
delete from Teacher where id=10001;
下面講解使用SQLite操作數據庫:
1.創建打開數據庫
使用openOrCreateDatabase函數實現,它會自動檢測是否存在該數據庫,如果存在則打開,否則創建一個數據庫,並返回一個SQLiteDatabase對象.
2.創建表
通過定義建表的SQL語句,再調用execSQL方法執行該SQL語句實現建立表.
//創建學生表(學號,姓名,電話,身高) 主鍵學號
public static final String createTableStu = "create table Student (" +
		"id integer primary key, " +
		"name text, " +
		"tel text, " +
		"height real)";
//SQLiteDatabase定義db變量
db.execSQL(createTableStu);
3.插入數據
//方法一
SQLiteDatabase db = sqlHelper.getWritableDatabase();
ContentValues values = new ContentValues();
values.put("id", "10001");
values.put("name", "Eastmount");
values.put("tel", "15201610000");
values.put("height", "172.5");
db.insert("Student", null, values);
//方法二
public static final String insertData = "insert into Student (" +
		"id, name, tel, height) values('10002','XiaoMing','110','175')";
db.execSQL(insertData);
4.刪除數據
//方法一 刪除身高>175cm
SQLiteDatabase db = sqlHelper.getWritableDatabase();
db.delete("Student", "height > ?", new String[] {"175"});
//方法二
String deleteData = "DELETE FROM Student WHERE height>175";
db.execSQL(deleteData);
5.更新數據//小明的身高修改為180
SQLiteDatabase db = sqlHelper.getWritableDatabase();
ContentValues values = new ContentValues();
values.put("height", "180");
db.update("Student", values, "name = ?", new String[] {"XiaoMing"}); 6.其他操作下面是關於數據庫的其他操作,其中包括使用SQL語句執行,而查詢數據Query方法由於涉及ListView顯示,請見具體實例.
//關閉數據庫
SQLiteDatabase.close();
//刪除表 執行SQL語句
SQLiteDatabase.execSQL("DROP TABLE Student");
//刪除數據庫
this.deleteDatabase("StuDatabase.db");
//查詢數據
SQLiteDatabase.query();
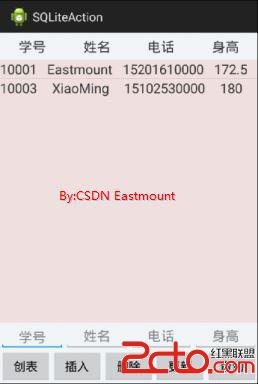
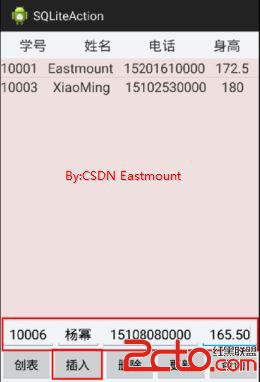
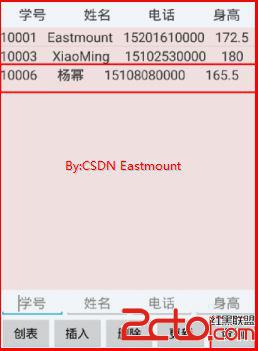
顯示效果如下圖所示:
首先,添加activity_main.xml文件布局如下:
然後是在res/layout中添加ListView顯示的stu_item.xml:
再次,添加自定義類MySQLiteOpenHelper:
//添加自定義類 繼承SQLiteOpenHelper
public class MySQLiteOpenHelper extends SQLiteOpenHelper {

	public Context mContext;

	//創建學生表(學號,姓名,電話,身高) 主鍵學號
	public static final String createTableStu = "create table Student (" +
			"id integer primary key, " +
			"name text, " +
			"tel text, " +
			"height real)";

	//抽象類 必須定義顯示的構造函數 重寫方法
	public MySQLiteOpenHelper(Context context, String name, CursorFactory factory,
			int version) {
		super(context, name, factory, version);
		mContext = context;
	}

	@Override
	public void onCreate(SQLiteDatabase arg0) {
		// TODO Auto-generated method stub
		arg0.execSQL(createTableStu);
		Toast.makeText(mContext, "Created", Toast.LENGTH_SHORT).show();
	}

	@Override
	public void onUpgrade(SQLiteDatabase arg0, int arg1, int arg2) {
		// TODO Auto-generated method stub
		arg0.execSQL("drop table if exists Student");
		onCreate(arg0);
		Toast.makeText(mContext, "Upgraged", Toast.LENGTH_SHORT).show();
	}
}
最後是MainActivity.java文件,代碼如下:public class MainActivity extends Activity {
//繼承SQLiteOpenHelper類
private MySQLiteOpenHelper sqlHelper;
private ListView listview;
private EditText edit1;
private EditText edit2;
private EditText edit3;
private EditText edit4;
@Override
protected void onCreate(Bundle savedInstanceState) {
super.onCreate(savedInstanceState);
setContentView(R.layout.activity_main);
sqlHelper = new MySQLiteOpenHelper(this, "StuDatabase.db", null, 2);
//建立新表
Button createBn = (Button) findViewById(R.id.button1);
createBn.setOnClickListener(new OnClickListener() {
@Override
public void onClick(View v) {
sqlHelper.getWritableDatabase();
}
});
//插入數據
Button insertBn = (Button) findViewById(R.id.button2);
edit1 = (EditText) findViewById(R.id.edit_id);
edit2 = (EditText) findViewById(R.id.edit_name);
edit3 = (EditText) findViewById(R.id.edit_tel);
edit4 = (EditText) findViewById(R.id.edit_height);
insertBn.setOnClickListener(new OnClickListener() {
@Override
public void onClick(View v) {
SQLiteDatabase db = sqlHelper.getWritableDatabase();
ContentValues values = new ContentValues();
/*
//插入第一組數據
values.put("id", "10001");
values.put("name", "Eastmount");
values.put("tel", "15201610000");
values.put("height", "172.5");
db.insert("Student", null, values);
*/
values.put("id", edit1.getText().toString());
values.put("name", edit2.getText().toString());
values.put("tel", edit3.getText().toString());
values.put("height", edit4.getText().toString());
db.insert("Student", null, values);
Toast.makeText(MainActivity.this, "數據插入成功", Toast.LENGTH_SHORT).show();
edit1.setText("");
edit2.setText("");
edit3.setText("");
edit4.setText("");
}
});
//刪除數據
Button deleteBn = (Button) findViewById(R.id.button3);
deleteBn.setOnClickListener(new OnClickListener() {
@Override
public void onClick(View v) {
SQLiteDatabase db = sqlHelper.getWritableDatabase();
db.delete("Student", "height > ?", new String[] {"180"});
Toast.makeText(MainActivity.this, "刪除數據", Toast.LENGTH_SHORT).show();
}
});
//更新數據
Button updateBn = (Button) findViewById(R.id.button4);
updateBn.setOnClickListener(new OnClickListener() {
@Override
public void onClick(View v) {
SQLiteDatabase db = sqlHelper.getWritableDatabase();
ContentValues values = new ContentValues();
values.put("height", "180");
db.update("Student", values, "name = ?", new String[] {"XiaoMing"});
Toast.makeText(MainActivity.this, "更新數據", Toast.LENGTH_SHORT).show();
}
});
//查詢數據
listview = (ListView) findViewById(R.id.listview1);
Button selectBn = (Button) findViewById(R.id.button5);
selectBn.setOnClickListener(new OnClickListener() {
@Override
public void onClick(View v) {
try {
SQLiteDatabase db = sqlHelper.getWritableDatabase();
//游標查詢每條數據
Cursor cursor = db.query("Student", null, null, null, null, null, null);
//定義list存儲數據
List> list = new ArrayList>();
//適配器SimpleAdapter數據綁定
//錯誤:構造函數SimpleAdapter未定義 需把this修改為MainActivity.this
SimpleAdapter adapter = new SimpleAdapter(MainActivity.this, list, R.layout.stu_item,
new String[]{"id", "name", "tel", "height"},
new int[]{R.id.stu_id, R.id.stu_name, R.id.stu_tel, R.id.stu_height});
//讀取數據 游標移動到下一行
while(cursor.moveToNext()) {
Map map = new HashMap();
map.put( "id", cursor.getString(cursor.getColumnIndex("id")) );
map.put( "name", cursor.getString(cursor.getColumnIndex("name")) );
map.put( "tel", cursor.getString(cursor.getColumnIndex("tel")) );
map.put( "height", cursor.getString(cursor.getColumnIndex("height")) );
list.add(map);
}
listview.setAdapter(adapter);
}
catch (Exception e){
Log.i("exception", e.toString());
}
}
});
}
} PS:希望文章對大家有所幫助,文章是關於SQLite的基礎操作,而且沒有涉及到數據庫的觸發器、存儲過程、事務、索引等知識,網上也有很多相關的資料.同時現在有門課程《數據庫高級技術與開發》,故作者當個在線筆記及基礎講解吧!這篇文章有一些不足之處,但作為基礎文章還是不錯的.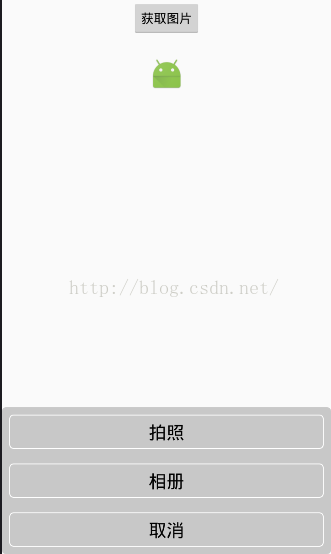 Android中拍照和從相冊選擇圖片,並剪裁(二)
從系統相冊中選擇照片或則調用系統相機。大部分的項目都會用到,我進行了一下封裝,仿ios的效果。效果如下:1、Camera的基類package com.zhang.test
 Android ART運行時無縫替換Dalvik虛擬機的過程分析
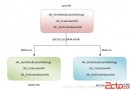
Android 4.4發布了一個ART運行時,准備用來替換掉之前一直使用的Dalvik虛擬機,希望籍此解決飽受诟病的性能問題。老羅不打算分析ART的實現原理,只是很有興趣
 Android入門之TableLayout應用解析(二)
本文在上一篇初步介紹TableLayout常用屬性的基礎上,將進一步介紹如何UI設計器設計TableLayout + TableRow。由於實際應用中,經常需要在代碼裡往
 Android實現button居中的方法
本文實例講述了Android實現button居中的方法。分享給大家供大家參考。具體如下:通過在main.xml 或者其他xml 布局文件中布局Button的時候,選擇An