編輯:關於Android編程
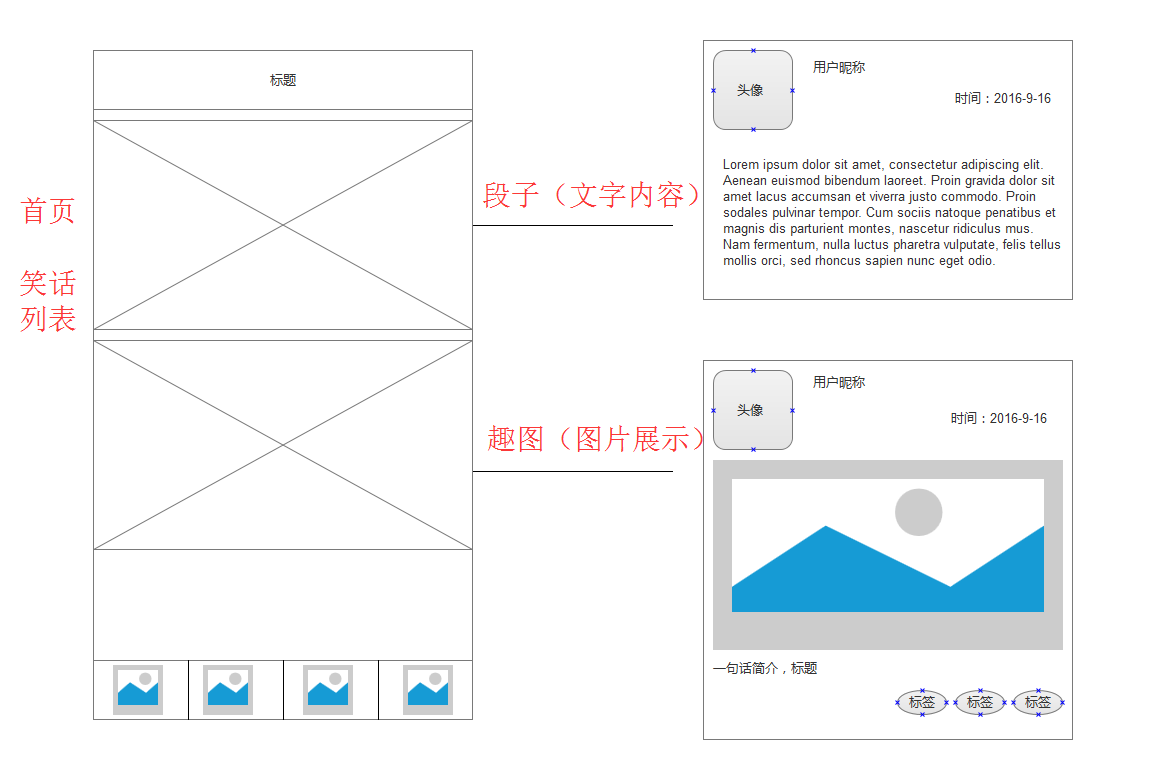
Android自定義View之組合View 前序 設計圖UI效果 實現思路 動手實現 繼承LinearLayout實現外部輪廓 定義各種需要的屬性 初始化View 添加一些必要的接口方法 自定義View完成 自定義View的引用 實現效果圖
最近在開發一款電商類B端APP,比較忙,現在最新版本要上線了。剛好年底才有時間停下來梳理一下自己寫過的東西,順便分享一些出來,拋磚引玉,還請大家不吝賜教。

我們這裡要介紹的就是後面三塊的UI效果實現。可以看到這幾個塊都是類似的,但是如果要一個一個用布局寫出來,不僅工作量大,而且還會造成XML文件代碼冗余、文件臃腫。顯然,我們可以通過自定義View來實現一個塊的效果,然後在需要的地方include進來就好了,代碼也簡潔好看。
最外層布局采用LinearLayout,圖片部分和底部文字部分就可以使用android:layout_weight來控制顯示比例。文字部分也可以使用LinearLayout來布局,設置android:gravity=”center”就好,裡面的TextView就不贅述了。
先寫好XML布局文件,調整好要實現的效果。下面是XML代碼:
新建Java代碼文件RecommendedItem.java繼承LinearLayout,把上面的布局文件使用LayoutInflater加載進來。
public class RecommendedItem extends LinearLayout {
    public static final String TAG = RecommendedItem .class.getSimpleName();

    private Context mContext;
    private boolean isDataSet = false;
    private float titleTextSize, newPriceTextSize, oldPriceTextSize;

    private RemoteImageView mItemCover;
    private TextView mItemTitle, mItemNewPrice, mItemOldPrice;
    private LinearLayout mPriceLayout, mRootLayout;

    public RecommendedItem (Context context) {
        super(context);
        init(context, null);
    }

    public RecommendedItem (Context context, AttributeSet attrs) {
        super(context, attrs);
        init(context, attrs);
    }

    @SuppressLint(NewApi)
    public RecommendedItem (Context context, AttributeSet attrs,
            int defStyle) {
        super(context, attrs, defStyle);
        init(context, attrs);
    }

    private void init(Context context, AttributeSet attrs) {
        mContext = context;   LayoutInflater.from(context).inflate(R.layout.v2_recommended_item, this, true);
    }
}在values文件夾下新建attrs.xml文件,添加我們需要的View屬性。
然後我們就可以在XML文件中引用這些屬性了,在RecommendedItem類的init方法中獲取我們在XML文件中寫的這些屬性的值。
TypedArray array = context.obtainStyledAttributes(attrs, R.styleable.RecommendedItem);
this.titleTextSize = array.getDimension(R.styleable.RecommendedItem_title_textsize, 15);
this.newPriceTextSize = array.getDimension(R.styleable.RecommendedItem_newPrice_textsize, 15);
this.oldPriceTextSize = array.getDimension(R.styleable.RecommendedItem_oldPrice_textsize, 12);
array.recycle(); // 一定要調用,否則這次的設定會對下次的使用造成影響

Log.d(TAG, this.titleTextSize= + this.titleTextSize);
Log.d(TAG, this.newPriceTextSize= + this.newPriceTextSize);
Log.d(TAG, this.oldPriceTextSize= + this.oldPriceTextSize);@Override
protected void onFinishInflate() {
super.onFinishInflate();
this.mItemCover = (RemoteImageView) this.findViewById(R.id.recommended_item_front_cover);
this.mItemTitle = (TextView) this.findViewById(R.id.recommended_item_title);
this.mItemNewPrice = (TextView) this.findViewById(R.id.recommended_item_newprice);
this.mItemOldPrice = (TextView) this.findViewById(R.id.recommended_item_oldprice);
this.mPriceLayout = (LinearLayout) this.findViewById(R.id.recommended_item_price_layout);
this.mRootLayout = (LinearLayout) this.findViewById(R.id.recommended_item_root);
this.mItemTitle.setTextSize(this.titleTextSize);
this.mItemNewPrice.setTextSize(this.newPriceTextSize);
this.mItemOldPrice.setTextSize(this.oldPriceTextSize);
}自定義的View給外部使用提供接口,動態修改它的屬性,實現我們想要的顯示效果。
// 設置點擊事件監聽器
public void setOnClickListener(OnClickListener listener) {
    if(listener != null) {
        this.mRootLayout.setOnClickListener(listener);
    }
}

public void setItemCover(int resId) {
    this.mItemCover.setImageResource(resId);
}

public void setItemCover(String url) {
    this.mItemCover.setImageUrl(url);
}

public void setItemCover(Bitmap bitmap, boolean need2Recycle) {
    this.mItemCover.setImageBitmap(bitmap);
    if(need2Recycle) {
        if(bitmap != null) {
            bitmap = null;
            System.gc();
        }
    }
}

public void loadItemCover(String remoteUrl) {
    UILManager.displayImage(remoteUrl, this.mItemCover, UILManager.optionsPicsPreview);
}

public void setItemTitle(String title) {
    this.mItemTitle.setText(title);
}

public String getItemTitle() {
    if(!TextUtils.isEmpty(this.mItemTitle.getText())) {
        return this.mItemTitle.getText().toString();
    }
    return null;
}

public void setItemNewPrice(String newPrice) {
    this.mItemNewPrice.setText(String.format(mContext.getString(R.string.recommended_item_price_format), newPrice));
}

public void setItemOldPrice(String oldPrice) {
    this.mItemOldPrice.setText(String.format(mContext.getString(R.string.recommended_item_price_format), oldPrice));
    this.mItemOldPrice.getPaint().setFlags(Paint.STRIKE_THRU_TEXT_FLAG);
}

public void setPriceLayoutVisible(boolean visible) {
    if(!visible) {
        this.mPriceLayout.setVisibility(View.GONE);
    } else {
        this.mPriceLayout.setVisibility(View.VISIBLE);
    }
}

public boolean isDataSet() {
    return isDataSet;
}

public void setDataSet(boolean isDataSet) {
    this.isDataSet = isDataSet;
    if(isDataSet && this.mPriceLayout.getVisibility() == View.GONE)
        this.mPriceLayout.setVisibility(View.VISIBLE);
}

public void clearView() {
    this.mItemCover.setImageResource(R.drawable.default_loading);
    this.mItemTitle.setText(null);
    this.mPriceLayout.setVisibility(View.GONE);
}至此,我們根據UI設計圖實現的自定義View就完成,可以方便地在其他任何布局文件中使用了。

 AIDL/IPC Android AIDL/IPC 進程通信機制——超詳細講解及用法案例剖析(播放器)
首先引申下AIDL,什麼是AIDL呢?IPC? ------ Designing a Remote Interface Using AIDL 通常情況下,我們在同一進程內
 android高仿微信拍照、多選、預覽、刪除(去除相片)相冊功能
先聲明授人與魚不如授人與漁,只能提供一個思路,當然需要源碼的同學可以私下有償問我要源碼:QQ:508181017 工作了將近三年時間了,一直沒正兒八
 Android實戰:手把手實現“捧腹網”APP(三)-----UI實現,邏輯實現
APP頁面實現根據原型圖,我們可以看出,UI分為兩部分,底部Tab導航+上方列表顯示。 所以此處,我們通過 FragmentTabHost+Fragment,來實現底部的
 Android響應式編程(一)RxJava前篇[入門基礎]
1.RxJava概述ReactiveX與RxJava在講到RxJava之前我們首先要了解什麼是ReactiveX,因為RxJava是ReactiveX的一種java實現。