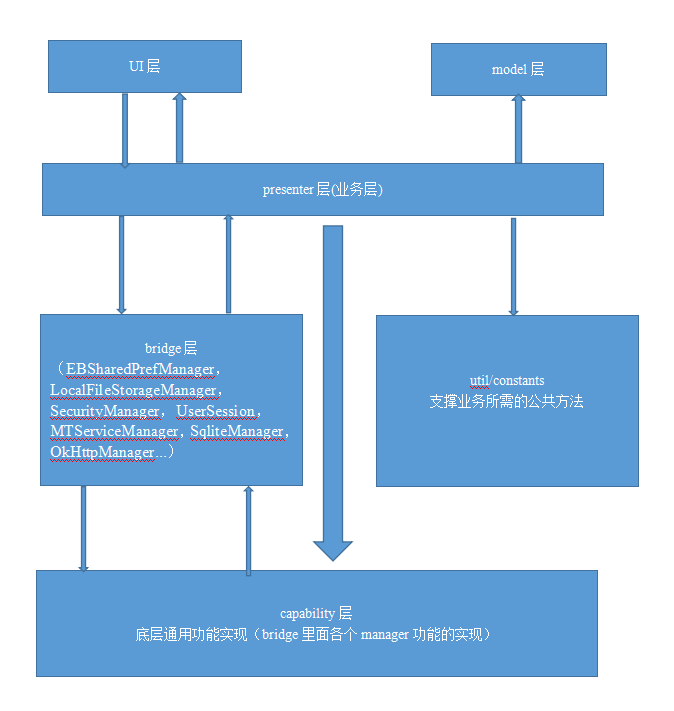
編輯:關於Android編程
android 實現http請求很多種,和服務器對接需要了解
在 Android 下,Android SDK 已經為我們封裝好了整個與 JSON 有關的操作,使用非常方便
直接上代碼
/**
* 發送 http 請求
*
* @param url
*/
@SuppressLint("DefaultLocale")
public int httpResponseCodeJsonPost(String strUrl, String authorization,
String currentSessionId, String ClientId,
PostParameter[] postParams, String httpMethod)
throws SystemException {
int responseCode = -1;
try {
HttpPost request = new HttpPost(strUrl);
JSONObject param = new JSONObject();
for (int j = 0; j < postParams.length; j++) {
param.put(postParams[j].name,
postParams[j].value);//設置參數
}
try {
StringEntity se = new StringEntity(param.toString(),"utf-8");//防止亂碼
request.setEntity(se);
} catch (UnsupportedEncodingException e1) {
// TODO Auto-generated catch block
e1.printStackTrace();
}
request.getParams().setParameter(CoreConnectionPNames.CONNECTION_TIMEOUT, 5000);
request.getParams().setParameter(CoreConnectionPNames.SO_TIMEOUT, 5000);//設置超時
request.setHeader("X-FBox-Session", currentSessionId);
request.setHeader("Authorization", authorization);//設置各種頭
request.setHeader("X-FBox-ClientId", ClientId);
request.setHeader("Content-Type",
"application/json;charset=UTF-8");
// 發送請求
try {
HttpResponse httpResponse = new DefaultHttpClient()
.execute(request);
//String retSrc = EntityUtils.toString(httpResponse.getEntity()); //返回結果
responseCode = httpResponse.getStatusLine().getStatusCode();//返回狀態
} catch (ClientProtocolException e) {
// TODO Auto-generated catch block
e.printStackTrace();
} catch (IOException e) {
// TODO Auto-generated catch block
e.printStackTrace();
}
} catch (JSONException e) {
// TODO Auto-generated catch block
e.printStackTrace();
}
return responseCode;
}
這裡基本包括了全部過程。和一些考慮亂碼問題。
下面一段是普通的http請求
/**
* 發送 http 請求
*
* @param url
*/
@SuppressLint("DefaultLocale")
public int httpResponseCode(String strUrl, String authorization,
String currentSessionId, String ClientId,
PostParameter[] postParams, String httpMethod)
throws SystemException {
int retriedCount;
int retry = 1;
Response res = null;
int responseCode = -1;
for (retriedCount = 0; retriedCount < retry; retriedCount++) {
try {
HttpURLConnection con = null;
OutputStream osw = null;
URL url = new URL(strUrl);
try {
con = (HttpURLConnection) url.openConnection();
con.setDoInput(true);
con.setRequestProperty("Authorization", authorization);
con.addRequestProperty("X-FBox-ClientId", ClientId);
setHeaders(strUrl, postParams, con, httpMethod);
if ("POST".equals(httpMethod) || "PUT".equals(httpMethod)) {// null
// 將當前HTTP請求方式設置為"POST"
con.setRequestMethod(httpMethod);
// 參數值為true時決定著當前鏈接可以進行數據提交工作
con.setRequestProperty("Content-Type",
"application/x-www-form-urlencoded");
con.setDoOutput(true);
String postParam = "";
if (postParams != null) {
postParam = encodeParameters(postParams);
}
byte[] bytes = postParam.getBytes("UTF-8");
// 設置文件長度
con.setRequestProperty("Content-Length",
Integer.toString(bytes.length));
osw = con.getOutputStream();
osw.write(bytes);
osw.flush();
osw.close();
} else {
con.setRequestMethod(httpMethod);
}
con.setConnectTimeout(this.connectionTimeout);
con.setReadTimeout(this.readTimeout);
res = new Response(con);
responseCode = con.getResponseCode();
} finally {
try {
osw.close();
} catch (Exception ignore) {
}
}
} catch (IOException ioe) {
// connection timeout or read timeout
if (retriedCount == 1) {// retryCount
throw new SystemException(ioe.getMessage(), ioe,
responseCode);
}
}
}
return responseCode;
}
這是 application/x-www-form-urlencoded 類型的請求方式。
這裡只是普通的請求http
有時候我們遇到https請求那只要加上下面的
if (url.getProtocol().toLowerCase().equals("https")) {
trustAllHosts();//信任所有
HttpsURLConnection https = (HttpsURLConnection) url
.openConnection();
https.setHostnameVerifier(DO_NOT_VERIFY);
con = https;
} else {
con = (HttpURLConnection) url.openConnection();
}
/**
* 信任所有主機-對於任何證書都不做檢查
*/
@SuppressLint("TrulyRandom")
private static void trustAllHosts() {
// Create a trust manager that does not validate certificate chains
// Android 采用X509的證書信息機制
TrustManager[] trustAllCerts = new TrustManager[] { new X509TrustManager() {
public java.security.cert.X509Certificate[] getAcceptedIssuers() {
return new java.security.cert.X509Certificate[] {};
}
public void checkClientTrusted(X509Certificate[] chain,
String authType) throws CertificateException {
}
public void checkServerTrusted(X509Certificate[] chain,
String authType) throws CertificateException {
}
} };
// Install the all-trusting trust manager
try {
SSLContext sc = SSLContext.getInstance("TLS");
sc.init(null, trustAllCerts, new java.security.SecureRandom());
HttpsURLConnection
.setDefaultSSLSocketFactory(sc.getSocketFactory());
} catch (Exception e) {
e.printStackTrace();
}
}
這樣就可以訪問有證書的https請求
 安卓CountDownTimer實現全民奪寶搶購倒計時和短信驗證碼倒計時
在sina裡看到了什麼全民奪寶的鏈接,然後忍不住1元的誘惑被坑了10多塊,什麼都沒有抽到,但是還是有人抽到了不知道是不是坑爹的,然後也就動手做一下倒計時的功能。先看全民奪
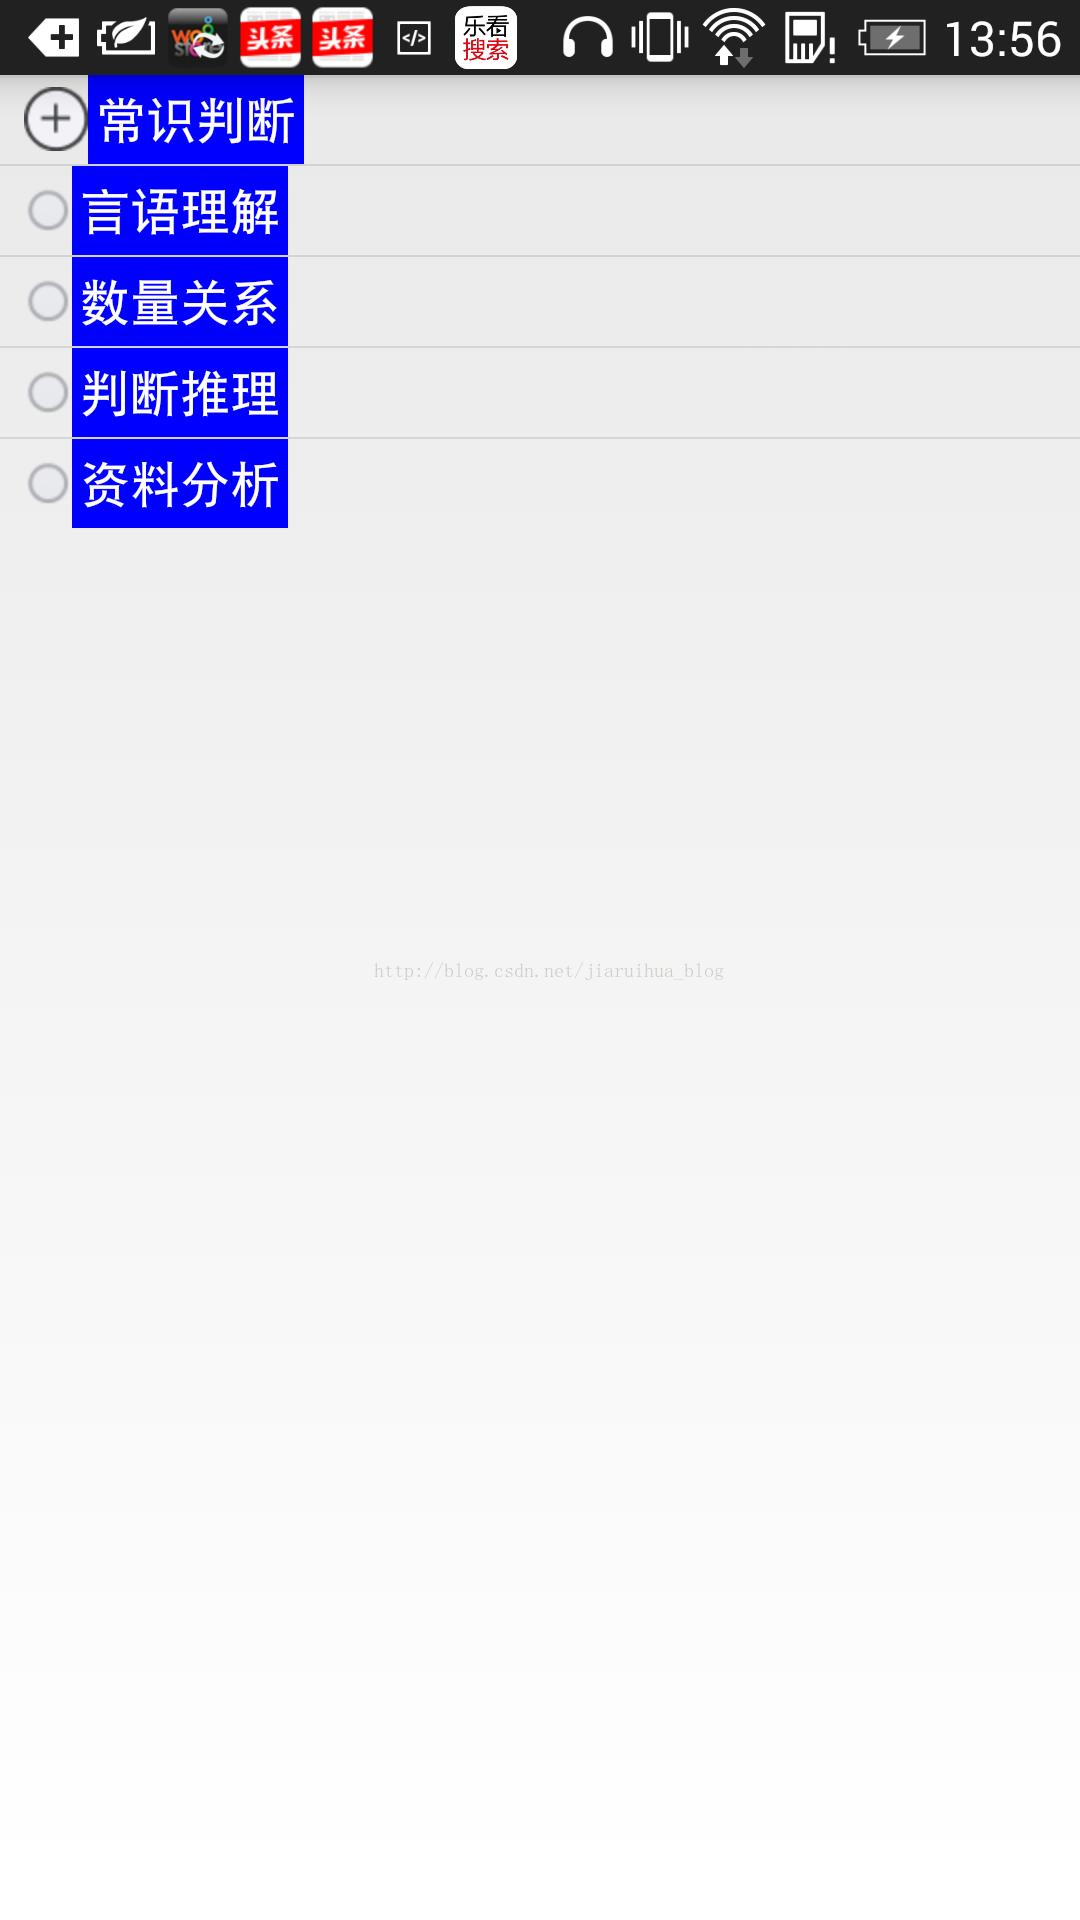 android ListView 實現3級節點 (可拓展N級)
ListView實現二級節點想必大家都知道可以用ExpandableListView 就可以輕松實現,但是要實現3級甚至多級菜單怎麼實現呢? 再利用ExpandableL
 Android開源組件小結
前言 Android自帶的組件比較丑陋(個人感覺),自己寫組件比較復雜,而且必須熟悉android應用層開發的
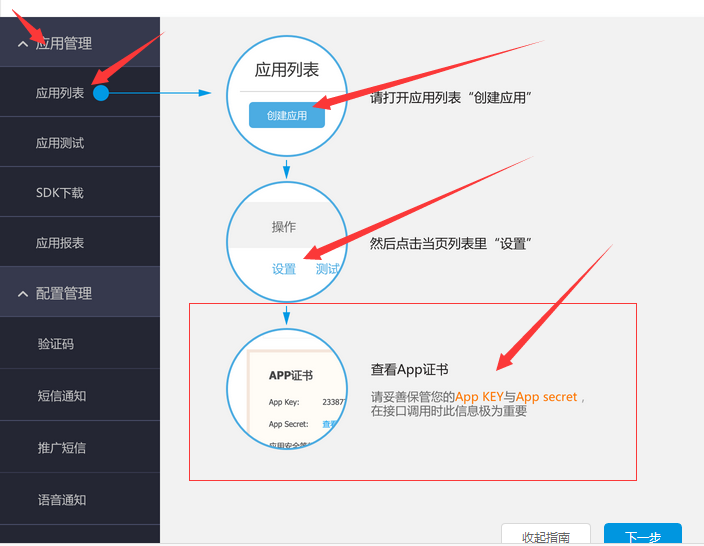 利用阿裡大於平台進行發送手機驗證碼
短信驗證(注冊或改密碼等)首先去登錄阿裡大於: http://www.alidayu.com/沒有號的就注冊一個!用淘寶就可以登錄了,相信一般人都是不需要注冊的。阿裡大於