編輯:關於Android編程
我們平台的build system移植於android,在android組件中,我們使用了Binder驅動,來實現進程間的交互,對於input系統,因為我們將android的java application framework換成了Qt,為了實現更好的圖形渲染,主要是我們需要實現主從設備的顯示屏公用,這樣我們需要將從設備的surface傳輸到主設備的來實現不同設備間的surface合成,來實現主從設備共同顯示。我們使用了Wayland,其自帶input系統。今天我深入android源碼,看看android是怎麼樣來完成input設備的插拔和事件監聽,和事件的分發。
這個我們以4.4.4的源碼為基礎。
一個在先android源碼閱讀網站:androidxref
input相關源碼
/frameworks/native/include/android/
/frameworks/native/include/input/
/frameworks/native/libs/input/
/frameworks/base/services/input/
/frameworks/base/services/java/com/android/server/input/
/frameworks/base/services/jni/
先看這個文件
/frameworks/native/include/android/input.h
這個文件定義了android系統input相關的枚舉值和一些輔助函數。input事件主要分為兩種一種是Key按下抬起事件,另一種是移動事件,比如觸摸屏手勢,TouchPad的Cursor移動。
Input系統分為分為兩個部分,一個是事件的讀取,一個是分發,分別對應/frameworks/base/services/input/InputReader.cpp和/frameworks/base/services/input/InputDispatcher.cpp。他們分別運行在不同的線程。
linux系統input系統,當有輸入設備插拔的時候,會在/dev/input目錄下生成和刪除相應的驅動文件。這裡介紹一個重要的類EventHub,其封裝了事件監聽相關的操作。android使用epoll來實現I/O的事件的監聽,以前我也在博文中介紹過epoll,用於高性能的服務器開發。
   mEpollFd = epoll_create(EPOLL_SIZE_HINT);
    LOG_ALWAYS_FATAL_IF(mEpollFd < 0, "Could not create epoll instance.  errno=%d", errno);

   mINotifyFd = inotify_init();
   int result = inotify_add_watch(mINotifyFd, DEVICE_PATH, IN_DELETE | IN_CREATE);
    LOG_ALWAYS_FATAL_IF(result < 0, "Could not register INotify for %s.  errno=%d",
            DEVICE_PATH, errno);

    struct epoll_event eventItem;
    memset(&eventItem, 0, sizeof(eventItem));
    eventItem.events = EPOLLIN;
  eventItem.data.u32 = EPOLL_ID_INOTIFY;
   result = epoll_ctl(mEpollFd, EPOLL_CTL_ADD, mINotifyFd, &eventItem);
使用inotify來實現/dev/input目錄的監聽,將inotify的句柄加入到epoll的監聽鏈表中實現當設備插拔時的事件監聽。
InputReader在loopOnce中通過調用EventHub的getEvent函數來驅input事件監聽。
設備插拔監聽
在將inotify的id加入epoll時
    struct epoll_event eventItem;
  memset(&eventItem, 0, sizeof(eventItem));
  eventItem.events = EPOLLIN;
   eventItem.data.u32 = EPOLL_ID_INOTIFY;
EPOLL_ID_INOTIFY作為額外參數傳入
這樣
   const struct epoll_event& eventItem = mPendingEventItems[mPendingEventIndex++];
          if (eventItem.data.u32 == EPOLL_ID_INOTIFY) {
             if (eventItem.events & EPOLLIN) {
                 mPendingINotify = true;
              } else {
                  ALOGW("Received unexpected epoll event 0x%08x for INotify.", eventItem.events);
               }
               continue;
            }
根據這個標識我們mPendingINotify置成true,這樣在epell_wait 調用後來執行設備插拔操作
     if (mPendingINotify && mPendingEventIndex >= mPendingEventCount) {
         mPendingINotify = false;
         readNotifyLocked();
            deviceChanged = true;
     }
readNotifyLocked函數去讀取/dev/input目錄下的create和delete的事件。
1462 status_t EventHub::readNotifyLocked() {
1463    int res;
1464    char devname[PATH_MAX];
1465    char *filename;
1466    char event_buf[512];
1467    int event_size;
1468    int event_pos = 0;
1469    struct inotify_event *event;
1470
1471    ALOGV("EventHub::readNotify nfd: %d\n", mINotifyFd);
1472    res = read(mINotifyFd, event_buf, sizeof(event_buf));
1473    if(res < (int)sizeof(*event)) {
1474        if(errno == EINTR)
1475            return 0;
1476        ALOGW("could not get event, %s\n", strerror(errno));
1477        return -1;
1478    }
1479    //printf("got %d bytes of event information\n", res);
1480
1481    strcpy(devname, DEVICE_PATH);
1482    filename = devname + strlen(devname);
1483    *filename++ = '/';
1484
1485    while(res >= (int)sizeof(*event)) {
1486        event = (struct inotify_event *)(event_buf + event_pos);
1487        //printf("%d: %08x \"%s\"\n", event->wd, event->mask, event->len ? event->name : "");
1488        if(event->len) {
1489            strcpy(filename, event->name);
1490            if(event->mask & IN_CREATE) {
1491                openDeviceLocked(devname);
1492            } else {
1493                ALOGI("Removing device '%s' due to inotify event\n", devname);
1494                closeDeviceByPathLocked(devname);
1495            }
1496        }
1497        event_size = sizeof(*event) + event->len;
1498        res -= event_size;
1499        event_pos += event_size;
1500    }
1501    return 0;
1502}
這裡讀出每個事件然後與/dev/input拼接成devicename來,然後根據是插拔來調用打開還是關閉驅動文件。
opendeviceLocked函數根據傳入的設備名,來開發設備,然後實例化一個Device對象,然後通過ioctl調用來獲得設備的各種信息,然後給設備分配一個deviceId,其初始值為1,然後遞加分配。
int32_t deviceId = mNextDeviceId++;
然後是比較重要的一步,就是知道是什麼輸入設備,是KeyBoard,Cursor,單點屏幕,多點屏幕還是joystick。這個很重要,決定了對raw數據的解析和上層將數據作為Key還是Motion處理。這之後還有一些需要處理,比如為KeyBoard配置Key映射表,設備是否有特殊的部分,內核驅動是否KEY支持repeat。
重要的一步
1245    struct epoll_event eventItem;
1246    memset(&eventItem, 0, sizeof(eventItem));
1247    eventItem.events = EPOLLIN;
1248    eventItem.data.u32 = deviceId;
1249    if (epoll_ctl(mEpollFd, EPOLL_CTL_ADD, fd, &eventItem)) {
1250        ALOGE("Could not add device fd to epoll instance.  errno=%d", errno);
1251        delete device;
1252        return -1;
1253    }
將設備加入到epoll中,這樣就能監聽設備操作了,eventItem.data.u32 = deviceId;可以知道那個設備的事件,根據deviceId可以知道那個設備,就知道怎麼對數據進行處理了。
在’InputReadner’中在loopOnce調用了EventHub::getEvents後使用
void InputReader::processEventsLocked(const RawEvent* rawEvents, size_t count) {
311    for (const RawEvent* rawEvent = rawEvents; count;) {
312        int32_t type = rawEvent->type;
313        size_t batchSize = 1;
314        if (type < EventHubInterface::FIRST_SYNTHETIC_EVENT) {
315            int32_t deviceId = rawEvent->deviceId;
316            while (batchSize < count) {
317                if (rawEvent[batchSize].type >= EventHubInterface::FIRST_SYNTHETIC_EVENT
318                        || rawEvent[batchSize].deviceId != deviceId) {
319                    break;
320                }
321                batchSize += 1;
322            }
323#if DEBUG_RAW_EVENTS
324            ALOGD("BatchSize: %d Count: %d", batchSize, count);
325#endif
326            processEventsForDeviceLocked(deviceId, rawEvent, batchSize);
327        } else {
328            switch (rawEvent->type) {
329            case EventHubInterface::DEVICE_ADDED:
330                addDeviceLocked(rawEvent->when, rawEvent->deviceId);
331                break;
332            case EventHubInterface::DEVICE_REMOVED:
333                removeDeviceLocked(rawEvent->when, rawEvent->deviceId);
334                break;
335            case EventHubInterface::FINISHED_DEVICE_SCAN:
336                handleConfigurationChangedLocked(rawEvent->when);
337                break;
338            default:
339                ALOG_ASSERT(false); // can't happen
340                break;
341            }
342        }
343        count -= batchSize;
344        rawEvent += batchSize;
345    }
346}
來處理事件
先來看device add事件
void InputReader::addDeviceLocked(nsecs_t when, int32_t deviceId) {
349    ssize_t deviceIndex = mDevices.indexOfKey(deviceId);
350    if (deviceIndex >= 0) {
351        ALOGW("Ignoring spurious device added event for deviceId %d.", deviceId);
352        return;
353    }
354
355    InputDeviceIdentifier identifier = mEventHub->getDeviceIdentifier(deviceId);
356    uint32_t classes = mEventHub->getDeviceClasses(deviceId);
357    int32_t controllerNumber = mEventHub->getDeviceControllerNumber(deviceId);
358
359    InputDevice* device = createDeviceLocked(deviceId, controllerNumber, identifier, classes);
360    device->configure(when, &mConfig, 0);
361    device->reset(when);
362
363    if (device->isIgnored()) {
364        ALOGI("Device added: id=%d, name='%s' (ignored non-input device)", deviceId,
365                identifier.name.string());
366    } else {
367        ALOGI("Device added: id=%d, name='%s', sources=0x%08x", deviceId,
368                identifier.name.string(), device->getSources());
369    }
370
371    mDevices.add(deviceId, device);
372    bumpGenerationLocked();
373}
這裡從EventHub中獲得這個設備的相關屬性,然後創建一個對應的InputDevice對象。
399InputDevice* InputReader::createDeviceLocked(int32_t deviceId, int32_t controllerNumber,
400        const InputDeviceIdentifier& identifier, uint32_t classes) {
401    InputDevice* device = new InputDevice(&mContext, deviceId, bumpGenerationLocked(),
402            controllerNumber, identifier, classes);
403
404    // External devices.
405    if (classes & INPUT_DEVICE_CLASS_EXTERNAL) {
406        device->setExternal(true);
407    }
408
409    // Switch-like devices.
410    if (classes & INPUT_DEVICE_CLASS_SWITCH) {
411        device->addMapper(new SwitchInputMapper(device));
412    }
413
414    // Vibrator-like devices.
415    if (classes & INPUT_DEVICE_CLASS_VIBRATOR) {
416        device->addMapper(new VibratorInputMapper(device));
417    }
418
419    // Keyboard-like devices.
420    uint32_t keyboardSource = 0;
421    int32_t keyboardType = AINPUT_KEYBOARD_TYPE_NON_ALPHABETIC;
422    if (classes & INPUT_DEVICE_CLASS_KEYBOARD) {
423        keyboardSource |= AINPUT_SOURCE_KEYBOARD;
424    }
425    if (classes & INPUT_DEVICE_CLASS_ALPHAKEY) {
426        keyboardType = AINPUT_KEYBOARD_TYPE_ALPHABETIC;
427    }
428    if (classes & INPUT_DEVICE_CLASS_DPAD) {
429        keyboardSource |= AINPUT_SOURCE_DPAD;
430    }
431    if (classes & INPUT_DEVICE_CLASS_GAMEPAD) {
432        keyboardSource |= AINPUT_SOURCE_GAMEPAD;
433    }
434
435    if (keyboardSource != 0) {
436        device->addMapper(new KeyboardInputMapper(device, keyboardSource, keyboardType));
437    }
438
439    // Cursor-like devices.
440    if (classes & INPUT_DEVICE_CLASS_CURSOR) {
441        device->addMapper(new CursorInputMapper(device));
442    }
443
444    // Touchscreens and touchpad devices.
445    if (classes & INPUT_DEVICE_CLASS_TOUCH_MT) {
446        device->addMapper(new MultiTouchInputMapper(device));
447    } else if (classes & INPUT_DEVICE_CLASS_TOUCH) {
448        device->addMapper(new SingleTouchInputMapper(device));
449    }
450
451    // Joystick-like devices.
452    if (classes & INPUT_DEVICE_CLASS_JOYSTICK) {
453        device->addMapper(new JoystickInputMapper(device));
454    }
455
456    return device;
457}
這邊就知道我們在EventHub裡面添加設備的時候為什麼需要得知設備的相關屬性。這邊為每個設備產生不同的設備的數據處理類。
下面是對設備輸入數據的處理
459void InputReader::processEventsForDeviceLocked(int32_t deviceId,
460        const RawEvent* rawEvents, size_t count) {
461    ssize_t deviceIndex = mDevices.indexOfKey(deviceId);
462    if (deviceIndex < 0) {
463        ALOGW("Discarding event for unknown deviceId %d.", deviceId);
464        return;
465    }
466
467    InputDevice* device = mDevices.valueAt(deviceIndex);
468    if (device->isIgnored()) {
469        //ALOGD("Discarding event for ignored deviceId %d.", deviceId);
470        return;
471    }
472
473    device->process(rawEvents, count);
474}
這邊會根據deviceId來獲得InputDevice對象,使用process來處理這些事件。
952void InputDevice::process(const RawEvent* rawEvents, size_t count) {
953    // Process all of the events in order for each mapper.
954    // We cannot simply ask each mapper to process them in bulk because mappers may
955    // have side-effects that must be interleaved.  For example, joystick movement events and
956    // gamepad button presses are handled by different mappers but they should be dispatched
957    // in the order received.
958    size_t numMappers = mMappers.size();
959    for (const RawEvent* rawEvent = rawEvents; count--; rawEvent++) {
960#if DEBUG_RAW_EVENTS
961        ALOGD("Input event: device=%d type=0x%04x code=0x%04x value=0x%08x when=%lld",
962                rawEvent->deviceId, rawEvent->type, rawEvent->code, rawEvent->value,
963                rawEvent->when);
964#endif
965
966        if (mDropUntilNextSync) {
967            if (rawEvent->type == EV_SYN && rawEvent->code == SYN_REPORT) {
968                mDropUntilNextSync = false;
969#if DEBUG_RAW_EVENTS
970                ALOGD("Recovered from input event buffer overrun.");
971#endif
972            } else {
973#if DEBUG_RAW_EVENTS
974                ALOGD("Dropped input event while waiting for next input sync.");
975#endif
976            }
977        } else if (rawEvent->type == EV_SYN && rawEvent->code == SYN_DROPPED) {
978            ALOGI("Detected input event buffer overrun for device %s.", getName().string());
979            mDropUntilNextSync = true;
980            reset(rawEvent->when);
981        } else {
982            for (size_t i = 0; i < numMappers; i++) {
983                InputMapper* mapper = mMappers[i];
984                mapper->process(rawEvent);
985            }
986        }
987    }
988}
然後使用設備對應的InputMapper們來處理事件。
這裡我們以KEY事件為例子查看KeyboardInputMapper。
最終會調到
void KeyboardInputMapper::processKey(nsecs_t when, bool down, int32_t keyCode, int32_t scanCode, uint32_t policyFlags)
這個方法,其在內部會將其打包成一個NotifyKeyArgs對象,通過注冊下來的監聽類來通知KEY到來。
    NotifyKeyArgs args(when, getDeviceId(), mSource, policyFlags,
          down ? AKEY_EVENT_ACTION_DOWN : AKEY_EVENT_ACTION_UP,
           AKEY_EVENT_FLAG_FROM_SYSTEM, keyCode, scanCode, newMetaState, downTime);
   getListener()->notifyKey(&args);
而這個監聽類就是我們下面說的分發類InputDispatcher,其實現了
InputListenerInterface類的相關接口,比如notifyKey。
在InputDispatcher的notifyKey中,我們根據參數產生一個
KeyEntry然後進隊。
2410        int32_t repeatCount = 0;
2411        KeyEntry* newEntry = new KeyEntry(args->eventTime,
2412                args->deviceId, args->source, policyFlags,
2413                args->action, flags, args->keyCode, args->scanCode,
2414                metaState, repeatCount, args->downTime);
2415
2416        needWake = enqueueInboundEventLocked(newEntry);
這些輸入事件其會放入一個名為mInboundQueue的Queue對象中。
InputDispathcer在獨立的線程運行。
4465bool InputDispatcherThread::threadLoop() {
4466    mDispatcher->dispatchOnce();
4467    return true;
4468}
其會不停的調用dispatchOnce,就像InputReader不停調用loopOnce一樣。
(1)dispatchOnce
(2)dispatchOnceInnerLocked,出隊一個mPendingEvent = mInboundQueue.dequeueAtHead()
(3)dispatchKeyLocked
(4)dispatchEventLocked
(5)prepareDispatchCycleLocked
(6)enqueueDispatchEntriesLocked
(7)startDispatchCycleLocked,這樣完成了一個事件的派發。
InputManager實現對reade和dispatcher的線程的管理。
下面一篇將講java層和c++層的關於事件分發,以及事件怎麼發送到application和Window。
 Android開發筆記(一百二十)兩種側滑布局
SlidingPaneLayoutSlidingPaneLayout是Android在android-support-v4.jar中推出的一個可滑動面板的布局,我們提到水
 Android 輸入法 微信公眾號搜索定制版
1. 一個簡單的Android 輸入法(1) 使用Android Studio建立一個沒有Activity的項目,對於一個簡單的輸入法而言,MainActivity並不是
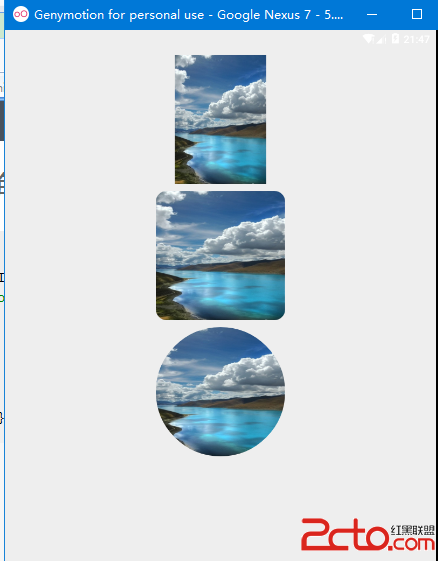 安卓圖片加載之使用universalimageloader加載圓形圓角圖片
前言話說這universalimageloader加載圖片對搞過2年安卓程序都是用爛了再熟悉不過了,就是安卓新手也是百度就會有一大堆東西出來,今天為什麼這裡還要講使用un
 Android官方開發文檔之從Eclipse遷移到Android Studio開發篇
1、前言從Eclipse遷移項目到Android Studio需要適應一個新的項目結構,建立系統和IDE的功能。為了簡化遷移過程,Android Studio提供了重要工