編輯:關於Android編程
這兩天在回顧Android Service方面的知識,趁著記憶沒有消退之前,來總結一下。本文主要講解Service的基本概念與使用、跨進程調用Service、系統常見Service的使用。所以本文的難度微乎其微,僅適用於想回顧Service知識點的同學,或者還不怎麼了解Service的同學,至於Service源碼之類的東東,等老夫分析研究之後再來分享。
一、Service基礎
我相信只要接觸過Android開發的人,都或多或少的了解過Service。Service是什麼呢?Service是Android四大組件中與Activity最相似的組件,它完全具有自己的生命周期,不過它可沒有和Activity一樣的華麗外表,它常年在後台默默付出。Service也是可執行的程序,前面說了它有自己的生命周期,其創建於配置過程與Activity極其相似。不僅如此,Activity與Service還有共同的父親Context,因此它們都可以調用Context裡定義的如getResources()、getContentResolver()等方法。
1、Service的簡單使用:
開發Service需要兩個步驟:(1)定義一個繼承Service的子類。(2)在AndroidManifest.xml文件中配置該Service。
在動手開發第一個Service之前,我們先來了解一下Service的系列生命周期方法:
(1)IBinder onBind(Intent intent):該方法是Service子類必須實現的方法。該方法返回一個IBinder對象,應用程序可通過該對象與Service組件通信。
(2)void onCreate():當該Service第一次被創建後將立即回調該方法。
(3)void onDestroy():當該Service被關閉之前將會回調該方法。
(4)void onStartCommand(Intent intent,int flags,int startId):該方法的早期版本是void onStart(Intent intent,int startId),每次客戶端調用startService(Intent)方法啟動該Service 時都會回調該方法。
(5)boolean onUnbind(Intent intent):當該Service上綁定的所有客戶端都斷開連接時將會回調該方法。
下面我們來開發我們的第一個Service,代碼如下:
package com.gc.servicetest;

import android.app.Notification;
import android.app.PendingIntent;
import android.app.Service;
import android.content.Intent;
import android.os.Binder;
import android.os.IBinder;
import android.util.Log;
/**
 * 注意: onCreate()方法只會在Service第一次被創建的時候調用,如果當前Service已經被創建過了,
 * 不管怎樣調用startService方法,onCreate()方法都不會再執行。
 * @author Android將軍
 *
 */
public class MyService extends Service{

	public static final String TAG=MyService.class.getSimpleName();
	//必須要實現的方法
	@Override
	public IBinder onBind(Intent intent) {
		// TODO Auto-generated method stub
		Log.v(TAG, onBind() executed);
		return null;
	}
      //Service被創建時回調該方法
	@Override
	public void onCreate() {
		// TODO Auto-generated method stub
		super.onCreate();
		Log.v(TAG, onCreate() executed);
		Log.v(TAG, MyService thread id is +Thread.currentThread().getId());


	}
       //Service被啟動時回調該方法
	@Override
	public int onStartCommand(Intent intent, int flags, int startId) {
		// TODO Auto-generated method stub
		Log.v(TAG, onStartCommand() executed);
		return super.onStartCommand(intent, flags, startId);
	}
       //Service被關閉之前回調該方法
	@Override
	public void onDestroy() {
		// TODO Auto-generated method stub
		super.onDestroy();
		Log.v(TAG, onDestroy() executed);
	}


}
上面這個Service什麼也沒干——它只是重寫了Service組件的onCreate()、onStartCommand()、onDestroy()、onBind()等方法。如果希望Service組件做某些事情,那麼只要在onCreate()或onStartCommand()方法中定義相關業務代碼即可。開發Service的兩個步驟,我們現在已經走完了第一個步驟,下面我們一起走第二步吧。第二步很簡單,在AndroidManifest.xml配置Service與在該文件中配置Activity是一樣的,只不過標簽一個是
當兩個步驟走完,我們已經開發出了一個Service組件,接下來就可在程序中運行該Service了,Android系統中運行Service有兩種方式,如下:
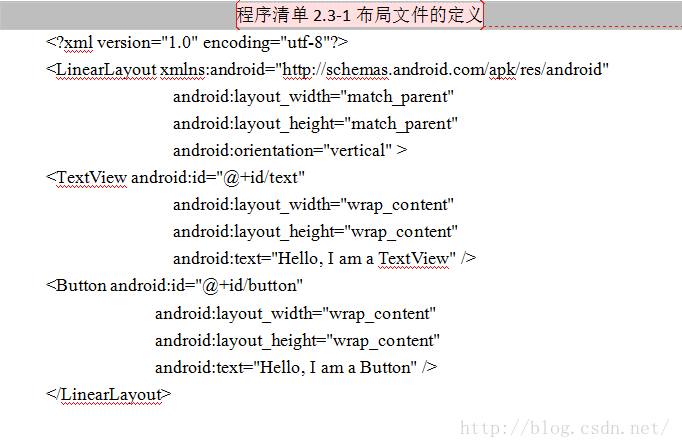
下面我們就來看看如何使用這兩種方式來啟動我們剛剛開發的Myservice,我們使用Activity作為Service的訪問者,該Activity的界面中包含四個按鈕,由於代碼簡單,這裡就不再給出其布局文件,下面直接看一下MainActivity的代碼,如下
package com.gc.servicetest;

import com.gc.servicetest.MyService.MyBinder;

import android.app.Activity;
import android.content.ComponentName;
import android.content.Intent;
import android.content.ServiceConnection;
import android.os.Bundle;
import android.os.IBinder;
import android.util.Log;
import android.view.Menu;
import android.view.MenuItem;
import android.view.View;
import android.view.View.OnClickListener;
import android.widget.Button;
/**
 *
 * @author Android將軍
 *
 */
public class MainActivity extends Activity implements OnClickListener {

    public static final String TAG=MainActivity.class.getSimpleName();
    private Button mBtnStartService;
    private Button mBtnStopService;
    private Button mBtnBindService;
    private Button mBtnUnBindService;
    private MyService.MyBinder myBinder;

    private ServiceConnection connection=new ServiceConnection() {

		@Override
		public void onServiceDisconnected(ComponentName name) {
			// TODO Auto-generated method stub
			Log.v(TAG, onServiceDisconnected() executed);
			Log.v(TAG, onServiceDisconnected() executed name+name);

		}

		@Override
		public void onServiceConnected(ComponentName name, IBinder service) {
			// TODO Auto-generated method stub
			Log.v(TAG, onServiceConnected() executed);
			Log.v(TAG, onServiceConnected() executed name+name);
			myBinder=(MyBinder) service;
			myBinder.startDownload();
		}
	};
	@Override
    protected void onCreate(Bundle savedInstanceState) {
        super.onCreate(savedInstanceState);
        setContentView(R.layout.activity_main);
        initUI();
        setListener();
        Log.v(TAG, MainActivity thread id is +Thread.currentThread().getId());
    }
	public void initUI()
	{
		mBtnStartService=(Button) findViewById(R.id.start_service);
		mBtnStopService=(Button) findViewById(R.id.stop_service);
		mBtnBindService=(Button) findViewById(R.id.bind_service);
		mBtnUnBindService=(Button) findViewById(R.id.unbind_service);

	}
	public void setListener()
	{
		mBtnStartService.setOnClickListener(this);
		mBtnStopService.setOnClickListener(this);
		mBtnBindService.setOnClickListener(this);
		mBtnUnBindService.setOnClickListener(this);

	}
	@Override
	public void onClick(View v) {
		// TODO Auto-generated method stub
		switch (v.getId()) {
		case R.id.start_service:
			Intent mStartIntent=new Intent(this, MyService.class);
			startService(mStartIntent);

			break;

		case R.id.stop_service:
			Intent mStopIntent=new Intent(this, MyService.class);
			stopService(mStopIntent);
			break;
		case R.id.bind_service:
			Intent mBindIntent=new Intent(this, MyService.class);
			bindService(mBindIntent, connection, BIND_AUTO_CREATE);
			break;
		case R.id.unbind_service:
			unbindService(connection);
			break;


		default:
			break;
		}
	}

}
到此為止,我們已經寫好了一個帶有Service功能的程序。然後我們運行程序,點擊Start Service按鈕,然後點擊Stop Service按鈕,可以看到如下打印結果:
如果在不關閉Service的情況下,連續點擊三次Start Sevice 按鈕,程序將會連續三次啟動Service,打印信息如下:

從上述兩種不同的操作以及打印信息,我們驗證了前面MyService注釋部分注意的內容的正確性,如下:
onCreate()方法只會在Service第一次被創建的時候調用,如果當前Service已經被創建過了, 不管怎樣調用startService方法,onCreate()方法都不會再執行。
現在我們已經了解了第一種方式,那麼我接下來看看第二種方式:
public class MyService extends Service{

	public static final String TAG=MyService.class.getSimpleName();
	private MyBinder mBinder=new MyBinder();
	@Override
	public IBinder onBind(Intent intent) {
		// TODO Auto-generated method stub
		Log.v(TAG, onBind() executed);
		return mBinder;
	}
	@Override
	public void onCreate() {
		// TODO Auto-generated method stub
		super.onCreate();
		Log.v(TAG, onCreate() executed);
		Log.v(TAG, MyService thread id is +Thread.currentThread().getId());


	}
	@Override
	public int onStartCommand(Intent intent, int flags, int startId) {
		// TODO Auto-generated method stub
		Log.v(TAG, onStartCommand() executed);
		return super.onStartCommand(intent, flags, startId);
	}
	@Override
	public void onDestroy() {
		// TODO Auto-generated method stub
		super.onDestroy();
		Log.v(TAG, onDestroy() executed);
	}
	class MyBinder extends Binder
	{
		public void startDownload()
		{
			Log.v(TAG, startDownload() executed);
		}
	}


}
在進行操作之前,我們先了解一下bindService方法:
 public boolean bindService(Intent service, ServiceConnection conn,
            int flags) {
        return mBase.bindService(service, conn, flags);
    }
這裡解釋一下該方法的三個參數:conn:該參數是一個ServiceConnection對象,該對象用於監聽訪問者與Service之間的連接情況。當訪問者與Service之間連接成功時將回調該ServiceConnecttion對象的onServiceConnected(ComponentName name,IBinder service)方法;當Service所在的宿主進程由於異常終止或由於其他原因終止,導致該Service與訪問者之間斷開連接時回調該ServiceConnection對象的onServiceDisconnected(ComponentName name)方法。
注意:當調用者主動通過unBindService()方法斷開與Service的連接時,ServiceConnection對象的onServiceDisconnected(ComponentName name)方法並不會被調用。
flags:指定綁定時是否自動創建Service(如果Service還未創建)。該參數可指定為0(不自動創建)或BIND_AUTO_CREATE(自動創建)。
注意到ServiceConnection對象的onServiceConnected方法中有一個IBinder對象,該對象即可實現與被綁定Service之間的通信。
額,啰嗦了這麼多,是不是有點暈了,咱們看看第二種方式啟動MyService的執行效果吧,運行程序,點擊Bind Service,然後點擊unBind Service,打印信息如下:
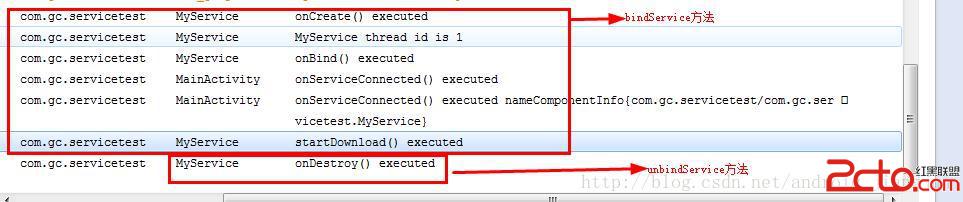
通過上圖我們可以看到,MainActivity已經成功的和MyService進行了通信。我們在MainActivity的成員對象connection的onServiceConnected的方法中調用了startDownload()方法。
下面我們來總結一下:
開發Service需要兩個步驟:(1)定義一個繼承Service的子類。(2)在AndroidManifest.xml文件中配置該Service。
啟動Service有兩種方式:(1)startService方法(2)bindService方法
通過startService方式啟動Service,Service與訪問者之間的基本上沒有太大的關聯。通過bindService方式啟動Service,可以實現Service與訪問者之間的通信。那麼當通過bindService啟動Service時,是如何進行通信的呢?我們按照本案例分析一下,當我們開發MyService類時,我們必須實現的方法是IBinder onBinder(Intent intent),當我們通過bindService方法啟動MyService時,我們已經把MainActivity與MyService綁定在一起了,這時MyService方法的onBind方法所返回的IBinder對象將會傳給MainActivity的成員connection裡的onServiceConnected(ComponentName name,IBinder service)方法的service參數,這樣MainActivity就可通過該IBinder對象與MyService進行通信了。
細心的通信會發現,通過startService啟動Service時,調用了onStartCommand方法,而通過bindService方法啟動Service時,並沒有調用onStartCommand方法,這是為什呢?這是因為兩種方式啟動Service,導致Service的生命周期略有不同。在下一篇的Service的生命周期中,我會講述清楚。
好了,BB了這麼多,我想對於Service的基礎知識應該差不多了,我會在文章末尾提供該Demo的下載地址,如果對你有幫助可以稍微頂一下奧,如果文中有哪裡不正確,歡迎指出,如果還有疑問之處,或者我沒有闡述清楚的地方,請留言指出,謝謝。
 Android Notification通知解析
Notification是顯示在手機狀態欄的通知,Notification通知是具有全局性的通知,一般通過NotificationManager來進行管理.一般運用Not
 Android項目實戰(二十八):使用Zxing實現二維碼及優化實例
前言:多年之前接觸過zxing實現二維碼,沒想到今日項目中再此使用竟然使用的還是zxing,百度之,竟是如此牛的玩意。當然,項目中我們也許只會用到二維碼的掃描和生成兩個功
 Android 組件ContentProvider
Android 組件ContentProviderAndroid的數據存儲有五種方式Shared Preferences、網絡存儲、文件存儲、外儲存儲、SQLite,一般
 學習Android自定義Spinner適配器
本文為大家分享Android自定義Spinner適配器的相關知識點,供大家參考,具體內容如下一、大致效果二.關鍵代碼在注釋中講重點吧。 (1)Spinner的布局: ca