編輯:關於Android編程
Android 組件ContentProvider
Android的數據存儲有五種方式Shared Preferences、網絡存儲、文件存儲、外儲存儲、SQLite,一般這些存儲都只是在單獨的一個應用程序之中達到一個數據的共享,有時候我們需要操作其他應用程序的一些數據,例如常見系統裡的通訊錄,短信,照片等等,所以雲存儲,通訊錄,艷照門等等就孕育而生了。ContentProvider可以理解成內容提供者,也可以理解為一個接口,就是提供了一個供外部訪問的接口,有的時候需要進行權限控制。
ContentProvider向我們提供了我們在應用程序之前共享數據的一種機制,而我們知道每一個應用程序都是運行在不同的應用程序的,不同程序的之間數據共享是現實的需要,程序總不能使閉環的,Android中的ContentProvider外共享數據的好處是統一了數據的訪問方式。簡單總結說下:
ContentProvider為存儲和獲取數據提供了統一的接口。ContentProvide對數據進行封裝,不用關心數據存儲的細節。使用表的形式來組織數據。使用ContentProvider可以在不同的應用程序之間共享數據。 Android為常見的一些數據提供了默認的ContentProvider(包括音頻、視頻、圖片和通訊錄等)。說到了ContentProvider這麼多好處,不能不說下Uri(Universal Resource Identifier)注意不是URL,通用資源標識符,看個簡單的讀取聯系人的Uri,content://contacts/people,
content://是前綴,固定的;contacts 主機名(或叫Authority)用於唯一標識這個ContentProvider,外部調用者可以根據這個標識來調用;people 路徑(path)表示我們要操作的數據,路徑的構建根據業務而定;俗話說,欲善其事必先利其器,想要成為一個內容提供者,就先需要有數據,先建立一個SqlDbConncetion:
view sourceprint?01.public class SqlDBConnection extends SQLiteOpenHelper { 02. 03.private static final String DbName ="Book.db"; 04.private static int version=1; 05. 06.public SqlDBConnection(Context context) { 07.super(context, DbName, null, version); 08.} 09. 10.@Override 11.public void onCreate(SQLiteDatabase db) { 12.// TODO Auto-generated method stub 13.String sqlString="create table Book (id integer primary key autoincrement,Name nvarchar(200),Title nvarchar(200))"; 14.db.execSQL(sqlString); 15.} 16. 17.@Override 18.public void onUpgrade(SQLiteDatabase db, int oldVersion, int newVersion) { 19.// TODO Auto-generated method stub 20.} 21.}
上篇文章講的junit測試這個時候可以拿過來使用一下初始化下數據:
view sourceprint?01.public class BookCase extends AndroidTestCase { 02. 03.public void Intial() { 04.SqlDBConnection dbConnection = new SqlDBConnection(getContext()); 05.SQLiteDatabase sqlDataBase = dbConnection.getWritableDatabase(); 06.long row = 0; 07.for (int i = 0; i < 5; i++) { 08.ContentValues values = new ContentValues(); 09.values.put("Name", "書籍"+i); 10.values.put("Title", "標題" + i); 11.row = sqlDataBase.insert("Book", null, values); 12.Log.i("BookCase", "插入成功:" + row); 13.} 14.} 15.}
前面是基礎工作,這個時候就可以建立一個自己的ContentProvider:
expand source主機名是需要自己去AndroidManifest.xml文件中自己配置的,要求是唯一的,最好是用包名就好:
view sourceprint?1."com.example.googlecontentprovider.MyContentProvider" 2.android:authorities="com.example.googlecontentprovider.MyContentProvider"> 如果覺得上面的那一串代碼不是很好理解,下面調用的時候我會分別解釋。
ContentResolver的使用方法寫在一個應用程序中調用屬於正常,在另外一個程序中調用該程序的方法就是類似於接口了,下面先看原來初始化的數據:
重新新建一個Android測試項目,定義為BookCase,首先插入數據,定義一個Uri,這裡面主機名就是上面定義的包名,book/insert與CONTENT_INSERT是對應的:
view sourceprint? 01.public void bookInsert() { 02.Uri uri = Uri 03..parse("content://com.example.googlecontentprovider.MyContentProvider/book/insert"); 04.ContentResolver resolver = getContext().getContentResolver(); 05.ContentValues values = new ContentValues(); 06.values.put("Name", "書籍5"); 07.values.put("Title", "標題5"); 08.uri = resolver.insert(uri, values); 09.Log.i("BookCase", "Uri" + uri); 10.long id = ContentUris.parseId(uri); 11.Log.i("BookCase", "測試成功" + id); 12.}
顯示結果如下:
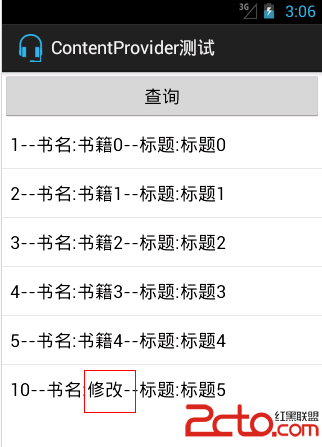
然後更新剛才插入的數據,同樣的更具Code給Uri賦值,然後初始化一個ContentResolver,調用update方法:
view sourceprint? 01.public void bookUpdate() { 02.Uri uri = Uri 03..parse("content://com.example.googlecontentprovider.MyContentProvider/book/update"); 04.ContentResolver resolver = getContext().getContentResolver(); 05.ContentValues values=new ContentValues(); 06.values.put("Name", "修改"); 07.int count = resolver.update(uri, values, " id=?",new String[]{"10"}); 08.Log.i("BookCase", "更新了" + count + "行"); 09.}
結果如下:
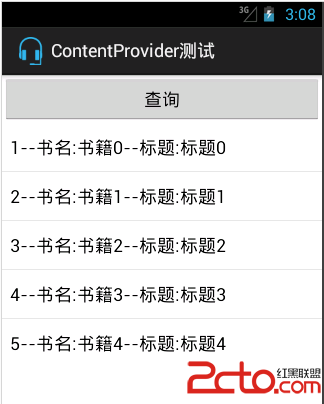
刪除插入的數據:
view sourceprint? 01.public void bookDelete() { 02.Uri uri = Uri 03..parse("content://com.example.googlecontentprovider.MyContentProvider/book/delete"); 04.ContentResolver resolver = getContext().getContentResolver(); 05.String where =" id=?"; 06.String[] argString = {"10"}; 07.int count = resolver.delete(uri, where, argString); 08.Log.i("BookCase", "刪除了" + count + "行"); 09.}
結果如下:
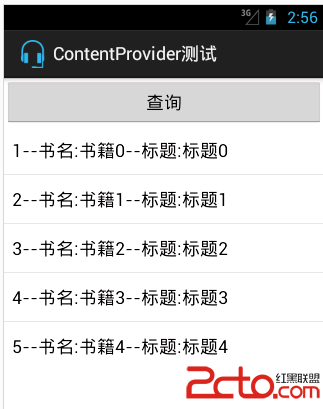
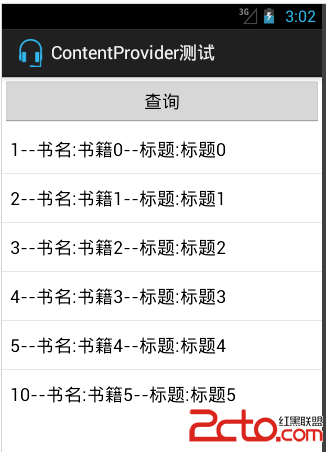
查詢所有的數據:
view sourceprint? 01.public void bookQuery() { 02.Uri uri = Uri 03..parse("content://com.example.googlecontentprovider.MyContentProvider/book/query"); 04.ContentResolver resolver = getContext().getContentResolver(); 05.Cursor cursor=resolver.query(uri, new String[]{"id","Name","Title"}, null, null, null); 06.if (cursor.getCount()>0) { 07.while (cursor.moveToNext()) { 08.int id=cursor.getInt(cursor.getColumnIndex("Id")); 09.String nameString=cursor.getString(cursor.getColumnIndex("Name")); 10.String titleString=cursor.getString(cursor.getColumnIndex("Title")); 11.Log.i("BookCase", id+"---"+nameString+"---"+titleString); 12.} 13.} 14. 15.}
Log下的記錄:

查詢單條記錄:
view sourceprint? 01.public void bookQuerySingle() { 02.Uri uri = Uri 03..parse("content://com.example.googlecontentprovider.MyContentProvider/book/query"); 04.ContentResolver resolver = getContext().getContentResolver(); 05.uri=ContentUris.withAppendedId(uri,1); 06.Cursor cursor=resolver.query(uri, new String[]{"id","Name","Title"}, null, null, null); 07.if (cursor.getCount()>0) { 08.while (cursor.moveToNext()) { 09.int id=cursor.getInt(cursor.getColumnIndex("Id")); 10.String nameString=cursor.getString(cursor.getColumnIndex("Name")); 11.String titleString=cursor.getString(cursor.getColumnIndex("Title")); 12.Log.i("BookCase", id+"---"+nameString+"---"+titleString); 13.} 14.} 15.}
結果如圖:

 Android Mms之:短信發送流程(圖文詳解)
信息的發送,對於Mms應用程序來講主要就是在信息數據庫中創建並維護一條信息記錄,真正的發送過程交由底層(Frameworks層)函數來處理。總體的來講,當信息創建完成後,
 Android-async-http封裝網絡請求框架源碼分析
Android-async-http開源項目可以是我們輕松的獲取網絡數據或者向服務器發送數據,使用起來非常簡單, 這個網絡請求庫是基於Apache HttpClient庫
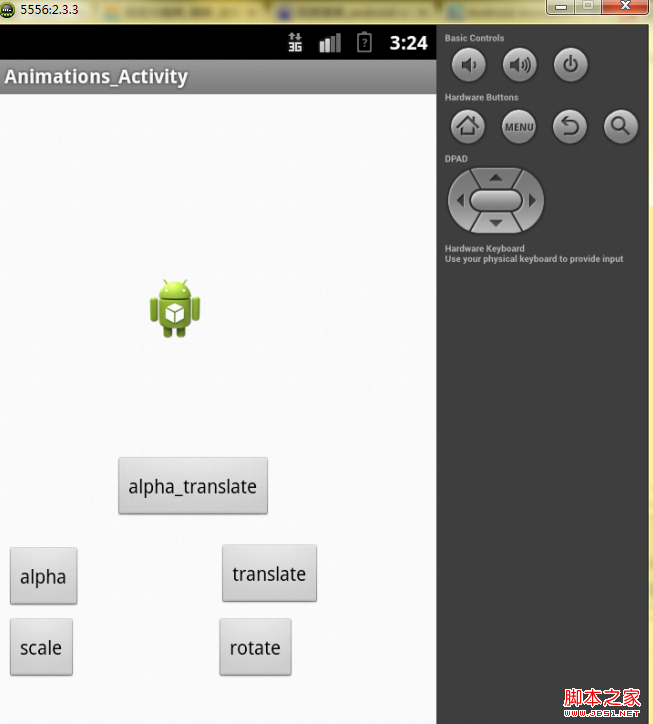 Android開發之圖形圖像與動畫(二)Animation實現圖像的漸變/縮放/位移/旋轉
Android 平台提供了兩類動畫。 一類是Tween動畫,就是對場景裡的對象不斷的進行圖像變化來產生動畫效果(旋轉、平移、放縮和漸變)。 下面就講一下Tweene An
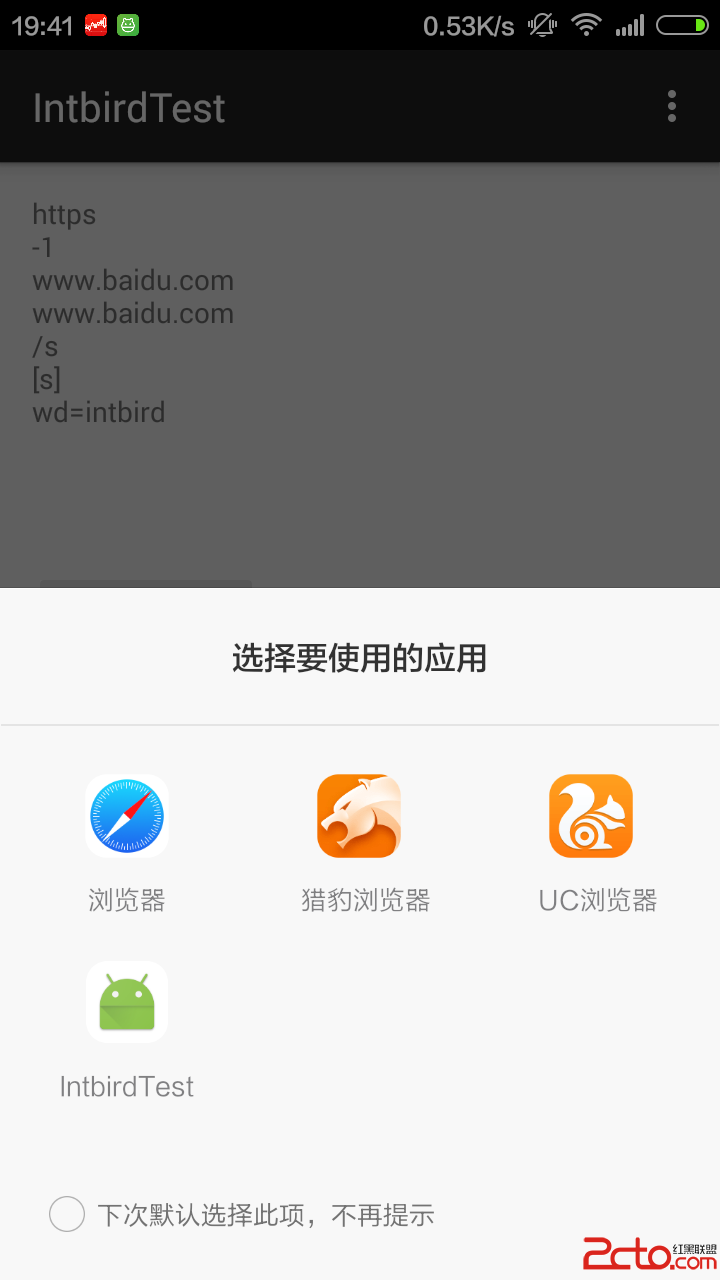 android:android Intent and IntentFilter
1,intentfilter說明:如果說是將一個activity有其他應用打開,或者是在webView 或者 bybird app中調用我們自己的activi