編輯:關於Android編程
一款軟件就像一個孩子,不斷的在學習,在探索,當孩子犯下錯誤的時候,我們可以去包容,當孩子犯不改的時候,獲取他就不再讓人喜歡,甚至是去拋棄他。人之常情的問題,也是做軟件的我們需要去考慮的問題。同樣孩子的成長速度和懂事程度也是我們非常關注的。
本章講述Android日志上傳功能,更快的更准確的將孩子的錯誤通知給我們,我們幫助孩子改正它的錯誤。

    public static void record(Context context, String ex) {
        if (context == null) {
            return;
        }
        PrintStream printStream = null;
        ByteArrayOutputStream bos = null;

        try {
            bos = new ByteArrayOutputStream(256);
            printStream = new PrintStream(bos);
            printStream.print(ex);
            JSONObject createJson = createJson(context, new String(bos.toByteArray()));//(1)做json
            DBManager.getInstance(context).addCrashLog(createJson.toString());//(2)存儲數據信息
            Prefs.setPrefBoolean(PrefsContants.IS_NEEDED_UPLOAD, true));
        } catch (Exception e) {
            Log.e("CrashUploadUtils", "writeLog", e);
        } finally {
            closeQuietly(printStream);//(3)
            closeQuietly(bos);
        }
    }
由上面代碼可以看出我們將數據字符串傳入統計記錄後,首先做成json數據,如步驟(1);其次將數據存入數據庫,如步驟(2);最後關閉我們的數據流,如步驟三。
(1)做成json數據
    private static JSONObject createJson(Context context, String log) {
        JSONObject object = null;
        try {
            object = new JSONObject();
            object.put("type", "crash");
            JSONObject data = new JSONObject();
            data.put("log", log);
            data.put("uk", AccountManager.getUK(context));
            data.put("version", IMManager.getVersion());
            data.put("trigger_id", Utility.getTriggerId(context));
            if (!TextUtils.isEmpty(android.os.Build.VERSION.RELEASE)) {
                data.put("os", android.os.Build.VERSION.RELEASE);
            }
            if (!TextUtils.isEmpty(android.os.Build.MODEL)) {
                data.put("device_model","mode" + android.os.Build.MODEL);
            }
            if (!TextUtils.isEmpty(android.os.Build.MANUFACTURER)) {
                data.put("manufacture",android.os.Build.MANUFACTURER);
            }
            object.put("data", data);
            object.put("ts", System.currentTimeMillis());

        } catch (JSONException e) {
            Log.e("CrashUploadUtils", "createJson", e);
        }

        return object;
    }
內容這裡可以忽略,自己放入就好。
(2)添加數據庫
    public void addCrashLog(String log) {
        synchronized (mSyncLock) {
            ContentValues values = new ContentValues();
            values.put(CrashLogColumns.COLUMN_COTENT, log);
            insert(TableDefine.DB_TABLE_CRASH_LOG, values);
        }
    }
其中insert函數,讀者要自己寫了。
(3)關閉數據流
    private static void closeQuietly(OutputStream os) {
        if (os != null) {
            try {
                os.close();
            } catch (IOException e) {
                Log.e("CrashUploadUtils", "closeQuietly", e);
            }
        }
    }
上面我們完成了,日志的統計和信息的存儲,其中日志的存儲看上面添加數據庫的過程。
日志上傳是該功能的關鍵步驟,涉及的問題有:怎麼上傳,什麼時候上傳,什麼網絡環境下上傳?
日志上傳功能
    private static void upLoad(Context context) {
        Pair log = getCrashLog(context);//1獲取數據庫中異常信息
        if (log == null || log.first < 0) {
            return;
        }
        StringBuilder builder = new StringBuilder();
        builder.append("device_id=" + Utility.getDeviceType(context));
        builder.append("&appid=" + AccountManager.getAppid(context));
        builder.append("&statistic=" + log.second.toString());
        String jsonResult = null;
        try {//2上傳異常信息
            jsonResult = HttpUtility.doUploadPost(url, builder.toString().getBytes("utf-8"));
        } catch (UnsupportedEncodingException e) {
            Log.e("CrashUploadUtils", "upLoadCrash UnsupportedEncodingException", e);
        }
        if (jsonResult == null) {
            Log.e("CrashUploadUtils", "upload crash log failed!!");
            return;
        }

        try {
            JSONObject jsonObject = new JSONObject(jsonResult);
            int errorCode = jsonObject.optInt("err_code");
            String msg = jsonObject.optString("msg");//根據網絡結果刪除已經上傳過的信息,並更新上傳記錄時間
            if (errorCode == OK) {//3刪除上傳過的信息
                int result = DBManager.getInstance(context).deleteLogBeforeId(log.first);
                if (result > 0) {//4更新上傳時間
                    updateUploadTime(context, System.currentTimeMillis());
                }
            }
        } catch (JSONException e) {
            Log.e("CrashUploadUtils", "upLoadCrash JSONException", e);
        }
    }
(1)獲取數據庫中異常信息
    public static Pair getCrashLog(Context context) {
        return DBManager.getInstance(context).getLog();
    }

    public Pair getLog() {
        synchronized (mSyncLock) {
            CrashLogParse parse = new CrashLogParse();
            query(TableDefine.DB_TABLE_CRASH_LOG, null, null, null, null, null, CrashLogColumns._ID + " asc ", " 10 ",
                    parse);
            return parse.getResult();
        }
    }

    class CrashLogParse implements CursorParse {
        Pair result = null;

        @Override
        public void parseCursor(Cursor cursor) {
            if (cursor != null) {
                long maxid = -1;
                long id = -1;
                String log = null;
                JSONArray array = null;
                try {
                    array = new JSONArray();
                    while (cursor.moveToNext()) {
                        id = cursor.getLong(cursor.getColumnIndex(CrashLogColumns._ID));
                        log = cursor.getString(cursor.getColumnIndex(CrashLogColumns.COLUMN_COTENT));
                        if (id > maxid) {
                            maxid = id;
                        }
                        array.put(new JSONObject(log));
                    }
                } catch (JSONException e) {
                    array = null;
                    e.printStackTrace();
                }
                if (array != null) {
                    result = new Pair(maxid, array);
                }
            }
        }

        @Override
        public Pair getResult() {
            return result;
        }

    }
獲取到相應的數據庫信息,獲取的是其中的所有記錄和最大id值。
(2)上傳異常信息
    public static String doUploadPost(String httpUrl, byte[] byteToUpload) {
        if (byteToUpload == null || byteToUpload.length < 0) {
            return null;
        }
        URL url;
        HttpURLConnection httpUrlConnection = null;
        try {
            url = new URL(httpUrl);
            httpUrlConnection = (HttpURLConnection) url.openConnection();
            httpUrlConnection.setRequestMethod("POST");
            httpUrlConnection.setDoInput(true);
            // Post mode
            httpUrlConnection.setDoOutput(true);
            httpUrlConnection.setConnectTimeout(30 * 1000);
            httpUrlConnection.setReadTimeout(30 * 1000);
            httpUrlConnection.setUseCaches(false);
            OutputStream outputStream = httpUrlConnection.getOutputStream();
            outputStream.write(byteToUpload);
            outputStream.flush();
            outputStream.close();
            // while (offset < byteLength) {
            // bufferOutStream.write(byteToUpload);
            // offset += length;
            // }
            int response = httpUrlConnection.getResponseCode();
            if (Constants.isDebugMode()) {
                Log.e("HttpUtility", "upload response:" + response);
            }
            if (response != HttpURLConnection.HTTP_OK) {
                return null;
            }
            return dealResponseResult(httpUrlConnection.getInputStream());
        } catch (MalformedURLException e) {
            Log.e("HttpUtility", "MalformedURLException doUploadPost", e);
        } catch (IOException e) {
            Log.e("HttpUtility", "IOException doUploadPost", e);
        } catch (Exception e) {
            Log.e("HttpUtility", "Exception doUploadPost", e);
        } finally {
            if (httpUrlConnection != null) {
                httpUrlConnection.disconnect();
            }
        }

        return null;
    }

    /**
     * @param inputStream
     * @return
     */
    public static String dealResponseResult(InputStream inputStream) {
        String resultData = null; // 存儲處理結果
        ByteArrayOutputStream byteArrayOutputStream = new ByteArrayOutputStream();
        byte[] data = new byte[1024];
        int len = 0;
        int offset = 0;
        try {
            while ((len = inputStream.read(data)) != -1) {
                byteArrayOutputStream.write(data, offset, len);
                offset += len;
            }
            resultData = new String(byteArrayOutputStream.toByteArray());
            if (Constants.isDebugMode()) {
                Log.d("HttpUtility", "resultData:" + resultData);
            }
        } catch (IOException e) {
            Log.e("HttpUtility", "IOException dealResponseResult", e);
        }
        return resultData;
    }
(3)刪除上傳過的信息
    public int deleteLogBeforeId(long id) {
        synchronized (mSyncLock) {
            return delete(TableDefine.DB_TABLE_CRASH_LOG, CrashLogColumns._ID + " <=?",
                    new String[] { String.valueOf(id) });
        }
    }
(4)更新上傳時間
其中定義了上傳時間間隔,不能上傳過於頻繁,造成服務壓力,基本幾個在10分鐘左右,這裡時間自己可以設定
    private static boolean updateUploadTime(Context context, long time) {
        if (time > lastUpdateTime) {
            lastUpdateTime = time;
            return Utility.writeLongData(context, key, lastUpdateTime);
        }
        return false;

    }

    private static long getUpdateTime(Context context) {
        if (lastUpdateTime == -1) {
            lastUpdateTime = Utility.readLongData(context, key, -1);
        }
        return lastUpdateTime;
    }

    public static boolean isNeedToUpload(Context context, long time) {
        return System.currentTimeMillis() - getUpdateTime(context) > time;
    }
(5)開始上傳
    public static void statUpload(final Context context) {
        if(!Prefs.getPrefBoolean(PrefsContants.IS_NEEDED_UPLOAD, false))){
            return;
        }
        if(!isNeedToUpload){
            return;
        }
        new Thread(new Runnable() {
            @Override
            public void run() {
                upLoadCrash(context);
            }
        }).start();
    }
以後就可以通過在服務端查看日志去快速修改app所犯下的錯誤。
 google官方架構MVP解析與實戰-(從零開始搭建android框架系列(3))
1 前言當然對於MVP的解說也是使用也是層出不窮,我也網絡上也能看到各種版本的解說,之前博客也有文章的更新,裡面有MVP的詳細說明和項目代碼—>Andr
 Android App的運行環境及Android系統架構概覽
Android基於linux內核,面向移動終端的操作系統。主要包括以下幾個方面:Application Framework:這一層為應用開發者提供了豐富的應用編程接口,如
 Android 自定義一款炫酷的加載控件
概述在設計應用的時候,我們應該熱愛極簡主義,簡單就是好的,對於很多用戶來說,復雜的東西並不受歡迎。我要實現的是根據不同的情況去顯示不同的加載效果,隨用隨調,效果是借鑒於某
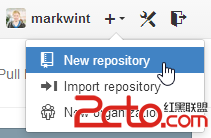 如何在Android Studio上使用Github
首先,登陸到Github上並創建一個新repository。在屏幕右上角,點擊“+”標記,並且選擇“New repository&rd