編輯:關於Android編程
IntentService繼承與Service,用來處理異步請求。客戶端可以通過startService(Intent)方法傳遞請求給IntentService。IntentService在onCreate()函數中通過HandlerThread單獨開啟一個線程來依次處理所有Intent請求對象所對應的任務。
這樣以免事務處理阻塞主線程(ANR)。執行完所一個Intent請求對象所對應的工作之後,如果沒有新的Intent請求達到,則**自動停止**Service;否則執行下一個Intent請求所對應的任務。
IntentService在處理事務時,還是采用的Handler方式,創建一個名叫ServiceHandler的內部Handler,並把它直接綁定到HandlerThread所對應的子線程。 ServiceHandler把處理一個intent所對應的事務都封裝到叫做onHandleIntent的虛函數;因此我們直接實現虛函數onHandleIntent,再在裡面根據Intent的不同進行不同的事務處理就可以了。
另外,IntentService默認實現了Onbind()方法,返回值為null。
使用IntentService需要實現的兩個方法:
構造函數
IntentService的構造函數一定是參數為空的構造函數,然後再在其中調用super(“name”)這種形式的構造函數。因為Service的實例化是系統來完成的,而且系統是用參數為空的構造函數來實例化Service的
實現虛函數onHandleIntent
在裡面根據Intent的不同進行不同的事務處理。
好處:處理異步請求的時候可以減少寫代碼的工作量,比較輕松地實現項目的需求。
Service不是獨立的進程,也不是獨立的線程,它是依賴於應用程序的主線程的,不建議在Service中編寫耗時的邏輯和操作,否則會引起ANR。
IntentService 它創建了一個獨立的工作線程來處理所有的通過onStartCommand()傳遞給服務的intents(把intent插入到工作隊列中)。通過工作隊列把intent逐個發送給onHandleIntent()。
不需要主動調用stopSelft()來結束服務。因為,在所有的intent被處理完後,系統會自動關閉服務。
默認實現的onBind()返回null。
首先是myIntentService.java
public class myIntentService extends IntentService {

    //------------------必須實現-----------------------------

    public myIntentService() {
        super("myIntentService");
        // 注意構造函數參數為空,這個字符串就是worker thread的名字
    }

    @Override
    protected void onHandleIntent(Intent intent) {
        //根據Intent的不同進行不同的事務處理
        String taskName = intent.getExtras().getString("taskName");
        switch (taskName) {
        case "task1":
            Log.i("myIntentService", "do task1");
            break;
        case "task2":
            Log.i("myIntentService", "do task2");
            break;
        default:
            break;
        }
    }
  //--------------------用於打印生命周期--------------------
   @Override
  public void onCreate() {
        Log.i("myIntentService", "onCreate");
    super.onCreate();
}

    @Override
    public int onStartCommand(Intent intent, int flags, int startId) {
        Log.i("myIntentService", "onStartCommand");
        return super.onStartCommand(intent, flags, startId);
    }

    @Override
    public void onDestroy() {
        Log.i("myIntentService", "onDestroy");
        super.onDestroy();
    }
}
然後記得在Manifest.xml中注冊服務
<code class=" hljs xml"> <service android:name=".myIntentService">
            <intent-filter>
                <action android:name="cn.scu.finch">
            </action></intent-filter>
        </service></code>
最後在Activity中開啟服務
public class MainActivity extends Activity {
    @Override
    protected void onCreate(Bundle savedInstanceState) {
        // TODO Auto-generated method stub
        super.onCreate(savedInstanceState);

        //同一服務只會開啟一個worker thread,在onHandleIntent函數裡依次處理intent請求。

        Intent i = new Intent("cn.scu.finch");
        Bundle bundle = new Bundle();
        bundle.putString("taskName", "task1");
        i.putExtras(bundle);
        startService(i);

        Intent i2 = new Intent("cn.scu.finch");
        Bundle bundle2 = new Bundle();
        bundle2.putString("taskName", "task2");
        i2.putExtras(bundle2);
        startService(i2);

        startService(i);  //多次啟動
    }
}
運行結果:
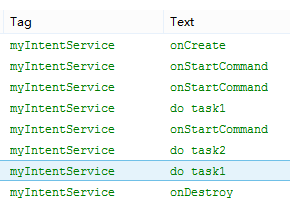
IntentService在onCreate()函數中通過HandlerThread單獨開啟一個線程來依次處理所有Intent請求對象所對應的任務。
通過onStartCommand()傳遞給服務intent被依次插入到工作隊列中。工作隊列又把intent逐個發送給onHandleIntent()。
注意:
它只有一個工作線程,名字就是構造函數的那個字符串,也就是“myIntentService”,我們知道多次開啟service,只會調用一次onCreate方法(創建一個工作線程),多次onStartCommand方法(用於傳入intent通過工作隊列再發給onHandleIntent函數做處理)。
 微信好友刪除怎麼找回 微信誤刪好友找回教程
微信好友刪除怎麼找回?很多朋友誤刪了微信好友很後悔,但是找不到恢復的方法,又不好意思重新加回好友,以免被好友發現,下面,小編就告訴大家微信好友刪除怎麼找回的
 Android Studio JNI開發基礎篇
前言開發過程中,為了數據交互安全,決定對數據進行des加密,然後進行前後交互;但是,如果密鑰放置在android代碼裡面,就算是混淆,反編譯也很容易讓人拿到密鑰,數據加密
 基於Android平台游戲之小拼圖
一:需求描述拼圖是一款益智類經典游戲了,本游戲學習了一些前輩們的經驗,整體來說講,將圖片用切圖工具進行切割,監聽用戶手指滑動事件,當用戶對凌亂的圖片,在一定的時間內拼湊恢
 Android中ProgressDialog的簡單示例
網上一般對進度條的示例都是如何顯示,沒有在任務結束如何關閉的文章,參考其他文章經過試驗之後把整套進度條顯示的簡單示例如下: 建立an