編輯:關於Android編程
上一篇,我們基本知道了EventBus的使用步驟,接下來先簡單研究一下其中的源碼。在分析源碼之前,我們先回顧一下Java反射的知識點:
JAVA反射機制是在運行狀態中,對於任意一個類,都能夠知道這個類的所有屬性和方法;對於任意一個對象,都能夠調用它的任意一個方法和屬性;這種動態獲取的信息以及動態調用對象的方法的功能稱為java語言的反射機制。
java.lang.Class;
java.lang.reflect.Constructor;
java.lang.reflect.Field;
java.lang.reflect.Method;
java.lang.reflect.Modifier;
我們可以通過反射機制訪問java對象的屬性,方法,構造方法等。
(1)getDeclaredMethods()
獲取所有的方法
(2)getDeclaredMethod(“方法名”,參數類型.class,……)
獲得特定的方法
(3)getFields()則是返回類型中的所有公有屬性
(4)getDeclaredField( )
獲得特定的屬性
(1)得到要調用類的class
(2)得到要調用的類中的方法(Method)
(3)方法調用(invoke)
如下:
//實體類
public class Student {
    private int age;
    private String name;
    public int getAge() {
        return age;
    }
    public void setAge(int age) {
        this.age = age;
    }
    public String getName() {
        return name;
    }
    public void setName(String name) {
        this.name = name;
    }

    public static void toString(int age,String name){
        System.out.println("大家好,我叫"+name+",今年"+age+"歲");
    }

//通過反射調用toString()方法
Class cls = Class.forName("chb.test.reflect.Student");
Method m = cls.getDeclaredMethod("toString",new Class[]{int.class,String.class});
m.invoke(cls.newInstance(),20,"chb")
反射的基本知識我們知曉了,再來看看EventBus的一些基本知識:
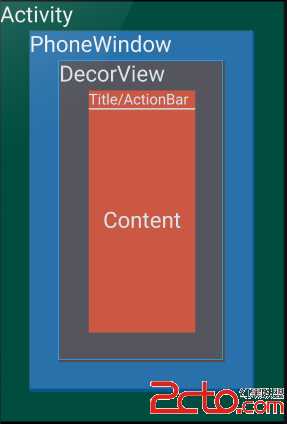
首先對EventBus的有一個大局的認識,參考官方的介紹圖如下:

(就是某件事情發生被調用的方法)
(1)、onEvent
(2)、onEventMainThread
(3)、onEventBackground
(4)、onEventAsync
這四種訂閱函數都是使用onEvent開頭的,它們的功能稍有不同,在介紹不同之前先介紹兩個概念:
(1)告知觀察者事件發生時通過EventBus.post函數實現,這個過程叫做事件的發布;
(2)觀察者被告知事件發生叫做事件的接收,是通過下面的四種訂閱函數實現的。
1 onEvent:如果使用onEvent作為訂閱函數,那麼該事件在哪個線程發布出來的,onEvent就會在這個線程中運行,也就是說發布事件和接收事件線程在同一個線程。使用這個方法時,在onEvent方法中不能執行耗時操作,如果執行耗時操作容易導致事件分發延遲。
2 onEventMainThread:如果使用onEventMainThread作為訂閱函數,那麼不論事件是在哪個線程中發布出來的,onEventMainThread都會在UI線程中執行,接收事件就會在UI線程中運行,這個在Android中是非常有用的,因為在Android中只能在UI線程中跟新UI,所以在onEvnetMainThread方法中是不能執行耗時操作的。
3 onEvnetBackground:如果使用onEventBackgrond作為訂閱函數,那麼如果事件是在UI線程中發布出來的,那麼onEventBackground就會在子線程中運行,如果事件本來就是子線程中發布出來的,那麼onEventBackground函數直接在該子線程中執行。
4 onEventAsync:使用這個函數作為訂閱函數,那麼無論事件在哪個線程發布,都會創建新的子線程在執行onEventAsync.
我們分析源碼先從程序的入口開始,EventBus的入口是注冊時開始, 即
EventBus.getDefault()返回的是一個EventBus的實例,是一個單例模式:
static volatile EventBus defaultInstance;

/** Convenience singleton for apps using a process-wide EventBus instance. */
    public static EventBus getDefault() {
        if (defaultInstance == null) {
            synchronized (EventBus.class) {
                if (defaultInstance == null) {
                    defaultInstance = new EventBus();
                }
            }
        }
        return defaultInstance;
    }
這裡實現單例采用了雙重校驗模式,提高的效率,也能防止並發可能產生的問題,同時defaultInstance采用了volatile 來修飾,避免了編譯期相關值的修改。
 public void register(Object subscriber) {
 //這裡subscriber一般是this,在上篇文章中就指MainActivity.this
        Class subscriberClass = subscriber.getClass();
        List subscriberMethods = subscriberMethodFinder.findSubscriberMethods(subscriberClass);//findSubscriberMethods()顧名思義就是通過類名去找類中的方法
        synchronized (this) {
            for (SubscriberMethod subscriberMethod : subscriberMethods) {
                subscribe(subscriber, subscriberMethod);
            }
        }
    }
 List findSubscriberMethods(Class subscriberClass) {
        List subscriberMethods = METHOD_CACHE.get(subscriberClass);
        //其中METHOD_CACHE是一個緩存的ConcurrentHashMap,Map, List> METHOD_CACHE = new ConcurrentHashMap<>();該Map以訂閱的類名為key,訂閱函數列表為value;

        if (subscriberMethods != null) {
            return subscriberMethods;
            //首先判斷緩存中是否已經包含該訂閱類(即是否已經訂閱過);
        }
//第一次進來subscriberMethods肯定是Null
        if (ignoreGeneratedIndex) {
            subscriberMethods = findUsingReflection(subscriberClass);
        } else {
            subscriberMethods = findUsingInfo(subscriberClass);
        }
        if (subscriberMethods.isEmpty()) {
            throw new EventBusException("Subscriber " + subscriberClass
                    + " and its super classes have no public methods with the @Subscribe annotation");
        } else {
            METHOD_CACHE.put(subscriberClass, subscriberMethods);
            return subscriberMethods;
        }
    }
執行findUsingReflection(subscriberClass)後,會去執行findUsingReflectionInSingleClass方法,我們再看看####findUsingReflectionInSingleClass方法:
private void findUsingReflectionInSingleClass(FindState findState) {
        Method[] methods;
        try {
            // This is faster than getMethods, especially when subscribers are fat classes like Activities
            methods = findState.clazz.getDeclaredMethods();   //通過反射,獲取該訂閱類下面的所有申明的公共方法;
        } catch (Throwable th) {
            // Workaround for java.lang.NoClassDefFoundError, see https://github.com/greenrobot/EventBus/issues/149
            methods = findState.clazz.getMethods();
            findState.skipSuperClasses = true;
        }
        for (Method method : methods) {
            int modifiers = method.getModifiers();
            if ((modifiers & Modifier.PUBLIC) != 0 && (modifiers & MODIFIERS_IGNORE) == 0) {
                Class[] parameterTypes = method.getParameterTypes();
                if (parameterTypes.length == 1) {
                    Subscribe subscribeAnnotation = method.getAnnotation(Subscribe.class);//獲取添加了@Subscribe注解的函數
                    if (subscribeAnnotation != null) {
                        Class eventType = parameterTypes[0];//獲取訂閱事件的類名
                        if (findState.checkAdd(method, eventType)) {
                            ThreadMode threadMode = subscribeAnnotation.threadMode();
                            findState.subscriberMethods.add(new SubscriberMethod(method, eventType, threadMode,
                                    subscribeAnnotation.priority(), subscribeAnnotation.sticky()));
                        }
                    }
                } else if (strictMethodVerification && method.isAnnotationPresent(Subscribe.class)) {
                    String methodName = method.getDeclaringClass().getName() + "." + method.getName();
                    throw new EventBusException("@Subscribe method " + methodName +
                            "must have exactly 1 parameter but has " + parameterTypes.length);
                }
            } else if (strictMethodVerification && method.isAnnotationPresent(Subscribe.class)) {
                String methodName = method.getDeclaringClass().getName() + "." + method.getName();
                throw new EventBusException(methodName +
                        " is a illegal @Subscribe method: must be public, non-static, and non-abstract");
            }
        }
    }
這樣就完成了EventBus訂閱者的注冊;
for (SubscriberMethod subscriberMethod : subscriberMethods) {
           subscribe(subscriber, subscriberMethod, sticky, priority);
       }
對每一個訂閱方法,對其調用subscribe方法,進入該方法看看到底干了什麼:
private void subscribe(Object subscriber, SubscriberMethod subscriberMethod, boolean sticky, int priority) {
        subscribed = true;
        //從訂閱方法中拿到訂閱事件的類型
        Class eventType = subscriberMethod.eventType;
        //通過訂閱事件類型,找到所有的訂閱(Subscription),訂閱中包含了訂閱者,訂閱方法
        CopyOnWriteArrayList subscriptions = subscriptionsByEventType.get(eventType);
        //創建一個新的訂閱
        Subscription newSubscription = new Subscription(subscriber, subscriberMethod, priority);
        //將新建的訂閱加入到這個事件類型對應的所有訂閱列表
        if (subscriptions == null) {
            //如果該事件目前沒有訂閱列表,那麼創建並加入該訂閱
            subscriptions = new CopyOnWriteArrayList();
            subscriptionsByEventType.put(eventType, subscriptions);
        } else {
            //如果有訂閱列表,檢查是否已經加入過
            for (Subscription subscription : subscriptions) {
                if (subscription.equals(newSubscription)) {
                    throw new EventBusException("Subscriber " + subscriber.getClass() + " already registered to event "
                            + eventType);
                }
            }
        }

        //根據優先級插入訂閱
        int size = subscriptions.size();
        for (int i = 0; i <= size; i++) {
            if (i == size || newSubscription.priority > subscriptions.get(i).priority) {
                subscriptions.add(i, newSubscription);
                break;
            }
        }
        //將這個訂閱事件加入到訂閱者的訂閱事件列表中
        List> subscribedEvents = typesBySubscriber.get(subscriber);
        if (subscribedEvents == null) {
            subscribedEvents = new ArrayList>();
            typesBySubscriber.put(subscriber, subscribedEvents);
        }
        subscribedEvents.add(eventType);
        //這個是對粘性事件的,暫時不討論
        if (sticky) {
            Object stickyEvent;
            synchronized (stickyEvents) {
                stickyEvent = stickyEvents.get(eventType);
            }
            if (stickyEvent != null) {
                postToSubscription(newSubscription, stickyEvent, Looper.getMainLooper() == Looper.myLooper());
            }
        }
    }
好了,到這裡差不多register方法分析完了,大致流程就是這樣的,我們總結一下:
1、找到被注冊者中所有的訂閱方法。
2、依次遍歷訂閱方法,找到EventBus中eventType對應的訂閱列表,然後根據當前訂閱者和訂閱方法創建一個新的訂閱加入到訂閱列表
3、找到EvnetBus中subscriber訂閱的事件列表,將eventType加入到這個事件列表。
所以對於任何一個訂閱者,我們可以找到它的 訂閱事件類型列表,通過這個訂閱事件類型,可以找到在訂閱者中的訂閱函數。
register分析完了就分析一下post吧,這個分析完了,EventBus的原理差不多也完了…
public void post(Object event) {
        //這個EventBus中只有一個,差不多是個單例吧,具體不用細究
        PostingThreadState postingState = currentPostingThreadState.get();
        List
ost裡面沒有什麼具體邏輯,它的功能主要是調用postSingleEvent完成的,進入到這個函數看看吧:
private void postSingleEvent(Object event, PostingThreadState postingState) throws Error {
       Class eventClass = event.getClass();
    //找到eventClass對應的事件,包含父類對應的事件和接口對應的事件
       List> eventTypes = findEventTypes(eventClass);
       boolean subscriptionFound = false;
       int countTypes = eventTypes.size();
       for (int h = 0; h < countTypes; h++) {
           Class clazz = eventTypes.get(h);
           CopyOnWriteArrayList subscriptions;
           synchronized (this) {
            //找到訂閱事件對應的訂閱,這個是通過register加入的(還記得嗎....)
               subscriptions = subscriptionsByEventType.get(clazz);
           }
           if (subscriptions != null && !subscriptions.isEmpty()) {
               for (Subscription subscription : subscriptions) {
                   postingState.event = event;
                   postingState.subscription = subscription;
                   boolean aborted = false;
                   try {
                    //對每個訂閱調用該方法
                       postToSubscription(subscription, event, postingState.isMainThread);
                       aborted = postingState.canceled;
                   } finally {
                       postingState.event = null;
                       postingState.subscription = null;
                       postingState.canceled = false;
                   }
                   if (aborted) {
                       break;
                   }
               }
               subscriptionFound = true;
           }
       }
    //如果沒有訂閱發現,那麼會Post一個NoSubscriberEvent事件
       if (!subscriptionFound) {
           Log.d(TAG, "No subscribers registered for event " + eventClass);
           if (eventClass != NoSubscriberEvent.class && eventClass != SubscriberExceptionEvent.class) {
               post(new NoSubscriberEvent(this, event));
           }
       }
   }
這個方法有個核心方法 postToSubscription方法,進入看看吧
private void postToSubscription(Subscription subscription, Object event, boolean isMainThread) {
        //第一個參數就是傳入的訂閱,第二個參數就是對於的分發事件,第三個參數非常關鍵:是否在主線程
        switch (subscription.subscriberMethod.threadMode) {
        //這個threadMode是怎麼傳入的,仔細想想?是不是根據onEvent,onEventMainThread,onEventBackground,onEventAsync決定的?
        case PostThread:
            //直接在本線程中調用訂閱函數
            invokeSubscriber(subscription, event);
            break;
        case MainThread:
            if (isMainThread) {
                //如果直接在主線程,那麼直接在本現場中調用訂閱函數
                invokeSubscriber(subscription, event);
            } else {
                //如果不在主線程,那麼通過handler實現在主線程中執行,具體我就不跟蹤了
                mainThreadPoster.enqueue(subscription, event);
            }
            break;
        case BackgroundThread:
            if (isMainThread) {
                //如果主線程,創建一個runnable丟入線程池中
                backgroundPoster.enqueue(subscription, event);
            } else {
                //如果子線程,則直接調用
                invokeSubscriber(subscription, event);
            }
            break;
        case Async:
            //不論什麼線程,直接丟入線程池
            asyncPoster.enqueue(subscription, event);
            break;
        default:
            throw new IllegalStateException("Unknown thread mode: " + subscription.subscriberMethod.threadMode);
        }
    }
直接反射調用;也就是說在當前的線程直接調用該方法;
(1)case MainThread:
首先去判斷當前如果是UI線程,則直接調用;否則: mainThreadPoster.enqueue(subscription, event);把當前的方法加入到隊列,然後直接通過handler去發送一個消息,在handler的handleMessage中,去執行我們的方法。說白了就是通過Handler去發送消息,然後執行的。
(2)case BackgroundThread:
如果當前非UI線程,則直接調用;如果是UI線程,則將任務加入到後台的一個隊列,最終由Eventbus中的一個線程池去調用
executorService = Executors.newCachedThreadPool();。
(3) case Async:將任務加入到後台的一個隊列,最終由Eventbus中的一個線程池去調用;線程池與BackgroundThread用的是同一個。
這麼說BackgroundThread和Async有什麼區別呢?
BackgroundThread中的任務,一個接著一個去調用,中間使用了一個布爾型變量handlerActive進行的控制。
Async則會動態控制並發。
因此,從完整的源碼分析來看:register就是把當前類中匹配的方法,存入一個map,而post會根據實參(訂閱事件的類型(由類名決定))去map查找進行反射調用。其實如果不用發布者,訂閱者,事件,總線這幾個詞或許更好理解,以後大家提起EventBus,也可以說,就是在一個單例內部維持著一個map對象存儲了一堆的方法;post無非就是根據參數去查找方法,進行反射調用。
 Android組件Glide實現圖片平滑滾動效果
Glide是一款基於Android的圖片加載和圖片緩存組件,它可以最大性能地在Android設備上讀取、解碼、顯示圖片和視頻。Glide可以將遠程的圖片、視頻、動畫圖片等
 扣丁學堂(六)——音樂播放獨立頁面的實現
一丶音樂播放頁實現功能1.音樂格信息顯示,大圖顯示2.播放功能,上一曲,下一曲,暫停3.音樂進度顯示4.切換播放模式二丶顯示效果三丶原理及代碼實現1.自定義接口回調的方法
 學習Android開發之RecyclerView使用初探
在進行一些MaterialDesign規范開發的時候,比如之前說到的CoordinateLayout實現的向上折疊效果的時候,如果依然使用ListView,那麼這種效果是
 Android之異步線程原理
基礎介紹異步消息處理線程是指,線程在啟動後會進入一個無線循環體中,沒循環一次,從內部的消息隊列中取出一個一個消息,並回調相應的消息處理函數,執行完一個消息後則繼續循環。如