編輯:關於Android編程
每個版本的build variant代表了你可以構建的每一個版本。雖然你未直接配置build variants,你可以通過配置build type和product flavor。
比如,一個demo的product flavor可以聲明不同的特性和設備需求,比如自定義源碼,資源和最小的API。但是debug的build type卻有不同構建和打包設置,比如調試選項和簽名文件。
你可以在模塊的build.gradle文件裡的android{}區塊中來創建和配置構建類型。當你創建一個新的模塊的時候,Android Studio自動為你創建debug和release。雖然debug構建類型不出現在構建配置文件中,Android Studio通過debuggable true來配置。這會允許你在一個安全的Android設備中調試app,並且使用一個通用的debug的keystore對APK進行簽名。
如果你想添加或更高確定的設置,你可以添加debug構建類型到你的配置中。接下來的例子聲明為debug構建類型聲明了一個applicationIdSuffix。並且配置一個jnidebug構建類型,設置其根據debug構建類型進行初始化。
android {
    ...
    defaultConfig {...}
    buildTypes {
        release {
            minifyEnabled true
            proguardFiles getDefaultProguardFile('proguard-android.txt'), 'proguard-rules.pro'
        }

        debug {
            applicationIdSuffix ".debug"
        }

        /**
         * The 'initWith' property allows you to copy configurations from other build types,
         * so you don't have to configure one from the beginning. You can then configure
         * just the settings you want to change. The following line initializes
         * 'jnidebug' using the debug build type, and changes only the
         * applicationIdSuffix and versionNameSuffix settings.
         */

        jnidebug {

            // This copies the debuggable attribute and debug signing configurations.
            initWith debug

            applicationIdSuffix ".jnidebug"
            jniDebuggable true
        }
    }
}
創建product flavor跟創建構建類型相同:將其添加到productFlavors{}區塊中,並且配置你需要的設置。Product flavors支持defaultConfit,這是因為defaultConfig屬於ProfuctFlavor類。這就意味著你可以為所有的Flavors在defaultConfig{}提供基本的配置。每個flavor可以復寫任何這些默認值。比如applicationId。
注意:你仍然需要在manifest文件中的package屬性中來聲明包名。
以下是一個代碼示例,創建一個demo和full的product flavor,並設置了他們自己的applicationId和versionName。
android {
    ...
    defaultConfig {...}
    buildTypes {...}
    productFlavors {
        demo {
            applicationId "com.example.myapp.demo"
            versionName "1.0-demo"
        }
        full {
            applicationId "com.example.myapp.full"
            versionName "1.0-full"
        }
    }
}
在你創建和配置你的product flavor之後,點擊消息提示條中出現的Sync Now按鈕。在同步完成後,Gradle根據你的構建類型和product flavor自動創建build variants,並且用<product-flavor>。比如,如果你創建demo和full兩個product flavor,並且保持debug和release為默認,Gradle則會創建以下build variants:
1、 demoDebug
2、 demoRelease
3、 fullDebug
4、 fullRelease
默認情況下,Android Studio創建main/ source set和目錄在所有的build variants中共享。然而,你可以創建新的source sets來控制Gradle編譯和特定的build types,product flavors和build variants。例如,你可以在main/ source set中定義基本的功能,使用product flavor source sets來改變你的app的東西,包括權限和日志等。
Gradle希望你通過確定的方式來組織source set文件和目錄。
Android的Gradle插件提供了一個非常有用的Gradle 任務來顯示你如何為乜咯build type,product flavor和build variants來組織你的文件。比如,以下的報告部分描述了Gradle希望找到debug 的build type的特定的文件:
------------------------------------------------------------
Project :app


debug

Compile configuration: compile
build.gradle name: android.sourceSets.debug
Java sources: [app/src/debug/java]
Manifest file: app/src/debug/AndroidManifest.xml
Android resources: [app/src/debug/res]
Assets: [app/src/debug/assets]
AIDL sources: [app/src/debug/aidl]
RenderScript sources: [app/src/debug/rs]
JNI sources: [app/src/debug/jni]
JNI libraries: [app/src/debug/jniLibs]
Java-style resources: [app/src/debug/resources]
為了生成和查看你的構建配置的報告,遵循如下:
1、 點擊右面的IDE窗口
2、 找到MyApplication > Tasks > android,雙擊sourceSets
3、 查看報告,點擊IDE窗口底部的Gradle Console
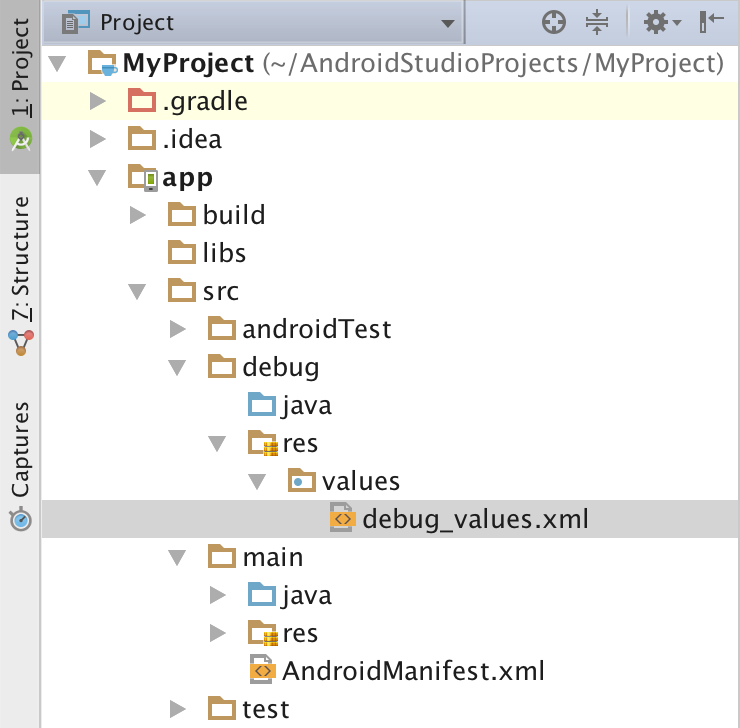
當你創建一個新的build variant,Android Studio不會為你創建一個source set 目錄,但是會給你一些選項來幫助你。比如,為你的debug構建類型創建java/目錄:
1、 打開項目面板,選擇Project視圖
2、 找到MyProject/app/src
3、 右鍵單擊src目錄,選擇New > Folder > Java Folder
4、 在下拉中找到Target Source Set,選擇debug
5、 點擊Finish
Android Studio為你的debug構建類型創建一個source set目錄,然後創建一個java/目錄到裡面。你同樣可以讓Android Studio為特定的build variant創建的新的文件來創建相應的目錄。比如,為你的debug構建類型創建一個values XML文件:
1、 在Project面板中,右鍵單擊src目錄,選擇New > XML > Values XML File
2、 輸入XML文件名字,或者保持默認。
3、 在下拉中找到Target Source Set,選擇debug
4、 點擊Finish
因為debug構建類型是針對特定的source set,Android Studio在創建XML文件時自動創建必要的目錄。如圖:
 Mock Server利器 - Moco
Moco介紹在開發過程中,經常會使用到一些http網絡接口,而這部分功能通常是由第三方開發團隊或者是後端同事進行開發的,在我們開發時不能給我們提供服務,更有甚者,要集成的
 android interpolator含義和用法
Interpolator 被用來修飾動畫效果,定義動畫的變化率,可以使存在的動畫效果accelerated(加速),decelerated(減速),repeated(重復
 Android實現動態向Gallery中添加圖片及倒影與3D效果示例
本文實例講述了Android實現動態向Gallery中添加圖片及倒影與3D效果的方法。分享給大家供大家參考,具體如下:在Android中gallery可以提供一個很好的顯
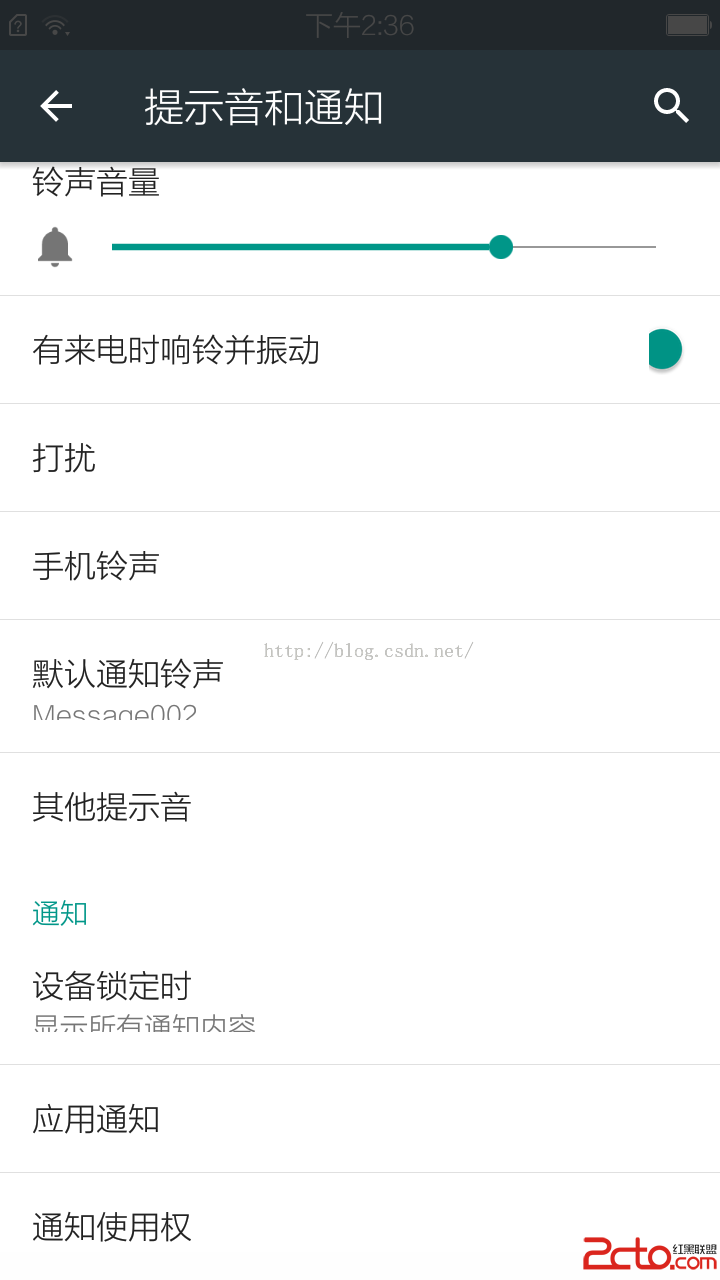 Android之通知使用權
通知使用權打開方式設置——提示音和通知——通知使用權。詳細界面如圖:存在需要擁有通知使用權應用時:不存在需要擁有通知使用權