編輯:關於Android編程
本文實例講述了Android實現動態向Gallery中添加圖片及倒影與3D效果的方法。分享給大家供大家參考,具體如下:
在Android中gallery可以提供一個很好的顯示圖片的方式,實現上面的效果以及動態添加數據庫或者網絡上下載下來的圖片資源。我們首先實現一個自定義的Gallery類。
MyGallery.java:
package nate.android.Service;
import android.content.Context;
import android.graphics.Camera;
import android.graphics.Matrix;
import android.graphics.Rect;
import android.util.AttributeSet;
import android.view.View;
import android.view.animation.Transformation;
import android.widget.Gallery;
import android.widget.ImageView;
import android.widget.Toast;
publicclass MyGallery extends Gallery {
private Camera mCamera =new Camera();
privateint mMaxRotationAngle =45;
privateint mMaxZoom =-120;
privateint mCoveflowCenter;
public MyGallery(Context context) {
super(context);
this.setStaticTransformationsEnabled(true);
 }
public MyGallery(Context context, AttributeSet attrs) {
super(context, attrs);
this.setStaticTransformationsEnabled(true);
 }
public MyGallery(Context context, AttributeSet attrs, int defStyle) {
super(context, attrs, defStyle);
this.setStaticTransformationsEnabled(true);
 }
publicint getMaxRotationAngle() {
return mMaxRotationAngle;
 }
publicvoid setMaxRotationAngle(int maxRotationAngle) {
   mMaxRotationAngle = maxRotationAngle;
 }
publicint getMaxZoom() {
return mMaxZoom;
 }
publicvoid setMaxZoom(int maxZoom) {
   mMaxZoom = maxZoom;
 }
privateint getCenterOfCoverflow() {
return (getWidth() - getPaddingLeft() - getPaddingRight()) /2
+ getPaddingLeft();
 }
privatestaticint getCenterOfView(View view) {
return view.getLeft() + view.getWidth() /2;
 }
protectedboolean getChildStaticTransformation(View child, Transformation t) {
finalint childCenter = getCenterOfView(child);
finalint childWidth = child.getWidth();
int rotationAngle =0;
   t.clear();
   t.setTransformationType(Transformation.TYPE_MATRIX);
if (childCenter == mCoveflowCenter) {
     transformImageBitmap((ImageView) child, t, 0);
   } else {
     rotationAngle = (int) (((float) (mCoveflowCenter - childCenter) / childWidth) * mMaxRotationAngle);
if (Math.abs(rotationAngle) > mMaxRotationAngle) {
       rotationAngle = (rotationAngle <0) ?-mMaxRotationAngle
           : mMaxRotationAngle;
     }
     transformImageBitmap((ImageView) child, t, rotationAngle);
   }
returntrue;
 }
protectedvoid onSizeChanged(int w, int h, int oldw, int oldh) {
   mCoveflowCenter = getCenterOfCoverflow();
super.onSizeChanged(w, h, oldw, oldh);
 }
privatevoid transformImageBitmap(ImageView child, Transformation t,
int rotationAngle) {
   mCamera.save();
final Matrix imageMatrix = t.getMatrix();
finalint imageHeight = child.getLayoutParams().height;
finalint imageWidth = child.getLayoutParams().width;
finalint rotation = Math.abs(rotationAngle);
// 在Z軸上正向移動camera的視角,實際效果為放大圖片。
// 如果在Y軸上移動,則圖片上下移動;X軸上對應圖片左右移動。
   mCamera.translate(0.0f, 0.0f, 100.0f);
// As the angle of the view gets less, zoom in
if (rotation < mMaxRotationAngle) {
float zoomAmount = (float) (mMaxZoom + (rotation *1.5));
     mCamera.translate(0.0f, 0.0f, zoomAmount);
   }
// 在Y軸上旋轉,對應圖片豎向向裡翻轉。
// 如果在X軸上旋轉,則對應圖片橫向向裡翻轉。
   mCamera.rotateY(rotationAngle);
   mCamera.getMatrix(imageMatrix);
   imageMatrix.preTranslate(-(imageWidth /2), -(imageHeight /2));
   imageMatrix.postTranslate((imageWidth /2), (imageHeight /2));
   mCamera.restore();
 }
}
在布局文件中
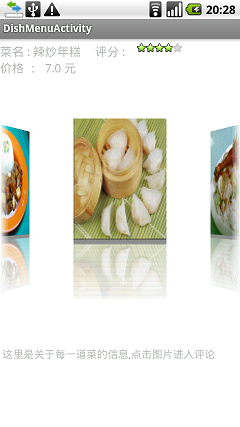
<?xml version="1.0" encoding="utf-8"?>
<LinearLayout xmlns:android="http://schemas.android.com/apk/res/android"
 android:orientation="vertical"
 android:layout_width="fill_parent"
 android:layout_height="fill_parent"
 android:background="#ffffff"
>
<LinearLayout
android:layout_width="fill_parent" android:layout_height="wrap_content"
 android:orientation="vertical" android:paddingTop="10px"
>
<LinearLayout
android:layout_width="fill_parent" android:layout_height="wrap_content"
 android:orientation="horizontal"
>
<TextView
android:layout_width="wrap_content" android:layout_height="wrap_content"
 android:id="@+id/dishName"   android:textSize="18pt"
 android:text="菜名"
/>
<LinearLayout
android:layout_width="fill_parent" android:layout_height="wrap_content"
 android:orientation="horizontal" android:paddingLeft="10px"
>
<TextView
android:layout_width="wrap_content" android:layout_height="wrap_content"
 android:id="@+id/ds"   android:textSize="18pt"
 android:text="評分 : "
/>
<RatingBar
android:numStars="5" android:rating="3"
 android:stepSize="0.2" android:layout_width="wrap_content"
 android:layout_height="wrap_content" android:isIndicator="true"
 android:id="@+id/dishScores"
/>
</LinearLayout>
</LinearLayout>
<LinearLayout
android:layout_width="fill_parent" android:layout_height="wrap_content"
 android:orientation="horizontal"
>
<TextView
android:layout_width="fill_parent" android:layout_height="wrap_content"
 android:id="@+id/dishPrice" android:text="價格" android:textSize="18pt"
/>
</LinearLayout>
</LinearLayout>
<nate.android.Service.MyGallery
android:id="@+id/Gallery01"
 android:layout_width="fill_parent"
 android:layout_height="wrap_content"
 android:layout_centerInParent="true"
/>
<TextView
android:text="\n\n\n\n這裡是關於每一道菜的信息,點擊圖片進入評論"
 android:layout_width="fill_parent"
 android:layout_height="wrap_content"
 android:layout_below="@+id/gallery01"
 android:paddingLeft="5px"
 android:id="@+id/showHint"
/>
</LinearLayout>
在上面的XML文件中,我們使用了自定義的MyGallery。
然後頂一個ImageAdapter類繼承自BaseAdapter。
package nate.android.Service;
import java.util.ArrayList;
import android.content.Context;
import android.content.res.Resources;
import android.graphics.Bitmap;
import android.graphics.BitmapFactory;
import android.graphics.Canvas;
import android.graphics.LinearGradient;
import android.graphics.Matrix;
import android.graphics.Paint;
import android.graphics.PorterDuffXfermode;
import android.graphics.Bitmap.Config;
import android.graphics.PorterDuff.Mode;
import android.graphics.Shader.TileMode;
import android.view.View;
import android.view.ViewGroup;
import android.widget.BaseAdapter;
import android.widget.ImageView;
publicclass ImageAdapter extends BaseAdapter {
int mGalleryItemBackground;
private Context mContext;
private ArrayList<byte[]> dishImages =new ArrayList<byte[]>();
private ImageView[] mImages;
public ImageAdapter(Context c,ArrayList<byte[]> tmpDishImages) {
  mContext = c;
  dishImages = tmpDishImages;
  mImages =new ImageView[dishImages.size()];
 }
publicboolean createReflectedImages() {
finalint reflectionGap =4;
int index =0;
  System.out.println("dishImages size "+ dishImages.size());
for (int i =0; i < dishImages.size(); ++i ) {
   System.out.println("dishImage --- "+ dishImages.get(i));
   Bitmap originalImage = BitmapFactory.decodeByteArray(dishImages.get(i), 0, dishImages.get(i).length);
int width = originalImage.getWidth();
int height = originalImage.getHeight();
   Matrix matrix =new Matrix();
   matrix.preScale(1, -1);
   Bitmap reflectionImage = Bitmap.createBitmap(originalImage, 0,
     height /2, width, height /2, matrix, false);
   Bitmap bitmapWithReflection = Bitmap.createBitmap(width,
     (height + height /2), Config.ARGB_8888);
   Canvas canvas =new Canvas(bitmapWithReflection);
   canvas.drawBitmap(originalImage, 0, 0, null);
   Paint deafaultPaint =new Paint();
   canvas.drawRect(0, height, width, height + reflectionGap,
     deafaultPaint);
   canvas.drawBitmap(reflectionImage, 0, height + reflectionGap, null);
   Paint paint =new Paint();
   LinearGradient shader =new LinearGradient(0, originalImage
     .getHeight(), 0, bitmapWithReflection.getHeight()
+ reflectionGap, 0x70ffffff, 0x00ffffff, TileMode.CLAMP);
   paint.setShader(shader);
   paint.setXfermode(new PorterDuffXfermode(Mode.DST_IN));
   canvas.drawRect(0, height, width, bitmapWithReflection.getHeight()
+ reflectionGap, paint);
   ImageView imageView =new ImageView(mContext);
   imageView.setImageBitmap(bitmapWithReflection);
//   imageView.setLayoutParams(new GalleryFlow.LayoutParams(180, 240));
   imageView.setLayoutParams(new MyGallery.LayoutParams(270, 360));
//imageView.setScaleType(ScaleType.MATRIX);
   mImages[index++] = imageView;
  }
returntrue;
 }
private Resources getResources() {
returnnull;
 }
publicint getCount() {
return dishImages.size();
 }
public Object getItem(int position) {
return position;
 }
publiclong getItemId(int position) {
return position;
 }
public View getView(int position, View convertView, ViewGroup parent) {
return mImages[position];
 }
publicfloat getScale(boolean focused, int offset) {
return Math.max(0, 1.0f/ (float) Math.pow(2, Math.abs(offset)));
 }
}
在這個類中構造函數需要傳入將要在gallery中繪制的圖片數據,(以byte[]類型的為例,因為我在存入sqlite以及從從網絡下載下來的圖片demo中都將其轉成byte[]),同樣我們使用
復制代碼 代碼如下:Bitmap originalImage = BitmapFactory.decodeByteArray(dishImages.get(i), 0, dishImages.get(i).length);
在這篇文章有較詳細的說明:http://www.jb51.net/article/88588.htm
將byte[]類型的圖片數據“還原”。byte[]類型的圖片源數據保存在一個ArrayList<byte[]>當中。這樣我們為動態的實現在gallery中添加圖片提供數據來源。
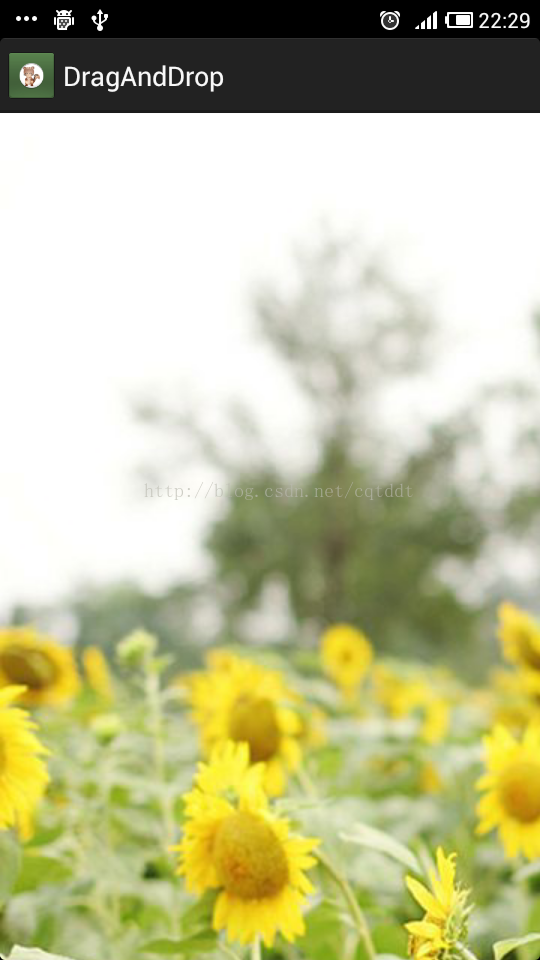
在下面的activity中使用我們自定義的baseAdapter以及Gallery。實現上圖顯示的效果。
使用實例類
package com.nate.wte2;
import java.io.IOException;
import java.util.ArrayList;
import nate.InfoService.DishInfo;
import nate.InfoService.StoreInfoService;
import nate.InfoService.WhichChoice;
import nate.NetConnection.GetConnectionSock;
import nate.android.Service.GalleryFlow;
import nate.android.Service.ImageAdapter;
import android.app.Activity;
import android.app.ProgressDialog;
import android.content.Intent;
import android.os.Bundle;
import android.os.Handler;
import android.os.Message;
import android.view.View;
import android.widget.AdapterView;
import android.widget.RatingBar;
import android.widget.TextView;
import android.widget.Toast;
import android.widget.AdapterView.OnItemClickListener;
import android.widget.AdapterView.OnItemSelectedListener;
import com.nate.wte.LocalSql.StoresInfoDB;
publicclass DishMenuActivity extends Activity {
private ArrayList<DishInfo> dishInfoList =new ArrayList<DishInfo>();
private TextView dishName;
private RatingBar dishScores;
private TextView dishPrice;
//3:send the dish's whole info to fill the activity(send the comments of the dish)
privateint flag3 =3;
 WhichChoice choice3 =new WhichChoice(flag3);
private StoreInfoService storeInfo;
private ProgressDialog loadingDialog;
/**
  * handler handle the dialog dismission
*/
private Handler handler =new Handler(){
  @Override
publicvoid handleMessage(Message msg) {
   loadingDialog.dismiss();
//other operation
super.handleMessage(msg);
  }
 };
/**
  * thread to load the data from local database or from the server
  * @author Administrator
  *
*/
class Loading implements Runnable{
  @Override
publicvoid run() {
try {
//這兒的sleep將換成一個循環,知道某個條件滿足時候才結束循環,讓dialog終止
    Thread.sleep(1500);
    handler.sendEmptyMessage(0);
   } catch (InterruptedException e) {
    e.printStackTrace();
   }
  }
 }
/**
  * loading the items,start the thread to load
*/
publicvoid loadingItems(){
  loadingDialog = ProgressDialog.show(DishMenuActivity.this, "", "loading...");
  Thread t =new Thread(new Loading());
  t.start();
 }
publicvoid onCreate(Bundle savedInstanceState) {
super.onCreate(savedInstanceState);
  setContentView(R.layout.dishmenu_gallery);
  StoresInfoDB infoDB;
int dishInfoListLength;
  ArrayList<byte[]> dishImages =new ArrayList<byte[]>();
byte[] dishImage;
  dishName = (TextView)this.findViewById(R.id.dishName);
  dishPrice = (TextView)this.findViewById(R.id.dishPrice);
  dishScores = (RatingBar)this.findViewById(R.id.dishScores);
//得到intent中從Choices類中傳過來的對象
  Intent intent = getIntent();
  Bundle bundle = intent.getBundleExtra("bundleData");
  storeInfo = (StoreInfoService)bundle.getSerializable("storeInfo");
  dishInfoList = (ArrayList<DishInfo>)bundle.getSerializable("dishInfoList");
  System.out.println("look look the info received from Choices Activity");
for(int i =0; i < dishInfoList.size(); i++){
   System.out.println("--- "+ i + dishInfoList.get(i).getDishImage().toString());
  }
  dishInfoListLength = dishInfoList.size();
//初始化 dishImages
for(int i =0; i < dishInfoListLength; i++){
   dishImages.add(dishInfoList.get(i).getDishImage());
  }
  System.out.println("the length of the dishImages ---- "+ dishImages.size());
////////////////////////////////
//注意這裡一段
////////////////////////////////
  ImageAdapter adapter =new ImageAdapter(DishMenuActivity.this,dishImages);
  adapter.createReflectedImages();
  GalleryFlow galleryFlow = (GalleryFlow) findViewById(R.id.Gallery01);
  galleryFlow.setOnItemSelectedListener(new OnItemSelectedListener(){
   @Override
publicvoid onItemSelected(AdapterView<?> arg0, View arg1,
int arg2, long arg3) {
    String showName ="菜名 : "+ dishInfoList.get((int)arg3).getDishName() +"";
    dishName.setText(showName);
    dishScores.setRating(dishInfoList.get((int)arg3).getDishScores());
    dishPrice.setText("價格 : "+ dishInfoList.get((int)arg3).getPrice() +" 元\n\n\n");
   }
   @Override
publicvoid onNothingSelected(AdapterView<?> arg0) {
   }
  });
  galleryFlow.setOnItemClickListener(new OnItemClickListener(){
  @Override
publicvoid onItemClick(AdapterView<?> arg0, View arg1, int arg2,
long arg3) {
   loadingItems();
   DishInfo dishInfo = dishInfoList.get((int)arg3);
try {
    GetConnectionSock.fromClient.writeObject(choice3);
    System.out.println("send the flag 3 ");
    GetConnectionSock.fromClient.writeObject(dishInfo);
    System.out.println("send the name back to server");
    DishInfo dishComments = (DishInfo)GetConnectionSock.fromServer.readObject();
    System.out.println("recv the dish comments");
    dishInfo.setDishName(dishInfoList.get((int)arg3).getDishName());
    dishInfo.setDishComments(dishComments.getDishComments());
    System.out.println("full the dish info");
   } catch (IOException e) {
    e.printStackTrace();
   } catch (ClassNotFoundException e) {
    e.printStackTrace();
   }
   Intent intent =new Intent();
   Bundle bundle =new Bundle();
   bundle.putSerializable("dishInfo",dishInfo);
   bundle.putSerializable("storeInfo",storeInfo);
   intent.putExtra("dishBundleData",bundle);
   intent.setClass(DishMenuActivity.this,DishInfoDynamic.class);
   Toast.makeText(DishMenuActivity.this, "進入評論此道菜",Toast.LENGTH_LONG).show();
   DishMenuActivity.this.startActivity(intent);
  }
  });
  galleryFlow.setAdapter(adapter); //注意這裡
 }
}
在這個activity中跟本文相關的,也就是在galley中添加圖片功能,只需注意上面代碼中標注出來的部分代碼即可,至於數據來源得到的方式都不一樣,這裡只要知道數據是一個ArrayList<byte[]>就行了。重要的是利用上面的MyGallery以及ImageAdapter,當然,通過簡單的理解,很輕松的這兩個類就能夠在其他的工程中重用的
更多關於Android相關內容感興趣的讀者可查看本站專題:《Android圖形與圖像處理技巧總結》、《Android開發入門與進階教程》、《Android調試技巧與常見問題解決方法匯總》、《Android多媒體操作技巧匯總(音頻,視頻,錄音等)》、《Android基本組件用法總結》、《Android視圖View技巧總結》、《Android布局layout技巧總結》及《Android控件用法總結》
希望本文所述對大家Android程序設計有所幫助。
 Android開發筆記(一百零七)統計分析SDK
用戶畫像對程序員來說,用戶畫像就是用戶的屬性和行為;通俗地說,用戶畫像是包括了個人信息、興趣愛好、日常行為等血肉豐滿的客戶實體。用戶畫像是精准營銷的產物,企業通過收集用戶
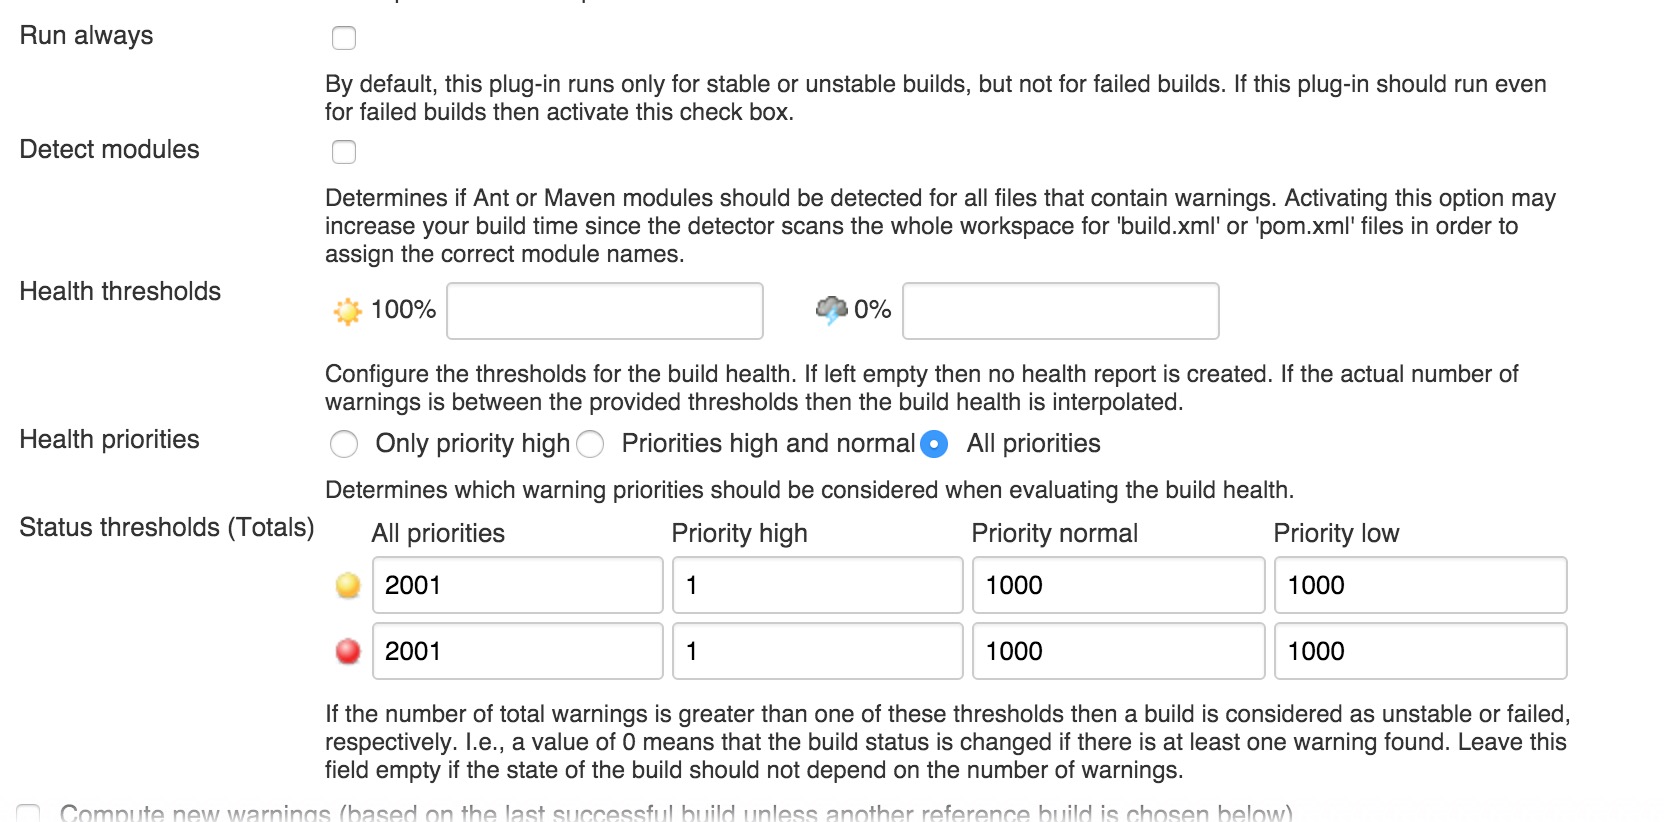 Jenkins 中運行Android lint和monkey
進入到相應job的配置頁面。Lint:1.在增加構建後操作中添加lint2.在高級中添加lint的通過標准monkey1.在跑monkey前需要將此次構建的apk包安裝到
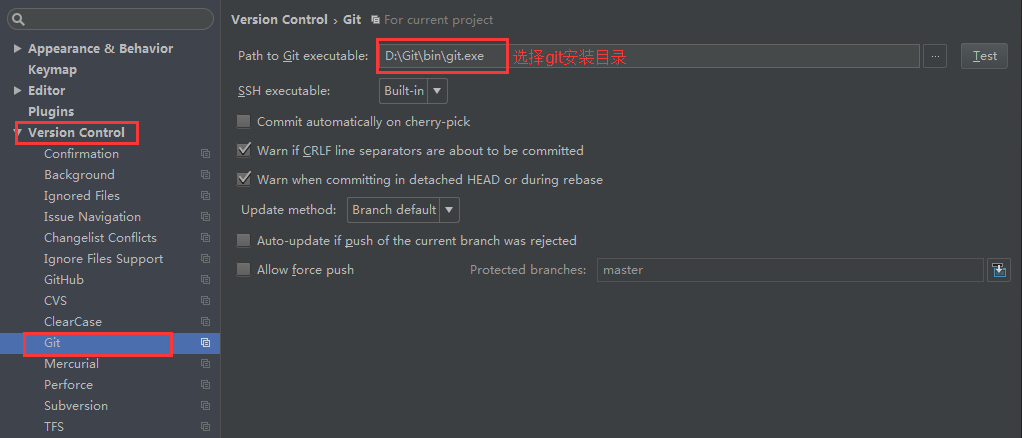 IntelliJ IDEA和Android Studio上使用Git
因為Android Studio是基於IntelliJ IDEA開發過來的,使用的插件其實都是IDEA上面的。IDEA與Android Studio默認已經安裝了Git插
 Android基礎入門教程——8.2.1 Bitmap(位圖)全解析 Part 1
本節引言: 在上一節中我們對Android中的13種類型的Drawable的類型進行了講解,有沒有應用到自己的 項目當中呢?而本節我們來探討的是Bitmap(