編輯:關於Android編程
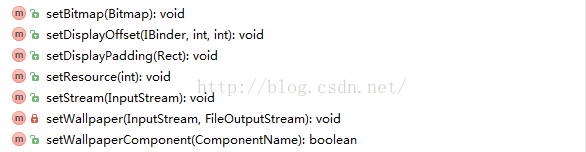 我們可以根據壁紙資源的不同,選擇合適的方法,其中,最後一個可以用來設置動態壁紙。
下面就來說說Launcher3中是如何設置壁紙的,我們直接從壁紙設置界面的入口說起,
我們可以根據壁紙資源的不同,選擇合適的方法,其中,最後一個可以用來設置動態壁紙。
下面就來說說Launcher3中是如何設置壁紙的,我們直接從壁紙設置界面的入口說起,
    /**
     * Event handler for the wallpaper picker button that appears after a long press
     * on the home screen.
     */
    protected void onClickWallpaperPicker(View v) {
        if (LOGD) Log.d(TAG, "onClickWallpaperPicker");
        final Intent pickWallpaper = new Intent(Intent.ACTION_SET_WALLPAPER);
        pickWallpaper.setComponent(getWallpaperPickerComponent());
        startActivityForResult(pickWallpaper, REQUEST_PICK_WALLPAPER);

        if (mLauncherCallbacks != null) {
            mLauncherCallbacks.onClickWallpaperPicker(v);
        }
    }
    protected ComponentName getWallpaperPickerComponent() {
        if (mLauncherCallbacks != null) {
            return mLauncherCallbacks.getWallpaperPickerComponent();
        }
        return new ComponentName(getPackageName(), LauncherWallpaperPickerActivity.class.getName());
    }
很顯然,LauncherWallpaperPickerActivity就是壁紙設置界面了,LauncherWallpaperPickerActivity繼承於WallpaperPickerActivity,WallpaperPickerActivity又繼承於WallpaperCropActivity,這麼多繼承,看來這個界面還是比較復雜的。從命名來看的話,也是為了區分每個類的處理重點,WallpaperCropActivity用來進行壁紙的裁剪,將圖片裁剪到合適的尺寸;WallpaperPickerActivity就是壁紙選擇器,選擇壁紙並設置;至於LauncherWallpaperPickerActivity,從代碼中看到只是重寫了父類的兩個方法,沒什麼可分析的,這裡我們重點分析WallpaperPickerActivity這個類。
    public static abstract class WallpaperTileInfo {
        protected View mView;
        public Drawable mThumb;

        public void setView(View v) {
            mView = v;
        }
        public void onClick(WallpaperPickerActivity a) {}// 縮略圖點擊事件
        public void onSave(WallpaperPickerActivity a) {}// 設置壁紙,並做一些保存操作
        public void onDelete(WallpaperPickerActivity a) {}// 刪除壁紙
        public boolean isSelectable() { return false; }// 是否可選
        public boolean isNamelessWallpaper() { return false; }// 壁紙是否沒有名字
        public void onIndexUpdated(CharSequence label) {// 更新索引
            if (isNamelessWallpaper()) {
                mView.setContentDescription(label);
            }
        }
    }
壁紙對象的一個抽象類,不直接使用,具體的壁紙繼承該類並根據自身特點擴展。壁紙來源有多個途徑,如應用內置的壁紙、圖庫、第三方等,另外設為壁紙的方式也不一定相同,需要對不同來源區分處理,所有就定義了以下幾個壁紙類對象,
PickImageInfo--圖片選擇器,在Activity中添加屬性,就可以隱式調用到,如圖庫
UriWallpaperInfo--通過圖片的Uri來設置壁紙
FileWallpaperInfo--通過圖片文件來設置壁紙
ResourceWallpaperInfo--Launcher3中內置的壁紙資源來設置
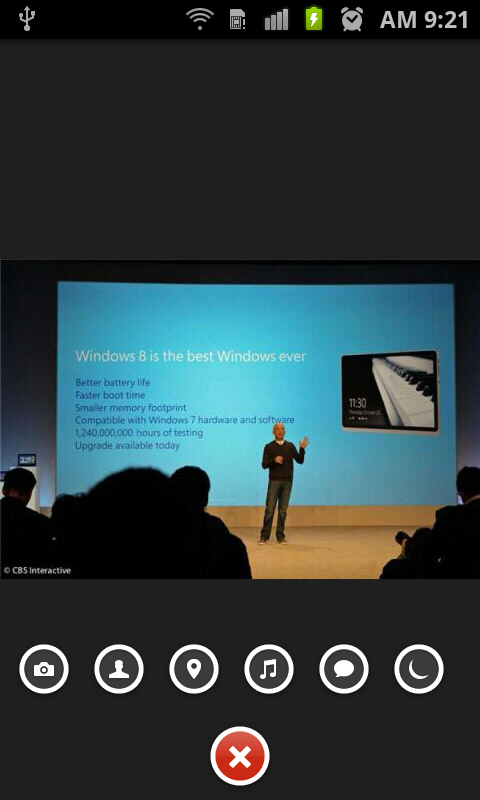
DefaultWallpaperInfo--系統默認壁紙,資源在framework中這幾個類實現其抽象父類中的方法,具體代碼實現就不一一細說,後面說到具體方法時會舉其中的例子來說明,這裡對幾個抽象方法已經做了注釋。 二、加載壁紙列表 圖1是壁紙設置界面,界面簡單,包含了壁紙列表、設置壁紙按鈕以及壁紙預覽圖等。
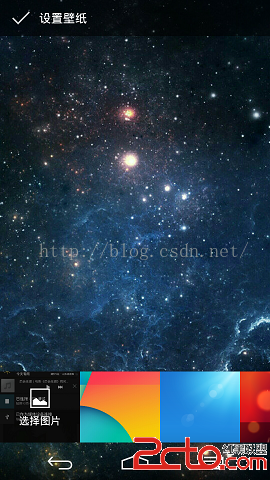 圖1
WallpaperPickerActivity中沒有重寫onCreate方法,而是通過父類的onCreate的方法調用了重寫的init方法,進行布局的加載和初始化。
1、布局
圖1
WallpaperPickerActivity中沒有重寫onCreate方法,而是通過父類的onCreate的方法調用了重寫的init方法,進行布局的加載和初始化。
1、布局
WallpaperRootView是根視圖,繼承RelativeLayout自定義的一個視圖,重寫了fitSystemWindows方法,
    protected boolean fitSystemWindows(Rect insets) {
        a.setWallpaperStripYOffset(insets.bottom);
        return true;
    }
這麼做的目的是為了讓視圖內離底部一段距離,否則會出現如圖2的情況,跟虛擬鍵重合,就不大美觀了。

        setContentView(R.layout.wallpaper_picker);

        mCropView = (CropView) findViewById(R.id.cropView);
        mCropView.setVisibility(View.INVISIBLE);// 默認是不可見的

        mWallpaperStrip = findViewById(R.id.wallpaper_strip);
1)CropView--裁剪視圖,用於壁紙的裁剪、預覽,還有手勢操作(兩個手指縮放)。
2)進度條--加載該界面時的進度條。
3)壁紙列表--LinearLayout布局塊,其中的子視圖HorizontalScrollView是一個橫向的滑動視圖,就是我們的壁紙列表,也是根據壁紙類型的分了多個布局塊,分別加載。
好像還少了ActionBar,這個是在代碼中動態添加的,下面會說到。
        mCropView.setTouchCallback(new CropView.TouchCallback() {
            ViewPropertyAnimator mAnim;
            @Override
            public void onTouchDown() {
                if (mAnim != null) {
                    mAnim.cancel();
                }
                if (mWallpaperStrip.getAlpha() == 1f) {
                    mIgnoreNextTap = true;
                }
                mAnim = mWallpaperStrip.animate();
                mAnim.alpha(0f)
                    .setDuration(150)
                    .withEndAction(new Runnable() {
                        public void run() {
                            mWallpaperStrip.setVisibility(View.INVISIBLE);
                        }
                    });
                mAnim.setInterpolator(new AccelerateInterpolator(0.75f));
                mAnim.start();
            }
            @Override
            public void onTouchUp() {
                mIgnoreNextTap = false;
            }
            @Override
            public void onTap() {
                boolean ignoreTap = mIgnoreNextTap;
                mIgnoreNextTap = false;
                if (!ignoreTap) {
                    if (mAnim != null) {
                        mAnim.cancel();
                    }
                    mWallpaperStrip.setVisibility(View.VISIBLE);
                    mAnim = mWallpaperStrip.animate();
                    mAnim.alpha(1f)
                         .setDuration(150)
                         .setInterpolator(new DecelerateInterpolator(0.75f));
                    mAnim.start();
                }
            }
        });
CropView的touch回調處理,這裡只做了一些動畫效果,具體裁剪的操作還是在CropView中實現的,這裡就不詳細說明了。
        mThumbnailOnClickListener = new OnClickListener() {
            public void onClick(View v) {
                if (mActionMode != null) {
                    // When CAB is up, clicking toggles the item instead
                    if (v.isLongClickable()) {
                        mLongClickListener.onLongClick(v);
                    }
                    return;
                }
                mSetWallpaperButton.setEnabled(true);
                WallpaperTileInfo info = (WallpaperTileInfo) v.getTag();
                if (info.isSelectable() && v.getVisibility() == View.VISIBLE) {
                    selectTile(v);
                }
                info.onClick(WallpaperPickerActivity.this);// 縮略圖點擊事件
            }
        };
縮略圖點擊事件,如果處於ActionMode(長按事件),處理長按事件,否則回調該壁紙所實現的onClick方法,啟用mSetWallpaperButton,該控件定義在其父類WallpaperCropActivity中,
// Action bar // Show the custom action bar view final ActionBar actionBar = getActionBar(); actionBar.setCustomView(R.layout.actionbar_set_wallpaper); actionBar.getCustomView().setOnClickListener( new View.OnClickListener() { @Override public void onClick(View v) { boolean finishActivityWhenDone = true; cropImageAndSetWallpaper(imageUri, null, finishActivityWhenDone); } }); mSetWallpaperButton = findViewById(R.id.set_wallpaper_button);
        mLongClickListener = new View.OnLongClickListener() {
            // Called when the user long-clicks on someView
            public boolean onLongClick(View view) {
                CheckableFrameLayout c = (CheckableFrameLayout) view;
                c.toggle();
                if (mActionMode != null) {
                    mActionMode.invalidate();
                } else {
                    // Start the CAB using the ActionMode.Callback defined below
                    mActionMode = startActionMode(mActionModeCallback);
                    int childCount = mWallpapersView.getChildCount();
                    for (int i = 0; i < childCount; i++) {
                        mWallpapersView.getChildAt(i).setSelected(false);
                    }
                }
                return true;
            }
        };
定義了縮略圖長按事件,並不是所有的壁紙類型都設置了長按事件,下面會講到。
        // Populate the built-in wallpapers
        // 填充內置壁紙,資源文件配置的壁紙和系統默認壁紙
        ArrayList wallpapers = findBundledWallpapers();
        mWallpapersView = (LinearLayout) findViewById(R.id.wallpaper_list);
        SimpleWallpapersAdapter ia = new SimpleWallpapersAdapter(this, wallpapers);
        populateWallpapersFromAdapter(mWallpapersView, ia, false);
通過findBundledWallpapers來查找壁紙,
    private ArrayList findBundledWallpapers() {
        final PackageManager pm = getPackageManager();
        final ArrayList bundled = new ArrayList(24);

        Partner partner = Partner.get(pm);
        if (partner != null) {
            final Resources partnerRes = partner.getResources();
            final int resId = partnerRes.getIdentifier(Partner.RES_WALLPAPERS, "array",
                    partner.getPackageName());
            if (resId != 0) {
                addWallpapers(bundled, partnerRes, partner.getPackageName(), resId);
            }

            // Add system wallpapers
            File systemDir = partner.getWallpaperDirectory();
            if (systemDir != null && systemDir.isDirectory()) {
                for (File file : systemDir.listFiles()) {
                    if (!file.isFile()) {
                        continue;
                    }
                    String name = file.getName();
                    int dotPos = name.lastIndexOf('.');
                    String extension = "";
                    if (dotPos >= -1) {
                        extension = name.substring(dotPos);
                        name = name.substring(0, dotPos);
                    }

                    if (name.endsWith("_small")) {
                        // it is a thumbnail
                        continue;
                    }

                    File thumbnail = new File(systemDir, name + "_small" + extension);
                    Bitmap thumb = BitmapFactory.decodeFile(thumbnail.getAbsolutePath());
                    if (thumb != null) {
                        bundled.add(new FileWallpaperInfo(file, new BitmapDrawable(thumb)));
                    }
                }
            }
        }

        // 添加Launcher中配置的壁紙
        Pair r = getWallpaperArrayResourceId();
        if (r != null) {
            try {
                Resources wallpaperRes = getPackageManager().getResourcesForApplication(r.first);
                addWallpapers(bundled, wallpaperRes, r.first.packageName, r.second);
            } catch (PackageManager.NameNotFoundException e) {
            }
        }

        // 創建一個空的實體,用於放置默認壁紙
        if (partner == null || !partner.hideDefaultWallpaper()) {
            // Add an entry for the default wallpaper (stored in system resources)
            WallpaperTileInfo defaultWallpaperInfo =
                    (Build.VERSION.SDK_INT < Build.VERSION_CODES.KITKAT)
                    ? getPreKKDefaultWallpaperInfo()
                    : getDefaultWallpaper();
            if (defaultWallpaperInfo != null) {
                bundled.add(0, defaultWallpaperInfo);
            }
        }
        return bundled;
    }
加載系統中有監聽特定廣播的應用中的資源,這個廣播是"com.android.launcher3.action.PARTNER_CUSTOMIZATION"
加載Launcher3中配置的壁紙,這些壁紙放在drawable-xxx目錄下,並在wallpapers.xml中配置(必須有原圖和縮略圖)
加載默認壁紙,默認壁紙放在framework資源目錄下- zzz_wallpaper
- zzz_wallpaper_small
    private void populateWallpapersFromAdapter(ViewGroup parent, BaseAdapter adapter,
                                               boolean addLongPressHandler) {
        for (int i = 0; i < adapter.getCount(); i++) {
            FrameLayout thumbnail = (FrameLayout) adapter.getView(i, null, parent);
            parent.addView(thumbnail, i);
            WallpaperTileInfo info = (WallpaperTileInfo) adapter.getItem(i);
            thumbnail.setTag(info);
            info.setView(thumbnail);
            if (addLongPressHandler) {// 是否添加長按事件,只對數據庫中保存的壁紙處理
                addLongPressHandler(thumbnail);
            }
            thumbnail.setOnClickListener(mThumbnailOnClickListener);
        }
    }
這個方法比較好理解,需要注意的是第三個參數,這個布爾值用來確定該類型壁紙是否添加長按事件,這裡是false,不添加;根據後面的分析來看,也只有保存在數據庫中的壁紙添加該操作,這也好理解,因為其他幾種類型都不是用戶自己定義的,不允許刪除壁紙,長按操作就是用來刪除該壁紙的。
2)添加保存在數據庫中的壁紙
        // Populate the saved wallpapers
        // 填充保存在數據庫中的壁紙
        mSavedImages = new SavedWallpaperImages(this);
        mSavedImages.loadThumbnailsAndImageIdList();
        populateWallpapersFromAdapter(mWallpapersView, mSavedImages, true);
3)添加動態壁紙
        // Populate the live wallpapers
        // 填充動態壁紙
        final LinearLayout liveWallpapersView =
                (LinearLayout) findViewById(R.id.live_wallpaper_list);
        final LiveWallpaperListAdapter a = new LiveWallpaperListAdapter(this);
        a.registerDataSetObserver(new DataSetObserver() {
            public void onChanged() {
                liveWallpapersView.removeAllViews();
                populateWallpapersFromAdapter(liveWallpapersView, a, false);
                initializeScrollForRtl();
                updateTileIndices();
            }
        });
在Android中,除了可以顯示靜態壁紙外,也可以使用動態壁紙。當然,跟普通的壁紙不同的是,它是已apk的形式安裝到手機中的(至於怎麼制作一個動態壁紙的apk,不是我們這邊所講的,就不闡述了),加載動態壁紙就是要查找系統中已安裝的動態壁紙應用。
動態壁紙也定義了一個適配器類LiveWallpaperListAdapter,定義動態壁紙對象,查找動態壁紙應用等。
    public LiveWallpaperListAdapter(Context context) {
        mInflater = (LayoutInflater) context.getSystemService(Context.LAYOUT_INFLATER_SERVICE);
        mPackageManager = context.getPackageManager();

        List list = mPackageManager.queryIntentServices(
                new Intent(WallpaperService.SERVICE_INTERFACE),
                PackageManager.GET_META_DATA);

        mWallpapers = new ArrayList();

        new LiveWallpaperEnumerator(context).execute(list);
    }
這是構造方法,查詢action為"android.service.wallpaper.WallpaperService"的service,這是動態壁紙應用中必須配置的,如果我們自己想做一個動態壁紙也是要添加這個action的。
    public static class LiveWallpaperTile extends WallpaperPickerActivity.WallpaperTileInfo {
        private Drawable mThumbnail;
        private WallpaperInfo mInfo;
        public LiveWallpaperTile(Drawable thumbnail, WallpaperInfo info, Intent intent) {
            mThumbnail = thumbnail;
            mInfo = info;
        }
        @Override
        public void onClick(WallpaperPickerActivity a) {
            Intent preview = new Intent(WallpaperManager.ACTION_CHANGE_LIVE_WALLPAPER);
            preview.putExtra(WallpaperManager.EXTRA_LIVE_WALLPAPER_COMPONENT,
                    mInfo.getComponent());
            a.onLiveWallpaperPickerLaunch(mInfo);
            a.startActivityForResultSafely(preview, WallpaperPickerActivity.PICK_LIVE_WALLPAPER);
        }
    }
WallpaperTileInfo的子類,然後異步加載信息。
            for (ResolveInfo resolveInfo : list) {
                WallpaperInfo info = null;
                try {
                    info = new WallpaperInfo(mContext, resolveInfo);
                } catch (XmlPullParserException e) {
                    Log.w(LOG_TAG, "Skipping wallpaper " + resolveInfo.serviceInfo, e);
                    continue;
                } catch (IOException e) {
                    Log.w(LOG_TAG, "Skipping wallpaper " + resolveInfo.serviceInfo, e);
                    continue;
                }

                // 獲取動態壁紙信息
                Drawable thumb = info.loadThumbnail(packageManager);
                Intent launchIntent = new Intent(WallpaperService.SERVICE_INTERFACE);
                launchIntent.setClassName(info.getPackageName(), info.getServiceName());
                LiveWallpaperTile wallpaper = new LiveWallpaperTile(thumb, info, launchIntent);
                publishProgress(wallpaper);
            }
4)第三方壁紙
        // Populate the third-party wallpaper pickers
        // 填充第三方壁紙選擇器
        final LinearLayout thirdPartyWallpapersView =
                (LinearLayout) findViewById(R.id.third_party_wallpaper_list);
        final ThirdPartyWallpaperPickerListAdapter ta =
                new ThirdPartyWallpaperPickerListAdapter(this);
        populateWallpapersFromAdapter(thirdPartyWallpapersView, ta, false);
加載第三方壁紙選擇器,這個還是很友好的,這樣手機中如果裝有其他的第三方壁紙設置的應用,也可以在此處顯示出來。查詢是在ThirdPartyWallpaperPickerListAdapter適配器類中進行的,這個適配器跟剛才說的動態壁紙適配器類類似。
定義了第三方壁紙對象ThirdPartyWallpaperTile,
    public static class ThirdPartyWallpaperTile extends WallpaperPickerActivity.WallpaperTileInfo {

        private ResolveInfo mResolveInfo;
        public ThirdPartyWallpaperTile(ResolveInfo resolveInfo) {
            mResolveInfo = resolveInfo;
        }

        @Override
        public void onClick(WallpaperPickerActivity a) {
            final ComponentName itemComponentName = new ComponentName(
                    mResolveInfo.activityInfo.packageName, mResolveInfo.activityInfo.name);
            Intent launchIntent = new Intent(Intent.ACTION_SET_WALLPAPER);
            launchIntent.setComponent(itemComponentName);
            a.startActivityForResultSafely(launchIntent, WallpaperPickerActivity.PICK_WALLPAPER_THIRD_PARTY_ACTIVITY);// 啟動第三方壁紙選擇器
        }
    }
在構造方法中查詢第三方壁紙應用,
    public ThirdPartyWallpaperPickerListAdapter(Context context) {
        mInflater = (LayoutInflater) context.getSystemService(Context.LAYOUT_INFLATER_SERVICE);
        mPackageManager = context.getPackageManager();
        mIconSize = context.getResources().getDimensionPixelSize(R.dimen.wallpaperItemIconSize);
        final PackageManager pm = mPackageManager;

        final Intent pickWallpaperIntent = new Intent(Intent.ACTION_SET_WALLPAPER);
        final List apps = pm.queryIntentActivities(pickWallpaperIntent, 0);

        // Get list of image picker intents
        Intent pickImageIntent = new Intent(Intent.ACTION_GET_CONTENT);
        pickImageIntent.setType("image/*");
        final List imagePickerActivities =
                pm.queryIntentActivities(pickImageIntent, 0);
        final ComponentName[] imageActivities = new ComponentName[imagePickerActivities.size()];
        for (int i = 0; i < imagePickerActivities.size(); i++) {
            ActivityInfo activityInfo = imagePickerActivities.get(i).activityInfo;
            imageActivities[i] = new ComponentName(activityInfo.packageName, activityInfo.name);
        }

        outerLoop:
        for (ResolveInfo info : apps) {
            final ComponentName itemComponentName =
                    new ComponentName(info.activityInfo.packageName, info.activityInfo.name);
            final String itemPackageName = itemComponentName.getPackageName();
            // Exclude anything from our own package, and the old Launcher,
            // and live wallpaper picker
            if (itemPackageName.equals(context.getPackageName()) ||
                    itemPackageName.equals("com.android.launcher") ||
                    itemPackageName.equals("com.android.wallpaper.livepicker")) {
                continue;
            }
            // Exclude any package that already responds to the image picker intent
            for (ResolveInfo imagePickerActivityInfo : imagePickerActivities) {
                if (itemPackageName.equals(
                        imagePickerActivityInfo.activityInfo.packageName)) {
                    continue outerLoop;
                }
            }
            mThirdPartyWallpaperPickers.add(new ThirdPartyWallpaperTile(info));
        }
    }
根據"android.intent.action.SET_WALLPAPER"來查找的,然後做一些過濾,添加到列表中。
        // Add a tile for the Gallery
        // 列表開頭放置圖庫選擇器
        LinearLayout masterWallpaperList = (LinearLayout) findViewById(R.id.master_wallpaper_list);
        FrameLayout pickImageTile = (FrameLayout) getLayoutInflater().
                inflate(R.layout.wallpaper_picker_image_picker_item, masterWallpaperList, false);
        setWallpaperItemPaddingToZero(pickImageTile);
        masterWallpaperList.addView(pickImageTile, 0);

        // Make its background the last photo taken on external storage
        Bitmap lastPhoto = getThumbnailOfLastPhoto();
        if (lastPhoto != null) {
            ImageView galleryThumbnailBg =
                    (ImageView) pickImageTile.findViewById(R.id.wallpaper_image);
            galleryThumbnailBg.setImageBitmap(getThumbnailOfLastPhoto());
            int colorOverlay = getResources().getColor(R.color.wallpaper_picker_translucent_gray);
            galleryThumbnailBg.setColorFilter(colorOverlay, PorterDuff.Mode.SRC_ATOP);

        }

        PickImageInfo pickImageInfo = new PickImageInfo();
        pickImageTile.setTag(pickImageInfo);
        pickImageInfo.setView(pickImageTile);
        pickImageTile.setOnClickListener(mThumbnailOnClickListener);
在列表開頭添加圖庫入口,這樣用戶就可以選擇任一圖片了。
其他的初始化設置就不一一贅述了。
三、壁紙預覽和設置
之前說到不同類型的壁紙對象時,會重寫父類的方法,實現具體的功能,這裡我們已ResourceWallpaperInfo為例,來說明壁紙的預覽和設置的。
        @Override
        public void onClick(WallpaperPickerActivity a) {
            Log.d("dingfeng","ResourceWallpaperInfo onClick...");
            BitmapRegionTileSource.ResourceBitmapSource bitmapSource =
                    new BitmapRegionTileSource.ResourceBitmapSource(
                            mResources, mResId, BitmapRegionTileSource.MAX_PREVIEW_SIZE);
            bitmapSource.loadInBackground();
            BitmapRegionTileSource source = new BitmapRegionTileSource(a, bitmapSource);
            CropView v = a.getCropView();
            v.setTileSource(source, null);
            Point wallpaperSize = WallpaperCropActivity.getDefaultWallpaperSize(
                    a.getResources(), a.getWindowManager());
            RectF crop = WallpaperCropActivity.getMaxCropRect(
                    source.getImageWidth(), source.getImageHeight(),
                    wallpaperSize.x, wallpaperSize.y, false);
            v.setScale(wallpaperSize.x / crop.width());
            v.setTouchEnabled(false);
            a.setSystemWallpaperVisiblity(false);
        }
        @Override
        public void onSave(WallpaperPickerActivity a) {
            Log.d("dingfeng","ResourceWallpaperInfo onSave...");
            boolean finishActivityWhenDone = true;
            a.cropImageAndSetWallpaper(mResources, mResId, finishActivityWhenDone);
        }
        @Override
        public boolean isSelectable() {
            return true;
        }
        @Override
        public boolean isNamelessWallpaper() {
            return true;
        }
實現了四個方法,後面兩個返回bool值得含義之前已經說過,我們不細說。先看onClick,這個方法在點擊縮略圖列表是觸發,看看它究竟做了什麼。
這面用到了BitmapRegionTileSource及其內部類對象,這些類定義在src\main\java\com\android\photos\目錄下,自定義了圖片對象,實現了滾動、縮放等功能,這裡就不展開了,可以自己查看代碼 。

    protected void cropImageAndSetWallpaper(
            Resources res, int resId, final boolean finishActivityWhenDone) {
        // crop this image and scale it down to the default wallpaper size for
        // this device
        int rotation = getRotationFromExif(res, resId);
        Point inSize = mCropView.getSourceDimensions();
        Point outSize = getDefaultWallpaperSize(getResources(), getWindowManager());
        RectF crop = getMaxCropRect(inSize.x, inSize.y, outSize.x, outSize.y, false);
        Runnable onEndCrop = new Runnable() {
            public void run() {
                // Passing 0, 0 will cause launcher to revert to using the
                // default wallpaper size
                updateWallpaperDimensions(0, 0);
                if (finishActivityWhenDone) {
                    setResult(Activity.RESULT_OK);
                    finish();
                }
            }
        };
        BitmapCropTask cropTask = new BitmapCropTask(this, res, resId,
                crop, rotation, outSize.x, outSize.y, true, false, onEndCrop);
        cropTask.execute();
    }
設置裁剪大小,將其作為參數傳遞給異步任務執行,
        @Override
        protected Boolean doInBackground(Void... params) {
            return cropBitmap();
        }
最終就是cropBitmap方法來做最後的裁剪和壁紙設置操作。
其他幾種類型的壁紙也是類似的,根據壁紙來源做出相應的操作,比如第三方壁紙時,點擊縮略圖就是打開第三方應用;如果是圖庫,就打開圖庫,總之都是在這幾個重寫方法中實現的。如果以後有什麼不同於目前幾種類型的,也可以依此來擴展。
 android按鈕圖片和文本居中的代碼
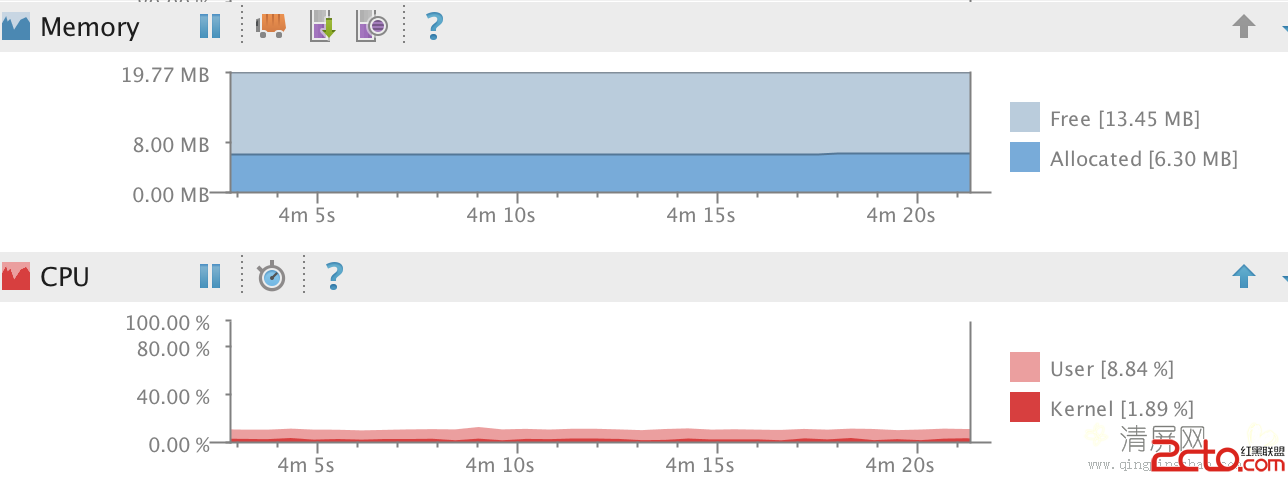
最近優化項目代碼時,發現一個比較詭異的現象:每當界面進入ActivityA時,cpu在不斷的消耗,內存在不斷的緩慢增長(雖然每次增長的量非常小)。如下圖:最後經過仔細排查
 app打包簽名(Eclipse版)
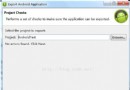
1.首先選中項目右擊→Android Tools→Export Signed Application Package 2.默認
 Android 殺死進程幾種方法詳細介紹
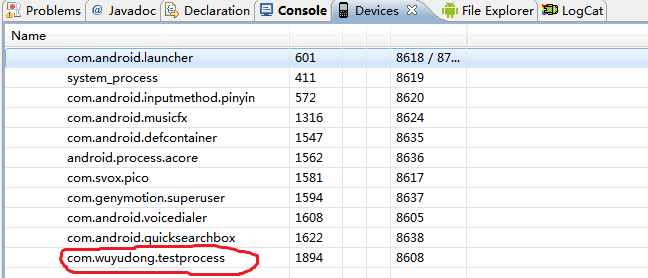
Android 殺死進程:
 一起學android之設置ListView數據顯示的動畫效果
效果圖: 平時我們要實現ListView數據顯示時的動畫效果,可以使用LayoutAnimationController為ListView設置動畫效果,並通過L