編輯:關於Android編程

控件基於android-Ultra-Pull-to-Refresh做的header定制,繼承PtrFrameLayout,把事件分發給裡面的RadioGroup,所以兩個自定義控件分別叫HoynPtrFrameLayout,HoynRadioGroup。 因為需要PtrFrameLayout裡面的一些私有屬性:mPtrIndicator,mScrollChecker,所以把PtrFrameLayout代碼提取出來,方便定制,使得HoynPtrFrameLayout可以更好的使用。
布局文件分別為:layout.xml,view_header.xml,view_header_tab.xml。
layout.xml : activity布局文件
view_header.xml : RadioGroup對應的控件
view_header_tab.xml 最上面 首頁、個人中心等tab控件
 hoynPtrFrameLayout.setHeaderView(view_header);  //必須
 hoynPtrFrameLayout.setTabView(tabview)          //可選
因為定制的原因,view_header只能由一個RelativeLayout裡面包裹一個HoynRadioGroup構成。
public class MainActivity extends Activity {
    private static final String TAG = "MainActivity";
    private HoynPtrFrameLayout hoynPtrFrameLayout;
    private HoynRadioGroup group;
    private RadioButton btn_share, btn_refresh;

    @Override
    protected void onCreate(Bundle savedInstanceState) {
        super.onCreate(savedInstanceState);
        setContentView(R.layout.layout);
        hoynPtrFrameLayout = (HoynPtrFrameLayout) findViewById(R.id.store_house_ptr_frame);
        View view_header = LayoutInflater.from(this).inflate(R.layout.view_header, null);
        View tabview = LayoutInflater.from(this).inflate(R.layout.view_header_tab, null);
        tabview.findViewById(R.id.iv_home).setOnClickListener(new View.OnClickListener() {
            @Override
            public void onClick(View v) {
                Toast.makeText(MainActivity.this, "點擊了首頁", Toast.LENGTH_SHORT).show();
            }
        });
        group = (HoynRadioGroup) view_header.findViewById(R.id.group);
        btn_share = (RadioButton) group.findViewById(R.id.radioButton1);
        btn_refresh = (RadioButton) group.findViewById(R.id.radioButton2);
        btn_share.setOnClickListener(new View.OnClickListener() {
            @Override
            public void onClick(View v) {
                Toast.makeText(MainActivity.this, "選擇了分享", Toast.LENGTH_SHORT).show();
            }
        });
        btn_refresh.setOnClickListener(new View.OnClickListener() {
            @Override
            public void onClick(View v) {
                Toast.makeText(MainActivity.this, "選擇了刷新", Toast.LENGTH_SHORT).show();
            }
        });
        hoynPtrFrameLayout.setHeaderView(view_header);
        hoynPtrFrameLayout.setTabView(tabview);

        hoynPtrFrameLayout.setOnFiggerUpListener(new HoynPtrFrameLayout.OnFiggerUpListener() {
            @Override
            public void onFiggerUp(int checkedId) {
                if (checkedId == btn_share.getId()) {
                    //選擇分享,直接到頂部
                    hoynPtrFrameLayout.scrollToTop();
                    btn_share.performClick();
                } else {
                    //選擇刷新,顯示loading,數據讀取完,再回到頂部
                    hoynPtrFrameLayout.showProgressBar();
                    btn_refresh.performClick();
                    hoynPtrFrameLayout.showProgressBar();
                    btn_refresh.performClick();
                }
                hoynPtrFrameLayout.postDelayed(new Runnable() {
                    @Override
                    public void run() {
                        hoynPtrFrameLayout.completeRefresh();
                    }
                }, 1000);
            }
        });
    }
}
   private static final String TAG = "HoynRadioGroup";
    private float down_x;
    private int childCount;
    private int currentIndex;
    private Paint mPaint;
    private int mColor = 0xFFE61A5F;
    private Path path;

    private int off_left = 0, off_right = 0;
    private Circle circle;
    private List circleList = new ArrayList<>();

    private boolean isAnimating = false; //判斷動畫是否正在執行
    private boolean isHeaderShow = false; //判斷下拉控件是否完全顯示出來且不超過1.5倍控件高度
    private boolean isShowCircle = true; //判斷下拉過程中是否顯示圓
    private boolean isChangeState = false;//圓動畫和動畫結束的切換
    private boolean isShowCircleAnimation = true; //下拉過程中是否應該顯示圓的動畫
    private boolean isCircleAnimating = false; //判斷顯示圓的動畫是否在執行

    private static final int createCircleDuration = 150; //圓出現動畫執行時間
    private static final int createCircleInterval = 10; //動畫執行頻率
    private static final int animatorDuration = 100;//圓左右移動動畫執行時間
    private static final int animatorInterval = 10; //動畫執行頻率

    private float radius;//下拉過程中 圓動畫的半徑
    private float alpha;//下拉過程中 控件的透明度

    //    private View tabView;
    private int tabViewHeight = 0;

    public HoynRadioGroup(Context context) {
        super(context);
        paintInit();
    }

    public HoynRadioGroup(Context context, AttributeSet attrs) {
        super(context, attrs);
        paintInit();
    }

    //中間省略setter/getter

    private void paintInit() {
        setWillNotDraw(false);
        mPaint = new Paint(Paint.ANTI_ALIAS_FLAG);
        mPaint.setAlpha(100);
        mPaint.setColor(mColor);
        mPaint.setAntiAlias(true);
        mPaint.setStyle(Paint.Style.FILL);
        mPaint.setStrokeWidth(5);
        path = new Path();
    }

    private void animatInit() {
        isAnimating = false; //判斷動畫是否正在執行
        isHeaderShow = false; //判斷下拉控件是否完全顯示出來且不超過1.5倍控件高度
        isShowCircle = true; //判斷下拉過程中是否顯示圓
        isChangeState = false;//圓動畫和動畫結束的切換
        isShowCircleAnimation = true; //下拉過程中是否應該顯示圓的動畫
    }

    private boolean isShowTab = false; //用於判斷是否顯示header中的tabView

    public boolean isShowTab() {
        return isShowTab;
    }

    public void setIsShowTab(boolean isShowTab) {
        this.isShowTab = isShowTab;
    }
在這段代碼中主要做了初始化的處理,其中setWillNotDraw(false);是一定需要的,否則後文調用invalidate();後onDraw不會執行。
動畫主要包含2個。一個是圓的顯示過程,另一個是圓顯示完全後,根據手勢的左右滑動,圓的拉扯效果以及移動過程。
圓的顯示過程:
    /**
     * create circle animation
     *
     * @param from
     * @param to
     * @param duration     animation duration
     * @param isShowCircle show or dissmiss
     * @param ev           get the down_x when animation is end;
     */
    public void circleAnimationStart(final float from, final float to, final int duration, final boolean isShowCircle, final MotionEvent ev) {
        isCircleAnimating = true;
        if (isShowCircle) {
            //let the radiobutton is checked after the circle is showed;
            //if the animation is create circle
            if (duration < 0) {
                this.isShowCircle = isShowCircle;
                isAnimating = false;
                isChangeState = isHeaderShow;
                isShowCircleAnimation = false;
                isCircleAnimating = false;
                if (ev != null)
                    down_x = ev.getX();
                return;
            }
            radius = from;
            invalidate();
            postDelayed(new Runnable() {
                @Override
                public void run() {
                    float addInterval = to / (createCircleDuration / createCircleInterval);
                    circleAnimationStart(from + addInterval, to, duration - createCircleInterval, isShowCircle, ev);
                }
            }, createCircleInterval);
        } else {
            if (duration < 0) {
                this.isShowCircle = isShowCircle;
                isAnimating = false;
                isChangeState = isHeaderShow;
                isShowCircleAnimation = false;
                isCircleAnimating = false;
                if (ev != null)
                    down_x = ev.getX();
                return;
            }
            radius = from;
            invalidate(); //update this view
            postDelayed(new Runnable() {
                @Override
                public void run() {
                    float addInterval = circle.getRadius() / (createCircleDuration / createCircleInterval);
                    circleAnimationStart(from - addInterval, to, duration - createCircleInterval, isShowCircle, ev);
                }
            }, createCircleInterval);
        }
    }
其中參數MotionEvent ev的作用是為了避免圓顯示動畫執行過程中手按下的位移變大之後出現的坐標偏差。
因為在圓的顯示動畫執行的過程中,按下去的坐標down_x是可能改變的,這就可能導致圓顯示完了,突然一下子就拉扯的很大。
而圓的顯示動畫主要分為兩塊。
通過ShowCircle參數 來判斷圓是從無到有,還是從有到無。
動畫執行關鍵代碼
postDelayed(new Runnable() {
      @Override
      public void run() {
          float addInterval = circle.getRadius() / (createCircleDuration / createCircleInterval);
          circleAnimationStart(from - addInterval, to, duration - createCircleInterval ,isShowCircle, ev);
      }
}, createCircleInterval);
addInterva是改變圓大小速度,動畫用遞歸來執行,每次執行間隔為createCircleInterval,最後根據isShowCircle來判斷from和to的關系來結束動畫。
圓的移動過程:
    private int endX;
    private int mOff_left;
    private int mOff_right;
    /**
     * move animation.
     * control a circle slip to the new circle.
     *
     * @param index
     * @param onAnimatorListener
     */
    private void moveAnimationStart(final int index, OnAnimatorListener onAnimatorListener) {
        final Circle mCurrentCircle = circleList.get(index);
        int preX = circle.getX();
        int currentX = mCurrentCircle.getX();
        endX = preX;
        mOff_left = off_left;
        mOff_right = off_right;
        onAnimatorListener.onAnimatorStart();
        animationHelper(preX, currentX, animatorDuration, onAnimatorListener);
    }

    /**
     * use recursion help animator to draw the view
     *
     * @param preX               previous circle x position
     * @param currentX           current circle x position
     * @param duration           use recursion to judge the duration whether is overtime
     * @param onAnimatorListener
     */
    private void animationHelper(final int preX, final int currentX, final int duration, final OnAnimatorListener onAnimatorListener) {
        if (duration < 0) {
            return;
        }
        postDelayed(new Runnable() {
            @Override
            public void run() {
                int mPreX = preX;
                //move distance once
                int mOff_x = Math.abs(currentX - endX) / (animatorDuration / animatorInterval);
                //judge the pull is left or right
                int mPull_x = mOff_left > mOff_right ? mOff_left : mOff_right;
                //the recover time is half of the move time
                int mPull_interval = Math.abs(mPull_x) / (animatorDuration / animatorInterval) * 2;

                if (mPreX < currentX) {
                    Log.i(TAG, "toRight");
                    //update the new circle position
                    mPreX += mOff_x;
                    //gradually recover the left pull
                    if (off_right > 0) {
                        off_right -= mPull_interval;
                    } else {
                        off_right = 0;
                    }
                    if (mPreX > currentX) {
                        mPreX = currentX;
                    }
                } else {
                    Log.i(TAG, "toLeft");
                    mPreX -= mOff_x;
                    if (off_left > 0) {
                        off_left -= mPull_interval;
                    } else {
                        off_left = 0;
                    }
                    if (mPreX < currentX) {
                        mPreX = currentX;
                    }
                }
                //set circle X position to invalidate the view
                circle.setX(mPreX);
                invalidate();
                if (mPreX != currentX) {
                    animationHelper(mPreX, currentX, duration - animatorInterval, onAnimatorListener);
                } else {
                    onAnimatorListener.onAnimatorComplete();
                }
            }
        }, animatorInterval);
    }
同圓顯示動畫一樣,通過手勢,得到初始點和結束點,判斷左滑還是右滑,然後計算每次移動的距離,通過遞歸不停的繪制圓所在的坐標。
  /**
     * the listener of animation callback
     */
    private interface OnAnimatorListener {
        void onAnimatorStart();
        void onAnimatorComplete();
    }
通過這個接口,改變radiobutton的check狀態,以及記錄isAnimating的狀態。
    /**
     * the animation callback listener
     */
    private class AnimatorListener implements OnAnimatorListener {

        View currentChild;
        View preChild;

        public AnimatorListener(View currentChild, View preChild) {
            this.currentChild = currentChild;
            this.preChild = preChild;
        }

        @Override
        public void onAnimatorStart() {
            isAnimating = true;
        }

        @Override
        public void onAnimatorComplete() {
            isAnimating = false;
            //First set current radiobutton be checked
            ((RadioButton) currentChild).setChecked(true);
            //Next set previous radiobuton be unchecked;
            if (preChild instanceof RadioButton && currentChild != preChild) {
                ((RadioButton) preChild).setChecked(false);
            }
        }
    }
圓的拉扯效果:
 @Override
    public boolean dispatchTouchEvent(MotionEvent ev) {
        …………
         case MotionEvent.ACTION_MOVE:
             …………
             ///pull left or right animation
             int off_x = (int) (ev.getX() - down_x);
             final View preChild = getChildAt(currentIndex);
             if (preChild == null) {
                 return super.dispatchTouchEvent(ev);
             }
             int width = preChild.getWidth();
             //Calculation of tensile strength and invalidate the view.
             if (off_x < 0 && Math.abs(off_x) < width / 2 && currentIndex != 0) {
             off_left = (int) Math.abs((off_x / 1.5));
             off_right = 0;
             } else if (off_x > 0 && Math.abs(off_x) < width / 2 && currentIndex < childCount - 1)
             {
                 off_right = (int) Math.abs((off_x / 1.5));
                 off_left = 0;
             }
             invalidate();
             …………
         break;
    }
通過比較移動時按下的x坐標和按下時x的坐標,得到偏移量off_x,再根據它的矢量以及currentIndex的邊界判斷圓是否能拉動(比如index=0,就只能往右拉,不能往左拉),然後得到左邊或右邊拉的偏移量off_left或者off_right。
值得注意的是,在圓移動的過程中,拉扯過後的變形不是瞬間變成圓,而是慢慢恢復原狀,但是恢復的速度比移動快。所以拉扯速度mPull_interval比位移速度mOff_x快一倍
int mOff_x = Math.abs(currentX - endX) / (animatorDuration / animatorInterval);
int mPull_interval = Math.abs(mPull_x) / (animatorDuration / animatorInterval) * 2;
off_right -= mPull_interval; @Override
protected void onDraw(final Canvas canvas) {
super.onDraw(canvas);
//get the short edge
int width = circle.getX() < circle.getY() ? circle.getX() : circle.getY();
RectF rectLeft = null;
RectF rectRight = null;
if (isShowCircleAnimation) {
//show the circle animation
rectLeft = new RectF(width - radius, width - radius, width + radius, width + radius);
rectRight = new RectF(width - radius, width - radius, width + radius, width + radius);
} else {
if (isShowCircle && isHeaderShow) {
//show the circle and follow touch
rectLeft = new RectF(width - circle.getRadius() - off_left, width - circle.getRadius(), width + circle.getRadius() + off_left, width + circle.getRadius());
rectRight = new RectF(width - circle.getRadius() - off_right, width - circle.getRadius(), width + circle.getRadius() + off_right, width + circle.getRadius());
}
}
if (rectLeft == null) {
return;
}
rectLeft.offset(circle.getX() - circle.getRadius(), circle.getY() - circle.getRadius());
rectRight.offset(circle.getX() - circle.getRadius(), circle.getY() - circle.getRadius());
//draw the circle
canvas.drawArc(rectLeft, 90, 180, true, mPaint);
canvas.drawArc(rectRight, 270, 180, true, mPaint);
}onDraw()就是畫圓的關鍵代碼了。
首先判斷畫圓的大小。因為圓是一定在控件內部的,所以先取RadioButton的控件寬和高,取小的值賦給width。
接著判斷isShowCircleAnimation,isShowCircleAnimation為true的話,需要繪制圓顯示或消失,否則繪制圓的移動過程。
要實現拉扯的效果,需要繪制兩個半圓,組成一個圓,然後分別控制左半圓或右半圓的寬。
new Rectf(xx,xx,xx,xx)確定矩形范圍
rect.offset(xx,xx)確定矩形坐標
canvas.drawArc(rectLeft, 90, 180, true, mPaint);
畫一個半圓的弧形,因為畫弧形0°是從右邊開始,所以從90°開始畫180°的弧形,繪制出左半圓,右半圓同理。
在dispatchTouchEvent中,獲取了off_left和off_right,所以只需要增加或減少矩形rect的左邊寬度或右邊寬度即可。
    private static final String TAG = "PtrFrameLayout";
    //the effective max height rate,
    // if have tabview,the rate = 1 and the all height is tabview's height + group's height.
    // else the all height is group's height * NOT_HAS_TABVIEW_RATE;
    private float NOT_HAS_TABVIEW_RATE = 1.8f;
    private boolean hasTabView = true;
    // the header view
    private HoynRadioGroup myRadioGroup;
    // the relevant of screen
    private PtrIndicator mPtrIndicator;
    // the scroll util
    private ScrollChecker mScrollChecker;
    // draw the shadow paint
    private Paint mPaint;
    // draw the shadow transparent alpha
    private float alpha;
    // control progressBar show or hide
    private LinearLayout progressLayout;
    //custom progressBar,if null,use the default progressbar
    private ProgressBar progressBar;
    private View tabView;
    private OnFiggerUpListener onFiggerUpListener;

    private boolean isShowTab = false;

    //省略getter、setter

    public HoynPtrFrameLayout(Context context) {
        super(context);
        init();
    }

    public HoynPtrFrameLayout(Context context, AttributeSet attrs) {
        super(context, attrs);
        init();
    }

    public HoynPtrFrameLayout(Context context, AttributeSet attrs, int defStyle) {
        super(context, attrs, defStyle);
        init();
    }

    private void init() {
        //let this view can draw
        setWillNotDraw(false);
        mScrollChecker = getScrollChecker();
        mPtrIndicator = getPtrIndicator();
        mPaint = new Paint(Paint.ANTI_ALIAS_FLAG);
        mPaint.setColor(Color.BLACK);
        mPaint.setAntiAlias(true);
        mPaint.setAlpha(0);
        mPaint.setStyle(Paint.Style.FILL);
    }
mScrollChecker和mPtrIndicator是PtrFrameLayout中的私有對象,把源碼copy出來,寫上getter方法才能獲取到該對象。
    @Override
    public boolean dispatchTouchEvent(MotionEvent e) {
        boolean superEvent = super.dispatchTouchEvent(e);
        //put touchEvent to customRadioGroup
        if (myRadioGroup != null) {
            myRadioGroup.dispatchTouchEvent(e);
            float headerHeight = myRadioGroup.getHeight();
            float off_y = mPtrIndicator.getCurrentPosY();
            //control the header transparent alpha.
            if (off_y < myRadioGroup.getHeight()) {
                myRadioGroup.setIsHeaderShow(false);
                //In order to Alpha change fast , so off_y/3.
                myRadioGroup.setAlpha(-0.5f + off_y / headerHeight);
            } else if (off_y > (getPtrIndicator().getHeaderHeight() + (hasTabView ? tabView.getHeight() : 0)) * (hasTabView ? 1 : NOT_HAS_TABVIEW_RATE)) {
                myRadioGroup.setIsHeaderShow(false);
                myRadioGroup.setAlpha(1);
            } else {
                myRadioGroup.setIsHeaderShow(true);
                myRadioGroup.setAlpha(1);
            }
        }
        //show the progressBar
            …………
        return superEvent;
        }
第一步就是把event傳給HoynRadioGroup,這樣左右滑動才能接受到事件。
第二步是添加progressbar,如果是刷新的話,就讓它顯示。
    /**
     * add the progressBar and tabView
     */
    @Override
    protected void onLayout(boolean flag, int i, int j, int k, int l) {
        super.onLayout(flag, i, j, k, l);
        RelativeLayout headerView = (RelativeLayout) getHeaderView();
        for(int a = 0; a < headerView.getChildCount();a++){
            if(headerView.getChildAt(a) instanceof HoynRadioGroup){
                myRadioGroup = (HoynRadioGroup) headerView.getChildAt(a);
            }
        }

        if (progressLayout == null) {
            progressLayout = new LinearLayout(getContext());
            LinearLayout.LayoutParams params = new LinearLayout.LayoutParams(LinearLayout.LayoutParams.MATCH_PARENT, LinearLayout.LayoutParams.WRAP_CONTENT);
            params.height = getHeaderView().getHeight();
            progressLayout.setGravity(Gravity.CENTER);
            if (Build.VERSION.SDK_INT >= 16) {
                progressLayout.setBackground(getHeaderView().getBackground());
            } else {
                progressLayout.setBackgroundColor(Color.WHITE);
            }
            if (progressBar == null) {
                progressBar = new ProgressBar(getContext());
            }
            progressLayout.addView(progressBar);
            headerView.addView(progressLayout, params);
            progressLayout.setVisibility(INVISIBLE);
        } else {
            RelativeLayout.LayoutParams groupParams = (RelativeLayout.LayoutParams) myRadioGroup.getLayoutParams();
            int groupHeight = myRadioGroup.getHeight() + groupParams.topMargin + groupParams.bottomMargin;

            ViewGroup.LayoutParams params = progressLayout.getLayoutParams();
            if (params.height != groupHeight) {
                params.height = groupHeight;
                progressLayout.setLayoutParams(params);
            }
        }
    //add tabview
    …………
    }
由於onLayout有時會執行多次,所以在add progressBar 之前需要判斷progressLayout 是否為空,如果已存在的話,更新它的寬高。
添加的時候先判斷progressBar 是否為空,調用setProgressBar()可以自定義progressBar,如果沒調用就為空就用系統默認的progressBar。
    @Override
    public boolean dispatchTouchEvent(MotionEvent e) {
        boolean superEvent = super.dispatchTouchEvent(e);

        //put touchEvent to customRadioGroup
        …………
        //show the progressBar
        if (e.getAction() == MotionEvent.ACTION_DOWN) {
            hideProgressBar();
        } else if (e.getAction() == MotionEvent.ACTION_UP && onFiggerUpListener != null) {
            if (myRadioGroup.isHeaderShow()) {
                if (getFixHeader()) {
                //if tabview show complete
                …………
                } else {
                    //if is refresh
                    scrollTo(myRadioGroup.getHeight());
                    onFiggerUpListener.onFiggerUp(myRadioGroup.getCheckedRadioButtonId());
                }
            } else {
                //show the tabview
            }
        }
        return superEvent;
    }
public interface OnFiggerUpListener {
void onFiggerUp(int checkedId);
}
用OnFiggerUpListener替代setPtrHandler來得到手指抬起時,當前選擇RadioButton的Id。
而當手指抬起時,先調用scrollTo(myRadioGroup.getHeight());讓下拉控件先滑動到RadioGroup的高度,然後在MainActivity中的hoynPtrFrameLayout.setOnFiggerUpListener判斷,
如果選擇的是刷新,先讓progressBar顯示,當數據加載完成後,再讓它滑回起點。
如果是分享,直接調用hoynPtrFrameLayout.scrollToTop();到頂部。
Setter:
    public void setTabView(View tabView) {
        this.tabView = tabView;
    }
添加tabView:
    /**
     * add the progressBar and tabView
     */
    @Override
    protected void onLayout(boolean flag, int i, int j, int k, int l) {
        super.onLayout(flag, i, j, k, l);
        RelativeLayout headerView = (RelativeLayout) getHeaderView();
        …………
        /**
         * add progressBar
         */
        …………
        //add tabView
        if (tabView == null) {
            /**
             * if not has tabView
             */
            hasTabView = false;
            tabView = new LinearLayout(getContext());
            RelativeLayout.LayoutParams layoutParams = new RelativeLayout.LayoutParams(ViewGroup.LayoutParams.MATCH_PARENT, ViewGroup.LayoutParams.WRAP_CONTENT);
            layoutParams.height = 1;
            headerView.addView(tabView, layoutParams);
        } else {
            if (headerView.findViewById(android.R.id.text1) == null) {
                headerView.removeAllViews();
                //let the footerView  translation is 0
                //set a casual id which can let groupView below the tabView
                tabView.setAlpha(0);
                tabView.setId(android.R.id.text1);
                tabView.setTag(TAG);
                RelativeLayout.LayoutParams layoutParams = new RelativeLayout.LayoutParams(ViewGroup.LayoutParams.MATCH_PARENT, ViewGroup.LayoutParams.WRAP_CONTENT);
                headerView.addView(tabView, layoutParams);
                //RadioGroup
                RelativeLayout.LayoutParams groupParams = (RelativeLayout.LayoutParams) myRadioGroup.getLayoutParams();
                groupParams.addRule(RelativeLayout.BELOW, tabView.getId());
                myRadioGroup.setLayoutParams(groupParams);
                headerView.addView(myRadioGroup, groupParams);
                //progressbar
                int groupHeight = myRadioGroup.getHeight() + groupParams.topMargin + groupParams.bottomMargin;

                RelativeLayout.LayoutParams params = (RelativeLayout.LayoutParams) progressLayout.getLayoutParams();
                params.height = groupHeight;
                params.addRule(RelativeLayout.BELOW, tabView.getId());
                progressLayout.setLayoutParams(params);
                headerView.addView(progressLayout, params);
            }
        }
    }
給tabView設置Id,android.R.id.text1是隨便設置的一個,為了讓該控件能找到這個View。
在第一次onLayout的時候tabView == null,因為RelativeLayout無法讓一個新控件在一個頂部控件的上面,所以先removeAllViews();,添加tabView後再重新將radiogroup和progressBar加上。
tabView事件分發的處理:
    @Override
    public boolean dispatchTouchEvent(MotionEvent e) {
        boolean superEvent = super.dispatchTouchEvent(e);
        //put touchEvent to customRadioGroup
        …………
        //show the progressBar and tabView
        if (e.getAction() == MotionEvent.ACTION_DOWN) {
            hideProgressBar();
        } else if (e.getAction() == MotionEvent.ACTION_UP && onFiggerUpListener != null) {
            if (myRadioGroup.isHeaderShow()) {
                //if tabview show complete
                if (getFixHeader()) {
                    setShowTab(false);
                    scrollToTop();
                    return superEvent;
                } else {
                    //if is refresh
                    scrollTo(myRadioGroup.getHeight());
                    onFiggerUpListener.onFiggerUp(myRadioGroup.getCheckedRadioButtonId());
                }
            } else {
                if (mPtrIndicator.getCurrentPosY() > getHeaderHeight() && hasTabView) {
                    //if tabview show
                    setShowTab(true);
                    mScrollChecker.tryToScrollTo(mPtrIndicator.getHeaderHeight(), (int) getDurationToCloseHeader());
                    if (myRadioGroup.isCircleAnimating()) {
                        myRadioGroup.dismissCircleAnimationStart(e);
                    }
                    tabView.setAlpha(1);
                } else {
                    scrollToTop();
                }
            }
        }
        return superEvent;
    }
先判斷getFixHeader(),為什麼要判斷這個呢,因為在android-Ultra-Pull-to-Refresh中,當控件是全部拉出來的時候,無論在哪裡點擊,都會調用默認的事件處理。RadioButton的點擊事件。必須將它攔截了之後才能只調用tabview的onclick事件。
所以在PtrFrameLayout中
    //can fix the header
    private boolean fixHeader = false;

    public void setFixHeader(boolean fixHeader) {
        this.fixHeader = fixHeader;
    }

    public boolean getFixHeader(){
        return fixHeader;
    }
        @Override
    public boolean dispatchTouchEvent(MotionEvent e) {
        if (!isEnabled() || mContent == null || mHeaderView == null) {
            return dispatchTouchEventSupper(e);
        }
        int action = e.getAction();
        switch (action) {
            case MotionEvent.ACTION_UP:
            case MotionEvent.ACTION_CANCEL:
                /////////////////////////////////////////
                //add fixHeader
                if (fixHeader) {
                    return dispatchTouchEventSupper(e);
                }
                /////////////////////////////////////////
                mPtrIndicator.onRelease();
                if (mPtrIndicator.hasLeftStartPosition()) {
                    if (DEBUG) {
                        PtrCLog.d(LOG_TAG, "call onRelease when user release");
                    }
                    onRelease(false);
                    if (mPtrIndicator.hasMovedAfterPressedDown()) {
                        sendCancelEvent();
                        return true;
                    }
                    return dispatchTouchEventSupper(e);
                } else {
                    return dispatchTouchEventSupper(e);
                }
}vc3qyKvP1Mq+o6y0y8qxy8nK1srHyMN0YWJ2aWV3z9TKvqOsyLu687/J0tS147v3y/y1xHRhYqGjtvjIoc/7cmFkaW9CdXR0b261xGNoZWNrysK8/qGjPC9wPg0KPHA+1tjQtG9uUG9zaXRpb25DaGFuZ2WjujwvcD4NCjxwcmUgY2xhc3M9"brush:java;">
    @Override
    protected void onPositionChange(boolean isInTouching, byte status, PtrIndicator mPtrIndicator) {
        super.onPositionChange(isInTouching, status, mPtrIndicator);
        alpha = (float) mPtrIndicator.getCurrentPosY() / mPtrIndicator.getHeaderHeight();
        //the max alpha
        if (alpha > 0.8) {
            alpha = 0.8f;
        }
        //set tabview alpha
        if (hasTabView) {
            if (!isShowTab) {
                float tabAlpha = (mPtrIndicator.getCurrentPosY() - myRadioGroup.getHeight() - tabView.getHeight()) / (float) tabView.getHeight();
                // in order to set the alpha show naturally,so tabalpha / 1.5
                tabAlpha = tabAlpha / 1.5f;
                tabView.setAlpha(tabAlpha);
            } else {
                tabView.setAlpha(1);
            }
        }
        invalidate();
    }
設置0.8的原因是為了讓它不全黑,保留一些透明效果。
tabalpha / 1.5 是為了讓它顯示的更自然,透明度不會變的那麼快。導致還沒開始就已經完全顯示或者完全消失了。
由於alpha是全局變量,所以onDraw中可以直接用到。
onDraw():
   @Override
    protected void onDraw(Canvas canvas) {
        super.onDraw(canvas);
        //draw the shadow and transparent alpha
        mPaint.setAlpha((int) (255 * alpha));
        canvas.drawRect(0, mPtrIndicator.getCurrentPosY(), getWidth(), getHeight(), mPaint);
        getChildAt(0).setAlpha(1 - alpha);
    }
這裡就很簡單了,畫一個黑色背景,背景的透明度隨alpha變化而變化,然後將裡面的控件的透明度也讓它隨alpha變化。
到此就差不多結束了,完整代碼已經放到github上,github會持續更新,歡迎關注。
我的GitHub
 Android中的各種保活1
目前市面上的應用,貌似除了微信和手Q都會比較擔心被用戶或者系統(廠商)殺死問題。本文對 Android 進程拉活進行一個總結。Android 進程拉活包括兩個層面:A.
 android BaseAdapter getView 理解
ListView是安卓中非常常用的一個控件。安卓設計使用Adapter來對ListView進行管理。但是系統提供的Adapter無法滿足一些復雜的顯示情況,這個時候我們就
 Android NDK編譯選項設置
在Android NDK開發中,有兩個重要的文件:Android.mk和Application.mk,各盡其責,指導編譯器如何編譯程序,並決定編譯結果是什麼。本文將詳細說
 Android中dex文件的加載與優化流程
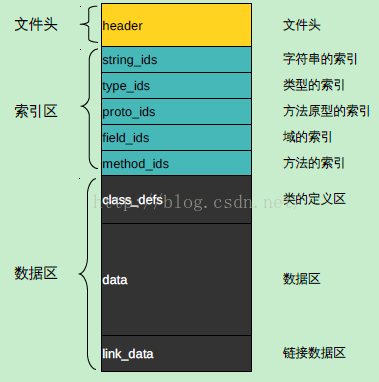
1、dex文件分析邏輯上,可以把dex文件分成3個區,頭文件、索引區和數據區。索引區的ids後綴為identifiers的縮寫。 headerdex文件裡的he