編輯:關於Android編程
看完了前面說的幾本書之後,對Linux Kernel和Android有一定的認識了,是不是心裡蠢蠢欲動,想小試牛刀自己編譯一把Android源代碼了呢?一直習慣使用Windows系統,而Android源代碼是不支持在Windows上編譯上,於是決定使用虛擬機安裝Ubuntu,然後下載、編譯和安裝Android源代碼。
一. 環境准備。
1. 磁盤空間預留20G左右,內存3G,因為一邊要跑主機,一邊要跑虛擬機,內存要求還是比較高的,這樣才會比較流暢。
2. 安裝VMWare 7.1.4。我的操作系統是Win7,VMWare的版本要新一點的,舊版本的VMWare在網絡支持上比較差,由於要在虛擬機上下載Android源代碼,沒有網絡是萬萬不行的。
3. 安裝好VMWare後,接下來就安裝Ubuntu系統了。我選擇目前最新的版本ubuntu-11.04-alternate-i386,從網上查到的資料說,要編譯Android源代碼,Ubuntu的最低版本是8.04。下載好後,安裝時采用一直默認安裝即可。
4. 安裝Git工具。Android源代碼采用Git工具來管理,與SVN相比,這是一種分布式的源代碼管理工具,而SVN是集中式的源代碼管理工具。要安裝Git工具,在Ubuntu上執行以下命令即可:
USER-NAME@MACHINE-NAME:~$ sudo apt-get install git-core gnupg
5. 安裝Java SDK。在Ubuntu上執行以下命令:
 USER-NAME@MACHINE-NAME:~$ sudo add-apt-repository ppa:ferramroberto/java
 USER-NAME@MACHINE-NAME:~$ sudo apt-get update
 USER-NAME@MACHINE-NAME:~$ sudo apt-get install sun-java6-jre sun-java6-plugin
 USER-NAME@MACHINE-NAME:~$ sudo apt-get install sun-java6-jdk
6. 依賴的其它包。在Ubuntu上執行以下命令:
USER-NAME@MACHINE-NAME:~$ sudo apt-get install flex bison gperf libsdl-dev libesd0-dev libwxgtk2.6-dev build-essential zip curl
7. 調試工具。在Ubuntu上執行以下命令:
USER-NAME@MACHINE-NAME:~$ sudo apt-get install valgrind
二. 下載Android源代碼工程。
1. 下載repo工具。在Ubuntu上執行以下命令:
 USER-NAME@MACHINE-NAME:~$ wget https://dl-ssl.google.com/dl/googlesource/git-repo/repo
 USER-NAME@MACHINE-NAME:~$ chmod 777 repo
 USER-NAME@MACHINE-NAME:~$ cp repo /bin/
2. 下載Android最新版本源代碼。在Ubuntu上執行以下命令:
 USER-NAME@MACHINE-NAME:~$ mkdir Android
 USER-NAME@MACHINE-NAME:~$ cd Android
 USER-NAME@MACHINE-NAME:~/Android$ repo init -u https://dl-ssl.google.com/dl/googlesource/git-repo/repo
 USER-NAME@MACHINE-NAME:~/Android$ repo sync
經過漫長的等待(我下載了兩三天)後,就可以把Android源代碼下載下來了。其間可能還有經歷下載中斷的情況,這時只要重新執行repo sync就可以了。
三. 編譯Android源代碼。
1. 編譯。在Android目錄下執行以下命令:
USER-NAME@MACHINE-NAME:~/Android$ make
第一次編譯要等待比較久的時間,編譯成功後,可以看到下面的輸出:
Target system fs image: out/target/product/generic/obj/PACKAGING/systemimage_intermediates/system.img
 Install system fs image: out/target/product/generic/system.img
 Target ram disk: out/target/product/generic/ramdisk.img
 Target userdata fs image: out/target/product/generic/userdata.img
 Installed file list: out/target/product/generic/installed-files.txt
2. 編譯過程中可能會遇到的問題。
問題一:You are attempting to build on a 32-bit system.
兩個地方需要個修改:
1)修改build/core目錄下的main.mk文件:
ifeq ($(BUILD_OS),linux)
build_arch := $(shell uname -m)
#Change the following line for building on a 32-bit system.
#ifneq (64,$(findstring 64,$(build_arch)))
ifneq (i686,$(findstring i686,$(build_arch)))
$(warning ************************************************************)
$(warning You are attempting to build on a 32-bit system.)
$(warning Only 64-bit build environments are supported beyond froyo/2.2.)
2)找到下列文件:
/external/clearsilver/cgi/Android.mk
/external/clearsilver/cs/Android.mk
/external/clearsilver/java-jni/Android.mk
/external/clearsilver/util/Android.mk
修改LOCAL_CFLAGS和LOCAL_LDFLAGS變量:
# This forces a 64-bit build for Java6
# Change the following two lines for building on a 32-bit system.
# LOCAL_CFLAGS += -m64
# LOCAL_LDFLAGS += -m64
LOCAL_CFLAGS += -m32
LOCAL_LDFLAGS += -m32
問題二:Undefined reference to `__dso_handle'
 external/stlport/src/monetary.cpp:39: undefined reference to `__dso_handle'
out/target/product/vm/obj/SHARED_LIBRARIES/libstlport_intermediates/src/locale.o: In function `__static_initialization_and_destruction_0':
 external/stlport/src/locale.cpp:29: undefined reference to `__dso_handle'
out/target/product/vm/obj/SHARED_LIBRARIES/libstlport_intermediates/src/locale_impl.o: In function `__static_initialization_and_destruction_0':
 external/stlport/src/locale_impl.cpp:31: undefined reference to `__dso_handle'
out/target/product/vm/obj/SHARED_LIBRARIES/libstlport_intermediates/src/locale_impl.o: In function `std::_Locale_impl::make_classic_locale()':
 external/stlport/src/locale_impl.cpp:670: undefined reference to `__dso_handle'
 external/stlport/src/locale_impl.cpp:667: undefined reference to `__dso_handle'
out/target/product/vm/obj/SHARED_LIBRARIES/libstlport_intermediates/src/locale_impl.o:external/stlport/src/locale_impl.cpp:604: more undefined
 references to `__dso_handle' follow
 collect2: ld returned 1 exit status
修改external/stlport/dll_main.cpp,加入以下聲明:
extern "C" {
 void * __dso_handle = 0;
 }
四. 編譯SDK,這一步是可選的。
1. 編譯。執行以下命令:
USER-NAME@MACHINE-NAME:~/Android$ make sdk
2. 編譯過程中可能會遇到的問題。
問題一:找不到bios.bin和vgabios-cirrus.bin文件
couldn't locate source file: usr/share/pc-bios/bios.bin
 couldn't locate source file: usr/share/pc-bios/vgabios-cirrus.bin
注意,這裡的usr/share目錄指的是~/Android/out/host/linux-x86目錄下的usr/share目錄,修改辦法是復制~/Android/prebuilt/common下的pc-bios文件夾到~/Android/out/host/linux-x86/usr/share即可:
USER-NAME@MACHINE-NAME:~/Android$ cp ~/Android/prebuilt/common/pc-bios ~/Android/out/host/linux-x86/usr/share
問題二:找不到ddmlib-tests.jar、 ninepath-tests.jar 、common-tests.jar 和sdkuilib-tests.jar文件
在~/Android/out/host/linux-x86/framework這個目錄下,可以找到以下幾個文件common.jar、ddmlib.jar、ninepatch.jar、sdkuilib.jar這四個文件,然後將它們分別復制一份,並重命名,命名的原則很簡單,就是在原有的名字後面跟上-tests即可。
五. 安裝編譯好的Android鏡像到模擬器上。
1. 設置環境變量:
USER-NAME@MACHINE-NAME:~/Android$ export PATH=$PATH:~/Android/out/host/linux-x86/bin
USER-NAME@MACHINE-NAME:~/Android$ export ANDROID_PRODUCT_OUT=~/Android/out/target/product/generic
其中,~/Android/out/host/linux-x86/bin有我們要執行的emulator命令,而~/Android/out/target/product/generic是Android鏡像存放目錄,下面執行emulator命令時會用到。
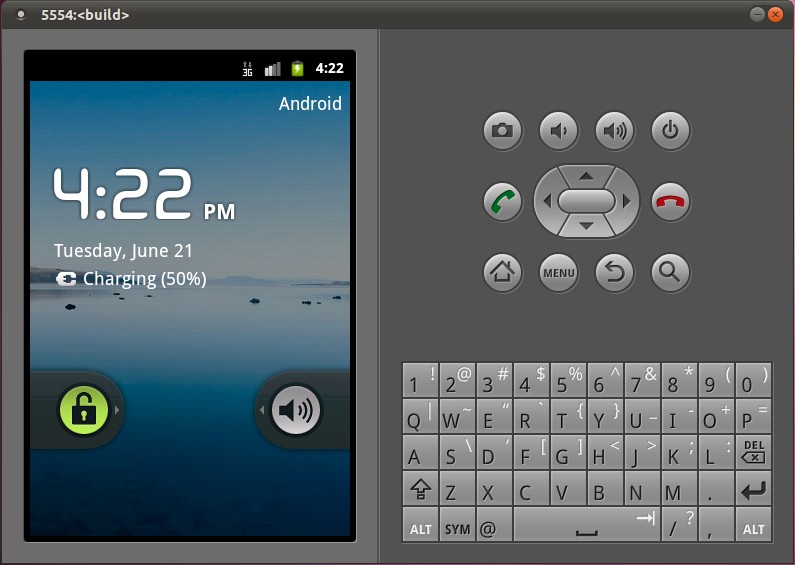
2. 運行模擬器。
USER-NAME@MACHINE-NAME:~/Android$ emulator
模擬器運行需要四個文件,分別是Linux Kernel鏡像zImage和Android鏡像文件system.img、userdata.img和ramdisk.img。執行emulator命令時,如果不帶任何參數,則Linux Kernel鏡像默認使用~/Android/prebuilt/android-arm/kernel目錄下的kernel-qemu文件,而Android鏡像文件則默認使用ANDROID_PRODUCT_OUT目錄下的system.img、userdata.img和ramdisk.img,也就是我們剛剛編譯出來的鏡像問題。
當然,我們也可以以指定的鏡像文件來運行模擬器,即運行emulator時,即:
USER-NAME@MACHINE-NAME:~/Android$ emulator -kernel ./prebuilt/android-arm/kernel/kernel-qemu -sysdir ./out/target/product/generic -system system.img -data userdata.img -ramdisk ramdisk.img
到這裡,我們就可以在模擬器上運行我們自己編譯的Android鏡像文件了,是不是很酷呢?但是注意,這裡說的Android鏡像文件,只是包括system.img、userdata.img和ramdisk.img這三個文件,而Linux Kernel鏡像用的是Android為我們預編譯好的kernel-qemu鏡像。那麼,有沒有辦法使用我們自己編譯的Linux Kernel鏡像呢?答案上肯定的,這樣我們就可以完全DIY自己的Android系統了!我將在下一篇文章描述如果編譯自己的Linux Kernel鏡像,敬請期待~
PS:主線上最新源代碼是不穩定版本,使用過程可能會有問題
另外,如果從官方下載不到源代碼(大家懂的),可以從這裡下:http://zhu.im/Android/
更正式的源碼編譯方法,請參考官網:http://source.android.com/source/initializing.html
以上就是對Ubuntu 上對Android 源碼的下載,編譯,安裝的資料整理,在這過程中會遇到很多問題,大家多多注意!
 Android中的Service相關全面總結
1、Service的種類 按運行地點分類: 類別區別 優點缺點 應用本地服務(Local)該服務依附在主進程上, 服務依附在主進
 Android程序開發之給背景圖加上移動的手勢
一,工程圖。二,效果圖。三,代碼。RootViewController.h#import <UIKit/UIKit.h>@interface RootView
 Android自定義狀態欄顏色與應用標題欄顏色一致
每次看IOS上的應用,應用中狀態欄的顏色總能與應用標題欄顏色保持一致,用戶體驗很不錯,對於這種效果,像我這種好奇心強的人就會去看看那安卓是否可以呢?若是在安卓4.4之前,
 如何在百度地圖上畫镂空圓 Android
首先我發現API還提供一個畫多邊形的類。而一個镂空圓分解成兩個多邊形,即橫著一刀切在這個镂空圓上,上下兩部分各為一個多邊形。但實現上述镂空圓時我的思路還是講經緯度看出笛卡