編輯:關於Android編程
前面一篇文章,分析了AppWidgetProvider和RemoteView的源碼,從中我們可以知道它們的實現原理,AppWidgetProvider是一個BroadcastReceiver,所以它是通過廣播接收通知的,收到更新通知後,AppWidgetProvider需要去提供View供遠程進程顯示,而提供的View則是使用RemoteView來代替,通過RemoteView(是一個Parcelable,可跨進程傳輸數據類型)來作為媒介去傳遞給遠程進程。由遠程進程解析RemoteView,然後顯示RemoteView表示的真正的View。在這篇文章將分析這個傳輸過程。
還是先看一下上一篇給出的一個過程圖示:

實際上,AppWidgetProvider是通過AppWidgetManager來更新View的,而AppWidgetManager裡面是有一個IAppWidgetService,一看就知道這是一個idle生成的,是一個Binder通信。而服務端的AppWidgetService是AppWidgetServiceImpl,AppWidgetServiceImpl又會通過一個IAppWidgetHost來跨進程通知AppWidgetHZ喎?/kf/ware/vc/" target="_blank" class="keylink">vc3SjrEFwcFdpZGdldEhvc3TE2rK/tcRJQXBwV2lkZ2V0SG9zdMrHQXBwV2lkZ2V0SG9zdC5DYWxsYmFja6Gj1eLR+b7Ntb3By8/Uyr7O0sPHtcRBcHBXaWRnZXS1xL34s8yjqLTzsr+31srHTGF1bmNoZXLTptPDo6mhozwvcD4NCjxwPrfWx+Wz/sO/uPayv7fWysfU2sqyw7S9+LPM1MvQ0LXEttTT2sDtveLV+7j2wfezzMrHt8ezo9PQsO/W+rXEo6xBcHBXaWRnZXRQcm92aWRlcsrH1NrO0sPH19S8urXE06bTw7PM0PK9+LPMtbHW0KOstvhBcHBXaWRnZXRTZXJ2aWNlysfUy9DQ1NpTeXN0ZW1TZXJ2ZXK9+LPMo6xBcHBXaWRnZXRIb3N01PLKx9TL0NDU2s/Uyr5BcHBXaWRnZXS1xL34s8zW0KOsscjI50xhdW5jaGVy06bTw6Oo18DD5qOpoaPV+7j2wfezzM/gtbHT2srHv+fUvcHLyP249r34s8yhozwvcD4NCjxoMiBpZD0="updateappwidgetids過程分析">updateAppWidgetIds過程分析
這是AppWidgetManager的一個接口函數,根據id來更新AppWidget。先把整個更新過程的時序圖拿出來看一下:

從我們普通的調用AppWidgetManager的updateAppWidget看起吧:
appWidgetManager.updateAppWidget(appwidgetids,remoteViews);
這裡進入updateAppWidget方法:
public void updateAppWidget(int[] appWidgetIds, RemoteViews views) {
   if (mService == null) {
       return;
   }
   try {
       mService.updateAppWidgetIds(mPackageName, appWidgetIds, views);
   }
   catch (RemoteException e) {
       throw new RuntimeException("system server dead?", e);
   }
}
mService是一個IAppWidgetService類型,初始化是在SystemServiceRegistry(6.0才出現的,之前在ContextImpl裡面)裡面:
registerService(Context.APPWIDGET_SERVICE, AppWidgetManager.class,
       new CachedServiceFetcher() {
   @Override
   public AppWidgetManager createService(ContextImpl ctx) {
       IBinder b = ServiceManager.getService(Context.APPWIDGET_SERVICE);
       return new AppWidgetManager(ctx, IAppWidgetService.Stub.asInterface(b));
   }});
注冊服務的時候獲取APPWIDGET_SERVICE。所以mService.updateAppWidgetIds最後會調用到遠程進程,而IAppWidgetService的實現者是AppWidgetServiceImpl,所以最終會調用AppWidgetServiceImpl的updateAppWidgetIds。
AppWidgetServiceImpl中的updateAppWidgetIds:
@Override
public void updateAppWidgetIds(String callingPackage, int[] appWidgetIds,
       RemoteViews views) {
   if (DEBUG) {
       Slog.i(TAG, "updateAppWidgetIds() " + UserHandle.getCallingUserId());
   }

   updateAppWidgetIds(callingPackage, appWidgetIds, views, false);
}
這就是AppWidgetServiceImpl的updateAppWidgetIds方法。程序已經開始進入到AppWidgetServiceImpl所在的進程了,實際上是SystemServer進程。怎麼看出AppWidgetServiceImpl是運行在SystemServer進程呢?AppWidgetService類new了一個AppWidgetServiceImpl,並且注冊到ServiceManager中:
public class AppWidgetService extends SystemService {
   private final AppWidgetServiceImpl mImpl;

   public AppWidgetService(Context context) {
       super(context);
       mImpl = new AppWidgetServiceImpl(context);
   }

   @Override
   public void onStart() {
       publishBinderService(Context.APPWIDGET_SERVICE, mImpl); //注冊mImpl到ServiceManager當中
       AppWidgetBackupBridge.register(mImpl);
   }

   @Override
   public void onBootPhase(int phase) {
       if (phase == PHASE_THIRD_PARTY_APPS_CAN_START) {
           mImpl.setSafeMode(isSafeMode());
       }
   }
}
而AppWidgetService在SystemServer.java中使用:
private static final String APPWIDGET_SERVICE_CLASS =
       "com.android.server.appwidget.AppWidgetService";
SystemServer是通過反射的方式new一個AppWidgetService對象,然後調用它的start函數。很多service類都是這樣啟動的。
回到updateAppWidgetIds方法,最後它會調用四個參數的updateAppWidgetIds方法:
private void updateAppWidgetIds(String callingPackage, int[] appWidgetIds,
       RemoteViews views, boolean partially) {
   final int userId = UserHandle.getCallingUserId();

   if (appWidgetIds == null || appWidgetIds.length == 0) {
       return;
   }

   // Make sure the package runs under the caller uid.
   mSecurityPolicy.enforceCallFromPackage(callingPackage);

   final int bitmapMemoryUsage = (views != null) ? views.estimateMemoryUsage() : 0;
   if (bitmapMemoryUsage > mMaxWidgetBitmapMemory) {
       throw new IllegalArgumentException("RemoteViews for widget update exceeds"
               + " maximum bitmap memory usage (used: " + bitmapMemoryUsage
               + ", max: " + mMaxWidgetBitmapMemory + ")");
   }

   synchronized (mLock) {
       ensureGroupStateLoadedLocked(userId);

       final int N = appWidgetIds.length;
       for (int i = 0; i < N; i++) {
           final int appWidgetId = appWidgetIds[i];

           // NOTE: The lookup is enforcing security across users by making
           // sure the caller can only access widgets it hosts or provides.
           Widget widget = lookupWidgetLocked(appWidgetId,
                   Binder.getCallingUid(), callingPackage);

           if (widget != null) {
               updateAppWidgetInstanceLocked(widget, views, partially);
           }
       }
   }
}
該方法首先會做些安全性檢查,以及圖片大小限制檢查。最後會針對每一個appWidgetId,通過lookupWidgetLocked找到其對應的Widget。
Widget是一個帶有很多信息的類,我們看看lookupWidgetLocked方法:
private Widget lookupWidgetLocked(int appWidgetId, int uid, String packageName) {
   final int N = mWidgets.size();
   for (int i = 0; i < N; i++) {
       Widget widget = mWidgets.get(i);
       if (widget.appWidgetId == appWidgetId
               && mSecurityPolicy.canAccessAppWidget(widget, uid, packageName)) {
           return widget;
       }
   }
   return null;
}
實際上它是從mWidgets找到對應的Widget,先看看Widget類,它是AppWidgetServiceImpl的非靜態內部類:
private static final class Widget {
   int appWidgetId;
   int restoredId;  // tracking & remapping any restored state
   Provider provider; // 對應AppWidgetProvider,裡面有AppWidgetProvider信息。
   RemoteViews views; //表示View的RemoteView
   Bundle options;
   Host host; //顯示的地方

   @Override
   public String toString() {
       return "AppWidgetId{" + appWidgetId + ':' + host + ':' + provider + '}';
   }
}
而是從什麼時候把Widget添加到mWidgets的呢?主要有三個地方,一個是綁定AppWidgetProvider跟id時,初始化時加載AppWidget與對應的host;一個是第一次添加AppWidget到桌面時,給AppWidget分配id的時候;一個是restore AppWidget的時候。我們看看分配id時,添加Widget的代碼:
@Override

public int allocateAppWidgetId(String callingPackage, int hostId) {
   final int userId = UserHandle.getCallingUserId();

   // Make sure the package runs under the caller uid.
   mSecurityPolicy.enforceCallFromPackage(callingPackage);

   synchronized (mLock) {
       ensureGroupStateLoadedLocked(userId);

       if (mNextAppWidgetIds.indexOfKey(userId) < 0) {
           mNextAppWidgetIds.put(userId, AppWidgetManager.INVALID_APPWIDGET_ID + 1);
       }

       final int appWidgetId = incrementAndGetAppWidgetIdLocked(userId); //增量分配一個id,保證不沖突

       // NOTE: The lookup is enforcing security across users by making
       // sure the caller can only access hosts it owns.
       HostId id = new HostId(Binder.getCallingUid(), hostId, callingPackage); //得到hostid
       Host host = lookupOrAddHostLocked(id); //根據id獲取host

       Widget widget = new Widget();
       widget.appWidgetId = appWidgetId;
       widget.host = host;

       host.widgets.add(widget);   //把widget添加到host的widgets列表中
       addWidgetLocked(widget); //添加

       saveGroupStateAsync(userId);

       return appWidgetId;
   }
}
實際上這裡還沒有添加對應的provider,所以在Launcher開發的時候,我們需要先調用allocateAppWidgetId方法,然後調用bindAppWidgetId方法綁定id與AppWidgetProvider。而當View有變化的時候,Host需要接收AppWidgetServiceImpl的通知,如何實現的呢?Host(Launcher應用)會跨進程調用AppWidgetServiceImpl的startListening方法,將AppWidgetHost端的Callback服務傳遞給AppWidgetServiceImpl:
// 在AppWidgetHost類當中,AppWidgetHost是Host端的代碼

public void startListening() {
   int[] updatedIds;
   ArrayList updatedViews = new ArrayList();
   try {
       updatedIds = sService.startListening(mCallbacks, mContextOpPackageName, mHostId,
               updatedViews); //把AppWidgetHost端的mCallbacks傳遞給AppWidgetService,mCallbacks是Binder對象。
   }
   catch (RemoteException e) {
       throw new RuntimeException("system server dead?", e);
   }

   final int N = updatedIds.length;
   for (int i = 0; i < N; i++) {
       updateAppWidgetView(updatedIds[i], updatedViews.get(i));
   }
}
在AppWidgetServiceImpl裡面會將mCallbacks保存在對應的Host當中。
從mWidgets裡面找到Widget後,會調用updateAppWidgetInstanceLocked方法來更新Widget。
private void updateAppWidgetInstanceLocked(Widget widget, RemoteViews views,
       boolean isPartialUpdate) {
   if (widget != null && widget.provider != null
           && !widget.provider.zombie && !widget.host.zombie) { // 保證widget有效,並且host也有效

       if (isPartialUpdate && widget.views != null) {
           // For a partial update, we merge the new RemoteViews with the old. 這裡是對於partial update的。
           widget.views.mergeRemoteViews(views);
       } else {
           // For a full update we replace the RemoteViews completely.
           widget.views = views;
       }

       scheduleNotifyUpdateAppWidgetLocked(widget, views);
   }
}
而scheduleNotifyUpdateAppWidgetLocked 則是使用handler發送一個消息給主線程處理:
private void scheduleNotifyUpdateAppWidgetLocked(Widget widget, RemoteViews updateViews) {
   if (widget == null || widget.provider == null || widget.provider.zombie
           || widget.host.callbacks == null || widget.host.zombie) {
       return;
   }

   SomeArgs args = SomeArgs.obtain();
   args.arg1 = widget.host;
   args.arg2 = widget.host.callbacks; //callbacks 是host的跨進程調用接口,來自於startListening

   args.arg3 = updateViews;
   args.argi1 = widget.appWidgetId;

   mCallbackHandler.obtainMessage(
           CallbackHandler.MSG_NOTIFY_UPDATE_APP_WIDGET,
           args).sendToTarget();
}
使用mCallbackHandler發送一條MSG_NOTIFY_UPDATE_APP_WIDGET的消息,mCallbackHandler是AppWidgetServiceImpl.CallbackHandler的實例。如果處理,具體就到CallbackHandler的handleMessage方法中,就是一個Handler機制,讓代碼運行在主線程:
@Override
public void handleMessage(Message message) {
   switch (message.what) {
       case MSG_NOTIFY_UPDATE_APP_WIDGET: {
           SomeArgs args = (SomeArgs) message.obj;
           Host host = (Host) args.arg1;
           IAppWidgetHost callbacks = (IAppWidgetHost) args.arg2;
           RemoteViews views = (RemoteViews) args.arg3;
           final int appWidgetId = args.argi1;
           args.recycle();

           handleNotifyUpdateAppWidget(host, callbacks, appWidgetId, views);
       } break;

       ...

   }

}
handleNotifyUpdateAppWidget方法:
private void handleNotifyUpdateAppWidget(Host host, IAppWidgetHost callbacks,
       int appWidgetId, RemoteViews views) {
   try {
       callbacks.updateAppWidget(appWidgetId, views); //通知AppWidgtHost
   } catch (RemoteException re) {
       synchronized (mLock) {
           Slog.e(TAG, "Widget host dead: " + host.id, re);
           host.callbacks = null;
       }
   }
}
這裡實際上就是調用IAppWidgetHost類型的updateAppWidget,進行跨進程調用。而callbacks就是在AppWidgetServiceImpl的startListening設置的:
@Override
public int[] startListening(IAppWidgetHost callbacks, String callingPackage,
       int hostId, List updatedViews) {
   final int userId = UserHandle.getCallingUserId();

   if (DEBUG) {
       Slog.i(TAG, "startListening() " + userId);
   }

   // Make sure the package runs under the caller uid.
   mSecurityPolicy.enforceCallFromPackage(callingPackage);

   synchronized (mLock) {
       ensureGroupStateLoadedLocked(userId);

       // NOTE: The lookup is enforcing security across users by making
       // sure the caller can only access hosts it owns.
       HostId id = new HostId(Binder.getCallingUid(), hostId, callingPackage);
       Host host = lookupOrAddHostLocked(id);

       host.callbacks = callbacks; //設置callbacks

       updatedViews.clear();

       ArrayList instances = host.widgets;
       int N = instances.size();
       int[] updatedIds = new int[N];
       for (int i = 0; i < N; i++) {
           Widget widget = instances.get(i);
           updatedIds[i] = widget.appWidgetId;
           updatedViews.add(cloneIfLocalBinder(widget.views));
       }

       return updatedIds;
   }
}
最終updateAppWidget的實現代碼是:
static class Callbacks extends IAppWidgetHost.Stub {
   private final WeakReference mWeakHandler;

   public Callbacks(Handler handler) {
       mWeakHandler = new WeakReference<>(handler);
   }

   public void updateAppWidget(int appWidgetId, RemoteViews views) {
       if (isLocalBinder() && views != null) {
           views = views.clone();
       }
       Handler handler = mWeakHandler.get();
       if (handler == null) {
           return;
       }
       Message msg = handler.obtainMessage(HANDLE_UPDATE, appWidgetId, 0, views);
       msg.sendToTarget();
   }
}
最後使用Handler發送消息給主線程,然後在handleMessage中有具體的處理程序:
class UpdateHandler extends Handler {
   public UpdateHandler(Looper looper) {
       super(looper);
   }

   public void handleMessage(Message msg) {
       switch (msg.what) {
           case HANDLE_UPDATE: {
               updateAppWidgetView(msg.arg1, (RemoteViews)msg.obj);
               break;
           }
       }
   }
}
然後調用AppWidgetHost的updateAppWidgetView方法:
void updateAppWidgetView(int appWidgetId, RemoteViews views) {
   AppWidgetHostView v;
   synchronized (mViews) {
       v = mViews.get(appWidgetId);
   }
   if (v != null) {
       v.updateAppWidget(views);
   }
}
根據appWidgetId找到對應的AppWidgetHostView,然後調用AppWidgetHostView的updateAppWidget來根據RemoteView來更新AppWidgetHostView:
/**
* Process a set of {@link RemoteViews} coming in as an update from the
* AppWidget provider. Will animate into these new views as needed
*/
public void updateAppWidget(RemoteViews remoteViews) {

   boolean recycled = false;
   View content = null;
   Exception exception = null;

   // Capture the old view into a bitmap so we can do the crossfade.
    ... 省去old view to bitmap

   if (remoteViews == null) {
       if (mViewMode == VIEW_MODE_DEFAULT) {
           // We've already done this -- nothing to do.
           return;
       }
       content = getDefaultView();  // 默認的View
       mLayoutId = -1;
       mViewMode = VIEW_MODE_DEFAULT;
   } else {
       // Prepare a local reference to the remote Context so we're ready to
       // inflate any requested LayoutParams.
       mRemoteContext = getRemoteContext();
       int layoutId = remoteViews.getLayoutId();

       // If our stale view has been prepared to match active, and the new
       // layout matches, try recycling it
       if (content == null && layoutId == mLayoutId) {
           try {
               remoteViews.reapply(mContext, mView, mOnClickHandler);
               content = mView;
               recycled = true;
               if (LOGD) Log.d(TAG, "was able to recycled existing layout");
           } catch (RuntimeException e) {
               exception = e;
           }
       }

       // Try normal RemoteView inflation
       if (content == null) {
           try {
               content = remoteViews.apply(mContext, this, mOnClickHandler);
               if (LOGD) Log.d(TAG, "had to inflate new layout");
           } catch (RuntimeException e) {
               exception = e;
           }
       }
       mLayoutId = layoutId;
       mViewMode = VIEW_MODE_CONTENT;
   }
   if (content == null) {
       if (mViewMode == VIEW_MODE_ERROR) {
           // We've already done this -- nothing to do.
           return ;
       }
       Log.w(TAG, "updateAppWidget couldn't find any view, using error view", exception);
       content = getErrorView();  // 在失敗的情況下,會使用ErrorView。
       mViewMode = VIEW_MODE_ERROR;
   }

   if (!recycled) {
       prepareView(content);
       addView(content);
   }

   if (mView != content) {
       removeView(mView);
       mView = content;
   }

   if (CROSSFADE) {
       if (mFadeStartTime < 0) {
           // if there is already an animation in progress, don't do anything --
           // the new view will pop in on top of the old one during the cross fade,
           // and that looks okay.
           mFadeStartTime = SystemClock.uptimeMillis();
           invalidate();
       }
   }
}
代碼有點長,但我覺得值得認真一看,可以從源碼中發現當我們的AppWidget在桌面顯示異常時究竟可能是什麼原因。更新view的整個策略主要就是:
如果remoteView為空,則看是否已經使用了默認視圖,如果已經使用了直接返回,如果沒有則使用默認的視圖。
如果remoteView不為空,則看layoutid是否跟現在已經使用的視圖的layoutid一致,一致則重用舊的視圖,調用remoteView.reapply方法重用視圖,並且設置視圖內容。
如果layoutid跟現使用的視圖不一致,則調用remoteView.apply方法得到新的視圖。
如果上面的步驟都沒有得到視圖,則使用錯誤視圖。
如果新的視圖與舊的視圖不一致,則添加新的視圖,刪除舊的視圖。
其實這裡更新視圖的策略非常簡單,盡量重用已有的視圖。裡面會有三種視圖,一種是我們自己設置的,一種是默認的,一種是有錯誤的情況的。當我們在桌面上看到我們的AppWidget顯示異常時,應該還是有兩種不同的表現的,一種是錯誤情況,一種是是用來額默認的視圖,如果remoteView為null的時候會使用默認視圖,如果是從remoteView中讀取視圖失敗時,則會使用錯誤視圖。
所以看到錯誤視圖時,我們可能需要考慮remoteView裡面的View設置是否合理。如果看到的是默認視圖,我們應該想想是否在AppWidgetProvider中調用了AppWidgetManager.updateAppWidget方法,是否remoteView參數為null?可能有的手機兩種視圖是一樣的。
總結整個updateAppWidget的分析就到這裡了,AppWidget其他的更新也是一樣的,整個更新過程跨越了三個進程,而RemoteView作為一種View跨進程傳遞的媒介。另外我覺得從AppWidget去理解Binder機制的使用可能也是一個非常好的切入點。因為這部分我們在應用開發當中經常使用,而且是View,能夠看到效果。接下來我想寫一篇關於Binder多線程的理解。我看AppWidget這部分的源碼,也是項目中的AppWidget存在問題,熟悉AppWidget才能解決好問題,預測代碼中可能潛在的問題。
 Android Design之Android4.0不一樣的裡程碑
想成為Android的傑出開發工程師,不懂得Android的設計規則怎麼可以,Android4.0問世後谷歌公司為Android程序員規范了一系列的設計原則,不要再盲目的
 Android提高之SQLite分頁讀取實現方法
一般來說,Android自身就包含了常用於嵌入式系統的SQLite,這樣就免去了開發者自己移植安裝的功夫。SQLite 支持多數SQL92標准,很多常用的SQL命令都能在
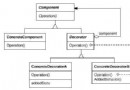 《Android源碼設計模式解析與實戰》讀書筆記(二十一)
第二十一章、裝飾模式 裝飾模式也稱為包裝模式,是結構型設計模式之一。裝飾模式是一種用於替代繼承技術的一種方案。1.定義動態的給一個對象添加一些額外的職責。就增加功能來說,
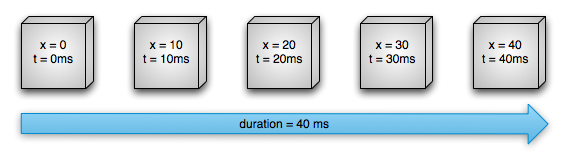 android的屬性動畫
前言屬性動畫(Property Animation)系統是一個更加強大的框架,它幾乎允許你為任何東西設置動畫。不管一個對象是否需要繪制到屏幕上面,你都可以定義一個動畫讓這