編輯:關於Android編程
大概在2015年10月底,QQ空間發了一篇叫《安卓App熱補丁動態修復技術介紹》的文章,文章中提到為了能讓Class進行熱修復,其中一個條件就是防止類被打上CLASS_ISPREVERIFIED標記,具體的做法便是讓一個Dex引用另一個Dex(hack.apk)中的空類(為了讓業務無感知,需要在編譯時動態注入字節碼),並且在應用程序Application類起來的時候要加載這個hack.apk。也就是說最多需要進行兩次反射,即加載hack.apk的時候需要進行一次反射操作,將hack.apk加入到DexElements中去,當有patch下發的時候,還要進行一次反射操作,將patch.apk加入到DexElements中去。雖說現在的手機已經很高級,但在應用起來的時候做兩次反射,對性能要求高的有時候還是無法接受。
而在不久前,在一個插件化的微信群裡,一位大神說,可以不使用hack.apk就可以做到同樣的效果,他們至今是單Dex模式,並且他們的方案在QQ空間文章發出來之前便已經實現了。那麼具體的實現是如何呢?
他們的做法很簡單,注入字節碼依舊是少不了的,只不過注入的字節碼的內容發生了變化,從原來的引用另一個Dex中的Hack.class空類,修改成了引用系統的一個類。
原來注入的字節碼內容如下:
if (Boolean.FALSE.booleanValue()){
      System.out.println(com.to.package.Hack.class);
}
而現在注入的字節碼內容修改成了如下
if (Boolean.FALSE.booleanValue()){
      System.out.println(com.android.internal.util.Predicate.class);
}
可以看到,在這段永遠不可能執行到的if語句中,唯一的區別就是打印的那個class發生了變化,由Hack.class修改成了com.android.internal.util.Predicate系統類,那麼這個類是干嘛用的呢,為什麼選擇這個類呢?
先來看看這個類的內容:
package com.android.internal.util;

/**
 * A Predicate can determine a true or false value for any input of its
 * parameterized type. For example, a {@code RegexPredicate} might implement
 * {@code Predicate}, and return true for any String that matches its
 * given regular expression.
 *
 *
 * Implementors of Predicate which may cause side effects upon evaluation are
 * strongly encouraged to state this fact clearly in their API documentation.
 */
public interface Predicate {

    boolean apply(T t);
}
很簡單的一個泛型類,從注釋中可以看到,這個類可以用於斷言一些內容,比如我需要判斷一個字符串是否滿足某個正則,如果滿足的話就在apply中返回true。並且這個類十分簡單,這也是選擇這個類的原因之一,因為這個類小,不復雜。還有一個原因就是這個類在API 8開始就一直存在,並且一直延續到最新版的Android系統,該類也沒有被刪除,還是com.android.internal.util包下唯一對上層開發者可見的一個類。
這樣就完事了,就可以打patch了?當然不是,如果這樣就完事了,豈不是和直接引用系統的類沒有區別了,還需要在項目中定義一個同樣的類,並且這個類不需要注入這段字節碼。這樣,就存在兩個這樣的類,一個是我們自己app定義的,另一個是系統中存在的。

於是,在application中我們再也不需要反射加載hack.apk了,直接加載patch.apk即可進行熱修復,節省了一次反射插入Dex到DexElements中的時間。
那麼這之中的原理是什麼呢?為什麼這麼做可以達到熱修復的目的呢。
其實,本質還是一樣的,這麼做也可以防止Class被打上CLASS_ISPREVERIFIED標記,讓我們一起扒一扒源碼。
在App安裝的時候,apk中的classes.dex會被虛擬機(dexopt)優化成odex文件,然後才會拿去執行。其中會執行到C/C++層的一個rewriteDex函數,該函數關鍵內容如下:
static bool rewriteDex(u1* addr, int len, u4* pHeaderFlags,
    DexClassLookup** ppClassLookup)
{
    //省略n行代碼...
    if (!loadAllClasses(pDvmDex))
        goto bail;
    verifyAndOptimizeClasses(pDvmDex->pDexFile, doVerify, doOpt);
    //省略n行代碼

bail:
    //省略n行代碼
    return result;
}
會先調用loadAllClasses函數加載所有class到內存中,該函數中會對加載的類遍歷進行判斷是否重復定義了,即app中是否定義了一個和系統一樣的類,函數內容如下:
static bool loadAllClasses(DvmDex* pDvmDex)
{
    //省略n行代碼
    for (idx = 0; idx < count; idx++) {
        //省略n行代碼
        newClass = dvmFindSystemClassNoInit(classDescriptor);
        if (newClass == NULL) {
            //省略n行代碼
        } else if (newClass->pDvmDex != pDvmDex) {
            //在這裡進行了重復定義的校驗,即app中的Predicate類和系統中的Predicate類重復定義了,會被標記成CLASS_MULTIPLE_DEFS
            /*
             * We don't load the new one, and we tag the first one found
             * with the "multiple def" flag so the resolver doesn't try
             * to make it available.
             */
            LOGD("DexOpt: '%s' has an earlier definition; blocking out\n",
                classDescriptor);
            SET_CLASS_FLAG(newClass, CLASS_MULTIPLE_DEFS);
        } else {
            //省略n行代碼
        }
    }
    //省略n行代碼
    return true;
}
上面這個函數中,會進行了重復定義的校驗,即app中的Predicate類和系統中的Predicate類重復定義了,於是app中的Predicate類就會被標記成CLASS_MULTIPLE_DEFS。
接著會執行到verifyAndOptimizeClass函數,該函數內容如下
static void verifyAndOptimizeClass(DexFile* pDexFile, ClassObject* clazz,
    const DexClassDef* pClassDef, bool doVerify, bool doOpt)
{
    const char* classDescriptor;
    bool verified = false;
    //這裡會進行一次判斷,如果重復定義,則輸出log
    if (clazz->pDvmDex->pDexFile != pDexFile) {
        /*
         * The current DEX file defined a class that is also present in the
         * bootstrap class path.  The class loader favored the bootstrap
         * version, which means that we have a pointer to a class that is
         * (a) not the one we want to examine, and (b) mapped read-only,
         * so we will seg fault if we try to rewrite instructions inside it.
         */
        ALOGD("DexOpt: not verifying/optimizing '%s': multiple definitions",
            clazz->descriptor);
        return;
    }

    classDescriptor = dexStringByTypeIdx(pDexFile, pClassDef->classIdx);

    /*
     * First, try to verify it.
     */
    if (doVerify) {
         //校驗
        if (dvmVerifyClass(clazz)) {
            /*
             * Set the "is preverified" flag in the DexClassDef.  We
             * do it here, rather than in the ClassObject structure,
             * because the DexClassDef is part of the odex file.
             */
            assert((clazz->accessFlags & JAVA_FLAGS_MASK) ==
                pClassDef->accessFlags);
            ((DexClassDef*)pClassDef)->accessFlags |= CLASS_ISPREVERIFIED;
            verified = true;
        } else {
            // TODO: log when in verbose mode
            ALOGV("DexOpt: '%s' failed verification", classDescriptor);
        }
    }
    //opt操作
    if (doOpt) {
        bool needVerify = (gDvm.dexOptMode == OPTIMIZE_MODE_VERIFIED ||
                           gDvm.dexOptMode == OPTIMIZE_MODE_FULL);
        if (!verified && needVerify) {
            ALOGV("DexOpt: not optimizing '%s': not verified",
                classDescriptor);
        } else {
            dvmOptimizeClass(clazz, false);

            /* set the flag whether or not we actually changed anything */
            ((DexClassDef*)pClassDef)->accessFlags |= CLASS_ISOPTIMIZED;
        }
    }
}
函數剛開始同樣會進行一次校驗,如果發現clazz->pDvmDex->pDexFile != pDexFile,就說明當前校驗的類存在重復定義,輸出了一行log,log內容為DexOpt: not verifying/optimizing Lcom/android/internal/util/Predicate: multiple definitions ;並且對當前類停止校驗和優化。
Predicate類會被強制return停止校驗,那麼其他類呢?如果虛擬機啟動的時候設置了doVerify為true,那麼就會去執行dvmVerifyClass函數。該函數內容如下:
bool dvmVerifyClass(ClassObject* clazz)
{
    int i;

    if (dvmIsClassVerified(clazz)) {
        ALOGD("Ignoring duplicate verify attempt on %s", clazz->descriptor);
        return true;
    }

    for (i = 0; i < clazz->directMethodCount; i++) {
        if (!verifyMethod(&clazz->directMethods[i])) {
            LOG_VFY("Verifier rejected class %s", clazz->descriptor);
            return false;
        }
    }
    for (i = 0; i < clazz->virtualMethodCount; i++) {
        if (!verifyMethod(&clazz->virtualMethods[i])) {
            LOG_VFY("Verifier rejected class %s", clazz->descriptor);
            return false;
        }
    }

    return true;
}
首先會判斷是否校驗過,如果校驗過則不再重復校驗,否則對部分方法調用verifyMethod函數進行校驗,即directMethods和virtualMethods方法,而這個函數的內部會進行一次code-flow analysis,簡單來說就是對每個方法的字節碼進行一次分析,如下
static bool verifyMethod(Method* meth)
{
    bool result = false;

    //此處省略n行代碼
    /*
     * Do code-flow analysis.
     *
     * We could probably skip this for a method with no registers, but
     * that's so rare that there's little point in checking.
     */

    if (!dvmVerifyCodeFlow(&vdata)) {
        //ALOGD("+++ %s failed code flow", meth->name);
        goto bail;
    }

success:
    result = true;

bail:
    //此處省略n行代碼
    return result;
}
繼續調用到dvmVerifyCodeFlow函數中去:
/*
 * Entry point for the detailed code-flow analysis of a single method.
 */
bool dvmVerifyCodeFlow(VerifierData* vdata)
{
    bool result = false;
    //此處省略n行代碼

    /*
     * Run the verifier.
     */
    if (!doCodeVerification(vdata, ®Table))
        goto bail;


    //此處省略n行代碼

    /*
     * Success.
     */
    result = true;

bail:
    //此處省略n行代碼
    return result;
}
繼續跟蹤到doCodeVerification函數:
static bool doCodeVerification(VerifierData* vdata, RegisterTable* regTable)
{
    //此處省略n行代碼

    /*
     * Continue until no instructions are marked "changed".
     */
    while (true) {

        //此處省略n行代碼

        if (!verifyInstruction(meth, insnFlags, regTable, insnIdx,
                uninitMap, &startGuess))
        {
            //ALOGD("+++ %s bailing at %d", meth->name, insnIdx);
            goto bail;
        }

        //此處省略n行代碼
    }

    //此處省略n行代碼

    result = true;

bail:
    return result;
}
一直跟蹤到verifyInstruction函數,verifyInstruction函數中有一個switc分支,當校驗到我們注入的那段字節碼的時候,會進入到 case OP_CONST_CLASS:分支。
那麼什麼時候會進入這個分支呢,簡單的說就是遇到了const_class字節碼操作的時候,這個字節碼在什麼時候會觸發呢,使用apktool反編譯一下我們注入字節碼的類可以發現,System.out.println打印的內容裡面,就有一段const_class字節碼
# direct methods
.method static constructor ()V
    .locals 2

    sget-object v0, Ljava/lang/Boolean;->FALSE:Ljava/lang/Boolean;

    invoke-virtual {v0}, Ljava/lang/Boolean;->booleanValue()Z

    move-result v0

    if-eqz v0, :cond_0

    sget-object v0, Ljava/lang/System;->out:Ljava/io/PrintStream;
    //這個字節碼會觸發該Switch語句OP_CONST_CLASS分支
    const-class v1, Lcom/android/internal/util/Predicate;

    invoke-virtual {v0, v1}, Ljava/io/PrintStream;->println(Ljava/lang/Object;)V

    :cond_0
    return-void
.end method
翻一下文檔可以發現OP_CONST_CLASS操作符的作用就是
Move a reference to the class specified by the given index into the specified register. In the case where the indicated type is primitive, this will store a reference to the primitive type’s degenerate class.
簡單的這麼理解
根據指定的索引將一個指向class的引用保存在一個特定的寄存器,如果是基本數據類型,會指向它的包裝類型。
verifyInstruction函數的內容如下:
static bool verifyInstruction(const Method* meth, InsnFlags* insnFlags,
    RegisterTable* regTable, int insnIdx, UninitInstanceMap* uninitMap,
    int* pStartGuess)
{

    //此處省略n行代碼

    switch (decInsn.opcode) {

        //此處省略n行代碼

        case OP_CONST_CLASS:
                assert(gDvm.classJavaLangClass != NULL);
                /* make sure we can resolve the class; access check is important */
                resClass = dvmOptResolveClass(meth->clazz, decInsn.vB, &failure);
                if (resClass == NULL) {
                    const char* badClassDesc = dexStringByTypeIdx(pDexFile, decInsn.vB);
                    dvmLogUnableToResolveClass(badClassDesc, meth);
                    LOG_VFY("VFY: unable to resolve const-class %d (%s) in %s",
                        decInsn.vB, badClassDesc, meth->clazz->descriptor);
                    assert(failure != VERIFY_ERROR_GENERIC);
                } else {
                    setRegisterType(workLine, decInsn.vA,
                        regTypeFromClass(gDvm.classJavaLangClass));
                }
                break;

         //此處省略n行代碼
    }

    //此處省略n行代碼

}
最終調用到了dvmOptResolveClass函數中去拿到一個ClassObject對象
ClassObject* dvmOptResolveClass(ClassObject* referrer, u4 classIdx,
    VerifyError* pFailure)
{
    DvmDex* pDvmDex = referrer->pDvmDex;
    ClassObject* resClass;

    //此處省略n行代碼

    /*
     * Check the table first.  If not there, do the lookup by name.
     */
    resClass = dvmDexGetResolvedClass(pDvmDex, classIdx);

    /* multiple definitions? */
    if (IS_CLASS_FLAG_SET(resClass, CLASS_MULTIPLE_DEFS)) {
        ALOGI("DexOpt: not resolving ambiguous class '%s'",
            resClass->descriptor);
        if (pFailure != NULL)
            *pFailure = VERIFY_ERROR_NO_CLASS;
        return NULL;
    }

    //此處省略n行代碼

    return resClass;
}
該函數中通過dvmDexGetResolvedClass函數拿到了class,這個class就是最開始的app中被終止校驗和優化的Predicate類,並且這個類由於被標記成了重復定義,執行到這裡的時候,就會被認為是一個模糊不清的概念,因為app中有一個,系統中有一個,不知道使用哪一個,這時候就會直接終止校驗,返回VERIFY_ERROR_NO_CLASS,一直會返回到最開始調用的verifyAndOptimizeClass函數中去,並且會輸出log,內容為DexOpt: ‘{classDescriptor}’ failed verification, 這時候verified變量會被標記成false,並且由於校驗失敗,opt操作也可能被終止,會輸出log,內容為DexOpt: ‘{classDescriptor}’ failed verification。最終所有注入了字節碼的類都沒有打上CLASS_ISPREVERIFIED標記,也就達到了QQ空間文章中的條件,即防止類被打上標記。
最後說下一些額外的東西,如果剛剛的const-class操作符指向的class不存在,就會扔出一個ClassNotFoundException異常。
總結一下這麼做的好處及壞處:
好處就是節約一次反射時間,畢竟是在app啟動的時候,能節約多少時間就節約多少時間,如果你的app沒有使用multidex,那麼app就是單dex,這種情況下無需重復引入hack.apk這個dex來額外達到熱修復的目的。 壞處就是com.android.internal.util.Predicate這個類如果在高版本中刪除了或者被國內的rom定制廠商刪除了,那麼就坑爹了。不過一般rom不會把這個類去除,因為一旦去除,google的CTS測試就過不了,這是一個公開的sdk中的方法。 權衡利弊,本文的方式更適合用於熱修復,不過百家爭鳴,百花齊放,存在即合理,不能隨隨便便對一種方式進行否定,就像當今的插件化技術,各有各的一套實現,也各自有各自的優缺點。
 如何將Crash率從2.2%降至0.2%
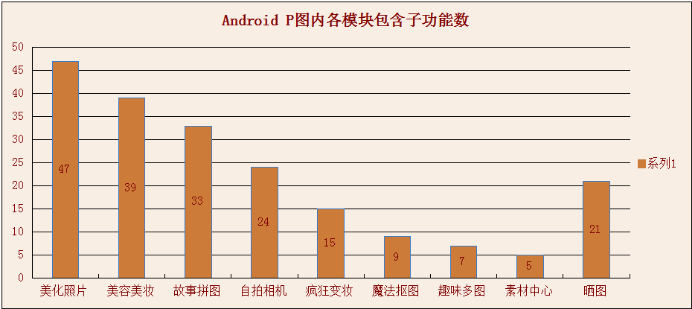
天天P圖作為圖像處理類APP,內部集成了很多功能,包括濾鏡、人臉檢測、美白、磨皮、美妝、拼圖、相機等,而且這些功能多是用底層算法依靠GPU實現,如何保證這些功能在眾廠商生
 Android 自定義View 實現刮刮卡效果
主要思想:將一個view設計成多層:背景層,含中獎信息等;遮蓋層,用於刮獎,使用關聯一個Bitmap的Canvas在該Bitmap上,使用它的canvas.drawPat
 DroidPlugin代碼分析(四) 進程管理
之所以單列一篇寫進程管理,是因為看到注釋上寫“這是一個復雜的進程管理程序”,但是仔細看了一下好像也沒那麼“復雜”...這一
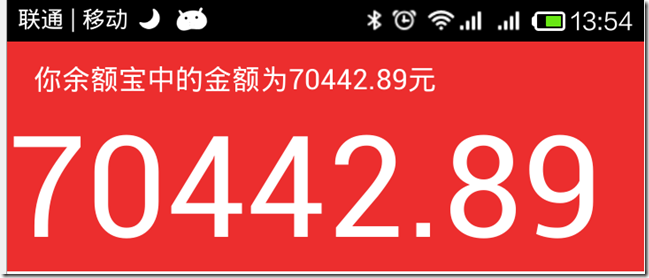 android編程實現類似於支付寶余額快速閃動效果的方法
本文實例講述了android編程實現類似於支付寶余額快速閃動效果的方法。分享給大家供大家參考,具體如下:效果如下:此圖片不會動,但實際上是會快速跳動的。之前看到有支付寶的