編輯:關於Android編程
Over the last year, we've been retooling our mobile apps to make them faster, more reliable, and easier to use. Several months ago, we embarked on a major step change for iOS and shipped a native re-write of Facebook for iOS. With Android, we've moved to a fixed-date release cycle and have been steadily making improvements over time so that Facebook performs consistently across multiple platforms.
Today, we're releasing a new version of Facebook for Android that's been rebuilt in native code to improve speed and performance. To support the unique complexity of Facebook stories across devices, we're moving from a hybrid native/webview to pure native code, allowing us to optimize the Facebook experience for faster loading, new user interfaces, disk cache, and so on.
We rebuilt several of Facebook for Android's core features in native code, including news feed and Timeline, to create a faster experience whether you're opening the app, looking at photos, or interacting with friends. Now, you can comment and like a story more quickly, and photo loading is optimized to be much faster. We also built a new, automatically updated story banner to bubble up the newest stories, no matter where you are in news feed.
We found that we had to develop new solutions and abstractions in order to address several performance challenges along the way.
Performance Challenges
a) Reducing Garbage Collection: Memory efficiency has a dramatic effect on UI smoothness. Inefficient memory usage will result in many garbage collection (GC) events, which in turn can pause the application for multiple frames and cause a visible stutter during scrolling. We focused specifically on minimizing, eliminating, or deferring allocations in performance-critical code. We also deferred performing allocation-heavy code (like feed story parsing) until scrolling stopped and moved them off the UI thread.
b) Writing a Custom Event Bus: An event bus allows for a publish/subscribe flow, which allows communication between classes that should not be aware of, or dependent on, each other's existence. Common event bus implementations use object iterators and reflection, which cause long operations and a lot of memory allocations. To solve this, we implemented a light-weight event bus that avoids all reflection and object iterators so it can be registered and unregistered during performance-critical areas of code like scrolling.
c) Moving Photos to the Native Heap: Loading photos is memory-intensive, and efficiently loading and handling bitmaps can be challenging. The standard method of allocating them directly on the Java heap can result in significant GCs and out-of-memory errors. We moved our bitmaps to be loaded on the native heap using the inPurgeable flag in the BitmapFactory class. This allowed photos to be allocated in native memory instead of the Java heap (Honeycomb and up) or in external memory tracked by the VM (Froyo/Gingerbread), which in turn significantly reduced their impact on our allocations and thus performance.
d) Writing a Custom ListView Recycler: View recycling speeds up scrolling performance. The stock Android ListView has view recycling support, but it is not efficient for list elements of very different row heights, such as in news feed stories. We wrote a custom view recycler, which detached heavy content views once they were added to the recycling heap. We also recycled substories in more complicated aggregated feed stories.
Looking Ahead
This new release creates a solid foundation for the Facebook for Android app moving forward. The infrastructure in place will let us continue to make the app even faster, smoother, and feature-rich. We hope you enjoy thenew Facebook for Android appand use it to celebrate memorable moments, share your stories, and enjoy the holidays with your family and friends.
Under the Hood: Dalvik patch for Facebook for Android
Facebook is one of the most feature-rich apps available for Android. With features likepushnotifications, news feed,and an embedded version of Facebook Messenger (a complete app in itsown right) all working together in real-time, the complexity and volume of code creates technical challenges that few, if any, other Android developers face--especially on older versions of the platform. (Our latest apps support Android versions as old as Froyo--Android version 2.2--which is almost three years old.)
One of these challenges is related to the way Android's runtime engine, the Dalvik Virtual Machine, handles Java methods. Late last year we completed amajor rebuildof our Android app (https://www.facebook.com/notes/facebook-engineering/under-the-hood-rebuilding-facebook-for-android/10151189598933920),which involved moving a lot of our code from JavaScript to Java, as well as using newer abstractions that encouraged large numbers of small methods (generally considered a good programming practice). Unfortunately, this caused the number of Java methods in our app to drastically increase.
As we were testing, the problem first showed up as described in this bug(http://code.google.com/p/android/issues/detail?id=22586), which caused our app installation to fail on older Android phones. During standard installation, a program called "dexopt" runs to prepare your app for the specific phone it's being installed on. Dexopt uses a fixed-size buffer (called the "LinearAlloc" buffer) to store information about all of the methods in your app. Recent versions of Android use an 8 or 16 MB buffer, but Froyo and Gingerbread (versions 2.2 and 2.3) only have 5 MB. Because older versions of Android have a relatively small buffer, our large number of methods was exceeding the buffer size and causing dexopt to crash.
After a bit of panic, we realized that we could work around this problem by breaking our app into multiple dex files, using the technique describedhere(http://android-developers.blogspot.com/2011/07/custom-class-loading-in-dalvik.html), which focuses on using secondary dex files for extension modules, not core parts of the app.
However, there was no way we could break our app up this way--too many of our classes are accessed directly by the Android framework. Instead, we needed to inject our secondary dex files directly into the system class loader. This isn't normally possible, but we examined the Android source code and used Java reflection to directly modify some of its internal structures. We were certainly glad and grateful that Android is open source—otherwise, this change wouldn’t have been possible.
But as we came closer to launching our redesigned app, we ran into another problem. The LinearAlloc buffer doesn't just exist in dexopt--it exists within every running Android program. While dexopt uses LinearAlloc to to store information about all of the methods in your dex file, the running app only needs it for methods in classes that you are actually using. Unfortunately, we were now using too many methods for Android versions up to Gingerbread, and our app was crashing shortly after startup.
There was no way to work around this with dex files since all of our classes were being loaded into one process, and we weren’t able to find any information about anyone who had faced this problem before (since it is only possible once you are already using multiple dex files, which is a difficult technique in itself). We were on our own.
We tried various techniques to reclaim space, including aggressive use of ProGuard and source code transformations to reduce our method count. We even built a profiler for LinearAlloc usage to figure out what the biggest consumers were. Nothing we tried had a significant impact, and we still needed to write many more methods to support all of the rich content types in our new and improved news feed and timeline.
As it stood, the release of the much-anticipated Facebook for Android 2.0 was at risk. It seemed like we would have to choose between cutting significant features from the app or only shipping our new version to the newest Android phones (ICS and up). Neither seemed acceptable. We needed a better solution.
Once again, we looked to the Android source code. Looking at thedefinitionof the LinearAlloc buffer(https://github.com/android/platform_dalvik/blob/android-2.3.7_r1/vm/LinearAlloc.h#L33),we realized that if we could only increase that buffer from 5 MB to 8 MB, we would be safe!
That's when we had the idea of using a JNI extension to replace the existing buffer with a larger one. At first, this idea seemed completely insane. Modifying the internals of the Java class loader is one thing, but modifying the internals of the Dalvik VM while it was running our code is incredibly dangerous. But as we pored over the code, analyzing all the uses of LinearAlloc, we began to realize that it should be safe as long as we did it at the start of our program. All we had to do was find the LinearAllocHdr object, lock it, and replace the buffer.
Finding it turned out to be the hard part.Here’swhere it’s stored(https://github.com/android/platform_dalvik/blob/android-2.3.7_r1/vm/Globals.h#L519), buried within the DvmGlobals object, over 700 bytes from the start. Searching the entire object would be risky at best, but fortunately, we had an anchor point: the vmList object just a few bytes before. This contained a value that we could compare to the JavaVM pointer available through JNI.
The plan was finally coming together: find the proper value for vmList, scan the DvmGlobals object to find a match, jump a few more bytes to the LinearAlloc header, and replace the buffer. So we built the JNI extension, embedded it in our app, started it up, and...we saw the app running on a Gingerbread phone for the first time in weeks.The plan had worked.
But for some reason it failed on the Samsung Galaxy S II...
The most popular Gingerbread phone...
Of all time...
It seems that Samsung made a small change to Android that was confusing our code. Other manufacturers might have done the same, so we realized we needed to make our code more robust.
Manual inspection of the GSII revealed that the LinearAlloc buffer was only 4 bytes from where we expected it, so we adjusted our code to look a few bytes to each side if it failed to find the LinearAlloc buffer in the expected location. This required us to parse our process's memory map to ensure we didn't make any invalid memory references (which would crash the app immediately) and also build some strong heuristics to make sure we would recognize the LinearAlloc buffer when we found it. As a last resort, we found a (mostly) safe way to scan the entire process heap to search for the buffer.
Now we had a version of the code that worked on a few popular phones--but we needed more than just a few. So we bundled our code up into a test app that would run the same procedure we were using for the Facebook app, then just display a large green or red box, indicating success or failure.
We used manual testing, DeviceAnywhere, and a test lab that Google let us borrow to run our test app on 70 different phone models, and fortunately, it worked on every single one!
We released this code with Facebook for Android 2.0 in December. It's now running on hundreds of different phone models, and we have yet to find one where it doesn't work. The great speed improvements in that release would not have been possible without this crazy hack. And needless to say, without Android’s open platform, we wouldn’t have had the opportunity to ship our best version of the app. There’s a lot of opportunity for building on Android, and we’re excited to keep bringing the Facebook experience to more people and devices.
當一個app的功能越來越復雜,代碼量越來越多,也許有一天便會突然遇到下列現象:
1. 生成的apk在2.3以前的機器無法安裝,提示INSTALL_FAILED_DEXOPT
2. 方法數量過多,編譯時出錯,提示:
Conversion to Dalvik format failed:Unable to execute dex: method ID not in [0, 0xffff]: 65536
出現這種問題的原因是:
1. Android2.3及以前版本用來執行dexopt(用於優化dex文件)的內存只分配了5M
2. 一個dex文件最多只支持65536個方法。
針對上述問題,也出現了諸多解決方案,使用的最多的是插件化,即將一些獨立的功能做成一個單獨的apk,當打開的時候使用DexClassLoader動態加載,然後使用反射機制來調用插件中的類和方法。這固然是一種解決問題的方案:但這種方案存在著以下兩個問題:
1. 插件化只適合一些比較獨立的模塊;
2. 必須通過反射機制去調用插件的類和方法,因此,必須搭配一套插件框架來配合使用;
由於上述問題的存在,通過不斷研究,便有了dex分包的解決方案。簡單來說,其原理是將編譯好的class文件拆分打包成兩個dex,繞過dex方法數量的限制以及安裝時的檢查,在運行時再動態加載第二個dex文件中。faceBook曾經遇到相似的問題,具體可參考:
https://www.facebook.com/notes/facebook-engineering/under-the-hood-dalvik-patch-for-facebook-for-android/10151345597798920
文中有這麼一段話:
However, there was no way we could break our app up this way--too many of our classes are accessed directly by the Android framework. Instead, we needed to inject our secondary dex files directly into the system class loader。
文中說得比較簡單,我們來完善一下該方案:除了第一個dex文件(即正常apk包唯一包含的Dex文件),其它dex文件都以資源的方式放在安裝包中,並在Application的onCreate回調中被注入到系統的ClassLoader。因此,對於那些在注入之前已經引用到的類(以及它們所在的jar),必須放入第一個Dex文件中。
下面通過一個簡單的demo來講述dex分包方案,該方案分為兩步執行:
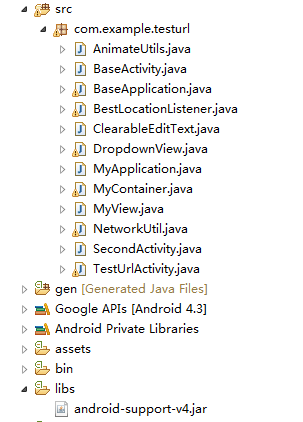
整個demo的目錄結構是這樣,我打算將SecondActivity,MyContainer以及DropDownView放入第二個dex包中,其它保留在第一個dex包。
一、編譯時分包
整個編譯流程如下:
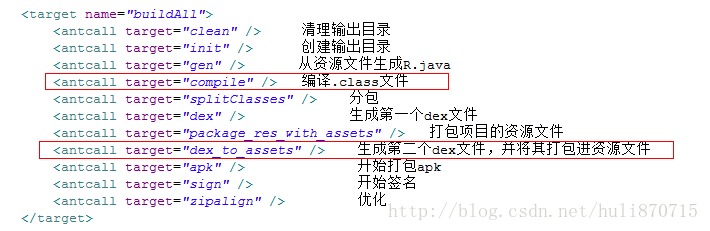
除了框出來的兩Target,其它都是編譯的標准流程。而這兩個Target正是我們的分包操作。首先來看看spliteClasses target。

由於我們這裡僅僅是一個demo,因此放到第二個包中的文件很少,就是上面提到的三個文件。分好包之後就要開始生成dex文件,首先打包第一個dex文件:
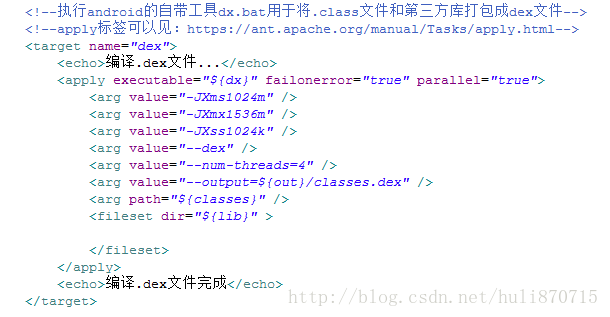
由這裡將${classes}(該文件夾下都是要打包到第一個dex的文件)打包生成第一個dex。接著生成第二個dex,並將其打包到資資源文件中:
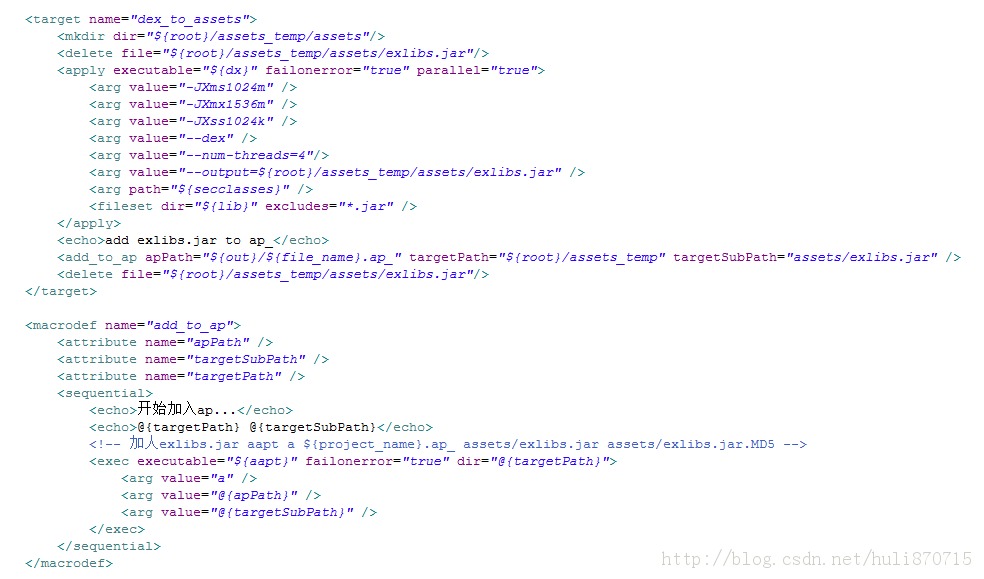
可以看到,此時是將${secclasses}中的文件打包生成dex,並將其加入ap文件(打包的資源文件)中。到此,分包完畢,接下來,便來分析一下如何動態將第二個dex包注入系統的ClassLoader。
二、將dex分包注入ClassLoader
這裡談到注入,就要談到Android的ClassLoader體系。
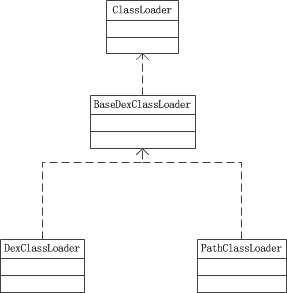
由上圖可以看出,在葉子節點上,我們能使用到的是DexClassLoader和PathClassLoader,通過查閱開發文檔,我們發現他們有如下使用場景:
1. 關於PathClassLoader,文檔中寫到:Android uses this class for its system class loader and for its application class loader(s),
由此可知,Android應用就是用它來加載;
2. DexClass可以加載apk,jar,及dex文件,但PathClassLoader只能加載已安裝到系統中(即/data/app目錄下)的apk文件。
知道了兩者的使用場景,下面來分析下具體的加載原理,由上圖可以看到,兩個葉子節點的類都繼承BaseDexClassLoader中,而具體的類加載邏輯也在此類中:
BaseDexClassLoader:
@Override
protectedClassfindClass(Stringname)throwsClassNotFoundException{
List
Classc=pathList.findClass(name,suppressedExceptions);
if(c==null){
ClassNotFoundExceptioncnfe=newClassNotFoundException("Didn'tfindclass\""+name+"\"onpath:"+pathList);
for(Throwablet:suppressedExceptions){
cnfe.addSuppressed(t);
}
throwcnfe;
}
returnc;
由上述函數可知,當我們需要加載一個class時,實際是從pathList中去需要的,查閱源碼,發現pathList是DexPathList類的一個實例。ok,接著去分析DexPathList類中的findClass函數,
DexPathList:
publicClassfindClass(Stringname,List
for(Elementelement:dexElements){
DexFiledex=element.dexFile;
if(dex!=null){
Classclazz=dex.loadClassBinaryName(name,definingContext,suppressed);
if(clazz!=null){
returnclazz;
}
}
}
if(dexElementsSuppressedExceptions!=null){
suppressed.addAll(Arrays.asList(dexElementsSuppressedExceptions));
}
returnnull;
上述函數的大致邏輯為:遍歷一個裝在dex文件(每個dex文件實際上是一個DexFile對象)的數組(Element數組,Element是一個內部類),然後依次去加載所需要的class文件,直到找到為止。
看到這裡,注入的解決方案也就浮出水面,假如我們將第二個dex文件放入Element數組中,那麼在加載第二個dex包中的類時,應該可以直接找到。
帶著這個假設,來完善demo。
在我們自定義的BaseApplication的onCreate中,我們執行注入操作:
publicStringinject(StringlibPath){
booleanhasBaseDexClassLoader=true;
try{
Class.forName("dalvik.system.BaseDexClassLoader");
}catch(ClassNotFoundExceptione){
hasBaseDexClassLoader=false;
}
if(hasBaseDexClassLoader){
PathClassLoaderpathClassLoader=(PathClassLoader)sApplication.getClassLoader();
DexClassLoaderdexClassLoader=newDexClassLoader(libPath,sApplication.getDir("dex",0).getAbsolutePath(),libPath,sApplication.getClassLoader());
try{
ObjectdexElements=combineArray(getDexElements(getPathList(pathClassLoader)),getDexElements(getPathList(dexClassLoader)));
ObjectpathList=getPathList(pathClassLoader);
setField(pathList,pathList.getClass(),"dexElements",dexElements);
return"SUCCESS";
}catch(Throwablee){
e.printStackTrace();
returnandroid.util.Log.getStackTraceString(e);
}
}
return"SUCCESS";
這是注入的關鍵函數,分析一下這個函數:
參數libPath是第二個dex包的文件信息(包含完整路徑,我們當初將其打包到了assets目錄下),然後將其使用DexClassLoader來加載(這裡為什麼必須使用DexClassLoader加載,回顧以上的使用場景),然後通過反射獲取PathClassLoader中的DexPathList中的Element數組(已加載了第一個dex包,由系統加載),以及DexClassLoader中的DexPathList中的Element數組(剛將第二個dex包加載進去),將兩個Element數組合並之後,再將其賦值給PathClassLoader的Element數組,到此,注入完畢。
現在試著啟動app,並在TestUrlActivity(在第一個dex包中)中去啟動SecondActivity(在第二個dex包中),啟動成功。這種方案是可行。
但是使用dex分包方案仍然有幾個注意點:
1. 由於第二個dex包是在Application的onCreate中動態注入的,如果dex包過大,會使app的啟動速度變慢,因此,在dex分包過程中一定要注意,第二個dex包不宜過大。
2. 由於上述第一點的限制,假如我們的app越來越臃腫和龐大,往往會采取dex分包方案和插件化方案配合使用,將一些非核心獨立功能做成插件加載,核心功能再分包加載。
當一個App發布之後,突然發現了一個嚴重bug需要進行緊急修復,這時候公司各方就會忙得焦頭爛額:重新打包App、測試、向各個應用市場和渠道換包、提示用戶升級、用戶下載、覆蓋安裝。有時候僅僅是為了修改了一行代碼,也要付出巨大的成本進行換包和重新發布。
這時候就提出一個問題:有沒有辦法以補丁的方式動態修復緊急Bug,不再需要重新發布App,不再需要用戶重新下載,覆蓋安裝?
雖然Android系統並沒有提供這個技術,但是很幸運的告訴大家,答案是:可以,我們QQ空間提出了熱補丁動態修復技術來解決以上這些問題。
2.實際案例
空間Android獨立版5.2發布後,收到用戶反饋,結合版無法跳轉到獨立版的訪客界面,每天都較大的反饋。在以前只能緊急換包,重新發布。成本非常高,也影響用戶的口碑。最終決定使用熱補丁動態修復技術,向用戶下發Patch,在用戶無感知的情況下,修復了外網問題,取得非常好的效果。
3.解決方案
該方案基於的是android dex分包方案的,關於dex分包方案,網上有幾篇解釋了,所以這裡就不再贅述,具體可以看這裡https://m.oschina.net/blog/308583。
簡單的概括一下,就是把多個dex文件塞入到app的classloader之中,但是android dex拆包方案中的類是沒有重復的,如果classes.dex和classes1.dex中有重復的類,當用到這個重復的類的時候,系統會選擇哪個類進行加載呢?
讓我們來看看類加載的代碼:
一個ClassLoader可以包含多個dex文件,每個dex文件是一個Element,多個dex文件排列成一個有序的數組dexElements,當找類的時候,會按順序遍歷dex文件,然後從當前遍歷的dex文件中找類,如果找類則返回,如果找不到從下一個dex文件繼續查找。
理論上,如果在不同的dex中有相同的類存在,那麼會優先選擇排在前面的dex文件的類,如下圖:
在此基礎上,我們構想了熱補丁的方案,把有問題的類打包到一個dex(patch.dex)中去,然後把這個dex插入到Elements的最前面,如下圖:
好,該方案基於第二個拆分dex的方案,方案實現如果懂拆分dex的原理的話,大家應該很快就會實現該方案,如果沒有拆分dex的項目的話,可以參考一下谷歌的multidex方案實現。然後在插入數組的時候,把補丁包插入到最前面去。
好,看似問題很簡單,輕松的搞定了,讓我們來試驗一下,修改某個類,然後打包成dex,插入到classloader,當加載類的時候出現了(本例中是QzoneActivityManager要被替換):
為什麼會出現以上問題呢?
從log的意思上來講,ModuleManager引用了QzoneActivityManager,但是發現這這兩個類所在的dex不在一起,其中:
1. ModuleManager在classes.dex中
2. QzoneActivityManager在patch.dex中
結果發生了錯誤。
這裡有個問題,拆分dex的很多類都不是在同一個dex內的,怎麼沒有問題?
讓我們搜索一下拋出錯誤的代碼所在,嘿咻嘿咻,找到了一下代碼:
從代碼上來看,如果兩個相關聯的類在不同的dex中就會報錯,但是拆分dex沒有報錯這是為什麼,原來這個校驗的前提是:
如果引用者(也就是ModuleManager)這個類被打上了CLASS_ISPREVERIFIED標志,那麼就會進行dex的校驗。那麼這個標志是什麼時候被打上去的?讓我們在繼續搜索一下代碼,嘿咻嘿咻~~,在DexPrepare.cpp找到了一下代碼:
這段代碼是dex轉化成odex(dexopt)的代碼中的一段,我們知道當一個apk在安裝的時候,apk中的classes.dex會被虛擬機(dexopt)優化成odex文件,然後才會拿去執行。
虛擬機在啟動的時候,會有許多的啟動參數,其中一項就是verify選項,當verify選項被打開的時候,上面doVerify變量為true,那麼就會執行dvmVerifyClass進行類的校驗,如果dvmVerifyClass校驗類成功,那麼這個類會被打上CLASS_ISPREVERIFIED的標志,那麼具體的校驗過程是什麼樣子的呢?
此代碼在DexVerify.cpp中,如下:
1. 驗證clazz->directMethods方法,directMethods包含了以下方法:
1. static方法
2. private方法
3. 構造函數
2.clazz->virtualMethods
1. 虛函數=override方法?
概括一下就是如果以上方法中直接引用到的類(第一層級關系,不會進行遞歸搜索)和clazz都在同一個dex中的話,那麼這個類就會被打上CLASS_ISPREVERIFIED:
所以為了實現補丁方案,所以必須從這些方法中入手,防止類被打上CLASS_ISPREVERIFIED標志。
最終空間的方案是往所有類的構造函數裡面插入了一段代碼,代碼如下:
if (ClassVerifier.PREVENT_VERIFY) {
System.out.println(AntilazyLoad.class);
}
其中AntilazyLoad類會被打包成單獨的hack.dex,這樣當安裝apk的時候,classes.dex內的類都會引用一個在不相同dex中的AntilazyLoad類,這樣就防止了類被打上CLASS_ISPREVERIFIED的標志了,只要沒被打上這個標志的類都可以進行打補丁操作。
然後在應用啟動的時候加載進來.AntilazyLoad類所在的dex包必須被先加載進來,不然AntilazyLoad類會被標記為不存在,即使後續加載了hack.dex包,那麼他也是不存在的,這樣屏幕就會出現茫茫多的類AntilazyLoad找不到的log。
所以Application作為應用的入口不能插入這段代碼。(因為載入hack.dex的代碼是在Application中onCreate中執行的,如果在Application的構造函數裡面插入了這段代碼,那麼就是在hack.dex加載之前就使用該類,該類一次找不到,會被永遠的打上找不到的標志)
其中:
之所以選擇構造函數是因為他不增加方法數,一個類即使沒有顯式的構造函數,也會有一個隱式的默認構造函數。
空間使用的是在字節碼插入代碼,而不是源代碼插入,使用的是javaassist庫來進行字節碼插入的。
虛擬機在安裝期間為類打上CLASS_ISPREVERIFIED標志是為了提高性能的,我們強制防止類被打上標志是否會影響性能?這裡我們會做一下更加詳細的性能測試.但是在大項目中拆分dex的問題已經比較嚴重,很多類都沒有被打上這個標志。
如何打包補丁包:
1. 空間在正式版本發布的時候,會生成一份緩存文件,裡面記錄了所有class文件的md5,還有一份mapping混淆文件。
2. 在後續的版本中使用-applymapping選項,應用正式版本的mapping文件,然後計算編譯完成後的class文件的md5和正式版本進行比較,把不相同的class文件打包成補丁包。
備注:該方案現在也應用到我們的編譯過程當中,編譯不需要重新打包dex,只需要把修改過的類的class文件打包成patch dex,然後放到sdcard下,那麼就會讓改變的代碼生效。
最近在學習Android的熱修復,使用了兩個比較熱門的框架,現做下總結:
項目git地址:https://github.com/dodola/RocooFix
源碼會編譯錯誤,可以使用下面的包。
修復lib包:RocooFix_libs
需要了解熱修復原理的可以看下張鴻洋博客
也可以加下這個群:561394234 (裡面有修復的項目,RocooFix作者也在裡面!)
前言:
RocooFix支持兩種模式:
1、靜態修復某種情況下需要重啟應用。 (推薦使用)
2、動態修復,無需重啟應用即可生效。
使用方法:
 //打補丁(需要制作補丁的時候使用)
        RocooFix.init(this);

//方案1:靜態啟用,一般在Application裡加載補丁

/**
  * 從Assets裡取出補丁,一般用於測試
  *
  * @param context
  * @param assetName
  */
RocooFix.initPathFromAssets(Context context, String assetName);

 /**
   * 從指定目錄加載補丁
   * @param context
   * @param dexPath
   */
RocooFix.applyPatch(Context context, String dexPath);


//方案2:動態打補丁,立即生效,有性能問題,適用於補丁方法數較少的情況,建議在ART虛擬機裡啟用該模式
/**
 * 從Asset裡加載補丁,一般用於本地測試
 * @param context
 * @param assetName
 */
RocooFix.initPathFromAssetsRuntime(Context context, String assetName) ;

/**
 * 從指定目錄加載補丁
 * @param context
 * @param dexPath
 */
RocooFix.applyPatchRuntime(Context context, String dexPath)  ;
沒有加群的朋友可以下載上面的RocooFix_libs包跟著我一步步來做:
項目使用Android Studio開發,所以准備好翻牆工具下載依賴包!!!
一、新建Android項目 app
二、將上面下載文件裡面的rocoo作為lib庫導入
在app的build.gradle 裡面添加compile project(‘:rocoo’),也可以手動添加依賴。
三、下載下來的文件夾裡面還有個buildsrc文件直接放到app項目平級目錄中(這個不用做任何操作)
到此我們的目錄結構為:

四:配置 根目錄裡面的 build.gradle文件:
buildscript {
    repositories {
        jcenter()
        maven {
            url "http://dl.bintray.com/dodola/maven"   //添加
        }
    }
    dependencies {
        classpath 'com.android.tools.build:gradle:2.1.2'
        classpath 'org.jacoco:org.jacoco.core:0.7.4.201502262128'   //添加
        // NOTE: Do not place your application dependencies here; they belong
        // in the individual module build.gradle files
    }
}
五、配置 app 裡面的build.gradle 文件
apply plugin: 'com.android.application'
apply plugin: 'com.dodola.rocoofix'            //添加

android {
    compileSdkVersion 23
    buildToolsVersion "23.0.3"

    defaultConfig {
        applicationId "com.test.hotfixtest"
        minSdkVersion 15
        targetSdkVersion 23
        versionCode 6
        versionName "1.0"
    }
//添加
    buildTypes {
        release {
            minifyEnabled true
            proguardFiles getDefaultProguardFile('proguard-android.txt'), 'proguard-rules.pro'
        }
        debug {
            minifyEnabled true
            proguardFiles getDefaultProguardFile('proguard-android.txt'), 'proguard-rules.pro'
        }
    }

}

/**
*
*必須添加
**/
rocoo_fix {
    preVersionPath = '5'
    enable = true
}

dependencies {
    compile fileTree(include: ['*.jar'], dir: 'libs')
    testCompile 'junit:junit:4.12'
    compile 'com.android.support:appcompat-v7:23.1.1'
    compile project(':rocoo')
}
preVersionPath = ‘1’ //注意:此項屬性只在需要制作補丁的時候才需開啟!!如果不需要制作補丁則需要去掉此項(其中的數值是前一個版本的版本號)
enable = true //注意:關掉此項會無法生成Hash.txt文件
重點介紹一下 preVersionPath 的屬性:
rocoo_fix將制作補丁的步驟透明化,用戶無需手動備份hash.txt文件,插件會自動根據當前的versionCode生成hash.txt和mapping.txt文件到指定目錄;
上一個版本發布的時候版本號是1,那麼生成的文件會放在app源碼目錄/rocooFix/version1/[debug]|[release]的目錄下,如果需要制作補丁那麼在配置裡指定preVersionPath 屬性,它的值是上一個版本的版本號,這裡的值是1,
然後將build.gradle的versionCode的號碼修改,這裡修改成2,只要和之前的版本不同就可以,沒有具體值的要求
六、添加混淆代碼(proguard-rules.pro):
-keep class com.dodola.rocoofix.** {*;}
-keep class com.lody.legend.* {*;}
七、添加測試代碼:
新建一個Java類:
public class HelloHack {
         public String showHello() {
                return "rocoofix";
              }
    }
在建一個繼承Application的類:
public class RocooApplication extends Application {
    @Override
    protected void attachBaseContext(Context base) {
        super.attachBaseContext(base);
        //需要打補丁時開啟
        RocooFix.init(this);
        //測試從assets文件夾讀取補丁
        RocooFix.initPathFromAssets(this, "patch.jar");
    }
}
八、運行項目看是否報錯。測試已沒錯。
九、生成 patch.jar 文件
1、首先隨便修改下代碼如:
public class HelloHack {
         public String showHello() {
                return "rocoofix——ok";
              }
    }
2、修改 app 項目中的build.gradle 文件把 versionCode 版本修改一下,把preVersionPath值修改成versionCode沒修改之前的值。
最後運行項目就會在app目錄下生成app\rocoofix\version4\debug\patch.jar 了,得到這個文件就算成功了,最後我們就可以隨便測試補丁了,放在sd目錄或者assets文件下,關閉補丁RocooFix.init(this)運行沒修改前的代碼看看程序是否變了。
ps:這裡做好心理准備補丁在有些機型會失效,目前測試MI 2S 4.4.4系統 成功。後面還會帶來阿裡的框架AndFix試用。
 仿微信圖片選擇器
仿微信圖片選擇器源碼下載連接:先上圖,後上代碼:打開app後點擊添加圖片按鈕:獲取選擇的圖片 並返回在gridview中:private ImageButton imag
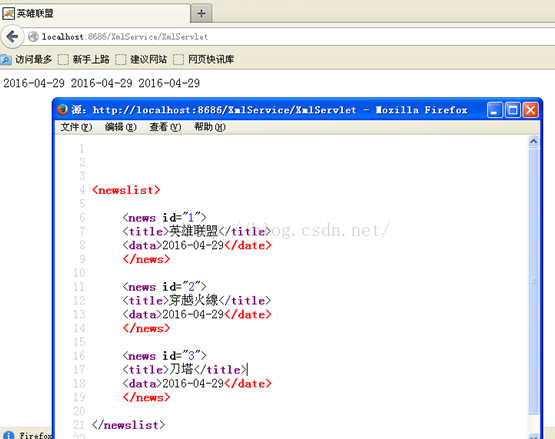 android之客戶端從服務端解析數據及上傳與反饋數據
1、json從服務端解析服務端數據客戶端的運行結果本來是這樣的[{id:1,title:"馬雲",publishTime:Sat May 14 15:
 深入淺出再談Unity內存洩漏
WeTest導讀本文通過對內存洩漏(what)及其危害性(why)的介紹,引出在Unity環境下定位和修復內存洩漏的方法和工具(how)。最後提出了一些避免洩漏的方法與建
 Android實現有視差效果的ListView
視差效果是什麼?所謂的視差效果在Web設計和移動應用中都非常常見,我們在一些主要的平台都可以發現它的身影,從Windows Phone到iOS乃至Android。按照維基