編輯:關於Android編程
我們探討了Activity的啟動,從startActivity()到進程創建,再到activity的創建,最後調用onCreate()方法。本篇博客我們接著onCreate()方法繼續研究Activity加載layout的過程。我們寫好layout布局後,在onCreate()方法中調用setContentView(layoutID)就能將我們的布局加載顯示。這一過程到底做了什麼?布局中的控件是怎樣被加載並顯示出來的?我們從setContentView()方法開始一步步分析 。(參考源碼版本為API23 )
step1.Activity.setContentView()??通常我們的做法是在OnCreate()方法中設置布局資源ID,Activity提供了三個設置視圖的方法,如下:
@Override
protected void onCreate(Bundle savedInstanceState) {
    super.onCreate(savedInstanceState);
    setContentView(R.layout.activity);
    //setContentView(new TextView(this));
    //setContentView(new TextView(this),new ViewGroup.LayoutParams(...));
}
再看看Activity中的調用關系:
public class Activity ...{
    private Window mWindow;

    //三個設置視圖的方法
    public void setContentView(@LayoutRes int layoutResID) {
        getWindow().setContentView(layoutResID);
        //初始化ActionBar
        initWindowDecorActionBar();
    }
    public void setContentView(View view) {
        getWindow().setContentView(view);
        initWindowDecorActionBar();
    }
    public void setContentView(View view, ViewGroup.LayoutParams params) {
        getWindow().setContentView(view, params);
        initWindowDecorActionBar();
    }

    final void attach(...) {
        ...
        //初始化mWindow
        mWindow = new PhoneWindow(this);
        ...
    }
    public Window getWindow() {
        return mWindow;
    }
}
??原來Activity中調用setContentView()方法最終調用的是PhoneWindow對象mWindow 的setContentView(...)方法。

??mWindow是在Activity創建的時候在attach()方法中初始化的

??每一個Activity組件都有一個關聯的Window的實現類PhoneWindow的對象mWindow ,用來描述一個應用程序窗口,它封裝了頂層窗口的外觀和行為策略,它提供了標准的用戶界面策略,如背景、標題區域、默認鍵處理等。PhoneWindow管理著整個屏幕的內容,不包括屏幕最頂部的系統狀態條。所以,PhoneWindow或者Window是與應用的一個頁面所相關聯。下面我們查看PhoneWindow.setContentView()方法:
step2. PhoneWindow.setContentView()
@Override
public void setContentView ( int layoutResID){
    if (mContentParent == null) {
        installDecor();
    } else if (!hasFeature(FEATURE_CONTENT_TRANSITIONS)) {
        //移除該mContentParent內所有的所有子View
        mContentParent.removeAllViews();
    }
    if (hasFeature(FEATURE_CONTENT_TRANSITIONS)) {
        final Scene newScene = Scene.getSceneForLayout(mContentParent, layoutResID,
                getContext());
        transitionTo(newScene);
    } else {
        //將我們的資源文件通過LayoutInflater對象轉換為View樹,並且添加至mContentParent中
        mLayoutInflater.inflate(layoutResID, mContentParent);
    }
    mContentParent.requestApplyInsets();
    final Callback cb = getCallback();
    if (cb != null && !isDestroyed()) {
        cb.onContentChanged();
    }
}

@Override
public void setContentView (View view){
    setContentView(view, new ViewGroup.LayoutParams(MATCH_PARENT, MATCH_PARENT));
}

@Override
public void setContentView (View view, ViewGroup.LayoutParams params){
    //此處判斷mContentParent是否為null,如果是null,則是第一次調用setContentView
    if (mContentParent == null) {
        //第一次需要初始化窗口和根布局(id為content的)
        installDecor();
    } else if (!hasFeature(FEATURE_CONTENT_TRANSITIONS)) {
        //如果不是第一次調用,需要清空根布局中的內容
        mContentParent.removeAllViews();
    }
    if (hasFeature(FEATURE_CONTENT_TRANSITIONS)) {
        view.setLayoutParams(params);
        final Scene newScene = new Scene(mContentParent, view);
        transitionTo(newScene);
    } else {
        mContentParent.addView(view, params);
    }
    mContentParent.requestApplyInsets();
    final Callback cb = getCallback();
    if (cb != null && !isDestroyed()) {
        cb.onContentChanged();
    }
}
??PhoneWindow中setContentView(view)接著調用setContentView(view, layoutParams),而setContentView(layoutResID)和setContentView(view, layoutParams)方法中的步驟是差不多的,唯一的區別就是setCOntentView(layoutResID)中是通過mLayoutInflater.inflate(layoutResID, mContentParent)將布局填充到mContentParent上,而setContentView(view, layoutParams)是將傳過來的view直接 add到mContentParent中 。到這一步我們發現,我們為某個activity寫的layout視圖最終是添加到一個叫mContentParent的ViewGroup中了。

??在加入mContentParent中之前,首先判斷如果mContentParent==null時,執行了installDecor()方法,我們猜想,installDecor()的作用大概就是初始化mContentParent,如果mContentParent已經初始化,而且窗口不是透明的,就清除mContentParent中的所有視圖。mContentParent只會實例化一次,所以如果我們在Activity中多次調用setContentView()只是改變了mContentParent的子視圖(也就是我們寫的布局文件)。接著看看installDecor():
step3. PhoneWindow.installDecor()??上一步我們猜測installDecor()方法的作用是實例化mContentParent,接下來我們深入PhoneWindow中驗證這個猜測對不對,下面是PhoneWindow的關鍵代碼:
public class PhoneWindow extends Window implements MenuBuilder.Callback {
    //id為content的容器,這個容器就是用於盛放我們寫的layout視圖的
    private ViewGroup mContentParent;
    //mContentRoot是整個界面內容,包括title和content等等
    private ViewGroup mContentRoot;
    //窗口頂層FrameLayout,用於盛放mContentRoot
    private DecorView mDecor;

    /**
     * DecorView是FrameLayout的子類
     */
    private final class DecorView extends FrameLayout{
        ...
    }

    //實例化了一個DecorView對象
    protected DecorView generateDecor() {
        return new DecorView(getContext(), -1);
    }

    /**
     * 初始化頂層窗口mDecor和根布局mContentParent
     */
    private void installDecor() {
        if (mDecor == null) {
            //①.初始化窗口
            mDecor = generateDecor();
            mDecor.setDescendantFocusability(ViewGroup.FOCUS_AFTER_DESCENDANTS);
            mDecor.setIsRootNamespace(true);
            ...
        }
        if (mContentParent == null) {
            //②.如果根布局
            mContentParent = generateLayout(mDecor);
            //③.初始化title和一些設置
            if (decorContentParent != null) {
                mDecorContentParent = decorContentParent;
                mDecorContentParent.setWindowCallback(getCallback());
                if (mDecorContentParent.getTitle() == null) {
                    mDecorContentParent.setWindowTitle(mTitle);
                }
                ...
            } else {
                mTitleView = (TextView) findViewById(R.id.title);
                if (mTitleView != null) {
                    mTitleView.setLayoutDirection(mDecor.getLayoutDirection());
                    if ((getLocalFeatures() & (1 << FEATURE_NO_TITLE)) != 0) {
                        ...
                    } else {
                        mTitleView.setText(mTitle);
                    }
                }
            }

            if (mDecor.getBackground() == null && mBackgroundFallbackResource != 0) {
                mDecor.setBackgroundFallback(mBackgroundFallbackResource);
            }
            ...
        }
    }
}
??PhoneWindow中引用了一個DecorView的對象,DecorView是FrameLayout的子類,相信你們應該多多少少知道Activity的頂層窗口是一個FramLayout,也正是這個DevorView的對象mDecor。在installDecor()方法中,第①步就是判斷mDecor是否為null,如果為null,將會調用generateDecor()方法實例化一個DecorView對象,緊接著第②步判斷mContentParent是否為null,如果為null,將調用generateLayout(mDecor)方法初始化mContentParent。現在就有一個疑問了,mDecor和mContentParent都是容器,他們是什麼關系?各自代表的是屏幕中那一塊的內容?帶著問題我們看看generateLayout(mDecor)方法:
step 4. PhoneWindow.generateLayout(mDecor )
/**
 * 初始化根布局mContentParent
 */
protected ViewGroup generateLayout(DecorView decor) {
    //①.獲取AndroidManifest.xml中指定的themes主題
    TypedArray a = getWindowStyle();
    //設置當前窗口是否有標題
    if (a.getBoolean(R.styleable.Window_windowNoTitle, false)) {
        //請求指定Activity窗口的風格類型
        requestFeature(FEATURE_NO_TITLE);
    } else if (a.getBoolean(R.styleable.Window_windowActionBar, false)) {
        requestFeature(FEATURE_ACTION_BAR);
    }
    ...
    //設置窗口是否全屏
    if (a.getBoolean(R.styleable.Window_windowFullscreen, false)) {
        setFlags(FLAG_FULLSCREEN, FLAG_FULLSCREEN & (~getForcedWindowFlags()));
    }
    ...

    //②.根據上面設置的窗口屬性Features, 設置相應的修飾布局文件layoutResource,這些xml文件位於frameworks/base/core/res/res/layout下
    int layoutResource;
    int features = getLocalFeatures();
    if ((features & (1 << FEATURE_SWIPE_TO_DISMISS)) != 0) {
        layoutResource = R.layout.screen_swipe_dismiss;
    } else if
        ...

    mDecor.startChanging();
    //③.將第2步選定的布局文件inflate為View樹,這也是整個窗口的內容(包括title、content等等)
    View in = mLayoutInflater.inflate(layoutResource, null);
    //④.將整個窗口內容添加到根mDecor中
    decor.addView(in, new ViewGroup.LayoutParams(MATCH_PARENT, MATCH_PARENT));
    //⑤.將整個窗口內容賦值給mContentRoot
    mContentRoot = (ViewGroup) in;

    //⑥.將窗口修飾布局文件中id="@android:id/content"的View賦值給mContentParent
    ViewGroup contentParent = (ViewGroup) findViewById(ID_ANDROID_CONTENT);
    if (contentParent == null) {
        throw new RuntimeException("Window couldn't find content container view");
    }
    ...

    mDecor.finishChanging();

    return contentParent;
}
在generateLayout()中,第①步是初始化了一些樣式屬性值,我們發現有一個很熟悉的類TypedArray,沒錯,這在之前講解自定義控件屬性的時候用到過,其實此處也是一樣的,之前自定義控件的屬性是用來描述我們自定義的View,而這裡的樣式屬性是用來描述窗口,而我們知道窗口實質上也是View,唯一的區別就是,控件的屬性是在layout中設置,而窗口的屬性是在AndroidManifest.xml中配置的,通過getWindowStyle()獲取當前Window在theme中定義的屬性,window支持的屬性可以參考\frameworks\base\core\res\res\values\attrs.xml 中的 。獲取到屬性值之後有與大堆代碼是調用setFlags()和requestFeature()給當前window設置屬性值,這就是為什麼我們一般在Activity的onCreate()中設置全屏等屬性需要在setContentView()之前設置,因為setContentView()之後installDecor()方法已經執行完畢,所以設置是沒有效的。 第①步執行完後,Window的相關屬性已經設置完畢,比如是否是全屏?是否有標題等等。然後第②步就是根據Window的各種屬性,設置相應的布局文件,如果是全屏layoutResource(布局文件ID)是多少,如果有標題…; 確定layoutResource之後,第③步就是mLayoutInflater解析出layoutResource對應的視圖in; 第④步將in這個視圖add到mDecor頂層窗口中; 第⑤步將in賦值給mContentRoot; 第⑥步調用findViewById()找到id為content的View賦值給mContentParent。
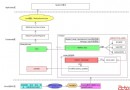
??通過generateLayout ()方法,我們發現了三個比較重要的視圖對象mDecor 、mContentRoot 、mContentParent 。他們的關系如下:
mDecor是Activity的頂層窗體,他是FramLayout的子類對象; mContentRoot是根據設置給窗體加載的整個Activity可見的視圖,這個視圖包含標題欄(如果主題設置有標題),用於容納我們自定義layout的id為content的容器,mContentRoot被添加到了頂層窗口mDecor中; mContentParent是mContentRoot中id為content的容器,這個容器就是用來添加我們寫的layout布局文件的,mContentParent是嵌套在mContentRoot中,mContentRoot嵌套在mDecor。所以在上面第⑥步可以直接調用findViewById()找到mContentParent。(跟蹤findViewById()方法,發現調用的是PhoneWindow中mDecor這個頂層窗口的findViewById()方法 ) 關系圖如下:
?????
step5. LayoutInflater.inflate()
??經過上面的步驟,Activity的頂層窗口mDecor和用於容納我們寫的layout的容器mContentParent已經初始化完畢,接下來就是將我們的布局layout添加到mContentParent中,先把step2 中的PhoneWindow.setContentView(int layoutResID)方法貼出來:
@Override
public void setContentView ( int layoutResID){
if (mContentParent == null) {
installDecor();
} else if (!hasFeature(FEATURE_CONTENT_TRANSITIONS)) {
//移除該mContentParent內所有的所有子View
mContentParent.removeAllViews();
}
if (hasFeature(FEATURE_CONTENT_TRANSITIONS)) {
final Scene newScene = Scene.getSceneForLayout(mContentParent, layoutResID,
getContext());
transitionTo(newScene);
} else {
//將我們的資源文件通過LayoutInflater對象轉換為View樹,並且添加至mContentParent中
mLayoutInflater.inflate(layoutResID, mContentParent);
}
mContentParent.requestApplyInsets();
final Callback cb = getCallback();
if (cb != null && !isDestroyed()) {
cb.onContentChanged();
}
}
??在分析PhoneWindow.setContentView()方法的過程中,我們穿插講解了installDecor()方法,接著有一個判斷hasFeature(FEATURE_CONTENT_TRANSITIONS),這個屬性是Android5.0引入的,這篇博客中參照的是API23的源碼 ,他的意思根據設置的主題屬性,判斷當前窗口內容變化的過程是否需要動畫,如果有動畫標志,將執行動畫。Scene是場景,這個對象中引用了mSceneRoot和mlayout兩個視圖,mSceneRoot就是mContentParent,而mLayout就是我們的布局視圖。我們發現另一個setContentView(view)方法中直接將view傳遞進去了Scene newScene = new Scene(mContentParent, view);,而setContentView(layoutResID)是將layoutResID傳遞進去,可以想象在Scene中也會根據此layoutResID將我們的布局layout加載並賦值給mLayout。由於我們主要研究的是View的加載過程,所以就不深入講解動畫了。直接看下面的mLayoutInflater.inflate(layoutResID, mContentParent),這一步的目的就是解析我們的布局layout,並將布局視圖掛載到mContentParent上,那下面看看LayoutInflater.inflate()方法:
public View inflate(@LayoutRes int resource, @Nullable ViewGroup root) {
return inflate(resource, root, root != null);
}
public View inflate(@LayoutRes int resource, @Nullable ViewGroup root, boolean attachToRoot) {
final Resources res = getContext().getResources();
if (DEBUG) {
Log.d(TAG, "INFLATING from resource: \"" + res.getResourceName(resource) + "\" ("
+ Integer.toHexString(resource) + ")");
}
final XmlResourceParser parser = res.getLayout(resource);
try {
return inflate(parser, root, attachToRoot);
} finally {
parser.close();
}
}
這個方法有三個參數:
resource:需要解析的布局layout的id root:解析layout之後得到的視圖層級的父視圖 attachToRoot:是否將解析出來的視圖添加到父視圖中,如果傳入true,並且root不為null,這個方法返回的是root,而且將解析出的視圖添加到root中。而我們看到inflate(resource)方法在inflate(resource,root,attachToRoot)方法時,傳入的attachToRoot是root!=null,所以inflate返回的是已經將布局layout視圖添加到mContentParent後的mContentParent。 ??inflate(resource,root,attachToRoot )方法中通過res.getLayout(resource)將layout關聯到一個XmlResourceParser中(Android內置的pull解析器),然後調用inflate(parser,root,attachToRoot )方法:
/**
* 將layout解析為view樹,並附加到root(mContentParent)中
*/
public View inflate(XmlPullParser parser, ViewGroup root, boolean attachToRoot) {
synchronized (mConstructorArgs) {
Trace.traceBegin(Trace.TRACE_TAG_VIEW, "inflate");
final Context inflaterContext = mContext;
final AttributeSet attrs = Xml.asAttributeSet(parser);
Context lastContext = (Context) mConstructorArgs[0];
mConstructorArgs[0] = inflaterContext;
//①.將最終返回的View初始化為root(也就是mContentParent)
View result = root;
try {
int type;
//②.循環直到解析到開始標簽<>或者結尾標簽
while ((type = parser.next()) != XmlPullParser.START_TAG &&
type != XmlPullParser.END_DOCUMENT) {
// Empty
}
//第一次解析到的不是開始標簽<>,說明layout文件沒有<>標簽,xml格式錯誤
if (type != XmlPullParser.START_TAG) {
throw new InflateException(parser.getPositionDescription()
+ ": No start tag found!");
}
//③.找到第一個開始標簽,這個標簽對應的name就是整個layout最外層的父控件
final String name = parser.getName();
...
if (TAG_MERGE.equals(name)) {
if (root == null || !attachToRoot) {
throw new InflateException(" can be used only with a valid "
+ "ViewGroup root and attachToRoot=true");
}
rInflate(parser, root, inflaterContext, attrs, false);
} else {
// Temp is the root view that was found in the xml
//★④.根據layout中第一個開始標簽的名稱創建一個View對象temp,temp就是整個xml中的根控件
final View temp = createViewFromTag(root, name, inflaterContext, attrs);
ViewGroup.LayoutParams params = null;
if (root != null) {
// Create layout params that match root, if supplied
// 根據父控件獲取布局參數,後面將解析的view樹添加到root中是要使用
params = root.generateLayoutParams(attrs);
//如果不需要附加到root父控件中
if (!attachToRoot) {
// Set the layout params for temp if we are not
// attaching. (If we are, we use addView, below)
//為temp設置布局參數如果我們不附加。(如果我們是,我們使用addView,下同)
temp.setLayoutParams(params);
}
}
// Inflate all children under temp against its context.
//★⑤.調用rInflateChildren遞歸解析temp中的所有子控件,通過這行代碼整個layout就被解析為view樹了
rInflateChildren(parser, temp, attrs, true);
//★⑥.如果root不為空,將view樹添加到root中
//此處root為mContentParent,也就是將layout布局添加到mContentParent中了
if (root != null && attachToRoot) {
root.addView(temp, params);
}
if (root == null || !attachToRoot) {
//如果不用附加到root中,直接返回解析的view樹
result = temp;
}
}
} catch (XmlPullParserException e) {
InflateException ex = new InflateException(e.getMessage());
ex.initCause(e);
throw ex;
} catch (Exception e) {
InflateException ex = new InflateException(
parser.getPositionDescription()
+ ": " + e.getMessage());
ex.initCause(e);
throw ex;
} finally {
// Don't retain static reference on context.
mConstructorArgs[0] = lastContext;
mConstructorArgs[1] = null;
}
Trace.traceEnd(Trace.TRACE_TAG_VIEW);
return result;
}
}
??這個方法的作用就是將layout填充到一個view樹上,然後將view樹附加到root(也就是mContentParent)中,然後返回root。
??方法中有6個重要步驟,上面注釋已經寫得很清楚了,注意簽名帶★的步驟是很重要的。在①-④步是將layout最外層的控件解析出來,在第④步中調用了createViewFromTag()方法(請看step6) 根據name實例化一個View對象,然後第⑤步調用rInflateChildren()方法,將剩余的控件解析出來後填充進最外層控件,這樣就完成了整個layout的填充,最後第⑥步將解析出來的view樹添加到root中。我們發現真正完成inflate的並不是這個方法,這個方法只是解析了在外層的控件,剩余的控件是由rInflateChildren()方法完成的,而rInflateChildren()中調用的是rInflate()方法(請看step7)
step6. LayoutInflater.createViewFromTag()
/**
* 根據控件名實例化控件對象
* @param parent 父控件
* @param name 控件名
* @param context
* @param attrs
* @param ignoreThemeAttr
* @return
*/
View createViewFromTag(View parent, String name, Context context, AttributeSet attrs,
boolean ignoreThemeAttr) {
if (name.equals("view")) {
name = attrs.getAttributeValue(null, "class");
}
// Apply a theme wrapper, if allowed and one is specified.
if (!ignoreThemeAttr) {
final TypedArray ta = context.obtainStyledAttributes(attrs, ATTRS_THEME);
final int themeResId = ta.getResourceId(0, 0);
if (themeResId != 0) {
context = new ContextThemeWrapper(context, themeResId);
}
ta.recycle();
}
if (name.equals(TAG_1995)) {
// Let's party like it's 1995!
return new BlinkLayout(context, attrs);
}
try {
View view;
if (mFactory2 != null) {
view = mFactory2.onCreateView(parent, name, context, attrs);
} else if (mFactory != null) {
view = mFactory.onCreateView(name, context, attrs);
} else {
view = null;
}
if (view == null && mPrivateFactory != null) {
view = mPrivateFactory.onCreateView(parent, name, context, attrs);
}
if (view == null) {
final Object lastContext = mConstructorArgs[0];
mConstructorArgs[0] = context;
try {
//先判斷name中是否有'.'字符,如果沒有,此控件為android自帶的View,此時會在name的前面加上包名"android.view."
if (-1 == name.indexOf('.')) {
view = onCreateView(parent, name, attrs);
} else {
//如果有這個'.',則認為是自定義View,因為自定義View在使用的時候使用的全名,所以直接創建
view = createView(name, null, attrs);
}
} finally {
mConstructorArgs[0] = lastContext;
}
}
return view;
} catch (InflateException e) {
throw e;
} catch (ClassNotFoundException e) {
final InflateException ie = new InflateException(attrs.getPositionDescription()
+ ": Error inflating class " + name);
ie.initCause(e);
throw ie;
} catch (Exception e) {
final InflateException ie = new InflateException(attrs.getPositionDescription()
+ ": Error inflating class " + name);
ie.initCause(e);
throw ie;
}
}
step7. LayoutInflater.rInflate()
/**
* 解析layout最外層parent中的所有子控件
* 此方法為遞歸方法,layout中有多少個ViewGroup就會遞歸調用多少次
* 每一次調用就會完成layout中某一個ViewGroup中所有的子控件的解析
*/
final void rInflateChildren(XmlPullParser parser, View parent, AttributeSet attrs,
boolean finishInflate) throws XmlPullParserException, IOException {
rInflate(parser, parent, parent.getContext(), attrs, finishInflate);
}
void rInflate(XmlPullParser parser, View parent, Context context,
AttributeSet attrs, boolean finishInflate) throws XmlPullParserException, IOException {
final int depth = parser.getDepth();
int type;
//如果遇到結束標簽()就結束,說明此parent中所有的子view已經解析完畢
while (((type = parser.next()) != XmlPullParser.END_TAG ||
parser.getDepth() > depth) && type != XmlPullParser.END_DOCUMENT) {
if (type != XmlPullParser.START_TAG) {
continue;
}
//1.找到開始標簽<>
final String name = parser.getName();
//2.根據name類型分別解析
if (TAG_REQUEST_FOCUS.equals(name)) {
parseRequestFocus(parser, parent);
} else if (TAG_TAG.equals(name)) {
parseViewTag(parser, parent, attrs);
} else if (TAG_INCLUDE.equals(name)) {
if (parser.getDepth() == 0) {
throw new InflateException(" cannot be the root element");
}
/*
* 如果是,調用parseInclude方法用於解析標簽:
* ①.根據include標簽的name屬性找到對應的layout的id
* ②.遍歷開始標簽解析layout中的view
* ③.調用rInflateChildren(childParser, view, childAttrs, true)解析view中的子控件
* ④.將view添加(add)進parent中
*/
parseInclude(parser, context, parent, attrs);
} else if (TAG_MERGE.equals(name)) {
throw new InflateException(" must be the root element");
} else {
//如果是普通View,調用createViewFromTag創建view對象
final View view = createViewFromTag(parent, name, context, attrs);
final ViewGroup viewGroup = (ViewGroup) parent;
final ViewGroup.LayoutParams params = viewGroup.generateLayoutParams(attrs);
//★遞歸調用rInflateChildren解析view中的子控件
//如果view不是ViewGroup,rInflateChildren()會在while的第一次循環結束
//如果view是ViewGroup,並且裡面有子控件,通過這行代碼view中的所有子控件就被掛到view上了
rInflateChildren(parser, view, attrs, true);
//將view樹添加到viewGroup中,到此為止完成一個view及其所有子控件的填充
viewGroup.addView(view, params);
}
}
if (finishInflate) {
/*
* ★parent的所有子控件都inflate完畢後調用onFinishInflate方法
* 這個方法在自定義ViewGroup的時候經常用到,自定義ViewGroup中
* 不能在構造方法中find子控件,因為構造方法中並沒有完成子控件的實例化,
* 只能在onFinishInflate回調方法中findViewById來初始化子控件
*/
parent.onFinishInflate();
}
}
??rInflate()方法無非就是根據剩余的xml找到開始標簽的name,然後根據name的類型分別解析,如果判斷是普通控件,調用createViewFromTag()創建一個控件view,接著遞歸調用rInflateChildren()解析view中的所有子控件(如果view是ViewGroup),最後將view添加到parent中。rInflateChildren()遞歸調用執行完畢後,整個layout就被填充為view樹了,最後在inflate()中,layout的view樹會被add到root中,也就是mContentParent中,整個窗體的view樹mDecor就算是填充完畢。
??總結一下這篇博客的內容,這篇博客分析的是View的加載填充原理,也就是從調用setContentView()方法開始,我們的布局layout是怎樣填充為整個View樹,並被掛載到Activity上的。其中有幾個重要的知識點如下:
每一個Activity組件都有一個關聯的Window的實現類PhoneWindow的對象mWindow ,mWindow管理著整個屏幕的內容,不包括屏幕最頂部的系統狀態條 ,它描述一個應用程序窗口,它封裝了頂層窗口的外觀和行為策略,它提供了標准的用戶界面策略,如背景、標題區域、默認鍵處理等; Activity的setContentView()方法裡面調用的是PhoneWindow的setContentView()方法; PhoneWindow中引用了mDecor(頂層窗口,FramLayout的子類)、mContentRoot(整個Activity的內容,包括TitleActionBar等)、mContentParent(mContentRoot中id為content的容器,用於放置我們的layout的容器);他們三者的關系是mDecor嵌套mContentRoot,mContentRoot嵌套mContentParent; 如果mContentParent不為null,將清空其中的內容,然後重新加載layout到mContentParent中 ; 如果mContentParent為null說明是第一次調用setContentView,這時候需要調用installDecor()為Activity加載一個頂層窗口mDecor,mContentParent; installDecor()方法中初始化了mDecor,然後調用generateLayout(mDecor); generateLayout(mDecor) 中首先設置了window的主題樣式,並根據這些樣式設置為Activity加載一個合適的布局視圖,並將這個視圖賦值給mContentRoot ,然後將此視圖add到mDecor頂層窗口中;然後通過mDecor.findViewById(R.id.content)初始化mContentParent。通過②-⑥步,Activity中的頂層窗體的View樹算是搭建完畢了; setContentView(layoutId)中完成上面步驟後緊接著調用LayoutInflater.inflate()將我們傳入的layoutId填充為View樹,inflate()只是解析了layout布局的最外層父控件,裡面的子控件是通過rInflateChildren()方法遞歸解析完成的。在解析的過程中如果遇到開始<>標簽會調用createViewFromTag()方法實例化一個View對象,並解析為view設置的屬性attrs。inflate()方法執行完畢後,layout就被映射為View樹了,然後將此View樹add到mContentParent中,整個Activity的view樹就形成了。  Android自定義控件基本原理詳解(一)
前言:在日常的Android開發中會經常和控件打交道,有時Android提供的控件未必能滿足業務的需求,這個時候就需要我們實現自定義一些控件,今天先大致了解一下自定義控件
 Android中使用achartengine生成圖表的具體方法
今天在做項目的時候用到了圖表功能,記錄下來achartengine是google的一個開源項目,可以在https://code.google.com/p/acharten
 Android5.0之Toobar的使用
總體上來說,Toolbar的使用可以分為兩個方面,一方面是將ToolBar當作ActionBar來用,另一方面就是將Toolbar當成一個單獨的控件來用,不過到目前為止我
 (原創)android6.0系統Healthd深入分析
概述Healthd是android4.4之後提出來的一種中介模型,該模型向下監聽來自底層的電池事件,向上傳遞電池數據信息給Framework層的BatteryServic