編輯:關於Android編程
新建module的時候一定要選擇 Java Library 否則在後面會找不到AbstractProcessor。
分別在app和processor 的文件夾下的build.gralde添加如下配置:
compileOptions {
   sourceCompatibility JavaVersion.VERSION_1_7
   targetCompatibility JavaVersion.VERSION_1_7
}
二、然後在建一個module名叫annotation,主要用來保存項目用到的annotation.
import java.lang.annotation.Retention;
import java.lang.annotation.Target;

import static java.lang.annotation.ElementType.FIELD;
import static java.lang.annotation.RetentionPolicy.CLASS;

@Retention(CLASS) @Target(FIELD)
public @interface BindView {
    int value();
}
三、新建MainActivity 字段上加上注解,如下:
public class MainActivity extends AppCompatActivity {

    @BindView(R.id.text_view)
    TextView textView;

    @BindView(R.id.view)
    TextView view;

    @Override
    protected void onCreate(Bundle savedInstanceState) {
        super.onCreate(savedInstanceState);
        setContentView(R.layout.activity_main);
    }
}
三、在processor module下新建一個ButterKnifeProcessor 繼承AbstractProcessor.
@SupportedAnnotationTypes("com.chiclaim.processor.annotation.BindView")
@SupportedSourceVersion(SourceVersion.RELEASE_7)
public class ButterKnifeProcessor extends AbstractProcessor {
    @Override
    public boolean process(Set annotations, RoundEnvironment roundEnv) {
        StringBuilder builder = new StringBuilder()
                .append("package com.chiclaim.processor.generated;\n\n")
                .append("public class GeneratedClass {\n\n") // open class
                .append("\tpublic String getMessage() {\n") // open method
                .append("\t\treturn \"");


        // for each javax.lang.model.element.Element annotated with the CustomAnnotation
        for (Element element : roundEnv.getElementsAnnotatedWith(BindView.class)) {
            String objectType = element.getSimpleName().toString();
            // this is appending to the return statement
            builder.append(objectType).append(" says hello!\\n");
        }

        builder.append("\";\n") // end return
                .append("\t}\n") // close method
                .append("}\n"); // close class

        try { // write the file
            JavaFileObject source = processingEnv.getFiler().createSourceFile("com.chiclaim.processor.generated.GeneratedClass");
            Writer writer = source.openWriter();
            writer.write(builder.toString());
            writer.flush();
            writer.close();
        } catch (IOException e) {
            // Note: calling e.printStackTrace() will print IO errors
            // that occur from the file already existing after its first run, this is normal
        }
        return true;
    }
}
@SupportedAnnotationTypes(…) 裡面的參數是我們需要處理的注解
四、在processor module主目錄下resources目錄然後新建META-INF目錄,然後在META-INF下新建services 然後新建一個文件名為 javax.annotation.processing.Processor, 裡面的內容就是剛剛新建的ButterKnifeProcessor的qualified name :
com.chiclaim.butterknife.processor.ButterKnifeProcessor
當然也可以用新建這麼多文件夾,只需要加入google AutoService,這樣就會自動完成上面的操作。
@SupportedSourceVersion(SourceVersion.RELEASE_7)
@AutoService(Processor.class)
//AutoService自動生成文件(in processor.jar): META-INF/services/javax.annotation.processing.Processor
public class ButterKnifeProcessor extends AbstractProcessor
五、添加android-apt支持在全局的build.gradle添加添加apt支持,com.neenbedankt.gradle.plugins:android-apt:1.8,如下所示:
buildscript {
    repositories {
        jcenter()
    }
    dependencies {
        classpath 'com.android.tools.build:gradle:2.2.0'
        classpath 'com.neenbedankt.gradle.plugins:android-apt:1.8'
        // NOTE: Do not place your application dependencies here; they belong
        // in the individual module build.gradle files
    }
}

ext {
    sourceCompatibilityVersion = JavaVersion.VERSION_1_7
    targetCompatibilityVersion = JavaVersion.VERSION_1_7
}

allprojects {
    repositories {
        jcenter()
    }
}

task clean(type: Delete) {
    delete rootProject.buildDir
}
分別在app module的build.gradle添加 apply plugin 如下所示:
apply plugin: 'com.android.application'
apply plugin: 'com.neenbedankt.android-apt'
六、添加module之間的依賴
dependencies {
    compile fileTree(include: ['*.jar'], dir: 'libs')
    androidTestCompile('com.android.support.test.espresso:espresso-core:2.2.2', {
        exclude group: 'com.android.support', module: 'support-annotations'
    })
    compile 'com.android.support:appcompat-v7:24.2.1'
    testCompile 'junit:junit:4.12'
    compile project(':annotation')
    compile project(':processor')
    compile project(':butterknife')
}
//把processor module生成的jar拷貝到app libs目錄
task processorTask(type: Exec) {
    commandLine 'cp', '../processor/build/libs/processor.jar', 'libs/'
}
//build processor 生成processor.jar
processorTask.dependsOn(':processor:build')
preBuild.dependsOn(processorTask)
如下圖所示:

會在app module的build的目錄下生成代碼,如:

public class GeneratedClass {
    public String getMessage() {
        return "button says hello!\nimageView says hello!\ntextView says hello!\nview says hello!\n";
    }
}
據此,在android studio 使用apt就介紹完畢了。
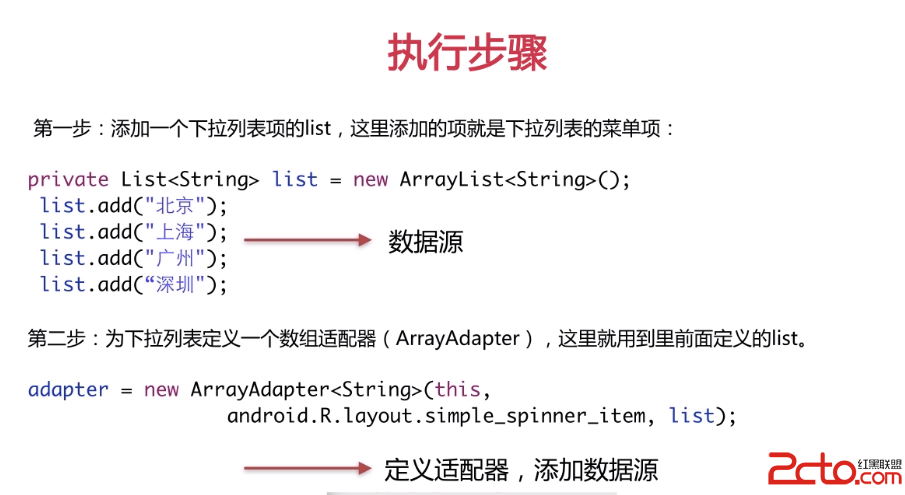 Android中Spinner(下拉列表的用法)的用法
寫Spinner的步驟 兩種Spinner下拉列表的用法 第一種 第二種 寫Spinner的步驟: 1、設置數據源。用List集合來寫 2、新建ArrayAdapte
 Android程序開發——簡單控件之AutoCompleteTextView的用法
1.初始使用android:completionThreshold="1"的作用是提示功能從第一個字母開始package com.treasure_c
 Android DrawerLayout帶有側滑功能的布局類(2)
ActionBarDrawerToggle:在前一張中我們並沒有使用drawLayout.setDrawerListener(); 對應的參數對象就是Drawe
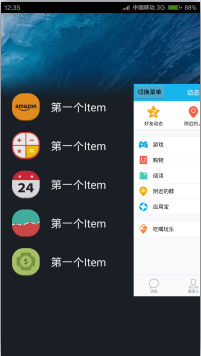 仿QQ5.0側滑(基於ViewDragHelper實現)
QQ5.0側滑效果實現方案有很多方式,今天我們使用ViewDragHelper來實現一下。先上效果圖: ①自定義控件SlidingMenu繼承FrameLayout,放在