編輯:關於Android編程
在寫一個小應用的時候,我接觸到了一個關於Handler和Thread以及runnable的問題,問了群裡各種人都解決不了,然後查閱大量資料,終於有些了解,現在發上來和大家分享。
主要是關於,Thread和Runnable的區別,以及他們在使用Handler時造成的影響~,我先上代碼
下面這個是錯誤的代碼~下面的代碼只要執行到handler中更新UI的部分就會報空指針錯誤~線程處用的Thread
public class MainActivity extends Activity {
	TextView text1, text2;
	Button button;
	myThread th;

	@Override
	protected void onCreate(Bundle savedInstanceState) {
		super.onCreate(savedInstanceState);
		setContentView(R.layout.activity_main);
		text1 = (TextView)findViewById(R.id.text1);
		text2 = (TextView)findViewById(R.id.text2);
		button = (Button)findViewById(R.id.button1);
		button.setOnClickListener(new View.OnClickListener() {
			@Override
			public void onClick(View v) {
				// TODO Auto-generated method stub
				th = new myThread();
				th.start();
			}
		});
	}
	Handler myHandler = new Handler(){
		@Override
		public void handleMessage(Message msg) {
			// TODO Auto-generated method stub
			switch (msg.what) {
			case 1:
				System.out.println("-----------1--------------");
				System.out.println(msg.getData().getString("s1"));
				System.out.println(msg.getData().getString("s2"));
				try{
				 text1.setText(msg.getData().getString("s1"));
				 text2.setText(msg.getData().getString("s1"));
				}catch(Exception e){
					e.printStackTrace();
				}
				break;

			default:
				break;
			}
			super.handleMessage(msg);
		}
	};
}

class myThread extends Thread{
	String s1, s2;
	MainActivity ma = new MainActivity();
	public void run(){
		  s1 = "fsdfsgfdsgdfgfdgdhshshs";
		  s2 = "fsfsdgdshdhdshrehreherh";


		  Message msg = new Message();
		  msg.what = 1;
		  Bundle bundle = new Bundle();
		  bundle.putString("s1", s1);
		  bundle.putString("s2", s2);
		  msg.setData(bundle);
		  ma.myHandler.sendMessage(msg);
	}
}
上面這段代碼,沒給注釋,但是很簡單,相信大家都能看懂~,這段代碼是錯誤的。
下面給大家上正確的代碼~線程處用的Runnable
public class MainActivity extends Activity {
	TextView text1, text2;
	Button button;
	Thread th;


	@Override
	protected void onCreate(Bundle savedInstanceState) {
		super.onCreate(savedInstanceState);
		setContentView(R.layout.activity_main);
		text1 = (TextView)findViewById(R.id.text1);
		text2 = (TextView)findViewById(R.id.text2);
		button = (Button)findViewById(R.id.button1);
		button.setOnClickListener(new View.OnClickListener() {
			@Override
			public void onClick(View v) {
				// TODO Auto-generated method stub

				th = new Thread(runnable);
				th.start();
			}
		});
	}
	Handler myHandler = new Handler(){
		@Override
		public void handleMessage(Message msg) {
			// TODO Auto-generated method stub
			switch (msg.what) {
			case 1:
				System.out.println("-----------1--------------");
				System.out.println(msg.getData().getString("s1"));
				System.out.println(msg.getData().getString("s2"));
				try{
				 text1.setText(msg.getData().getString("s1"));
				 text2.setText(msg.getData().getString("s1"));
				}catch(Exception e){
					e.printStackTrace();
				}
				break;

			default:
				break;
			}
			super.handleMessage(msg);
		}
	};

	Runnable runnable = new Runnable() {
		@Override
		public void run() {
			// TODO Auto-generated method stub
		      String s1 = "fsdfsgfdsgdfgfdgdhshshs";
			  String s2 = "fsfsdgdshdhdshrehreherh";

			  Message msg = new Message();
			  msg.what = 1;
			  Bundle bundle = new Bundle();
			  bundle.putString("s1", s1);
			  bundle.putString("s2", s2);
			  msg.setData(bundle);
			  MainActivity.this.myHandler.sendMessage(msg);
		}
	};
}
這是正確的代碼,能正確更新UI。
找到問題以後,我又做了幾個小實驗,發現,其實用Thread也是可以的,也是可以更新UI的,就像這樣
public class MainActivity extends Activity {
	TextView text1, text2;
	Button button;
	myThread th;


	@Override
	protected void onCreate(Bundle savedInstanceState) {
		super.onCreate(savedInstanceState);
		setContentView(R.layout.activity_main);
		text1 = (TextView)findViewById(R.id.text1);
		text2 = (TextView)findViewById(R.id.text2);
		button = (Button)findViewById(R.id.button1);
		button.setOnClickListener(new View.OnClickListener() {
			@Override
			public void onClick(View v) {
				// TODO Auto-generated method stub

				th = new myThread();
				th.start();
			}
		});
	}
	Handler myHandler = new Handler(){
		@Override
		public void handleMessage(Message msg) {
			// TODO Auto-generated method stub
			switch (msg.what) {
			case 1:
				System.out.println("-----------1--------------");
				System.out.println(msg.getData().getString("s1"));
				System.out.println(msg.getData().getString("s2"));
				try{
				 text1.setText(msg.getData().getString("s1"));
				 text2.setText(msg.getData().getString("s1"));
				}catch(Exception e){
					e.printStackTrace();
				}
				break;

			default:
				break;
			}
			super.handleMessage(msg);
		}
	};

	class myThread extends Thread{
		public void run() {
			// TODO Auto-generated method stub
		      String s1 = "fsdfsgfdsgdfgfdgdhshshs";
			  String s2 = "fsfsdgdshdhdshrehreherh";

			  Message msg = new Message();
			  msg.what = 1;
			  Bundle bundle = new Bundle();
			  bundle.putString("s1", s1);
			  bundle.putString("s2", s2);
			  msg.setData(bundle);
			  MainActivity.this.myHandler.sendMessage(msg);
	}
	}
}
到這,不知道大家發現問題在哪沒有?
據我所了解~Thread和Runnable的區別如下:
如果然一個線程實現Runnable接口,當調用這個線程對象開辟多線程時,可以讓這些線程調用同一變量~,(說白了就是,我主線程和拋出的子線程都可以用你主線程的變量了)
若這個線程類是繼承自Thread類而來,則通過內部類實現上述功能,利用的就是內部類可任意訪問外部類這一特性(這段說的就是我3段代碼的最後1段)。
好了,完了,就這麼多,希望對大家有幫助
 Android自定義View(一、初體驗)
對於一個Android攻城獅來說,自定義控件是一項必須掌握的重要技能點,然而對於大部分人而言,感覺自定義控件並不是那麼容易。在工作過程中難免遇到一些特效需要自己定義控件實
 Android簡易實戰教程--第十四話《模仿金山助手創建桌面Widget小部件》
打開谷歌api,對widget小部件做如下說明:App Widgets are miniature application views that can be embed
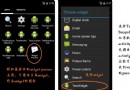
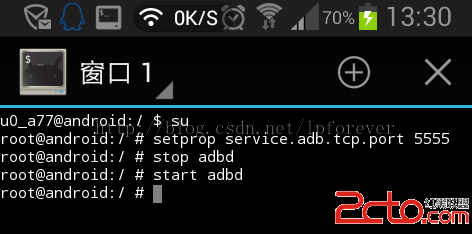 Android手機用WIFI與Android studio連接,真機測試APP
1,手機獲取ROOT權限(我的是小米note,直接下載MIUI開發版安裝即可)2,在應用市場下載(終端模擬器),安裝。3,賦予(終端模擬器)ROOT權限。提示:測試其是否
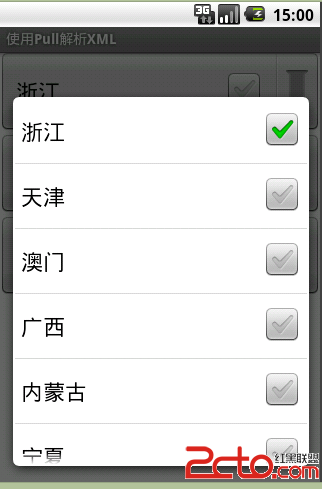 Android開發之解析XML並實現三級聯動效果
請尊重他人的勞動成果,轉載請注明出處:Android開發之解析XML並實現三級聯動效果 本實例主要應用XmlPullParser解析XML文檔中的省市區,然