編輯:關於Android編程
從本篇博客開始,我們開始分析PKMS的構造函數,看看PKMS到底是如何解析和管理手機中APK的信息的。
由於PKMS的構造函數較長,我們會分段進行研究。
public PackageManagerService(Context context, Installer installer,
        boolean factoryTest, boolean onlyCore) {
    ........
    mContext = context;
    mFactoryTest = factoryTest; //假定為false,運行在非工廠模式下
    mOnlyCore = onlyCore; //假定為false,即掃描所有的APK
    mMetrics = new DisplayMetrics(); //分辨率相關

    mSettings = new Settings(mPackages);
    mSettings.addSharedUserLPw("android.uid.system", Process.SYSTEM_UID,
        ApplicationInfo.FLAG_SYSTEM, ApplicationInfo.PRIVATE_FLAG_PRIVILEGED);
    mSettings.addSharedUserLPw("android.uid.phone", RADIO_UID,
        ApplicationInfo.FLAG_SYSTEM, ApplicationInfo.PRIVATE_FLAG_PRIVILEGED);
    mSettings.addSharedUserLPw("android.uid.log", LOG_UID,
        ApplicationInfo.FLAG_SYSTEM, ApplicationInfo.PRIVATE_FLAG_PRIVILEGED);
    mSettings.addSharedUserLPw("android.uid.nfc", NFC_UID,
        ApplicationInfo.FLAG_SYSTEM, ApplicationInfo.PRIVATE_FLAG_PRIVILEGED);
    mSettings.addSharedUserLPw("android.uid.bluetooth", BLUETOOTH_UID,
        ApplicationInfo.FLAG_SYSTEM, ApplicationInfo.PRIVATE_FLAG_PRIVILEGED);
    mSettings.addSharedUserLPw("android.uid.shell", SHELL_UID,
        ApplicationInfo.FLAG_SYSTEM, ApplicationInfo.PRIVATE_FLAG_PRIVILEGED);
    ...................
}
一、PKMS中的Settings
剛進入到PKMS的構造函數,我們就遇到了Settings對象,及一大堆的addSharedUserLPw調用。
我們看看Settings的構造函數:
Settings(Object lock) {
    this(Environment.getDataDirectory(), lock);
}

Settings(File dataDir, Object lock) {
    mLock = lock;

    mRuntimePermissionsPersistence = new RuntimePermissionPersistence(mLock);

    //目錄指向"data/system"
    mSystemDir = new File(dataDir, "system");
    //創建目錄
    mSystemDir.mkdirs();
    FileUtils.setPermissions(mSystemDir.toString(),
            FileUtils.S_IRWXU|FileUtils.S_IRWXG
            |FileUtils.S_IROTH|FileUtils.S_IXOTH,
            -1, -1);
    //packages.xml和packages-backup.xml為一組,用於描述系統所安裝的Package信息,其中packages-backup.xml是packages.xml的備份
    //PKMS寫把數據寫到backup文件中,信息全部寫成功後在改名為非backup文件,以防止在寫文件的過程中出錯,導致信息丟失
    mSettingsFilename = new File(mSystemDir, "packages.xml");
    mBackupSettingsFilename = new File(mSystemDir, "packages-backup.xml");

    //packages.list保存系統中存在的所有非系統自帶的APK信息,即UID大於10000的apk
    mPackageListFilename = new File(mSystemDir, "packages.list");
    FileUtils.setPermissions(mPackageListFilename, 0640, SYSTEM_UID, PACKAGE_INFO_GID);

    //感覺是sdcardfs相關的文件
    final File kernelDir = new File("/config/sdcardfs");
    mKernelMappingFilename = kernelDir.exists() ? kernelDir : null;

    // Deprecated: Needed for migration
    //packages-stopped.xml用於描述系統中強行停止運行的package信息,backup也是備份文件
    mStoppedPackagesFilename = new File(mSystemDir, "packages-stopped.xml");
    mBackupStoppedPackagesFilename = new File(mSystemDir, "packages-stopped-backup.xml");
}
從代碼可以看出,Settings的構造函數主要用於創建一些目錄和文件,並配置相應的權限。其中:
* PKMS掃描完目標文件夾後,會創建packages.xml。當系統進行程序安裝、卸載和更新等操作時,均會更新該文件;
* packages-list用於描述系統中存在的所有非系統自帶的APK信息。當這些APK有變化時,PKMS就會更新該文件;
* packages-stopped.xml記錄被用戶強行停止的應用的Package信息(例如,從設置進入某個應用,然後點擊強行停止,那麼應用的Package信息就會被記錄)。
因此,我們可以推測出Settings主要用於保存一些信息,實際上它確實是用於管理Android系統運行過程中的一些設置信息。
我們繼續跟進Settings的addSharedUserLPw函數:
//name和uid一一對應,例如:"android.uid.system":Process.SYSTEM_UID(1000)
//                      "android.uid.phone" :RADIO_UID(Process.PHONE_UID, 1001)
//pkgFlags均為:ApplicationInfo.FLAG_SYSTEM
//pkgPrivateFlags均為:ApplicationInfo.PRIVATE_FLAG_PRIVILEGED
SharedUserSetting addSharedUserLPw(String name, int uid, int pkgFlags, int pkgPrivateFlags) {
    SharedUserSetting s = mSharedUsers.get(name);
    if (s != null) {
        if (s.userId == uid) {
            return s;
        }
        PackageManagerService.reportSettingsProblem(Log.ERROR,
                "Adding duplicate shared user, keeping first: " + name);
        return null;
    }
    //目的就是利用參數構造出SharedUserSetting
    s = new SharedUserSetting(name, pkgFlags, pkgPrivateFlags);
    s.userId = uid;

    if (addUserIdLPw(uid, s, name)) {
        //按 <名稱---SharedUserSettings> 存入map中
        mSharedUsers.put(name, s);
        return s;
    }
    return null;
}

private boolean addUserIdLPw(int uid, Object obj, Object name) {
    //LAST_APPLICATION_UID = 19999
    if (uid > Process.LAST_APPLICATION_UID) {
        return false;
    }

    //普通APK的uid
    if (uid >= Process.FIRST_APPLICATION_UID) {
        int N = mUserIds.size();
        final int index = uid - Process.FIRST_APPLICATION_UID;

        while (index >= N) {
            mUserIds.add(null);
            N++;
        }
        if (mUserIds.get(index) != null) {
            PackageManagerService.reportSettingsProblem(Log.ERROR,
                "Adding duplicate user id: " + uid
                + " name=" + name);
            return false;
        }
        mUserIds.set(index, obj);
    } else {
        if (mOtherUserIds.get(uid) != null) {
            PackageManagerService.reportSettingsProblem(Log.ERROR,
                    "Adding duplicate shared id: " + uid
                        + " name=" + name);
            return false;
        }
        mOtherUserIds.put(uid, obj);
    }
    return true;
}
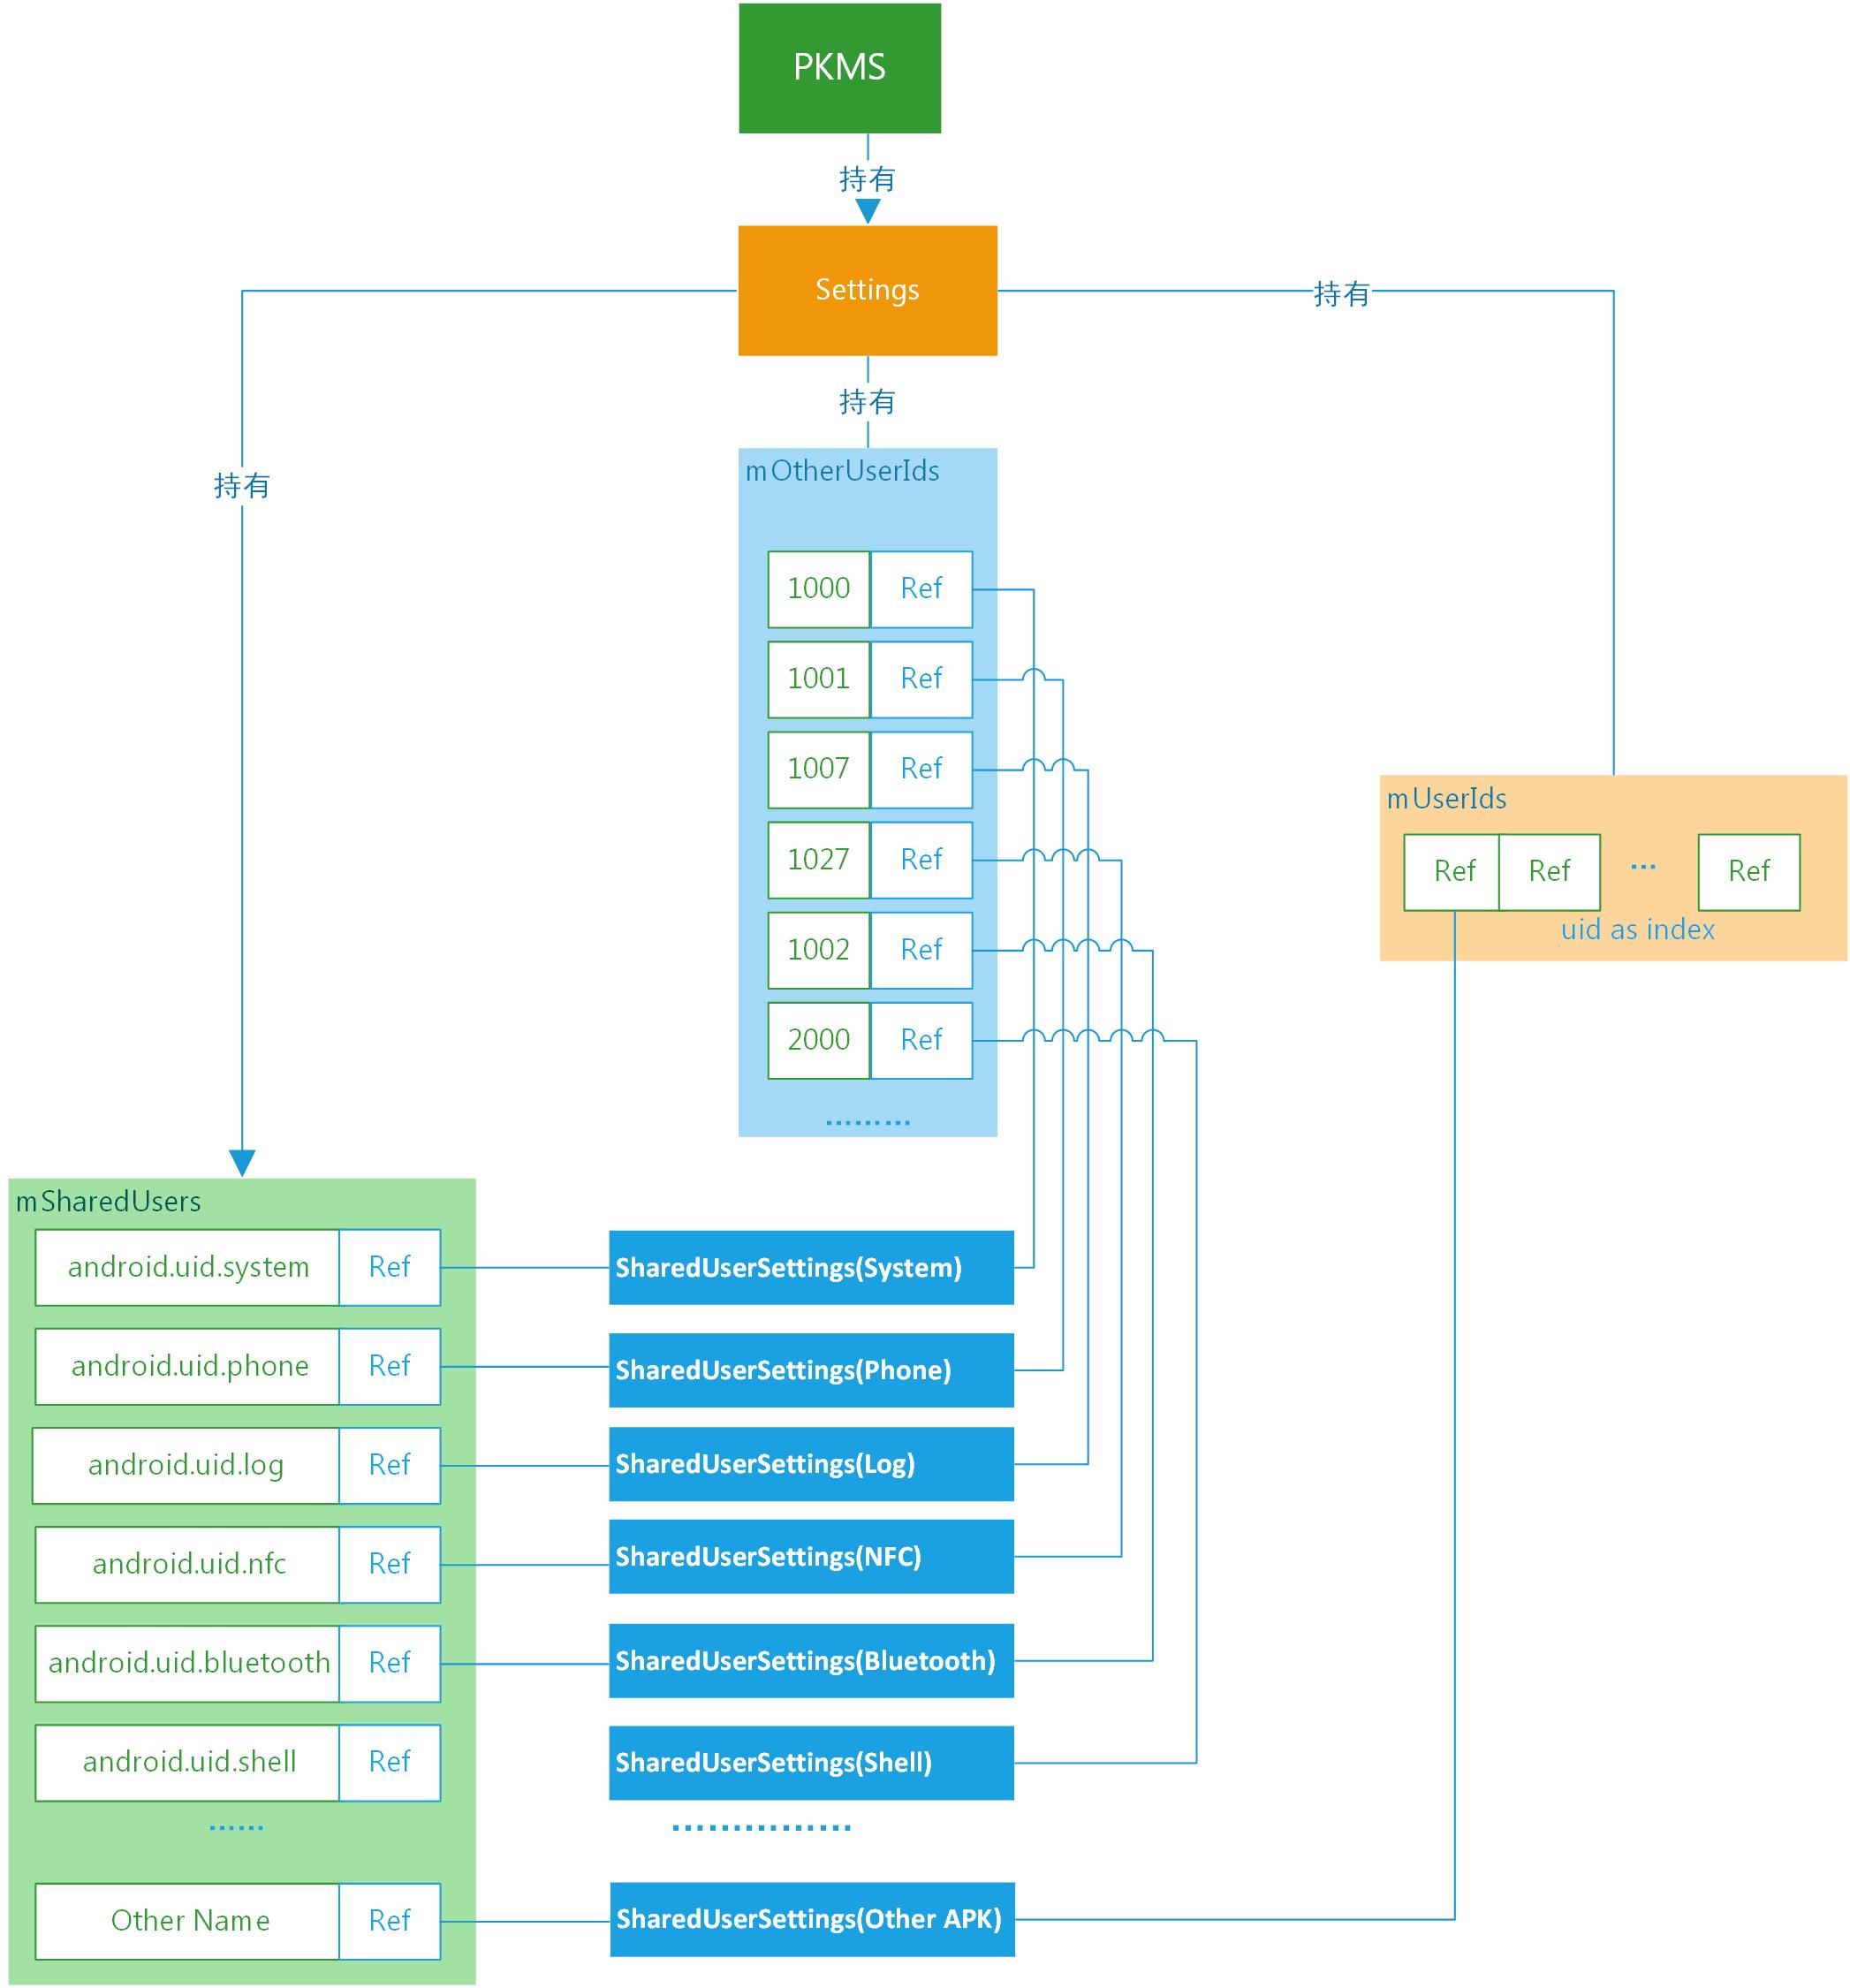
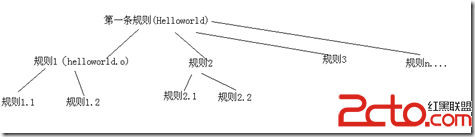
PKMS創建Settings後,調用一系列的addSharedUserLPw函數,將形成如上圖所示的數據結構。
如圖所示,PKMS將根據參數構建出SharedUserSettings對象,可以通過兩個維度來引用創建出的對象,即名稱和uid。
在Settings中mSharedUsers是一個map對象,利用名稱作為索引管理SharedUserSettings對象。
Settings中的mOtherUserIds和mUserIds,均是利用userId作為索引管理SharedUserSettings對象。不同的是mOtherUserIds是SparseArray,以系統uid作為鍵值;mUserIds是ArrayList,普通APK的uid為ArrayList的下標。
說了這麼多,SharedUserSettings到底是什麼?PKMS為什麼要花這麼大的力氣,創建和管理SharedUserSettings?接下來,我們就來逐步揭曉答案。
1.1 SharedUserSettings
我們看看SharedUserSettings類:
final class SharedUserSetting extends SettingBase {
    final String name;

    int userId;

    // flags that are associated with this uid, regardless of any package flags
    int uidFlags;
    int uidPrivateFlags;

    //關鍵點
    final ArraySet packages = new ArraySet();

    final PackageSignatures signatures = new PackageSignatures();

    SharedUserSetting(String _name, int _pkgFlags, int _pkgPrivateFlags) {
        super(_pkgFlags, _pkgPrivateFlags);
        uidFlags =  _pkgFlags;
        uidPrivateFlags = _pkgPrivateFlags;
        name = _name;
    }
    ............
    void removePackage(PackageSetting packageSetting) {
        if (packages.remove(packageSetting)) {
            .......
        }
    }

    void addPackage(PackageSetting packageSetting) {
        if (packages.add(packageSetting)) {
            ........
        }
    }
}
從上面的代碼來看,SharedUserSettings將持有一組PackageSetting。
從SharedUserSettings的命名來看,這一組PackageSetting應該有相似的共性。
為了進一步分析,我們舉個例子來看看。
在packages/apps/Settings的AndroidManifest.xml中,有以下內容:
...............
如上所示,在xml文件中,聲明了一個名為android:sharedUserId的屬性,其值為”android.uid.system”。
實際上多個聲明了同一種sharedUserId的APK可共享彼此的數據,並且可運行在同一進程中。更重要的是,通過聲明特點的sharedUserId,該APK所在的進程將被賦予指定UID對應的權限。
我們知道Android系統中的UID表示用戶ID,GID表示用戶組ID,均與Linux系統中進程的權限管理有關。一般來說,每一個進程都會有一個對應的UID,針對不同的UID可以有不同的權限;同時,每個進程也可以分屬於不同的用戶組,即有對應的GID,針對不同的GID也可以有不同的權限。
通過上面這個例子及UID/GID的用途,SharedUserSettings的作用就可以體現出來了:
SharedUserSettings將“android:sharedUserId”屬性的名稱和對應的uid關聯起來,同時持有所有聲明相同sharedUserId的APK的PackageSettings,因此PKMS可以為同一類APK設置相同的權限。
除了在AndroidManifest.xml中聲明sharedUserId外,APK在編譯時還必須使用對應的證書簽名。例如Settings.apk,對應的Android.mk中就聲明了LOCAL_CERTIFICATE := platform。這樣Settings.apk就具有系統權限了。
1.2 SharedUserSettings相關的類圖
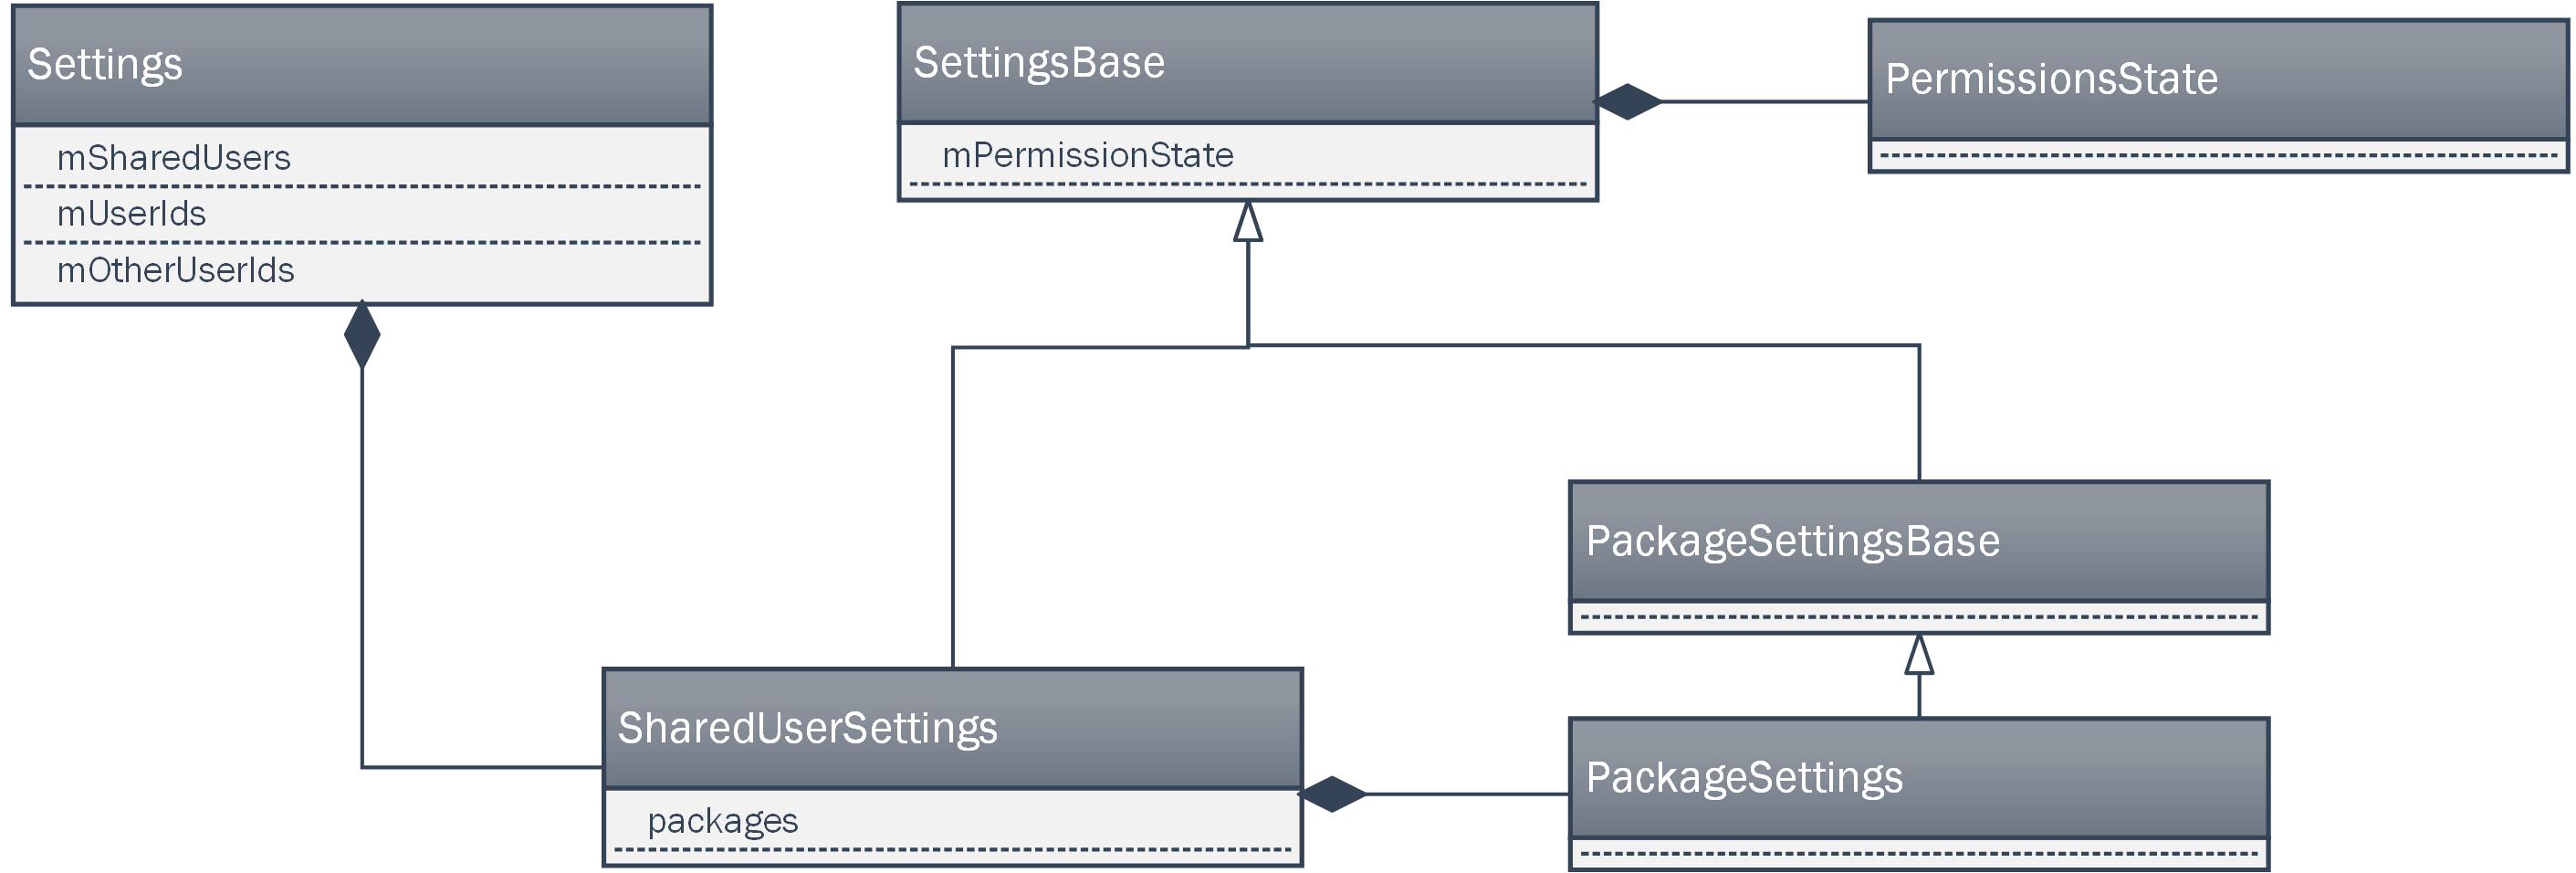
在這一部分的最後,我們來簡單回顧一下SharedUserSettings相關的類圖。
如上圖所示,Settings對象中持有多個SharedUserSettings對象,每個SharedUserSettings對象由會持有多個PackageSettings對象。
從繼承關系來看,SharedUserSettings和PackageSettings對象,最終都將繼承SettingsBase對象。
從圖上可以看出,SettingsBase對象持有PermissionsState對象,用於表示可用的權限。
因此,SharedUserSettings對象和PackageSettings對象中都將包含有PermissionsState。
可以據此推測出,SharedUserSettings中持有的是一組Package共有的權限;PackageSettings中持有的是單個Package獨有的權限。
PKMS中Settings除去SharedUserSettings之外,還管理了其它重要的數據結構,我們暫時略過,等流程涉及到時,再作分析。
二、讀取XML文件中系統配置信息
我們回到PKMS的構造函數,看下一段代碼:
//debug相關
.......
//構造函數傳入的InstallerService,與底層Installd通信
mInstaller = installer;
mPackageDexOptimizer = new PackageDexOptimizer(installer, mInstallLock, context,
        "*dexopt*");

//定義一些回調函數
mMoveCallbacks = new MoveCallbacks(FgThread.get().getLooper());

mOnPermissionChangeListeners = new OnPermissionChangeListeners(
        FgThread.get().getLooper());

//存儲顯示信息
getDefaultDisplayMetrics(context, mMetrics);

//獲取系統配置信息
SystemConfig systemConfig = SystemConfig.getInstance();
//將系統配置信息,存儲到PKMS中
mGlobalGids = systemConfig.getGlobalGids();
mSystemPermissions = systemConfig.getSystemPermissions();
mAvailableFeatures = systemConfig.getAvailableFeatures();
..........
在這一段代碼中,PKMS創建了許多對象,暫時可以先不管它們,重點看看SystemConfig相關的函數。
//單例模式
public static SystemConfig getInstance() {
    synchronized (SystemConfig.class) {
        if (sInstance == null) {
            sInstance = new SystemConfig();
        }
        return sInstance;
    }
}

SystemConfig() {
    // Read configuration from system
    //從“system”目錄下讀取
    readPermissions(Environment.buildPath(
            Environment.getRootDirectory(), "etc", "sysconfig"), ALLOW_ALL);

    // Read configuration from the old permissions dir
    readPermissions(Environment.buildPath(
            Environment.getRootDirectory(), "etc", "permissions"), ALLOW_ALL);

    // Allow ODM to customize system configs around libs, features and apps
    //從"/odm"目錄下讀取
    int odmPermissionFlag = ALLOW_LIBS | ALLOW_FEATURES | ALLOW_APP_CONFIGS;
    readPermissions(Environment.buildPath(
            Environment.getOdmDirectory(), "etc", "sysconfig"), odmPermissionFlag);
    readPermissions(Environment.buildPath(
            Environment.getOdmDirectory(), "etc", "permissions"), odmPermissionFlag);

    // Only allow OEM to customize features
    //從“oem”目錄下讀取
    readPermissions(Environment.buildPath(
        Environment.getOemDirectory(), "etc", "sysconfig"), ALLOW_FEATURES);
    readPermissions(Environment.buildPath(
        Environment.getOemDirectory(), "etc", "permissions"), ALLOW_FEATURES);
}
從上面的代碼可以看出,創建SystemConfig時,將從不同的“etc”目錄下讀取權限信息,包括root目錄、odm和oem目錄,不同目錄對應的可讀取權限的范圍不同。
我們看看readPermissions函數:
void readPermissions(File libraryDir, int permissionFlag) {
    //檢測目錄是否存在,是否可讀
    ..........
    // Iterate over the files in the directory and scan .xml files
    File platformFile = null;
    for (File f : libraryDir.listFiles()) {
        // We'll read platform.xml last
        if (f.getPath().endsWith("etc/permissions/platform.xml")) {
            platformFile = f;
            continue;
        }

        //僅讀取可讀的xml文件
        ..........
        readPermissionsFromXml(f, permissionFlag);
    }

    // Read platform permissions last so it will take precedence
    if (platformFile != null) {
        readPermissionsFromXml(platformFile, permissionFlag);
    }
}
現在我們知道了,readPermissions就是從指定目錄下,讀取xml中的配置的權限信息。實際的手機上,可能沒有代碼中指定的所有目錄,例如沒有“odm”等,但system/etc/permissions目錄一般都是有的。
1、xml文件內容舉例
我手邊有一台root過的android 6.0的手機,以system目錄為例,看看其system/etc/permissions下的xml文件:
android.hardware.bluetooth.xml
android.hardware.camera.xml
//中間略去了一些。在中間甚至有廠商自己添加的xml
//與Android的設計初衷不符,可能是考慮到PKMS限制了"oem"目錄下可以定義的權限種類,才添加到這個位置的
.......
platform.xml
1.1 platform.xml
platform.xml優先級最高,我們先看看platform.xml中的內容:
    ........


    ............


    ..........
從上面的xml文件可以看出,platform.xml主要作用是:
* permission和group字段用於建立Linux層GID和Android層permission字段之間的映射關系;
* assign-permission用於向指定的uid賦予相應的權限;
* library字段用於可鏈接的指定系統庫
* allow-in-power-save-except-idle用於指定進程在省電模式下(非Idle)仍可上網
* backup-transport-whitelisted-service用於指定服務具有傳輸備份數據的權利
1.2 一般的xml
了解了platform.xml後,再看看其它的xml文件,這裡以android.hardware.bluetooth.xml為例:
這種類型的xml文件包含了一些feature標簽,用於描述一個手持終端應該支持的硬件特性,例如上面的feature表示一個終端應該支持藍牙功能。
最後需要說明的是,不同設備支持的硬件特性不一樣。
同一套代碼可能需要適配不同的設備,此時通過定義mk文件,可以在編譯階段根據當前硬件平台的配置信息,復制相關的xml文件到system/etc/permission目錄下。
2、 readPermissionsFromXml
了解了xml文件的定義後,我們來看看readPermissionsFromXml函數:
private void readPermissionsFromXml(File permFile, int permissionFlag) {
    FileReader permReader = null;
    try {
        //利用file構造fileReader
        permReader = new FileReader(permFile);
    } catch (FileNotFoundException e) {
        .......
    }

    //讀取系統屬性"ro.config.low_ram",如果該屬性為true,不會加載指定notLowRam的feature屬性
    //自己曾經試過,將大量的文件利用adb push導入到/data目錄下,直到手機內存僅剩10幾M,不能再導入任何文件
    //此時,手機提示內存耗盡,部分系統功能可能無法正常使用
    //個人感覺和這裡的屬性比較類似,一旦手機low_ram,此時終端重啟後,將不再支持一些必須工作在內存足夠條件下的特性
    //不知道這個理解是否正確??
    final boolean lowRam = ActivityManager.isLowRamDeviceStatic();

    try {
        XmlPullParser parser = Xml.newPullParser();
        //Xml解析器的輸入為fileReader讀取的內容
        parser.setInput(permReader);

        //找到解析的起點
        .........

        //根據傳入的flag,決定當前目錄下,從xml文件中解析內容的范圍
        //對於system目錄,allowAll
        boolean allowAll = permissionFlag == ALLOW_ALL;
        boolean allowLibs = (permissionFlag & ALLOW_LIBS) != 0;
        boolean allowFeatures = (permissionFlag & ALLOW_FEATURES) != 0;
        boolean allowPermissions = (permissionFlag & ALLOW_PERMISSIONS) != 0;
        boolean allowAppConfigs = (permissionFlag & ALLOW_APP_CONFIGS) != 0;
        while (true) {
            XmlUtils.nextElement(parser);
            if (parser.getEventType() == XmlPullParser.END_DOCUMENT) {
                break;
            }

            String name = parser.getName();
            //解析group標簽,前面介紹的xml文件中沒有單獨使用該標簽的地方
            if ("group".equals(name) && allowAll) {
                String gidStr = parser.getAttributeValue(null, "gid");
                if (gidStr != null) {
                    //將Gid字符串轉化成整形,保存到mGlobalGids中
                    int gid = android.os.Process.getGidForName(gidStr);
                    mGlobalGids = appendInt(mGlobalGids, gid);
                } else {
                    .........
                }
                XmlUtils.skipCurrentTag(parser);
                continue;
            } else if ("permission".equals(name) && allowPermissions) {
                String perm = parser.getAttributeValue(null, "name");
                .......
                perm = perm.intern();
                //調用readPermission解析permission標簽
                readPermission(parser, perm);
            } else if ("assign-permission".equals(name) && allowPermissions) {
                //得到權限名
                String perm = parser.getAttributeValue(null, "name");
                ........
                //得到uid字符串
                String uidStr = parser.getAttributeValue(null, "uid");
                ......
                //將uid字符串轉變為整形
                int uid = Process.getUidForName(uidStr);
                .......
                perm = perm.intern();
                //得到保存uid當前已有的所有權限的ArraySet
                ArraySet perms = mSystemPermissions.get(uid);
                if (perms == null) {
                   perms = new ArraySet();
                    mSystemPermissions.put(uid, perms);
                }
                //將uid新增的權限,加入到它的ArraySet
                perms.add(perm);
                XmlUtils.skipCurrentTag(parser);
            } else if ("library".equals(name) && allowLibs) {
                String lname = parser.getAttributeValue(null, "name");
                String lfile = parser.getAttributeValue(null, "file");

                if (lname == null) {
                    ......
                } else if (lfile == null) {
                    .....
                } else {
                    //保存library標簽對應的內容
                    mSharedLibraries.put(lname, lfile);
                }
            } else if ("feature".equals(name) && allowFeatures) {
                String fname = parser.getAttributeValue(null, "name");
                int fversion = XmlUtils.readIntAttribute(parser, "version", 0);

                if (!lowRam) {
                    allowed = true;
                } else {
                    //內存不足時,指定notLowRam的feature不再加載
                    String notLowRam = parser.getAttributeValue(null, "notLowRam");
                    allowed = !"true".equals(notLowRam);
                }

                if (fname == null) {
                    .....
                } else if (allowed) {
                    //將feature構造成featureInfo,加入到mAvailableFeatures對象中
                    addFeature(fname, fversion);
                }
                .......
            } else if ("unavailable-feature".equals(name) && allowFeatures) {
                //mUnavailableFeatures保存不支持的feature
                .........
            } else if ("allow-in-power-save-except-idle".equals(name) && allowAll) {
                // These are the packages that are white-listed to be able to run in the
                // background while in power save mode (but not whitelisted from device idle modes),
                // as read from the configuration files.
                //mAllowInPowerSaveExceptIdle中保存省電模式下(非Idle),可上網的應用
                .........
            } else if ("allow-in-power-save".equals(name) && allowAll) {
                // These are the packages that are white-listed to be able to run in the
                // background while in power save mode, as read from the configuration files.
                //mAllowInPowerSave與mAllowInPowerSaveExceptIdle類似,權限更高
                //這與Android M新特性Doze and App Standby模式有關
                //DeviceIdleController用於判斷設備是否進入Idle狀態,進入Idle狀態時,mAllowInPowerSaveExceptIdle中的應用要被禁掉
                //但mAllowInPowerSave中的應用仍可運行
                ............
            } else if ("allow-in-data-usage-save".equals(name) && allowAll) {
                // These are the packages that are white-listed to be able to run in the
                // background while in data-usage save mode, as read from the configuration files.
                //mAllowInDataUsageSave保存此標簽對應的packageName
                //貌似android 7新增了一個節省數據流量的能力,有此標簽的應用在節省數據流量時,仍可訪問網絡
                ............
            } else if ("app-link".equals(name) && allowAppConfigs) {
                // These are the package names of apps which should be in the 'always'
                // URL-handling state upon factory reset.
                //mLinkedApps保存此標簽對應的packageName
                //這個不太明白,好像是指定可以一直處於URL-handling state的app
                .......
            } else if ("system-user-whitelisted-app".equals(name) && allowAppConfigs) {
                // These are the packages that are whitelisted to be able to run as system user
                //mSystemUserWhitelistedApps保存此標簽對應的packageName
                //指定以system user權限運行的app
                .......
            } else if ("system-user-blacklisted-app".equals(name) && allowAppConfigs) {
                // These are the packages that should not run under system user
                //mSystemUserBlacklistedApp保存此標簽對應的packageName
                //指定在system user權限下,不應該運行的app
                .........
            }else if ("default-enabled-vr-app".equals(name) && allowAppConfigs) {
                // These are the components that are enabled by default as VR mode listener services.
                //mDefaultVrComponents保存此標簽對應的packageName
                //指定默認運行在VR模式下的components
                .......
            } else if ("backup-transport-whitelisted-service".equals(name) && allowFeatures) {
                // These are the permitted backup transport service components
                //mBackupTransportWhitelist保存此標簽對應的packageName
                //保存能夠傳輸備份數據的服務
                ........
            } else {
                .......
            }
        }
    } catch (XmlPullParserException e) {PullParserException e) {
        .......
    } catch (IOException e) {
        .......
    } finally {
        IoUtils.closeQuietly(permReader);
    }

    // Some devices can be field-converted to FBE, so offer to splice in
    // those features if not already defined by the static config
    //加密相關的feature
    if (StorageManager.isFileEncryptedNativeOnly()) {
        addFeature(PackageManager.FEATURE_FILE_BASED_ENCRYPTION, 0);
        addFeature(PackageManager.FEATURE_SECURELY_REMOVES_USERS, 0);
    }

    for (String featureName : mUnavailableFeatures) {
        //從mAvailableFeatures移除不支持的feature
        removeFeature(featureName);
    }
}
從上面的代碼可以看出readPermissions函數就是將xml文件中的標簽轉換成對應的數據結構,此處重要的是理解各種標簽的作用。
對於”permission”標簽,還調用了readPermission函數:
void readPermission(XmlPullParser parser, String name)
        throws IOException, XmlPullParserException {
    if (mPermissions.containsKey(name)) {
        throw new IllegalStateException("Duplicate permission definition for " + name);
    }

    final boolean perUser = XmlUtils.readBooleanAttribute(parser, "perUser", false);
    final PermissionEntry perm = new PermissionEntry(name, perUser);
    //將permission name和permissionEntry結合起來
    mPermissions.put(name, perm);
    ........
    while(.....) {
        .......
        String tagName = parser.getName();
        if ("group".equals(tagName)) {
            String gidStr = parser.getAttributeValue(null, "gid");
            if (gidStr != null) {
                int gid = Process.getGidForName(gidStr);
                //對應gid存入permissionEntry結構體中,於是permission name與gid對應起來
                perm.gids = appendInt(perm.gids, gid);
            } else {
                ......
            }
        }
        .......
    }
}
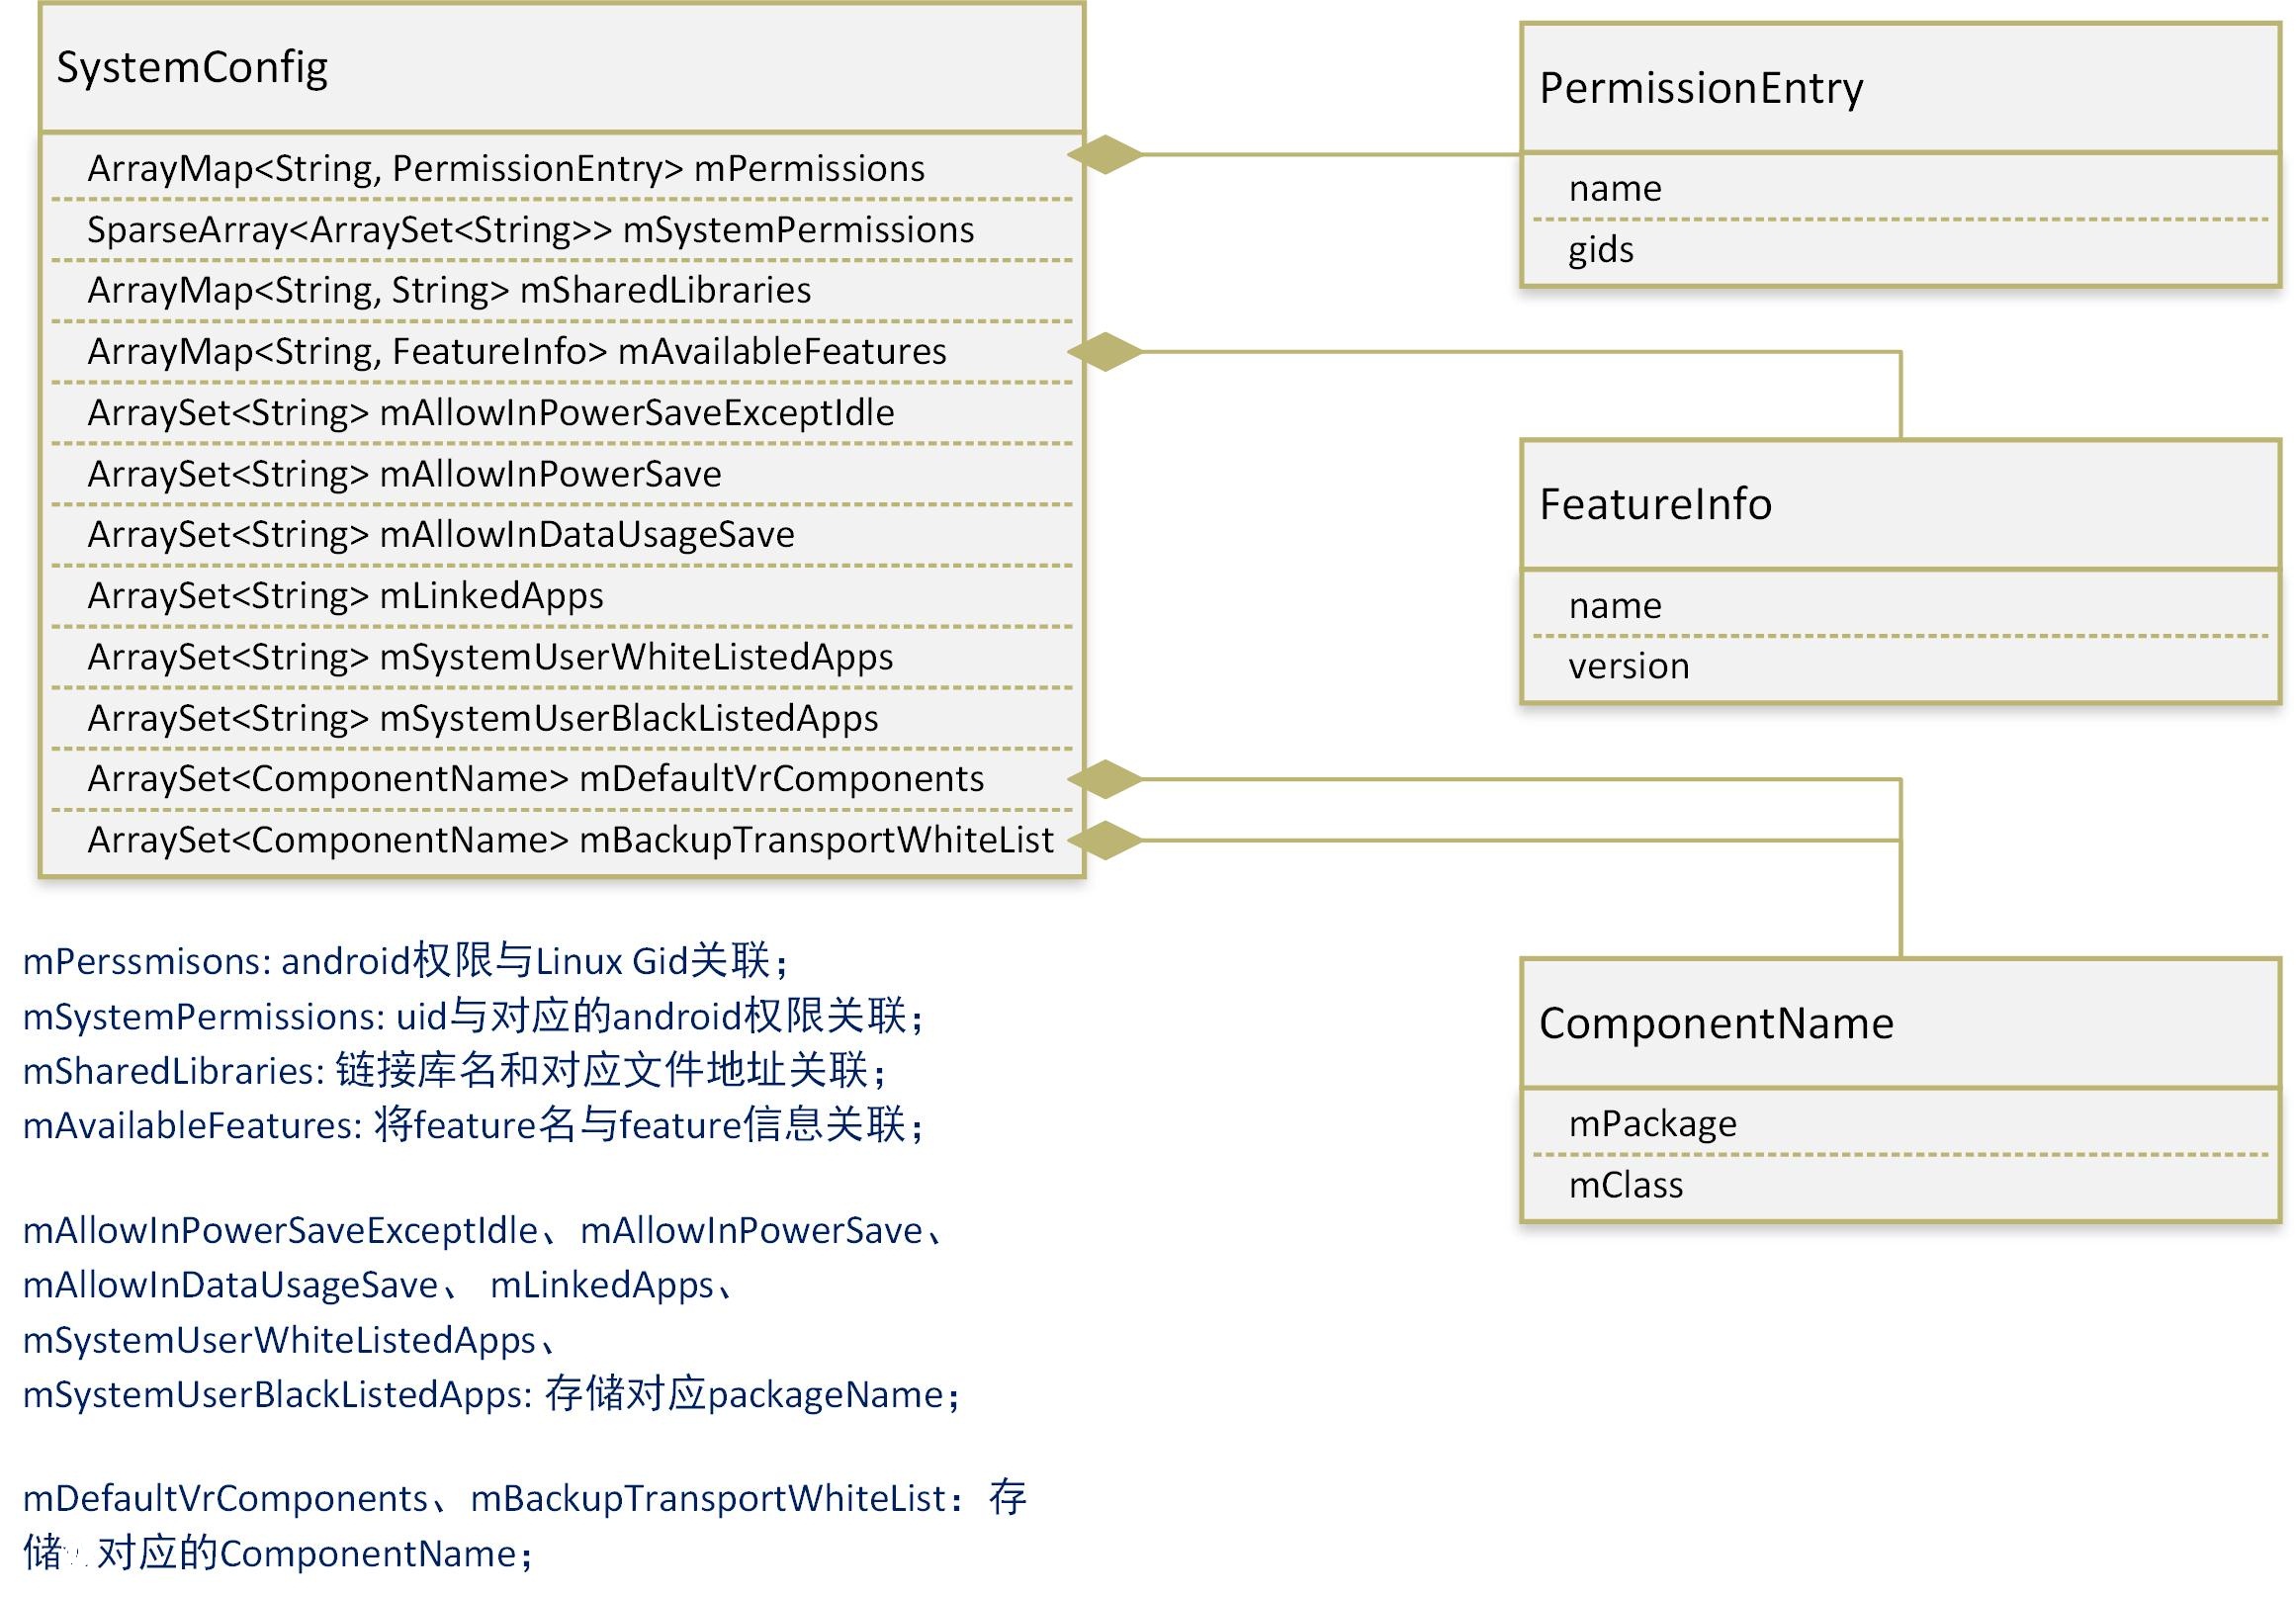
PKMS創建的SystemConfig負責解析系統的xml配置文件,最終將形成上圖所示的數據結構(列舉了主要數據)。
在此之後,PKMS取出並保存了SystemConfig中的權限和feature等信息。
三、加載簽名策略
我們回到PKMS的構造函數,看下一段代碼:
..............
synchronized (mInstallLock) {
synchronized (mPackages) {
    //mHandlerThread將負責Apk的安裝和卸載
    mHandlerThread = new ServiceThread(TAG,
            Process.THREAD_PRIORITY_BACKGROUND, true /*allowIo*/);
    mHandlerThread.start();

    //PackageHandler、ProcessLoggingHandler共用ServiceThread
    mHandler = new PackageHandler(mHandlerThread.getLooper());
    mProcessLoggingHandler = new ProcessLoggingHandler();

    //Watchdog監控ServiceThread是否長時間阻塞
    Watchdog.getInstance().addThread(mHandler, WATCHDOG_TIMEOUT);

    //創建/data下下一系列的目錄
    File dataDir = Environment.getDataDirectory();
    mAppInstallDir = new File(dataDir, "app");
    mAppLib32InstallDir = new File(dataDir, "app-lib");
    mEphemeralInstallDir = new File(dataDir, "app-ephemeral");
    mAsecInternalPath = new File(dataDir, "app-asec").getPath();
    mDrmAppPrivateInstallDir = new File(dataDir, "app-private");

    //針對Android系統中多用戶場景
    sUserManager = new UserManagerService(context, this, mPackages);

    //Propagate permission configuration in to package manager.
    //取出SystemConfig中的mPermissions
    ArrayMap<string, systemconfig.permissionentry=""> permConfig
            = systemConfig.getPermissions();
    for (int i=0; i<permconfig.size(); systemconfig.permissionentry="" perm="permConfig.valueAt(i);" basepermission="" bp="=" if="" perm.gids="" string=""> libConfig = systemConfig.getSharedLibraries();
    for (int i=0; i<libconfig.size(); new="" mfoundpolicyfile="SELinuxMMAC.readInstallPolicy();" pre="">
我們看看代碼:
/**
* Load the mac_permissions.xml file containing all seinfo assignments used to
* label apps. The loaded mac_permissions.xml file is determined by the
* MAC_PERMISSIONS class variable which is set at class load time which itself
* is based on the USE_OVERRIDE_POLICY class variable. For further guidance on
* the proper structure of a mac_permissions.xml file consult the source code
* located at system/sepolicy/mac_permissions.xml.
*/
public static boolean readInstallPolicy() {
    // Temp structure to hold the rules while we parse the xml file
    List policies = new ArrayList<>();

    FileReader policyFile = null;
    XmlPullParser parser = Xml.newPullParser();
    try {
        //MAC_PERMISSIONS為SELinuxMMAC中的靜態變量,保存"system/etc/security/mac_permissions.xml"對應的file
        //源碼7.0中路徑為"system/sepolicy/mac_permissions.xml",應該是編譯後拷入到etc目錄的
        policyFile = new FileReader(MAC_PERMISSIONS);
        .............
        while (parser.next() != XmlPullParser.END_TAG) {
            .........
            switch (parser.getName()) {
                case "signer":
                    //加載簽名策略
                    //readSignerOrThrow負責解析xml,構造出policy
                    policies.add(readSignerOrThrow(parser));
                    break;
                ..........
            }
        }
    } ......

    // Now sort the policy stanzas
    PolicyComparator policySort = new PolicyComparator();
    Collections.sort(policies, policySort);
    ..........

    synchronized (sPolicies) {
        //加載完簽名策略後存入靜態變量
        sPolicies = policies;
        .....
    }

    return true;
}
從上面的代碼可以看出,readInstallPolicy其實也是解析xml文件,以讀出相應的簽名策略。 我們看看”system/sepolicy/mac_permissions.xml”:
seinfo決定了Android中進程所在的domain,以及其數據文件在安全上下文中的Type,linux將根據此制定訪問策略。這些內容涉及到SEAndroid安全機制,自己其實也是一知半解,有機會再做分析。
根據mac_permissions.xml的定義,如果App是在Android源碼編譯環境下,其Android.mk中指定了LOCAL_CERTIFICATE : = platform的話,它的 seinfo就是platform。如果Android.mk中不進行對應的設置,setinfo為默認值default。對於第三方APK,其seinfo值通常為default。
mac_permissions.xml編譯進system/etc目錄時,@PLATFORM將被實際的簽名信息替換,以下是我從android6.0機器中導出的文件內容:
了解mac_permissions.xml的內容後,最後再看看解析xml使用的函數:
private static Policy readSignerOrThrow(XmlPullParser parser) throws IOException,
        XmlPullParserException {
    parser.require(XmlPullParser.START_TAG, null, "signer");
    //策略構造器
    Policy.PolicyBuilder pb = new Policy.PolicyBuilder();

    // Check for a cert attached to the signer tag. We allow a signature
    // to appear as an attribute as well as those attached to cert tags.
    String cert = parser.getAttributeValue(null, "signature");
    if (cert != null) {
        pb.addSignature(cert);
    }

    while (parser.next() != XmlPullParser.END_TAG) {
        .............
        String tagName = parser.getName();
        if ("seinfo".equals(tagName)) {
            String seinfo = parser.getAttributeValue(null, "value");
            pb.setGlobalSeinfoOrThrow(seinfo);
            readSeinfo(parser);
        } else if ("package".equals(tagName)) {
            readPackageOrThrow(parser, pb);
        } else if ("cert".equals(tagName)) {
            String sig = parser.getAttributeValue(null, "signature");
            pb.addSignature(sig);
            readCert(parser);
        } else {
            skip(parser);
        }
    }

    //構造出實際的policy
    return pb.build();
}
容易看出,上面的函數就是根據標簽信息,構造出對應的Selinux Policy。
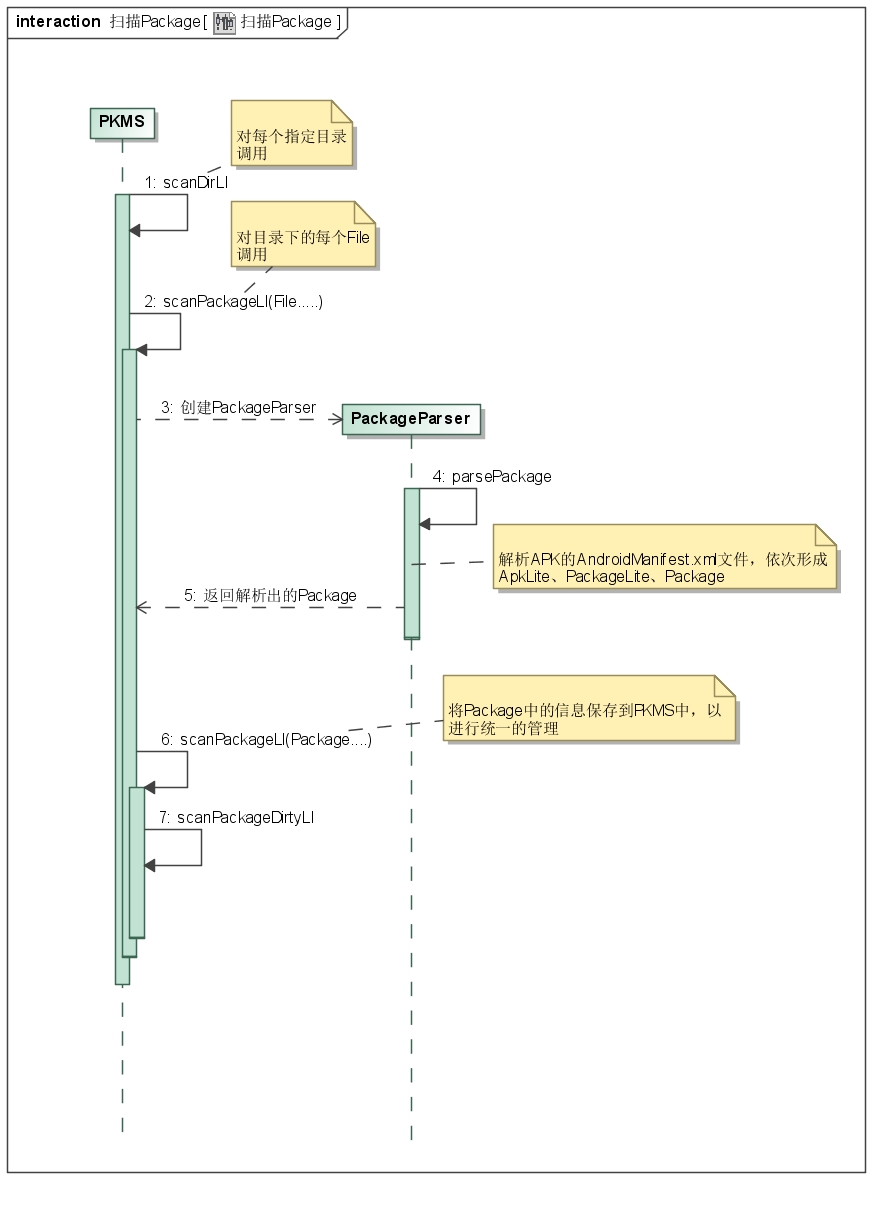
四、掃描Package 我們回到PKMS的構造函數,看下一段代碼:
........
//解析Settings構造函數中提及的文件:"packages.xml"、"packages-stopped.xml"等
//此處將通過解析XML文件,得到之前系統保存的Package相關的信息,暫時不深入分析函數
mRestoredSettings = mSettings.readLPw(sUserManager.getUsers(false));
..............
long startTime = SystemClock.uptimeMillis();
..............

// Set flag to monitor and not change apk file paths when
// scanning install directories.
//定義掃描參數
final int scanFlags = SCAN_NO_PATHS | SCAN_DEFER_DEX | SCAN_BOOTING | SCAN_INITIAL;
.........

/**
* Ensure all external libraries have had dexopt run on them.
*/
//這一部分代碼,應該是利用installd對所有platform.xml定義的鏈接庫文件進行dex優化
if (mSharedLibraries.size() > 0) {
    // NOTE: For now, we're compiling these system "shared libraries"
    // (and framework jars) into all available architectures. It's possible
    // to compile them only when we come across an app that uses them (there's
    // already logic for that in scanPackageLI) but that adds some complexity.
    ......................
}

//指向system/framework目錄
File frameworkDir = new File(Environment.getRootDirectory(), "framework");

//處理系統升級相關的問題
..............

// Collect vendor overlay packages.
// (Do this before scanning any apps.)
// For security and version matching reason, only consider
// overlay packages if they reside in VENDOR_OVERLAY_DIR.
File vendorOverlayDir = new File(VENDOR_OVERLAY_DIR);

//掃描目標目錄下的Package
scanDirTracedLI(vendorOverlayDir, mDefParseFlags
        | PackageParser.PARSE_IS_SYSTEM
        | PackageParser.PARSE_IS_SYSTEM_DIR
        | PackageParser.PARSE_TRUSTED_OVERLAY, scanFlags | SCAN_TRUSTED_OVERLAY, 0);

//利用scanDirTracedLI掃描system/framework、system/priv-app、system/app、vendor/app等目錄,傳入的parseFlag不一樣
........
我們跟進一下scanDirTracedLI:
private void scanDirTracedLI(File dir, final int parseFlags, int scanFlags, long currentTime) {
    Trace.traceBegin(TRACE_TAG_PACKAGE_MANAGER, "scanDir");
    try {
        //此處進行實際的掃描工作
        scanDirLI(dir, parseFlags, scanFlags, currentTime);
    } finally {
        Trace.traceEnd(TRACE_TAG_PACKAGE_MANAGER);
    }
}

private void scanDirLI(File dir, final int parseFlags, int scanFlags, long currentTime) {
    final File[] files = dir.listFiles();
    .......
    for (File file : files) {
        final boolean isPackage = (isApkFile(file) || file.isDirectory())
                && !PackageInstallerService.isStageName(file.getName());
        if (!isPackage) {
            // Ignore entries which are not packages
            continue;
        }

        try {
            //處理目錄下每一個package文件
            scanPackageTracedLI(file, parseFlags | PackageParser.PARSE_MUST_BE_APK,
                    scanFlags, currentTime, null);
        } catch (PackageManagerException e) {
            .........
        }
    }
}

private PackageParser.Package scanPackageTracedLI(File scanFile, final int parseFlags,
        int scanFlags, long currentTime, UserHandle user) throws PackageManagerException {
    Trace.traceBegin(TRACE_TAG_PACKAGE_MANAGER, "scanPackage");
    try {
        return scanPackageLI(scanFile, parseFlags, scanFlags, currentTime, user);
    } finally {
        Trace.traceEnd(TRACE_TAG_PACKAGE_MANAGER);
    }
}
我們看一下此時調用的scanPackageLI函數:
private PackageParser.Package scanPackageLI(File scanFile, int parseFlags, int scanFlags,
        long currentTime, UserHandle user) throws PackageManagerException {
    //創建出PackageParser對象
    PackageParser pp = new PackageParser();
    ...........
    final PackageParser.Package pkg;
    try {
        pkg = pp.parsePackage(scanFile, parseFlags);
    } catch (PackageParserException e) {
        ..........
    } finally {
        ..........
    }

    //調用另一個scanPackageLI
    return scanPackageLI(pkg, scanFile, parseFlags, scanFlags, currentTime, user);
}
從上面的代碼,可以看出scanPackageLI先調用PackageParser對APK文件進行解析,完成從物理文件從對應數據結構的轉換。 我們先來看看對應的parsePackage函數。
1、 PackageParser的parsePackage函數
/**
* Parse the package at the given location. Automatically detects if the
* package is a monolithic style (single APK file) or cluster style
* (directory of APKs).
*/
public Package parsePackage(File packageFile, int flags) throws PackageParserException {
    if (packageFile.isDirectory()) {
        return parseClusterPackage(packageFile, flags);
    } else {
        return parseMonolithicPackage(packageFile, flags);
    }
}
從上面的代碼可以看出,對於單一APK文件和多APK文件的package,分別調用了不同的函數進行處理。實際上,兩個函數中的關鍵部分是一致的,我們以第一個函數為例,繼續分析:
/**
* Parse all APKs contained in the given directory, treating them as a
* single package. This also performs sanity checking, such as requiring
* identical package name and version codes, a single base APK, and unique
* split names.
* /
private Package parseClusterPackage(File packageDir, int flags) throws PackageParserException {
    //1、解析出簡化信息,例如名稱、路徑之類的
    final PackageLite lite = parseClusterPackageLite(packageDir, 0);
    .........
    final AssetManager assets = new AssetManager();
    try {
        // Load the base and all splits into the AssetManager
        // so that resources can be overriden when parsing the manifests.
        //2、將APK的一些信息放入資源管理器中
        loadApkIntoAssetManager(assets, lite.baseCodePath, flags);

        if (!ArrayUtils.isEmpty(lite.splitCodePaths)) {
            for (String path : lite.splitCodePaths) {
                loadApkIntoAssetManager(assets, path, flags);
            }
        }

        final File baseApk = new File(lite.baseCodePath);
        //3、解析主要APK信息
        final Package pkg = parseBaseApk(baseApk, assets, flags);
        .........
        if (!ArrayUtils.isEmpty(lite.splitNames)) {
            final int num = lite.splitNames.length;
            pkg.splitNames = lite.splitNames;
            pkg.splitCodePaths = lite.splitCodePaths;
            pkg.splitRevisionCodes = lite.splitRevisionCodes;
            pkg.splitFlags = new int[num];
            pkg.splitPrivateFlags = new int[num];

            for (int i = 0; i < num; i++) {
                //4、解析其它分離的APK信息
                parseSplitApk(pkg, i, assets, flags);
            }
        }

        pkg.setCodePath(packageDir.getAbsolutePath());
        pkg.setUse32bitAbi(lite.use32bitAbi);
        return pkg;
    } finally {
        IoUtils.closeQuietly(assets);
    }
}
上面的代碼可以分為4個主要的步驟,我們現在來一一分析:
1.1 parseClusterPackageLite
private static PackageLite parseClusterPackageLite(File packageDir, int flags)
        throws PackageParserException {
    final File[] files = packageDir.listFiles();
    ................
    String packageName = null;
    int versionCode = 0;

    final ArrayMap apks = new ArrayMap<>();
    for (File file : files) {
        if (isApkFile(file)) {
            //執行實際的parse工作
            final ApkLite lite = parseApkLite(file, flags);

            // Assert that all package names and version codes are
            // consistent with the first one we encounter.
            if (packageName == null) {
                packageName = lite.packageName;
                versionCode = lite.versionCode;
            } else {
                //檢查名稱一致性
                if (!packageName.equals(lite.packageName)) {
                    //throw exception
                    ..............
                }
                //檢查版本號一致性
                if (versionCode != lite.versionCode) {
                    //throw exception
                    ..............
                }
            }

            // Assert that each split is defined only once
            if (apks.put(lite.splitName, lite) != null) {
                //throw exception
                ..........
            }
        }
    }

    //baseApk的splitName為null,因此remove後被移出
    final ApkLite baseApk = apks.remove(null);
    ..........
    // Always apply deterministic ordering based on splitName
    final int size = apks.size();

    String[] splitNames = null;
    String[] splitCodePaths = null;
    int[] splitRevisionCodes = null;
    //splitAPK信息排序後,存儲
    if (size > 0) {
        splitNames = new String[size];
        splitCodePaths = new String[size];
        splitRevisionCodes = new int[size];

        splitNames = apks.keySet().toArray(splitNames);
        Arrays.sort(splitNames, sSplitNameComparator);

        for (int i = 0; i < size; i++) {
            splitCodePaths[i] = apks.get(splitNames[i]).codePath;
            splitRevisionCodes[i] = apks.get(splitNames[i]).revisionCode;
        }
    }

    final String codePath = packageDir.getAbsolutePath();
    //構造出PackageLite並返回
    return new PackageLite(codePath, baseApk, splitNames, splitCodePaths,
            splitRevisionCodes);
}
容易看出,上述代碼中進行實際解析操作的函數是parseApkLite:
public static ApkLite parseApkLite(File apkFile, int flags)
        throws PackageParserException {
    final String apkPath = apkFile.getAbsolutePath();

    AssetManager assets = null;
    XmlResourceParser parser = null;
    try {
        assets = new AssetManager();
        assets.setConfiguration(0, 0, null, 0, 0, 0, 0, 0, 0, 0, 0, 0, 0, 0, 0, 0,
                Build.VERSION.RESOURCES_SDK_INT);

        //資源管理器中存儲路徑信息
        int cookie = assets.addAssetPath(apkPath);
        ........
        final DisplayMetrics metrics = new DisplayMetrics();
        metrics.setToDefaults();

        final Resources res = new Resources(assets, metrics, null);
        //獲取一個XML資源解析文件,該對象解析的是APK中的AndroidManifest.xml文件
        parser = assets.openXmlResourceParser(cookie, ANDROID_MANIFEST_FILENAME);

        //獲取APK中的簽名信息
        ..........

        //XmlResourceParser繼承自AttributeSet
        final AttributeSet attrs = parser;

        return parseApkLite(apkPath, res, parser, attrs, flags, signatures, certificates);
    } catch (XmlPullParserException | IOException | RuntimeException e) {
        .......
    } finally {
        IoUtils.closeQuietly(parser);
        IoUtils.closeQuietly(assets);
    }
}

private static ApkLite parseApkLite(String codePath, Resources res, XmlPullParser parser,
        AttributeSet attrs, int flags, Signature[] signatures, Certificate[][] certificates)
                throws IOException, XmlPullParserException, PackageParserException {
    //得到packageName+splitName
    final Pair packageSplit = parsePackageSplitNames(parser, attrs);

    //以下變量設為默認值
    int installLocation = PARSE_DEFAULT_INSTALL_LOCATION;
    int versionCode = 0;
    int revisionCode = 0;
    boolean coreApp = false;
    boolean multiArch = false;
    boolean use32bitAbi = false;
    boolean extractNativeLibs = true;

    //利用XML資源解析器,從xml中取出上述變量對應的值(未定義則用默認值)
    ................

    //利用上述變量構成ApkLite返回
    return new ApkLite(codePath, packageSplit.first, packageSplit.second, versionCode,
            revisionCode, installLocation, verifiers, signatures, certificates, coreApp,
            multiArch, use32bitAbi, extractNativeLibs);
}
上面的代碼做了多次封裝,但本質是獲取AndroidManifest.xml對應的XML資源解析器,解析出其中部分屬性,然後形成ApkLite對象返回。
1.2 loadApkIntoAssetManager
private static int loadApkIntoAssetManager(AssetManager assets, String apkPath, int flags)
        throws PackageParserException {
    ...........
    // The AssetManager guarantees uniqueness for asset paths, so if this asset path
    // already exists in the AssetManager, addAssetPath will only return the cookie
    // assigned to it
    //前一部分實際上已經調用過AssetManager添加apkPath
    int cookie = assets.addAssetPath(apkPath);
    ...........
    return cookie;
}

/**
* Add an additional set of assets to the asset manager.  This can be
* either a directory or ZIP file.  Not for use by applications.  Returns
* the cookie of the added asset, or 0 on failure.
*/
public final int addAssetPath(String path) {
    return  addAssetPathInternal(path, false);
}

private final int addAssetPathInternal(String path, boolean appAsLib) {
    synchronized (this) {
        //依賴Native函數,完成實際的添加
        int res = addAssetPathNative(path, appAsLib);
        .........
        return res;
    }
}
上面的主要是APK對應的資源文件的路徑,加入到資源管理器中。最終還是依賴於Native層的函數完成實際的工作,在此處先不做進一步分析。
1.3 parseBaseApk
private Package parseBaseApk(Resources res, XmlResourceParser parser, int flags,
        String[] outError) throws XmlPullParserException, IOException {
    //創建Package對象,填充部分構造Package對象需要的信息
    .........
    return parseBaseApkCommon(pkg, null, res, parser, flags, outError);
}

/**
* This is the common parsing routing for handling parent and child
* packages in a base APK. The difference between parent and child
* parsing is that some tags are not supported by child packages as
* well as some manifest attributes are ignored. The implementation
* assumes the calling code has already handled the manifest tag if needed
* (this applies to the parent only).
* /
private Package parseBaseApkCommon(Package pkg, Set acceptedTags, Resources res,
        XmlResourceParser parser, int flags, String[] outError) throws XmlPullParserException,
        IOException {
    ...........
    while ((type = parser.next()) != XmlPullParser.END_DOCUMENT
            && (type != XmlPullParser.END_TAG || parser.getDepth() > outerDepth)) {
        ...........
        String tagName = parser.getName();
        ............
        if (tagName.equals(TAG_APPLICATION)) {
            ........
            //解析“application”標簽
            f (!parseBaseApplication(pkg, res, parser, flags, outError)) {
                return null;
            }
        } else if (tagName.equals(TAG_OVERLAY)) {
            //填充overlay資源對應信息
            ...........
        }.........
        //解析一系列AndroidManifest.xml中定義的標簽
        ................
    }
}
parseBaseApk主要就是構造Package對象,然後解析AndroidManifest.xml中的標簽,形成對應的數據結構。 由於AndroidManifest.xml可使用的標簽太多,不一一列舉。
1.4 parseSplitApk parseSplitApk的內容與parseBaseApk基本一致:
private void parseSplitApk(Package pkg, int splitIndex, AssetManager assets, int flags)
        throws PackageParserException {
    final String apkPath = pkg.splitCodePaths[splitIndex];
    ...........
    //路徑進入到資源管理器中
    final int cookie = loadApkIntoAssetManager(assets, apkPath, flags);
    ..........
    try {
        res = new Resources(assets, mMetrics, null);
        assets.setConfiguration(0, 0, null, 0, 0, 0, 0, 0, 0, 0, 0, 0, 0, 0, 0, 0,
            Build.VERSION.RESOURCES_SDK_INT);
        //同樣構造出AndroidManifest.xml對應的資源解析器
        parser = assets.openXmlResourceParser(cookie, ANDROID_MANIFEST_FILENAME);
        //同樣是解析AndroidManifest.xml中的標簽信息,只是解析的標簽內容不同
        pkg = parseSplitApk(pkg, res, parser, flags, splitIndex, outError);
        .........
    } .......
    .......
}
以上就是parseClusterPackage的主要內容,實際上就是解析出Package對應的數據結構。 代碼看起來相當繁瑣,但實際思想確實很簡單的,無非就是解析AndroidManifest.xml對應的標簽項,然後形成對應的數據結構插入到Package中。
前面提到過parseClusterPackage是用於解析存在多個APK文件的Package,parseMonolithicPackage用於解析單個APK文件的Package。 實際上parseMonolithicPackage就是靠parseBaseApk函數完成解析工作的,是parseClusterPackage函數對應工作的一個子集。
 圖片鏈接
圖片鏈接
掃描Package的第一部分工作,難度不大,但極其的繁瑣,跟著流程走一邊真是想死的心都有了。不過正如Torvalds大神所說的,”RTFSC, read the fucking source code”,耐著性子多看看,是提高的基礎條件。
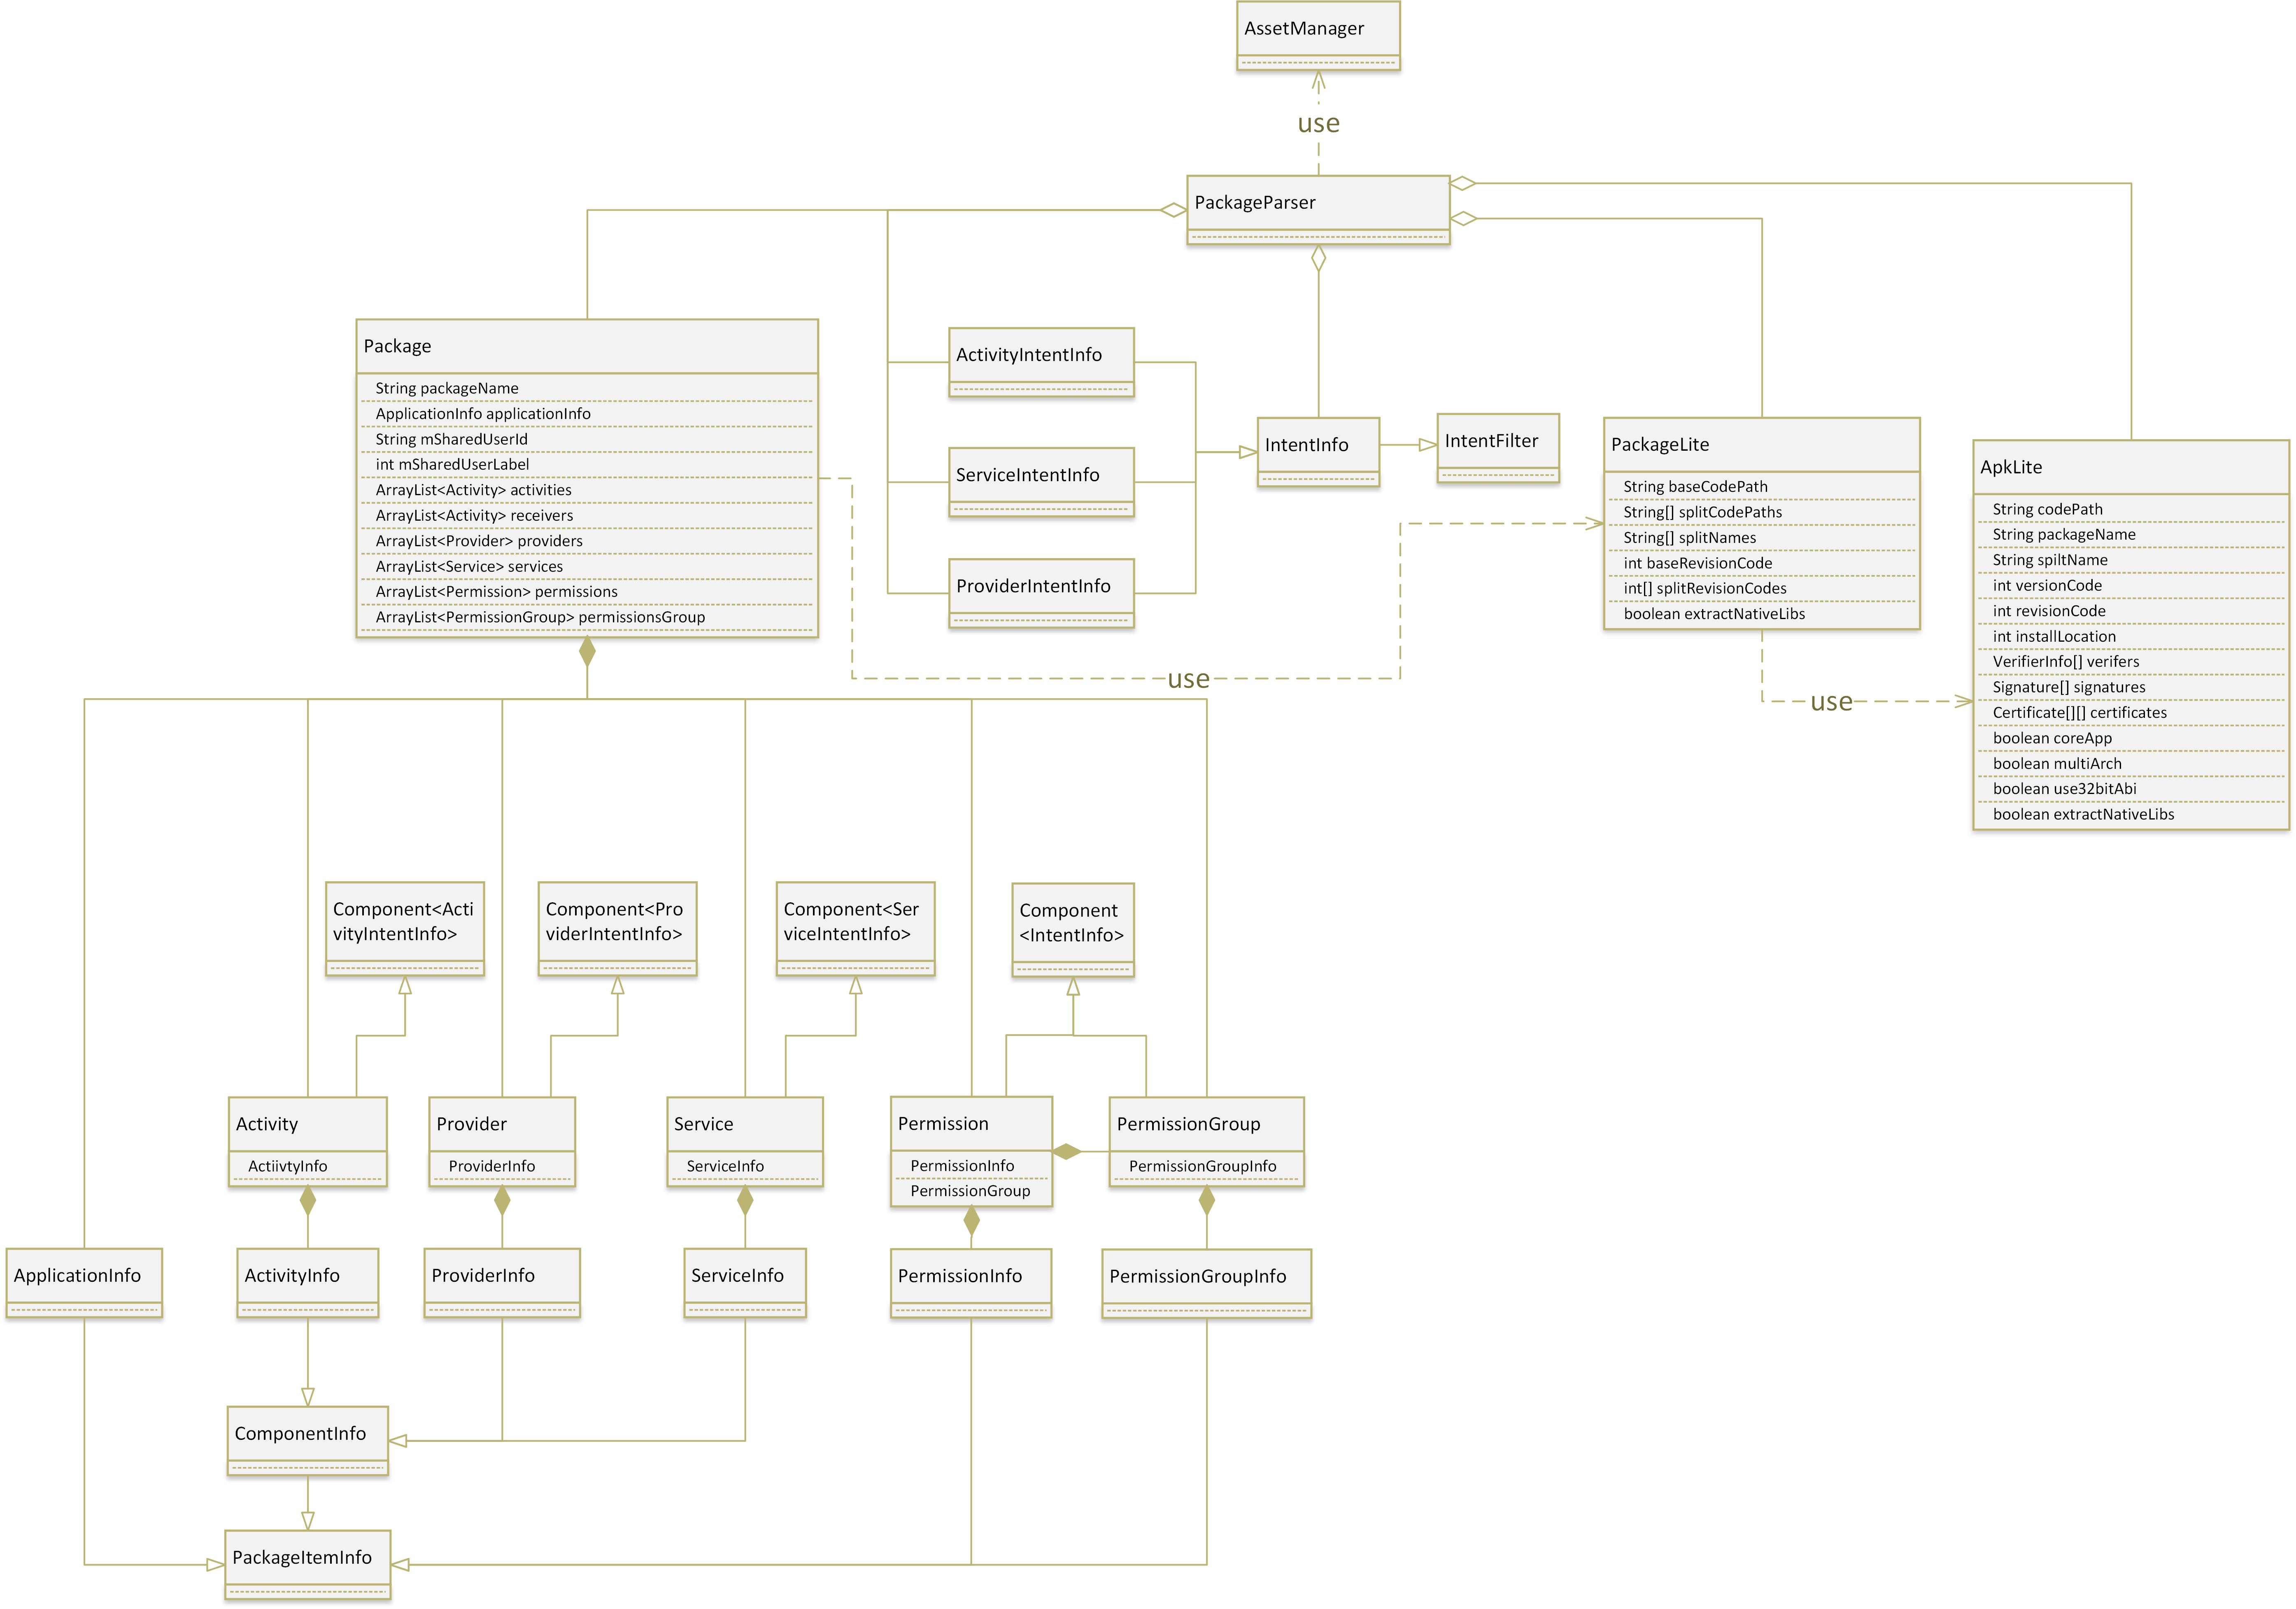
上圖畫出了PackageParser解析Apk文件,得到的主要的數據結構,實際的內容遠多於這些,我們僅保留了四大組件和權限相關的內容。 上面這些類,全部是定義於PackageParser中的內部類,這些內部類主要的作用就是保存AndroidManifest.xml解析出的對應信息。 以PackageParser.Activity為例,注意到該類持有ActivityInfo類,繼承自Component< ActivityIntentInfo>。其中,ActivityInfo用於保存Activity的信息;Component類是一個模板,對應元素類型是ActivityIntentInfo,頂層基類為IntentFilter。四大組件中的其它成員,也有類似的繼承結構。 這種設計的原因是:Package除了保存信息外,還需要支持Intent匹配查詢。例如,當收到某個Intent後,由於ActivityIntentInfo繼承自IntentFilter,因此它能判斷自己是否滿足Intent的要求。如果滿足,則返回對應的ActivityInfo。
最後,我們結合上圖回憶一下整個掃描過程: * PackageParser首先解析出了ApkLite,得到每個Apk文件的簡化信息(對於具有多個Apk文件的Package來說,將得到多個ApkLite); * 利用所有的ApkLite及XML中的其它信息,解析出PackageLite; * 利用PackageLite中的信息及XML中的其它信息,解析出Package信息;Package中就基本上涵蓋了AndroidManifest.xml中涉及的所有信息。 注意在上述的解析過程中,PackageParser利用AssetManager存儲了Package中資源文件的地址。
2、另一個scanPackageLI函數 通過上述的掃描過程,我們得到了當前Apk文件對應的Package信息。但這部分信息是存儲在PackageParser中的,必須將這部分信息上交到PKMS中。畢竟最終的目的是:讓PKMS能得到所有目錄下Package的信息。
private PackageParser.Package scanPackageLI(PackageParser.Package pkg, File scanFile,
        final int policyFlags, int scanFlags, long currentTime, UserHandle user)
        throws PackageManagerException {
    // If the package has children and this is the first dive in the function
    // we recursively scan the package with the SCAN_CHECK_ONLY flag set to see
    // whether all packages (parent and children) would be successfully scanned
    // before the actual scan since scanning mutates internal state and we want
    // to atomically install the package and its children
    //有childPackage時,第一次只執行檢查的工作
    if ((scanFlags & SCAN_CHECK_ONLY) == 0) {
        //當解析一個Package的AndroidManifest.xml時,如果該XML文件中使用了"package"的tag
        //那麼該tag對應的package是當前XML文件對應package的childPackage
        if (pkg.childPackages != null && pkg.childPackages.size() > 0) {
            scanFlags |= SCAN_CHECK_ONLY;
        }
    } else {
        //第二次進入,才開始實際的解析
        scanFlags &= ~SCAN_CHECK_ONLY;
    }

    final PackageParser.Package scannedPkg;
    try {
        // Scan the parent
        //scanFlags將決定這一次是否僅執行檢查工作
        scannedPkg = scanPackageLI(pkg, policyFlags, scanFlags, currentTime, user);

        final int childCount = (pkg.childPackages != null) ? pkg.childPackages.size() : 0;
        for (int i = 0; i < childCount; i++) {
            PackageParser.Package childPkg = pkg.childPackages.get(i);
            scanPackageLI(childPkg, policyFlags,
                    scanFlags, currentTime, user);
        }
    } finally {
        .........
    }

    if ((scanFlags & SCAN_CHECK_ONLY) != 0) {
        //第一次檢查完畢後,再次調用函數
        return scanPackageTracedLI(pkg, policyFlags, scanFlags, currentTime, user);
    }

    return scannedPkg;
}

private PackageParser.Package scanPackageLI(PackageParser.Package pkg, final int policyFlags,
        int scanFlags, long currentTime, UserHandle user) throws PackageManagerException {
    boolean success = false;
    try {
        //實際的解析函數,長達1000行......我覺得要是我來寫的話,應該無法通過代碼審查
        final PackageParser.Package res = scanPackageDirtyLI(pkg, policyFlags, scanFlags,
                currentTime, user);
        success = true;
        return res;
    } finally {
        ...........
    }
}
我們跟進一下scanPackageDirtyLI函數:
2.1 特殊處理”Android” package
private PackageParser.Package scanPackageDirtyLI(PackageParser.Package pkg,
        final int policyFlags, final int scanFlags, long currentTime, UserHandle user)
        throws PackageManagerException {
    final File scanFile = new File(pkg.codePath);
    ..........
    //根據policyFlags設置package及其中applicationInfo等成員的信息
    ..........
    //mCustomResolverComponentName是從系統資源中讀出的,可以配置
    if (mCustomResolverComponentName != null &&
            mCustomResolverComponentName.getPackageName().equals(pkg.packageName)) {
        //這裡的用途和下面判斷packageName是否為"android有關"
        //Replacing default ResolverActivity
        setUpCustomResolverActivity(pkg);
    }

    if (pkg.packageName.equals("android")) {
        synchronized (mPackages) {
            ........
            if ((scanFlags & SCAN_CHECK_ONLY) == 0) {
                // Set up information for our fall-back user intent resolution activity.
                mPlatformPackage = pkg;
                pkg.mVersionCode = mSdkVersion;
                mAndroidApplication = pkg.applicationInfo;

                //上面的setUpCustomResolverActivity被調用時,mResolverReplaced就為true
                if (!mResolverReplaced) {
                    mResolveActivity.applicationInfo = mAndroidApplication;
                    mResolveActivity.name = ResolverActivity.class.getName();
                    mResolveActivity.packageName = mAndroidApplication.packageName;
                    mResolveActivity.processName = "system:ui";
                    mResolveActivity.launchMode = ActivityInfo.LAUNCH_MULTIPLE;
                    mResolveActivity.documentLaunchMode = ActivityInfo.DOCUMENT_LAUNCH_NEVER;
                    mResolveActivity.flags = ActivityInfo.FLAG_EXCLUDE_FROM_RECENTS;
                    mResolveActivity.theme = R.style.Theme_Material_Dialog_Alert;
                    mResolveActivity.exported = true;
                    mResolveActivity.enabled = true;
                    mResolveActivity.resizeMode = ActivityInfo.RESIZE_MODE_RESIZEABLE;
                    mResolveActivity.configChanges = ActivityInfo.CONFIG_SCREEN_SIZE
                            | ActivityInfo.CONFIG_SMALLEST_SCREEN_SIZE
                            | ActivityInfo.CONFIG_SCREEN_LAYOUT
                            | ActivityInfo.CONFIG_ORIENTATION
                            | ActivityInfo.CONFIG_KEYBOARD
                            | ActivityInfo.CONFIG_KEYBOARD_HIDDEN;
                    mResolveInfo.activityInfo = mResolveActivity;
                    mResolveInfo.priority = 0;
                    mResolveInfo.preferredOrder = 0;
                    mResolveInfo.match = 0;
                    mResolveComponentName = new ComponentName(
                            mAndroidApplication.packageName, mResolveActivity.name);
            }
        }
    }
    .............
}
在這一部分代碼中,scanPackageDirtyLI函數單獨處理了名為”android”的Package。 和該Pacakge對應的APK是framework-res.apk,定義於frameworks/base/core/res中,對應的AndroidManifest.xml為:
..................
實際上,framework-res.apk還包含了以下常用的Activity: * ChooserActivity:當多個Activity符合某個Intent的時候,系統會彈出此Activity,由用戶選擇合適的應用來處理。 *ShutdownActivity:關機前彈出的系統對話框。
現在很多做ROM的廠商,應該就會修改這些Activity,以滿足自己的Feature。
該Package和系統息息相關,因此得到了PKMS的特變青睐,主要提現在以下幾點: * PKMS中的mPlatformPackage成員用於保存該Package信息。 * mAndroidApplication用於保存此Package中的ApplicationInfo。 * mResolveActivity指向用於表示ChooserActivity信息的ActivityInfo。 * mResolveInfo為ResolveInfo類型,它用於存儲系統解析Intent(經IntentFilter過濾)後得到得到的結果信息,例如滿足某個Intent的Activity的信息。
在從PKMS中查詢滿足某個Intent的Activity時,返回的就是ResolveInfo,再根據ResolveInfo的信息得到具體的Activity。 可能是因為ChooserActivity使用的地方較多,因此PKMS在此處保存這些信息,以提高運行過程中的效率。
在PKMS的構造函數中,有以下代碼:
..............
String customResolverActivity = Resources.getSystem().getString(
        R.string.config_customResolverActivity);
if (TextUtils.isEmpty(customResolverActivity)) {
    ustomResolverActivity = null;
} else {
    mCustomResolverComponentName = ComponentName.unflattenFromString(
            customResolverActivity);
}
...........
因此可以通過改變配置信息,使得setUpCustomResolverActivity被調用,從而替換默認的ResolverActivity。
2.2 正常處理流程 我們回到scanPackageDirtyLI函數:
.........
synchronized (mPackages) {
    //mPackages用於保存系統內所有Package,以pacakgeName為key
    if (mPackages.containsKey(pkg.packageName)
            || mSharedLibraries.containsKey(pkg.packageName)) {
        throw new PackageManagerException(INSTALL_FAILED_DUPLICATE_PACKAGE,
                "Application package " + pkg.packageName
                        + " already installed.  Skipping duplicate.");
    }

    // If we're only installing presumed-existing packages, require that the
    // scanned APK is both already known and at the path previously established
    // for it.  Previously unknown packages we pick up normally, but if we have an
    // a priori expectation about this package's install presence, enforce it.
    // With a singular exception for new system packages. When an OTA contains
    // a new system package, we allow the codepath to change from a system location
    // to the user-installed location. If we don't allow this change, any newer,
    // user-installed version of the application will be ignored.
    //這一段注釋和代碼都不是很懂........
    ............
}

// Initialize package source and resource directories
File destCodeFile = new File(pkg.applicationInfo.getCodePath());
File destResourceFile = new File(pkg.applicationInfo.getResourcePath());

//代表該Package的SharedUserSettings對象
SharedUserSetting suid = null;
//代表該Pacakge的PacakgeSettings對象
PackageSetting pkgSetting = null;

..........
synchronized (mPackages) {
    if (pkg.mSharedUserId != null) {
        //創建Package對應的ShareduserSetting,然後加入到PKMS中Settings對象維護的數據結構中
        suid = mSettings.getSharedUserLPw(pkg.mSharedUserId, 0, 0, true);
        if (suid == null) {
            //創建失敗,拋出異常
            .........
        }
    }

    //創建出Package對應的PackageSettings,必要時還要處理Package新舊信息的轉換
    .............

    if ((policyFlags&PackageParser.PARSE_IS_SYSTEM_DIR) == 0) {
        // Check all shared libraries and map to their actual file path.
        // We only do this here for apps not on a system dir, because those
        // are the only ones that can fail an install due to this.  We
        // will take care of the system apps by updating all of their
        // library paths after the scan is done.
        //如果Package申明需要library或option-library, PKMS要確保這些library已經被加載到mSharedLibraries中
        updateSharedLibrariesLPw(pkg, null);
    }

    //根據policy文件,找到Pacakge對應的seinfo,然後存入Pacakge的applicationInfo中
    if (mFoundPolicyFile) {
        SELinuxMMAC.assignSeinfoValue(pkg);
    }

    //處理Package的簽名信息,還包括更新和驗證
    ............

    // Verify that this new package doesn't have any content providers
    // that conflict with existing packages.  Only do this if the
    // package isn't already installed, since we don't want to break
    // things that are installed.
    if ((scanFlags & SCAN_NEW_INSTALL) != 0) {
        //如果是新安裝的Pacakge,需要檢查其中的Provider是否與之前安裝的Package沖突
        ...........
    }

    //還是處理權限相關的,不太懂mAdoptPermissions
    if ((scanFlags & SCAN_CHECK_ONLY) == 0 && pkg.mAdoptPermissions != null) {
        // This package wants to adopt ownership of permissions from
        // another package.
        .................
    }
}
.........
//設置運行該Pacakge的進程的進程名,一般為PackageName
pkg.applicationInfo.processName = fixProcessName(
        pkg.applicationInfo.packageName,
        pkg.applicationInfo.processName,
        pkg.applicationInfo.uid);

if (pkg != mPlatformPackage) {
    // Get all of our default paths setup
    //看代碼,此處只是為Pacakge賦予了安裝路徑
    pkg.applicationInfo.initForUser(UserHandle.USER_SYSTEM);
}

//處理Native庫和CPU ABI
................

//處理系統APK更新時,鏈接庫的改變
synchronized (mPackages) {
    ..............
    // New library entries can only be added through the
    // system image.  This is important to get rid of a lot
    // of nasty edge cases: for example if we allowed a non-
    // system update of the app to add a library, then uninstalling
    // the update would make the library go away, and assumptions
    // we made such as through app install filtering would now
    // have allowed apps on the device which aren't compatible
    // with it.  Better to just have the restriction here, be
    // conservative, and create many fewer cases that can negatively
    // impact the user experience.
    ..................
}

...........

//將Package中的信息加入到PKMS的Settings對象中
//在此之前,四大組件的信息都是屬於Package的私有財產,現在同一注冊到PKMS中
//於是PKMS就可以對外提供統一的組件信息了
synchronized (mPackages) {
     // Add the new setting to mSettings
    mSettings.insertPackageSettingLPw(pkgSetting, pkg);
    // Add the new setting to mPackages
    mPackages.put(pkg.applicationInfo.packageName, pkg);
    ..............
    // Add the package's KeySets to the global KeySetManagerService
    ksms.addScannedPackageLPw(pkg);

    //處理Provider信息
    int N = pkg.providers.size();
    .........
    for (i=0; i<n; packageparser.provider="" p="pkg.providers.get(i);" ........="" ..............="" n="pkg.services.size();" .........="" for="" i="0;" receiver="" .......="" activity="" permissiongroup="" .....="" ......="" return="" pre="">
PKMS掃描Pacakge的過程終於整理完畢,其實整個邏輯可以整理成上圖。 我們從代碼也可以看出,整個過程從大的邏輯上來看,其實並不復雜。但其中很多地方,例如每個標簽的含義、對某些字段的處理細節,還是需要進一步分析才談的上深入理解。此處,我們就像PKMS中提到的SCAN_CHECK_ONLY一樣,先做一個大致的了解。需要實際問題時,再作詳細分析。
五、最後的工作 我們再次回到PKMS的構造函數:
..............
// Prune any system packages that no longer exist.
//以下代碼會清除一些Pacakge,例如不能使用的或不完整的,同時清除PKMS中保留的對應信息
...............

if (!mOnlyCore) {
    ..........
    //掃描第三方APK的Pacakge
    scanDirTracedLI(mAppInstallDir, 0, scanFlags | SCAN_REQUIRE_KNOWN, 0);

    scanDirTracedLI(mDrmAppPrivateInstallDir, mDefParseFlags
        | PackageParser.PARSE_FORWARD_LOCK,
        scanFlags | SCAN_REQUIRE_KNOWN, 0);

    scanDirLI(mEphemeralInstallDir, mDefParseFlags
        | PackageParser.PARSE_IS_EPHEMERAL,
        scanFlags | SCAN_REQUIRE_KNOWN, 0);
    .............
}

// Resolve protected action filters. Only the setup wizard is allowed to
// have a high priority filter for these actions.
//為開機向導的action filter保留高優先級,不知原因
mSetupWizardPackage = getSetupWizardPackageName();
if (mProtectedFilters.size() > 0) {
    ...........
    for (ActivityIntentInfo filter : mProtectedFilters) {
        if (filter.activity.info.packageName.equals(mSetupWizardPackage)) {
            .........
            continue;
        }
        ......
        filter.setPriority(0);
    }
}
mDeferProtectedFilters = false;
mProtectedFilters.clear();

// Now that we know all of the shared libraries, update all clients to have
// the correct library paths.
updateAllSharedLibrariesLPw();

//最後做一些其它的更新操作,例如Pacakge使用時間、權限
//做一些其它檢查
...........

// can downgrade to reader
//將信息寫到package.xml、package.lsit及pacakge-stopped.xml文件中
mSettings.writeLPr();

// Perform dexopt on all apps that mark themselves as coreApps. We do this pretty
// early on (before the package manager declares itself as early) because other
// components in the system server might ask for package contexts for these apps.
//
if ((isFirstBoot() || isUpgrade() || VMRuntime.didPruneDalvikCache()) && !onlyCore) {
    ..........
    //對所有coreApp進行dexopt優化
    int[] stats = performDexOpt(coreApps, false,
            getCompilerFilterForReason(REASON_CORE_APP));
    ..........
}

//最後完成PKMS中一些變量的賦值、內存清理等工作
...............
最後一部分比較重要的其實還是解析非系統Apk的AndroidManifest.xml,形成對應的Package信息加入到PKMS中。 其它部分比較細節,此處不做詳述。
六、總結 從邏輯的角度來看,PKMS構造函數主要功能比較清晰,但隱藏了許多細節。我們關注的是它大體的流程,及形成的數據結構。
 Android開發的重要方面之Makefile分析
Android開發的重要方面之Makefile分析 隨著移動互聯網的發展,移動開發也越來越吃香了,目前最火的莫過於android,android是什麼就不用說了,andr
 Android插件化開發之OpenAtlas中四大組件與Application功能的驗證
使用OpenAtlas進行插件化開發,插件的開發幾乎可以按照正常程序的開發流程進行,無需添加額外的東西。為了驗證四大組件是否能夠正常工作,這裡編寫一個插件,驗證其功能。除
 Android API Guides---Location Strategies
Location Strategies注:本指南中描述的策略適用於平台定位API中android.location。該谷歌位置服務API,谷歌Play的一部分服務,提供了
 android組件式開發(1)——可復用的彈出式菜單
組件式開發,融入android**引言**在app中經常能看到底部彈出式菜單的應用,比如手機qq和微信中頭像的選擇。這一組件非常常用。所以,將這一組件進行封裝後,就可以