編輯:關於Android編程
備注:代碼已傳至https://github.com/yanzi1225627/FragmentProject_QQ 歡迎fork,現在來審視這份代碼,很多地方寫的不太好,歡迎大家指正。有時間我會繼續完善。2015-11-1.
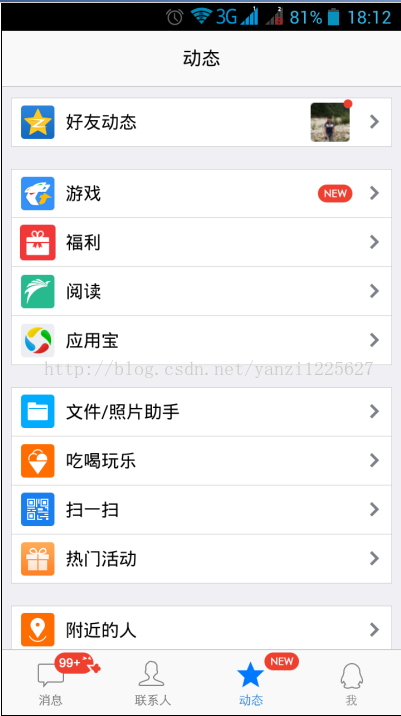
最近反復研究日常經典必用的幾個Androidapp,從主界面帶來的交互方式入手進行分析,我將其大致分為三類。今天記錄第一種方式,即主界面下面有幾個tab頁,最上端是標題欄,tab頁和tab頁之間不是通過滑動切換的,而是通過點擊切換tab頁。早期這種架構一直是使用tabhost+activitygroup來使用,隨著fragment的出現及google官方也大力推薦使用fragment,後者大有代替前者之勢。本文也使用fragment進行搭建,標題中的“經典”指這種交互經典,非本文的代碼框架結構,歡迎大家提出指出不足,幫助完善。文中的fragment部分參考了郭神的博文(鏈接1鏈接2鏈接3),代碼也是在郭神代碼基礎上加入了自己對框架的理解。
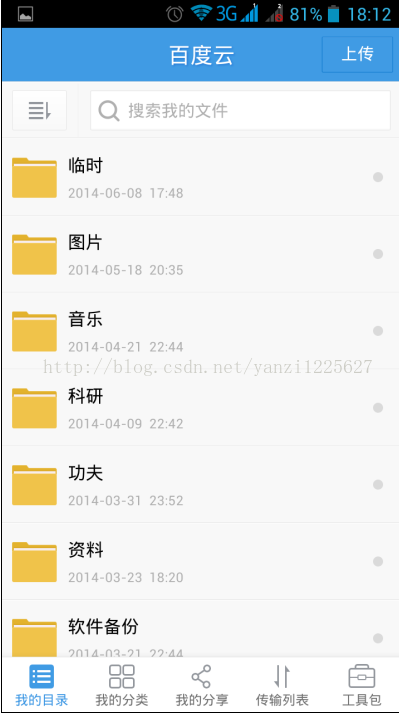
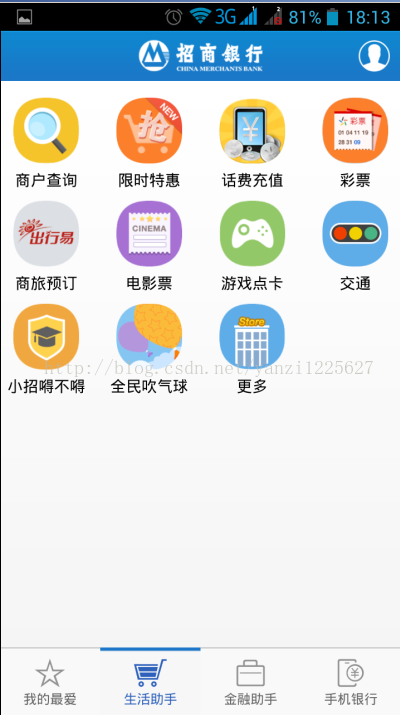
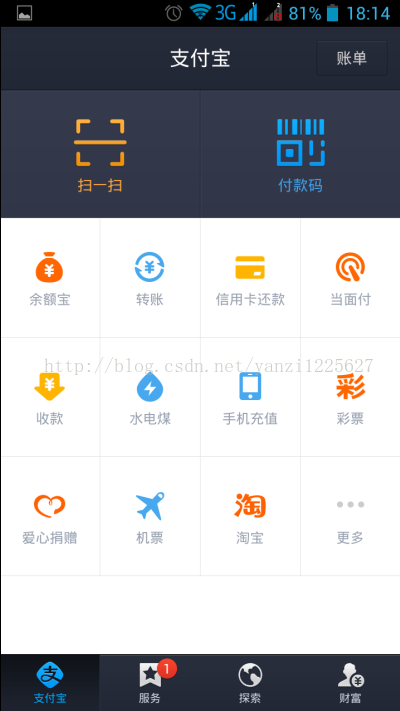
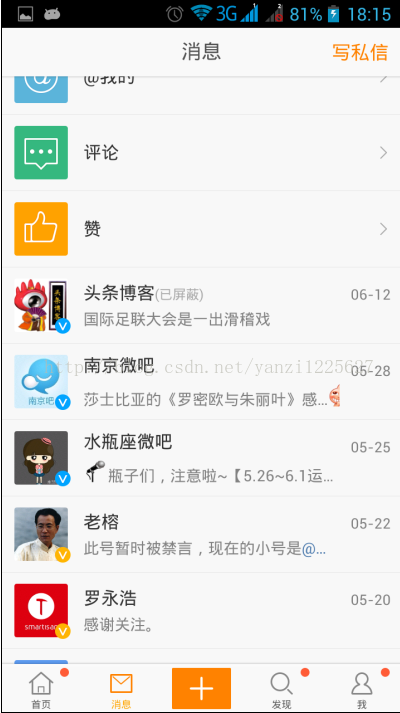
再次重申下這種主界面交互的特點:1,多個tab,不能滑動切換只能點擊切換;2,上有標題欄。這種模式也是目前app中使用最多的。如qq、百度雲盤、招商銀行、微博、支付寶。幾個月前支付寶還是能滑動切換的,後來取消了。視圖如下:
下面本文從底部控制欄、頂部控制欄及中間的內容顯示載體fragment三部分敘述。
一、底部控制欄
底部控制欄裡每個控件都不是單一基礎控件,上面是圖片、下面是文字,右上角是紅點,當有更新時紅點顯示,否則隱藏。另外像qq的右上角還能顯示未讀消息的個數,我的參考鏈接裡是通過大量的layout一點一點搭出來的,這樣的好處是方便控制比較直觀,另外是可以利用Linearlayout裡的layout_weight這個屬性,讓底部的這些item均勻分布,缺點是代碼上有很多重復,維護起來不方便。既然是整理app的通用模板框架,因此我將每個item視為一個對象,然後將其放在底部就ok了。本代碼裡只封裝了上面是圖片下面是文字,右上角的紅點麼有封裝進來。
ImageText.Java就作了這樣一件事:
[java]view plaincopy
print?
packageorg.yanzi.ui;
importorg.yanzi.constant.Constant;
importandroid.content.Context;
importandroid.graphics.Color;
importandroid.util.AttributeSet;
importandroid.view.LayoutInflater;
importandroid.view.MotionEvent;
importandroid.view.View;
importandroid.view.ViewGroup;
importandroid.widget.ImageView;
importandroid.widget.LinearLayout;
importandroid.widget.TextView;
importcom.example.fragmentproject.R;
publicclassImageTextextendsLinearLayout{
privateContextmContext=null;
privateImageViewmImageView=null;
privateTextViewmTextView=null;
privatefinalstaticintDEFAULT_IMAGE_WIDTH=64;
privatefinalstaticintDEFAULT_IMAGE_HEIGHT=64;
privateintCHECKED_COLOR=Color.rgb(29,118,199);//選中藍色
privateintUNCHECKED_COLOR=Color.GRAY;//自然灰色
publicImageText(Contextcontext){
super(context);
//TODOAuto-generatedconstructorstub
mContext=context;
}
publicImageText(Contextcontext,AttributeSetattrs){
super(context,attrs);
//TODOAuto-generatedconstructorstub
mContext=context;
LayoutInflaterinflater=(LayoutInflater)mContext.getSystemService(Context.LAYOUT_INFLATER_SERVICE);
ViewparentView=inflater.inflate(R.layout.image_text_layout,this,true);
mImageView=(ImageView)findViewById(R.id.image_iamge_text);
mTextView=(TextView)findViewById(R.id.text_iamge_text);
}
publicvoidsetImage(intid){
if(mImageView!=null){
mImageView.setImageResource(id);
setImageSize(DEFAULT_IMAGE_WIDTH,DEFAULT_IMAGE_HEIGHT);
}
}
publicvoidsetText(Strings){
if(mTextView!=null){
mTextView.setText(s);
mTextView.setTextColor(UNCHECKED_COLOR);
}
}
@Override
publicbooleanonInterceptTouchEvent(MotionEventev){
//TODOAuto-generatedmethodstub
returntrue;
}
privatevoidsetImageSize(intw,inth){
if(mImageView!=null){
ViewGroup.LayoutParamsparams=mImageView.getLayoutParams();
params.width=w;
params.height=h;
mImageView.setLayoutParams(params);
}
}
publicvoidsetChecked(intitemID){
if(mTextView!=null){
mTextView.setTextColor(CHECKED_COLOR);
}
intcheckDrawableId=-1;
switch(itemID){
caseConstant.BTN_FLAG_MESSAGE:
checkDrawableId=R.drawable.message_selected;
break;
caseConstant.BTN_FLAG_CONTACTS:
checkDrawableId=R.drawable.contacts_selected;
break;
caseConstant.BTN_FLAG_NEWS:
checkDrawableId=R.drawable.news_selected;
break;
caseConstant.BTN_FLAG_SETTING:
checkDrawableId=R.drawable.setting_selected;
break;
default:break;
}
if(mImageView!=null){
mImageView.setImageResource(checkDrawableId);
}
}
}
對應的布局
android:layout_height="match_parent"
android:orientation="vertical">
android:id="@+id/image_iamge_text"
android:layout_width="wrap_content"
android:layout_height="wrap_content"
android:layout_gravity="center_horizontal"/>
android:id="@+id/text_iamge_text"
android:layout_width="wrap_content"
android:layout_height="wrap_content"
android:layout_gravity="center_horizontal"/>
代碼裡用到了Constant.java,這裡面放的都是常量:
packageorg.yanzi.constant;
publicclassConstant{
//Btn的標識
publicstaticfinalintBTN_FLAG_MESSAGE=0x01;
publicstaticfinalintBTN_FLAG_CONTACTS=0x01<<1;
publicstaticfinalintBTN_FLAG_NEWS=0x01<<2;
publicstaticfinalintBTN_FLAG_SETTING=0x01<<3;
//Fragment的標識
publicstaticfinalStringFRAGMENT_FLAG_MESSAGE="消息";
publicstaticfinalStringFRAGMENT_FLAG_CONTACTS="聯系人";
publicstaticfinalStringFRAGMENT_FLAG_NEWS="新聞";
publicstaticfinalStringFRAGMENT_FLAG_SETTING="設置";
publicstaticfinalStringFRAGMENT_FLAG_SIMPLE="simple";
}
第一排是復合Button的標識,下面的string類型的是將來創建fragment的標識。
完成了ImageText之後,下面就是將4個這樣的控件放到一個布局裡。為了控制方便,我們將底部欄抽象為一個對象BottomControlPanel.java,這樣在維護底部欄相關內容時直接找他就行了。BottomControlPanel繼承自RelativeLayout,先來看它的布局:
bottom_panel_layout.xml
[html]view plaincopy
print?
android:layout_height="60dp"
android:layout_alignParentBottom="true"
android:gravity="center_vertical"
android:paddingLeft="20dp"
android:paddingRight="20dp">
android:id="@+id/btn_message"
android:layout_width="wrap_content"
android:layout_height="wrap_content"
android:layout_alignParentLeft="true"/>
android:id="@+id/btn_contacts"
android:layout_width="wrap_content"
android:layout_height="wrap_content"
android:layout_toRightOf="@id/btn_message"/>
android:id="@+id/btn_news"
android:layout_width="wrap_content"
android:layout_height="wrap_content"
android:layout_toRightOf="@id/btn_contacts"/>
android:id="@+id/btn_setting"
android:layout_width="wrap_content"
android:layout_height="wrap_content"
android:layout_alignParentRight="true"/>
對應的java文件:
BottomControlPanel.java
[java]view plaincopy
print?
packageorg.yanzi.ui;
importjava.util.ArrayList;
importjava.util.List;
importorg.yanzi.constant.Constant;
importandroid.content.Context;
importandroid.graphics.Color;
importandroid.util.AttributeSet;
importandroid.util.Log;
importandroid.view.View;
importandroid.widget.RelativeLayout;
importcom.example.fragmentproject.R;
publicclassBottomControlPanelextendsRelativeLayoutimplementsView.OnClickListener{
privateContextmContext;
privateImageTextmMsgBtn=null;
privateImageTextmContactsBtn=null;
privateImageTextmNewsBtn=null;
privateImageTextmSettingBtn=null;
privateintDEFALUT_BACKGROUND_COLOR=Color.rgb(243,243,243);//Color.rgb(192,192,192)
privateBottomPanelCallbackmBottomCallback=null;
privateListviewList=newArrayList();
publicinterfaceBottomPanelCallback{
publicvoidonBottomPanelClick(intitemId);
}
publicBottomControlPanel(Contextcontext,AttributeSetattrs){
super(context,attrs);
//TODOAuto-generatedconstructorstub
}
@Override
protectedvoidonFinishInflate(){
//TODOAuto-generatedmethodstub
mMsgBtn=(ImageText)findViewById(R.id.btn_message);
mContactsBtn=(ImageText)findViewById(R.id.btn_contacts);
mNewsBtn=(ImageText)findViewById(R.id.btn_news);
mSettingBtn=(ImageText)findViewById(R.id.btn_setting);
setBackgroundColor(DEFALUT_BACKGROUND_COLOR);
viewList.add(mMsgBtn);
viewList.add(mContactsBtn);
viewList.add(mNewsBtn);
viewList.add(mSettingBtn);
}
publicvoidinitBottomPanel(){
if(mMsgBtn!=null){
mMsgBtn.setImage(R.drawable.message_unselected);
mMsgBtn.setText("消息");
}
if(mContactsBtn!=null){
mContactsBtn.setImage(R.drawable.contacts_unselected);
mContactsBtn.setText("聯系人");
}
if(mNewsBtn!=null){
mNewsBtn.setImage(R.drawable.news_unselected);
mNewsBtn.setText("新聞");
}
if(mSettingBtn!=null){
mSettingBtn.setImage(R.drawable.setting_unselected);
mSettingBtn.setText("設置");
}
setBtnListener();
}
privatevoidsetBtnListener(){
intnum=this.getChildCount();
for(inti=0;i Viewv=getChildAt(i);
if(v!=null){
v.setOnClickListener(this);
}
}
}
publicvoidsetBottomCallback(BottomPanelCallbackbottomCallback){
mBottomCallback=bottomCallback;
}
@Override
publicvoidonClick(Viewv){
//TODOAuto-generatedmethodstub
initBottomPanel();
intindex=-1;
switch(v.getId()){
caseR.id.btn_message:
index=Constant.BTN_FLAG_MESSAGE;
mMsgBtn.setChecked(Constant.BTN_FLAG_MESSAGE);
break;
caseR.id.btn_contacts:
index=Constant.BTN_FLAG_CONTACTS;
mContactsBtn.setChecked(Constant.BTN_FLAG_CONTACTS);
break;
caseR.id.btn_news:
index=Constant.BTN_FLAG_NEWS;
mNewsBtn.setChecked(Constant.BTN_FLAG_NEWS);
break;
caseR.id.btn_setting:
index=Constant.BTN_FLAG_SETTING;
mSettingBtn.setChecked(Constant.BTN_FLAG_SETTING);
break;
default:break;
}
if(mBottomCallback!=null){
mBottomCallback.onBottomPanelClick(index);
}
}
publicvoiddefaultBtnChecked(){
if(mMsgBtn!=null){
mMsgBtn.setChecked(Constant.BTN_FLAG_MESSAGE);
}
}
@Override
protectedvoidonLayout(booleanchanged,intleft,inttop,intright,intbottom){
//TODOAuto-generatedmethodstub
super.onLayout(changed,left,top,right,bottom);
layoutItems(left,top,right,bottom);
}
/**最左邊和最右邊的view由母布局的padding進行控制位置。這裡需對第2、3個view的位置重新設置
*@paramleft
*@paramtop
*@paramright
*@parambottom
*/
privatevoidlayoutItems(intleft,inttop,intright,intbottom){
intn=getChildCount();
if(n==0){
return;
}
intpaddingLeft=getPaddingLeft();
intpaddingRight=getPaddingRight();
Log.i("yanguoqi","paddingLeft="+paddingLeft+"paddingRight="+paddingRight);
intwidth=right-left;
intheight=bottom-top;
Log.i("yanguoqi","width="+width+"height="+height);
intallViewWidth=0;
for(inti=0;i Viewv=getChildAt(i);
Log.i("yanguoqi","v.getWidth()="+v.getWidth());
allViewWidth+=v.getWidth();
}
intblankWidth=(width-allViewWidth-paddingLeft-paddingRight)/(n-1);
Log.i("yanguoqi","blankV="+blankWidth);
LayoutParamsparams1=(LayoutParams)viewList.get(1).getLayoutParams();
params1.leftMargin=blankWidth;
viewList.get(1).setLayoutParams(params1);
LayoutParamsparams2=(LayoutParams)viewList.get(2).getLayoutParams();
params2.leftMargin=blankWidth;
viewList.get(2).setLayoutParams(params2);
}
}
在onFinishInflate()函數裡實例化裡面的子元素,在initBottomPanel()裡設置每個孩子的圖片和文字、監聽.onLayout()裡對中間的2個孩子的位置進行調整,使其均勻分布,見我的前文。這個BottomControlPanel實現了View.OnClickListener接口,在onClick()裡通過id來判斷用戶點擊了哪一個孩子。判斷出來後需要做兩件事,一是對這個被點擊的對象進行處理,如字體顏色、圖片資源的變化,右上角小紅點的隱藏等等。另一方面,BottomControlPanel要告訴將來它的主人,也就是Activity到底是點了哪個,通知Activity去切換fragment。可以看到,activity類似個總控中心,BottomControlPanel管理屬於它的ImageText,同時上報Activity。Activity知道消息後再切換fragment,每個fragment都有自己的事務邏輯。
這裡定義了
public interface BottomPanelCallback{
public void onBottomPanelClick(int itemId);
}這個接口,通過傳遞Id來通知Activity。defaultBtnChecked()函數是apk初次打開後,默認切換到第一個消息fragment上。
這裡有個地方需要注意,就是雖然ImageText和BottomControlPanel都是自定義控件,但兩者在方式上是有區別的。在ImageText的構造函數裡通過inflater將布局加載進來,它對應的布局是個普通的布局。而BottomControlPanel對應的布局文件裡,直接使用了定義的BottomControlPanel,在onFinishInflate函數裡實例化孩子View。前者是inflate之後實例化的。在使用ImageText到一個新的母布局時是通過這種方式進行的,那麼使用BottomControlPanel有何區別,請見下文介紹Activity的布局時。
二、頂部控制欄
有了底部控制欄,頂部控制欄就可以如法炮制了。這裡先交代幾句,雖然Android3.0 後Google推出的有ActionBar來做頂部導航欄,參見郭神的這篇博文。但我發現,本文最前面貼圖的幾款應用應該都沒有使用ActionBar,因為它不夠靈活。ActionBar使用起來什麼樣,大家看看微信就知道了,那個的頂部控制欄就是ActionBar做的,這個應該沒跑。
通過觀察,頂部控制欄除了標題居中外,在右上角通常會再放一個按鈕。不是ImageView就是TextView,這裡我為了方便放的是兩個TextView,右側的按鈕效果可以再TextView上弄個背景來實現。
HeadControlPanel.java
[html]view plaincopy
print?
packageorg.yanzi.ui;
importorg.yanzi.constant.Constant;
importcom.example.fragmentproject.R;
importandroid.content.Context;
importandroid.graphics.Color;
importandroid.util.AttributeSet;
importandroid.widget.RelativeLayout;
importandroid.widget.TextView;
publicclassHeadControlPanelextendsRelativeLayout{
privateContextmContext;
privateTextViewmMidleTitle;
privateTextViewmRightTitle;
privatestaticfinalfloatmiddle_title_size=20f;
privatestaticfinalfloatright_title_size=17f;
privatestaticfinalintdefault_background_color=Color.rgb(23,124,202);
publicHeadControlPanel(Contextcontext,AttributeSetattrs){
super(context,attrs);
//TODOAuto-generatedconstructorstub
}
@Override
protectedvoidonFinishInflate(){
//TODOAuto-generatedmethodstub
mMidleTitle=(TextView)findViewById(R.id.midle_title);
mRightTitle=(TextView)findViewById(R.id.right_title);
setBackgroundColor(default_background_color);
}
publicvoidinitHeadPanel(){
if(mMidleTitle!=null){
setMiddleTitle(Constant.FRAGMENT_FLAG_MESSAGE);
}
}
publicvoidsetMiddleTitle(Strings){
mMidleTitle.setText(s);
mMidleTitle.setTextSize(middle_title_size);
}
}
布局文件head_panel_layout.xml
[html]view plaincopy
print?
android:layout_height="50dp"
android:layout_alignParentTop="true">
android:id="@+id/midle_title"
android:layout_width="wrap_content"
android:layout_height="wrap_content"
android:layout_centerInParent="true"
android:textColor="@android:color/white"/>
android:id="@+id/right_title"
android:layout_width="wrap_content"
android:layout_height="wrap_content"
android:layout_alignParentRight="true"
android:textColor="@android:color/white"/>
三、總控中心Activity和Fragment
先交代下Fragment的使用大致分兩種,一種是將Fragment作為一個View寫死在布局中,布局裡使用android:name來告訴它對應的是哪個實體Fragment。這種添加fragment的方式不能delete和replace掉。另一種是通過獲得activity的fragmentmanager和fragmentTransaction和進行動態的添加。這種方式更加靈活,一般使用此種方法。
先看Activity的布局activity_main.xml:
[html]view plaincopy
print?
android:id="@+id/root_layout"
android:layout_width="match_parent"
android:layout_height="match_parent"
tools:context="org.yanzi.fragmentproject.MainActivity">
android:id="@+id/bottom_layout"
layout="@layout/bottom_panel_layout"/>
android:layout_width="match_parent"
android:layout_height="1dip"
android:layout_above="@id/bottom_layout"
android:background="#FFE7E7E7"/>
android:id="@+id/head_layout"
layout="@layout/head_panel_layout"/>
android:layout_width="match_parent"
android:layout_height="1dip"
android:layout_below="@id/head_layout"
android:background="#FFE7E7E7"/>
android:id="@+id/fragment_content"
android:layout_width="match_parent"
android:layout_height="wrap_content"
android:layout_below="@id/head_layout"
android:layout_above="@id/bottom_layout">
注意看這裡是通過include的方式把剛才自定義的上下panel加過來,而不能直接用這種方式直接加載。當然如果也模仿ImageText的構造方式,也是可以這樣用的。關於include方式的使用有幾個注意事項,就是最好讓它的母布局是RelativeLayout,否則的話很難控制include進來的布局的位置。另外,include布局的位置一定要寫在include之前,如底部面板在最底部,android:layout_alignParentBottom="true"這句話是在bottom_panel_layout.xml裡寫的,如果寫在activity_main.xml裡就是無效的,這著實是個蛋疼的問題。再就是include後設置的id會覆蓋掉以前的,所以這裡只在include的時候設置id。其中的兩個View是分割線。整體是按照底部欄、上部欄、中間Fragment的容器來放置的。
在放Fragment的時候需要注意,究竟是否要將頂部控制欄放到各自的fragment裡合適還是放到Activity裡合適要看具體情況,如果頂部欄裡多是顯示標題這種功能或少量的點擊事件,應該放到Activity裡,即頂部欄的事務邏輯和當前fragment的事務邏輯耦合的不是很緊。舉個例子,比如微信的頂部欄,不管你處在哪個Tab頁(聊天、發現、通訊錄),點擊頂部欄裡的按鈕都呈現出同樣的內容。但反過來講,如果頂部欄裡的事務邏輯和fragment耦合很緊,即在不同的fragment,頂部欄呈現的內容都不一樣,且點擊後處理的事務也和當前fragment緊密聯系一起,那就應該一個fragment配套一個頂部欄,方便控制。本文是將兩者分開的。所以讓fragment的容器在頂部欄之下,底部欄之上,不這樣寫的話,就會遮擋。
android:id="@+id/fragment_content"
android:layout_width="match_parent"
android:layout_height="wrap_content"
android:layout_below="@id/head_layout"
android:layout_above="@id/bottom_layout" >
MainActivity.java代碼:
[java]view plaincopy
print?
packageorg.yanzi.activity;
importorg.yanzi.constant.Constant;
importorg.yanzi.fragment.BaseFragment;
importorg.yanzi.fragment.ContactsFragment;
importorg.yanzi.fragment.MessageFragment;
importorg.yanzi.fragment.NewsFragment;
importorg.yanzi.fragment.SettingFragment;
importorg.yanzi.ui.BottomControlPanel;
importorg.yanzi.ui.BottomControlPanel.BottomPanelCallback;
importorg.yanzi.ui.HeadControlPanel;
importandroid.app.Activity;
importandroid.app.Fragment;
importandroid.app.FragmentManager;
importandroid.app.FragmentTransaction;
importandroid.os.Bundle;
importandroid.text.TextUtils;
importandroid.util.Log;
importandroid.view.Menu;
importandroid.widget.Toast;
importcom.example.fragmentproject.R;
publicclassMainActivityextendsActivityimplementsBottomPanelCallback{
BottomControlPanelbottomPanel=null;
HeadControlPanelheadPanel=null;
privateFragmentManagerfragmentManager=null;
privateFragmentTransactionfragmentTransaction=null;
/*privateMessageFragmentmessageFragment;
privateContactsFragmentcontactsFragment;
privateNewsFragmentnewsFragment;
privateSettingFragmentsettingFragment;*/
publicstaticStringcurrFragTag="";
@Override
protectedvoidonCreate(BundlesavedInstanceState){
super.onCreate(savedInstanceState);
setContentView(R.layout.activity_main);
initUI();
fragmentManager=getFragmentManager();
setDefaultFirstFragment(Constant.FRAGMENT_FLAG_MESSAGE);
}
@Override
publicbooleanonCreateOptionsMenu(Menumenu){
//Inflatethemenu;thisaddsitemstotheactionbarifitispresent.
getMenuInflater().inflate(R.menu.main,menu);
returntrue;
}
privatevoidinitUI(){
bottomPanel=(BottomControlPanel)findViewById(R.id.bottom_layout);
if(bottomPanel!=null){
bottomPanel.initBottomPanel();
bottomPanel.setBottomCallback(this);
}
headPanel=(HeadControlPanel)findViewById(R.id.head_layout);
if(headPanel!=null){
headPanel.initHeadPanel();
}
}
/*處理BottomControlPanel的回調
*@seeorg.yanzi.ui.BottomControlPanel.BottomPanelCallback#onBottomPanelClick(int)
*/
@Override
publicvoidonBottomPanelClick(intitemId){
//TODOAuto-generatedmethodstub
Stringtag="";
if((itemId&Constant.BTN_FLAG_MESSAGE)!=0){
tag=Constant.FRAGMENT_FLAG_MESSAGE;
}elseif((itemId&Constant.BTN_FLAG_CONTACTS)!=0){
tag=Constant.FRAGMENT_FLAG_CONTACTS;
}elseif((itemId&Constant.BTN_FLAG_NEWS)!=0){
tag=Constant.FRAGMENT_FLAG_NEWS;
}elseif((itemId&Constant.BTN_FLAG_SETTING)!=0){
tag=Constant.FRAGMENT_FLAG_SETTING;
}
setTabSelection(tag);//切換Fragment
headPanel.setMiddleTitle(tag);//切換標題
}
privatevoidsetDefaultFirstFragment(Stringtag){
Log.i("yan","setDefaultFirstFragmententer...currFragTag="+currFragTag);
setTabSelection(tag);
bottomPanel.defaultBtnChecked();
Log.i("yan","setDefaultFirstFragmentexit...");
}
privatevoidcommitTransactions(Stringtag){
if(fragmentTransaction!=null&&!fragmentTransaction.isEmpty()){
fragmentTransaction.commit();
currFragTag=tag;
fragmentTransaction=null;
}
}
privateFragmentTransactionensureTransaction(){
if(fragmentTransaction==null){
fragmentTransaction=fragmentManager.beginTransaction();
fragmentTransaction
.setTransition(FragmentTransaction.TRANSIT_FRAGMENT_FADE);
}
returnfragmentTransaction;
}
privatevoidattachFragment(intlayout,Fragmentf,Stringtag){
if(f!=null){
if(f.isDetached()){
ensureTransaction();
fragmentTransaction.attach(f);
}elseif(!f.isAdded()){
ensureTransaction();
fragmentTransaction.add(layout,f,tag);
}
}
}
privateFragmentgetFragment(Stringtag){
Fragmentf=fragmentManager.findFragmentByTag(tag);
if(f==null){
Toast.makeText(getApplicationContext(),"fragment=nulltag="+tag,Toast.LENGTH_SHORT).show();
f=BaseFragment.newInstance(getApplicationContext(),tag);
}
returnf;
}
privatevoiddetachFragment(Fragmentf){
if(f!=null&&!f.isDetached()){
ensureTransaction();
fragmentTransaction.detach(f);
}
}
/**切換fragment
*@paramtag
*/
privatevoidswitchFragment(Stringtag){
if(TextUtils.equals(tag,currFragTag)){
return;
}
//把上一個fragmentdetach掉
if(currFragTag!=null&&!currFragTag.equals("")){
detachFragment(getFragment(currFragTag));
}
attachFragment(R.id.fragment_content,getFragment(tag),tag);
commitTransactions(tag);
}
/**設置選中的Tag
*@paramtag
*/
publicvoidsetTabSelection(Stringtag){
//開啟一個Fragment事務
fragmentTransaction=fragmentManager.beginTransaction();
/*if(TextUtils.equals(tag,Constant.FRAGMENT_FLAG_MESSAGE)){
if(messageFragment==null){
messageFragment=newMessageFragment();
}
}elseif(TextUtils.equals(tag,Constant.FRAGMENT_FLAG_CONTACTS)){
if(contactsFragment==null){
contactsFragment=newContactsFragment();
}
}elseif(TextUtils.equals(tag,Constant.FRAGMENT_FLAG_NEWS)){
if(newsFragment==null){
newsFragment=newNewsFragment();
}
}elseif(TextUtils.equals(tag,Constant.FRAGMENT_FLAG_SETTING)){
if(settingFragment==null){
settingFragment=newSettingFragment();
}
}elseif(TextUtils.equals(tag,Constant.FRAGMENT_FLAG_SIMPLE)){
if(simpleFragment==null){
simpleFragment=newSimpleFragment();
}
}*/
switchFragment(tag);
}
@Override
protectedvoidonStop(){
//TODOAuto-generatedmethodstub
super.onStop();
currFragTag="";
}
@Override
protectedvoidonSaveInstanceState(BundleoutState){
//TODOAuto-generatedmethodstub
}
}
注意這塊我作了改動,不需要申明
/* private MessageFragment messageFragment;
private ContactsFragment contactsFragment;
private NewsFragment newsFragment;
private SettingFragment settingFragment;*/
這些內容,因為Fragment的生成是通過BaseFragment.newInstance()來生成的,傳進去Tag生成相應的Fragment。所有的Fragment,ContactsFragment、MessageFragment、NewsFragment、SettingFragment都繼承自BaseFragment,通過BaseFragment裡的newInstance()接口進行實例化對應的fragment。優點是方便管理,缺點麼也有,因為java繼承繼承一個類,不能同時繼承兩個類。所以如ListFragment這些,就沒法同時繼承了。不過好在有listview這些,也妨礙不了我們做到同樣的效果。
Activity裡事件的入口是在onBottomPanelClick()監聽點擊了誰,然後:
setTabSelection(tag); //切換Fragment
headPanel.setMiddleTitle(tag);//切換標題
先切換Fragment再切換頂部欄的標題。setTabSelection()裡直接調switchFragment(),在switchFragment函數裡先判斷標簽是否一樣,一樣則意外著無需切換,否則的話就先把當前Fragment找到然後detach掉,之後進到attachFragment()函數裡。在這裡,先判斷這個fragment是不是被detach掉的,如果是的話意味著之前曾被add過,所以只需attach就ok了。否則的話,意味著這是第一次,進行add.這裡記錄下Fragment的聲明周期:
MessageFragment正常打開:
Line 155: 01-04 11:50:46.688 E/MessageFragment( 2546): onAttach-----
Line 159: 01-04 11:50:46.688 E/MessageFragment( 2546): onCreate------
Line 161: 01-04 11:50:46.693 D/MessageFragment( 2546): onCreateView---->
Line 165: 01-04 11:50:46.694 E/MessageFragment( 2546): onActivityCreated-------
Line 169: 01-04 11:50:46.694 E/MessageFragment( 2546): onStart----->
Line 173: 01-04 11:50:46.694 E/MessageFragment( 2546): onresume---->
返回鍵退出:
Line 183: 01-04 11:52:26.506 E/MessageFragment( 2546): onpause
Line 259: 01-04 11:52:27.131 E/MessageFragment( 2546): onStop
Line 263: 01-04 11:52:27.132 E/MessageFragment( 2546): ondestoryView
Line 269: 01-04 11:52:27.134 E/MessageFragment( 2546): ondestory
Line 271: 01-04 11:52:27.135 D/MessageFragment( 2546): onDetach------
按home按鍵退出:
Line 97: 01-05 05:06:15.659 E/MessageFragment(18835): onpause
Line 215: 01-05 05:06:16.292 E/MessageFragment(18835): onStop
再次打開:
Line 81: 01-05 05:07:02.408 E/MessageFragment(18835): onStart----->
Line 85: 01-05 05:07:02.408 E/MessageFragment(18835): onresume---->
通過detach的方式切換至其他Fragment:
Line 69: 01-04 11:53:33.381 E/MessageFragment( 2546): onpause
Line 73: 01-04 11:53:33.382 E/MessageFragment( 2546): onStop
Line 77: 01-04 11:53:33.382 E/MessageFragment( 2546): ondestoryView
再次切換過來:
Line 55: 01-04 11:54:59.462 D/MessageFragment( 2546): onCreateView---->
Line 59: 01-04 11:54:59.463 E/MessageFragment( 2546): onActivityCreated-------
Line 63: 01-04 11:54:59.463 E/MessageFragment( 2546): onStart----->
Line 67: 01-04 11:54:59.464 E/MessageFragment( 2546): onresume---->
四、適配器和MessageBean
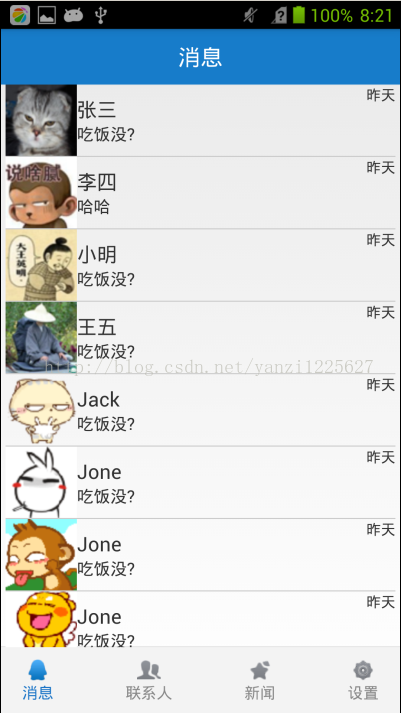
本來要連數據庫的,時間原因用個簡單的MessageBean代替了。一個消息分聯系人頭像、名字、消息正文和時間四部分組成,封裝到一個MessageBean裡。
MessageBean.java
[java]view plaincopy
print?
packageorg.yanzi.bean;
publicclassMessageBean{
privateintPhotoDrawableId;
privateStringMessageName;
privateStringMessageContent;
privateStringMessageTime;
publicMessageBean(){
}
publicMessageBean(intphotoDrawableId,StringmessageName,
StringmessageContent,StringmessageTime){
super();
PhotoDrawableId=photoDrawableId;
MessageName=messageName;
MessageContent=messageContent;
MessageTime=messageTime;
}
publicintgetPhotoDrawableId(){
returnPhotoDrawableId;
}
publicvoidsetPhotoDrawableId(intmPhotoDrawableId){
this.PhotoDrawableId=mPhotoDrawableId;
}
publicStringgetMessageName(){
returnMessageName;
}
publicvoidsetMessageName(StringmessageName){
MessageName=messageName;
}
publicStringgetMessageContent(){
returnMessageContent;
}
publicvoidsetMessageContent(StringmessageContent){
MessageContent=messageContent;
}
publicStringgetMessageTime(){
returnMessageTime;
}
publicvoidsetMessageTime(StringmessageTime){
MessageTime=messageTime;
}
@Override
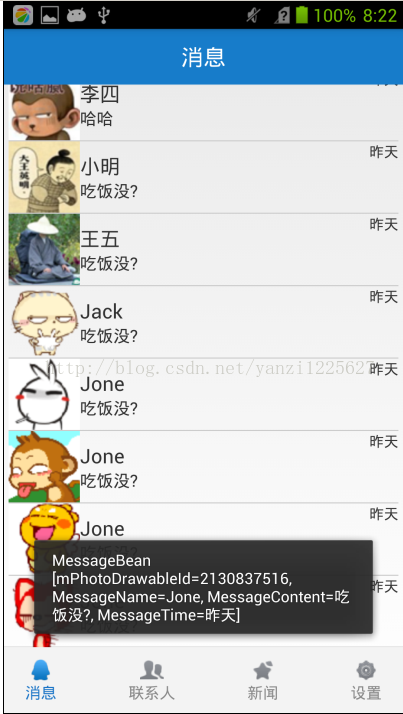
publicStringtoString(){
return"MessageBean[mPhotoDrawableId="+PhotoDrawableId
+",MessageName="+MessageName+",MessageContent="
+MessageContent+",MessageTime="+MessageTime+"]";
}
}
然後就是MessageFragment的ListView裡的適配器,MessageAdapter.java
[java]view plaincopy
print?
packageorg.yanzi.fragment.adapter;
importjava.util.List;
importorg.yanzi.bean.MessageBean;
importcom.example.fragmentproject.R;
importandroid.content.Context;
importandroid.view.LayoutInflater;
importandroid.view.View;
importandroid.view.ViewGroup;
importandroid.widget.BaseAdapter;
importandroid.widget.ImageView;
importandroid.widget.TextView;
publicclassMessageAdapterextendsBaseAdapter{
privateListmListMsgBean=null;
privateContextmContext;
privateLayoutInflatermInflater;
publicMessageAdapter(ListlistMsgBean,Contextcontext){
mListMsgBean=listMsgBean;
mContext=context;
mInflater=LayoutInflater.from(mContext);
}
@Override
publicintgetCount(){
//TODOAuto-generatedmethodstub
returnmListMsgBean.size();
}
@Override
publicObjectgetItem(intposition){
//TODOAuto-generatedmethodstub
returnmListMsgBean.get(position);
}
@Override
publiclonggetItemId(intposition){
//TODOAuto-generatedmethodstub
returnposition;
}
@Override
publicViewgetView(intposition,ViewconvertView,ViewGroupparent){
//TODOAuto-generatedmethodstub
Viewv=mInflater.inflate(R.layout.message_item_layout,null);
ImageViewimageView=(ImageView)v.findViewById(R.id.img_msg_item);
imageView.setImageResource(mListMsgBean.get(position).getPhotoDrawableId());
TextViewnameMsg=(TextView)v.findViewById(R.id.name_msg_item);
nameMsg.setText(mListMsgBean.get(position).getMessageName());
TextViewcontentMsg=(TextView)v.findViewById(R.id.content_msg_item);
contentMsg.setText(mListMsgBean.get(position).getMessageContent());
TextViewtimeMsg=(TextView)v.findViewById(R.id.time_msg_item);
timeMsg.setText(mListMsgBean.get(position).getMessageTime());
returnv;
}
}
因為是示例,getView裡沒用ViewHolder。
最後是MessageFragment裡通過對listview設置適配器,將MessageBean作為信息的提供者也填充到適配器裡。
MessageFragment.java代碼:
[java]view plaincopy
print?
packageorg.yanzi.fragment;
importjava.util.ArrayList;
importjava.util.List;
importorg.yanzi.activity.MainActivity;
importorg.yanzi.bean.MessageBean;
importorg.yanzi.constant.Constant;
importorg.yanzi.fragment.adapter.MessageAdapter;
importandroid.app.Activity;
importandroid.os.Bundle;
importandroid.util.Log;
importandroid.view.LayoutInflater;
importandroid.view.View;
importandroid.view.ViewGroup;
importandroid.widget.AdapterView;
importandroid.widget.Toast;
importandroid.widget.AdapterView.OnItemClickListener;
importandroid.widget.ListView;
importcom.example.fragmentproject.R;
publicclassMessageFragmentextendsBaseFragment{
privatestaticfinalStringTAG="MessageFragment";
privateMainActivitymMainActivity;
privateListViewmListView;
privateMessageAdaptermMsgAdapter;
privateListmMsgBean=newArrayList();
publicViewonCreateView(LayoutInflaterinflater,ViewGroupcontainer,
BundlesavedInstanceState){
ViewmessageLayout=inflater.inflate(R.layout.message_layout,
container,false);
Log.d(TAG,"onCreateView---->");
mMainActivity=(MainActivity)getActivity();
mFragmentManager=getActivity().getFragmentManager();
mListView=(ListView)messageLayout.findViewById(R.id.listview_message);
mMsgAdapter=newMessageAdapter(mMsgBean,mMainActivity);
mListView.setAdapter(mMsgAdapter);
mListView.setOnItemClickListener(newOnItemClickListener(){
@Override
publicvoidonItemClick(AdapterViewparent,Viewview,
intposition,longid){
//TODOAuto-generatedmethodstub
Toast.makeText(mMainActivity,mMsgBean.get(position).toString(),
Toast.LENGTH_SHORT).show();
}
});
returnmessageLayout;
}
@Override
publicvoidonAttach(Activityactivity){
//TODOAuto-generatedmethodstub
super.onAttach(activity);
Log.e(TAG,"onAttach-----");
}
@Override
publicvoidonCreate(BundlesavedInstanceState){
//TODOAuto-generatedmethodstub
super.onCreate(savedInstanceState);
Log.e(TAG,"onCreate------");
mMsgBean.add(newMessageBean(R.drawable.ic_photo_1,"張三","吃飯沒?","昨天"));
mMsgBean.add(newMessageBean(R.drawable.ic_photo_2,"李四","哈哈","昨天"));
mMsgBean.add(newMessageBean(R.drawable.ic_photo_3,"小明","吃飯沒?","昨天"));
mMsgBean.add(newMessageBean(R.drawable.ic_photo_4,"王五","吃飯沒?","昨天"));
mMsgBean.add(newMessageBean(R.drawable.ic_photo_5,"Jack","吃飯沒?","昨天"));
mMsgBean.add(newMessageBean(R.drawable.ic_photo_6,"Jone","吃飯沒?","昨天"));
mMsgBean.add(newMessageBean(R.drawable.ic_photo_7,"Jone","吃飯沒?","昨天"));
mMsgBean.add(newMessageBean(R.drawable.ic_photo_8,"Jone","吃飯沒?","昨天"));
mMsgBean.add(newMessageBean(R.drawable.ic_photo_9,"Jone","吃飯沒?","昨天"));
}
@Override
publicvoidonActivityCreated(BundlesavedInstanceState){
//TODOAuto-generatedmethodstub
super.onActivityCreated(savedInstanceState);
Log.e(TAG,"onActivityCreated-------");
}
@Override
publicvoidonStart(){
//TODOAuto-generatedmethodstub
super.onStart();
Log.e(TAG,"onStart----->");
}
@Override
publicvoidonResume(){
//TODOAuto-generatedmethodstub
super.onResume();
Log.e(TAG,"onresume---->");
MainActivity.currFragTag=Constant.FRAGMENT_FLAG_MESSAGE;
}
@Override
publicvoidonPause(){
//TODOAuto-generatedmethodstub
super.onPause();
Log.e(TAG,"onpause");
}
@Override
publicvoidonStop(){
//TODOAuto-generatedmethodstub
super.onStop();
Log.e(TAG,"onStop");
}
@Override
publicvoidonDestroyView(){
//TODOAuto-generatedmethodstub
super.onDestroyView();
Log.e(TAG,"ondestoryView");
}
@Override
publicvoidonDestroy(){
//TODOAuto-generatedmethodstub
super.onDestroy();
Log.e(TAG,"ondestory");
}
@Override
publicvoidonDetach(){
//TODOAuto-generatedmethodstub
super.onDetach();
Log.d(TAG,"onDetach------");
}
}
最後來看下效果吧,只有MessageFragment填充了數據:
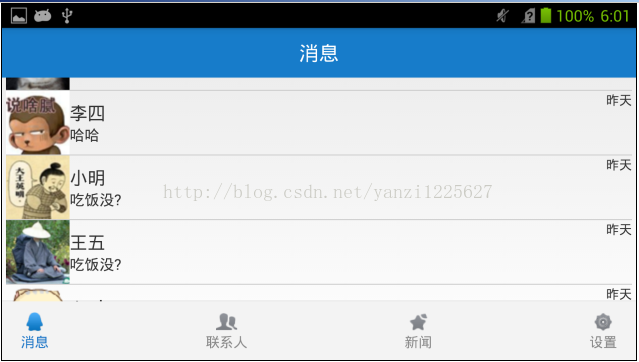
橫屏情況下:
 OkHttp源碼淺析
Android為我們提供了兩種HTTP交互的方式:HttpURLConnection 和 Apache HTTP Client,雖然兩者都支持HTTPS,流的上傳和下載,
 Android UI設計系列之自定義Dialog實現各種風格的對話框效果(7)
雖然Android給我們提供了眾多組件,但是使用起來都不是很方便,我們開發的APK都有自己的風格,如果使用了系統自帶的組件,總是覺得和應用的主題不著邊際並且看起來也不順心
 Google Play服務已停止運行解決方法
很多朋友在啟動應用或者玩游戲的時候都出現Google Play服務已停止運行,或者之前運行正常的應用突然不能使用了。這是為什麼?在這我們就來講解一下Goog
 從零開始學android(chronometer計時器組件.三十二.)
計時器來計算每個運動員所消耗的時間等,而在Android系統之中,這種計時的功能就可以使用Chronometer組件,此類的繼承結構如下所示: 2java.lang.Ob